Learn exactly how to make an incredibly moist and flavorful butter layer cake complete with fudge frosting and filled with candies inside. It’s a piñata cake, everyone!
Picture overload today! I hope you’re ready for this. I don’t even know if I’m ready for this but it’s happening. And it’s still gracing the corner of my kitchen counter staring back at me. “Eat meeeee,” it says. Am I the only one taunted by talking leftover cake?
Oh. Ok. The cheese stands alone.
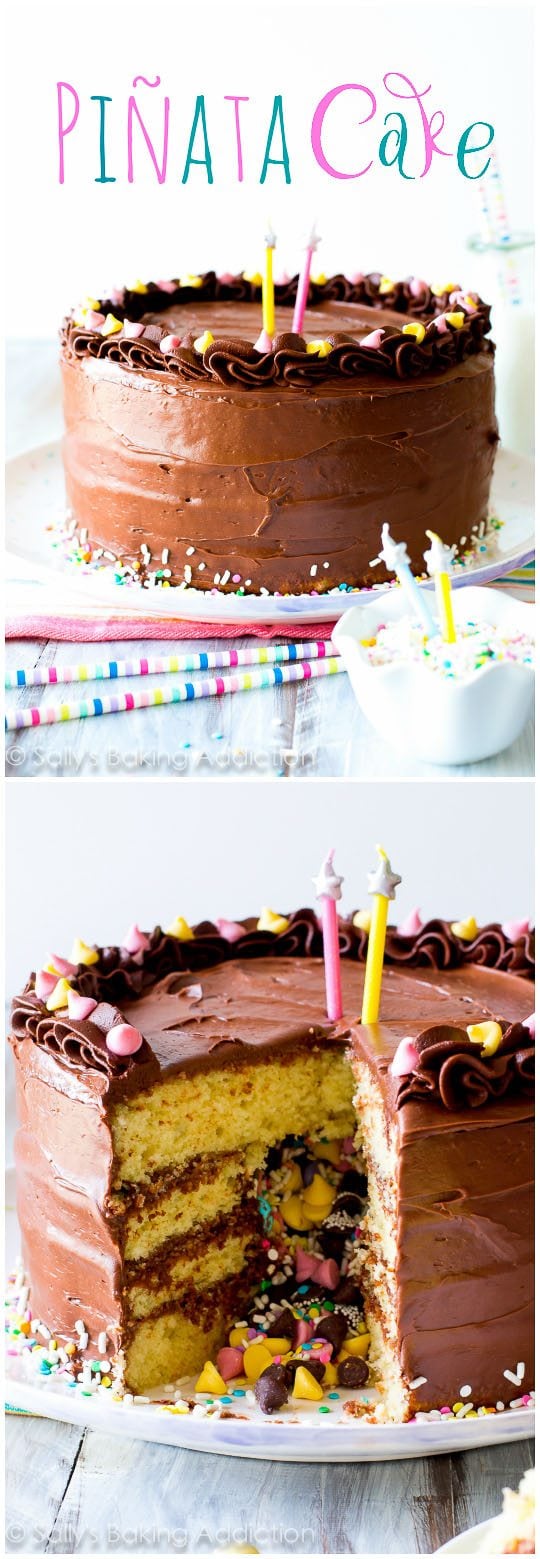
If you are looking for the most epic cake in the entire world, look no further. This here cake, my dear readers, is the tallest most buttery tower of indulgence. To make it even better, this layer cake is topped and filled with rich fudge frosting. But the crème de la crème of this entire dessert masterpiece is the hidden treasure inside.
SURPRISE CANDIES! I simply cannot type that without all caps.
Video Tutorial
I made today’s party perfect cake for several reasons: first, Cinco de Mayo is around the corner. And if that’s not enough excuse for a piñata, I don’t know what is. Second, it’s my birthday next month so a plethora of sprinkles on any given day between now and then is required. And finally, I teamed up with BHLDN, Anthropologie’s wedding brand, to bring you this recipe.
BHLDN asked me to create a homemade alternative to a wedding cake. Something fun, exciting, celebration worthy, and with even more sprinkles than my confetti cake. So I delivered.
Let me teach you exactly how to make this piñata cake. I promise this is totally something you can handle. As you know, I like to keep my layer cakes (like this raspberry chocolate chip layer cake, for example), on the simpler side when it comes to decorating. Today’s recipe is just like baking a regular layer cake, but with a couple extra assembly steps. Start with my homemade cake batter. You want a flavorful cake with a tight crumb to hold its shape, but also one that is still tender and enjoyable to eat.
Today’s piñata cake is a cross between a vanilla cake, a butter cake, and a yellow cake. Its ingredients are standard: creamed butter and sugar, eggs, vanilla extract, flour, buttermilk. The KEY is in the eggs. This is a giant four layer cake—you will need 3 whole eggs plus 4 egg yolks. That is a lot, I know. But again, this cake is enormous. All those egg yolks (and the buttermilk) are what make this piñata cake so rich, so moist, and soooo tender. Oh my gosh, this has to be my favorite cake recipe.
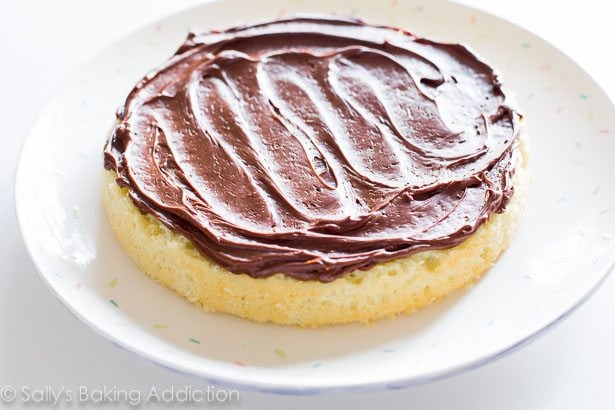
Begin the assembly! Bake the four layers in 9-inch round cake pans. Allow to cool completely. Frost one layer. This will be the bottom of the cake. More on this silky smooth fudge frosting in just a sec.
Bottom layer:
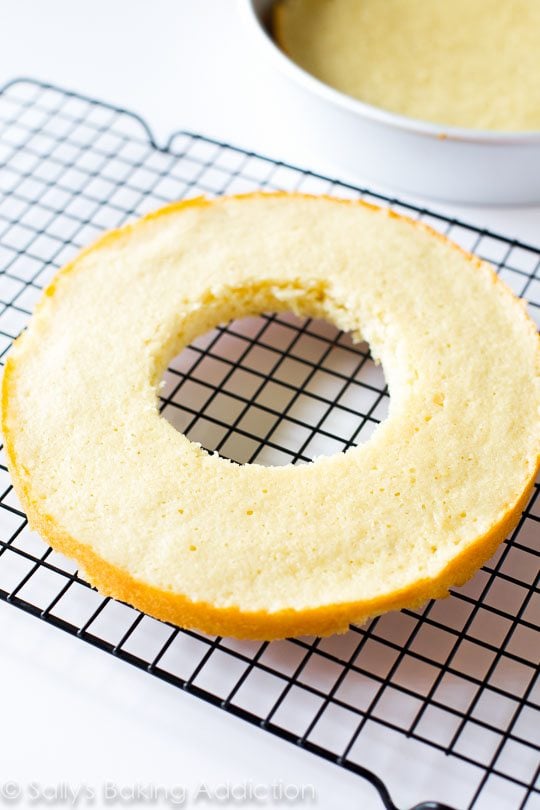
Then, cut a circle in the center of two of the cakes. You know what I used? A large, wide cup. You can also use a 3 – 4 inch round cookie cutter or a cut circular piece of parchment paper to use for tracing with a sharp knife. Just make sure those two cakes have the same size hole. These two holed cakes will be the two middle layers of the piñata cake.
Place one holed cake layer on top of the bottom frosted layer. Frost the holed layer and inside the cavity. Like so:
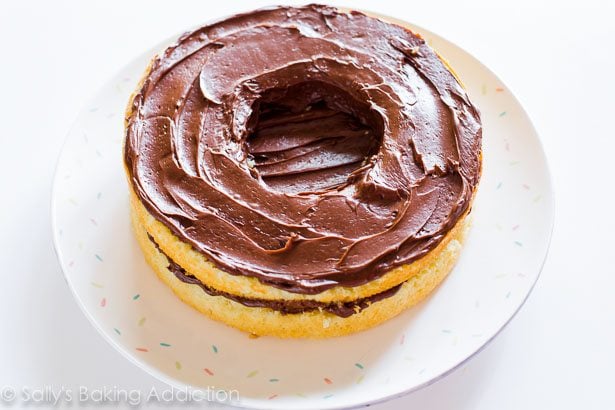
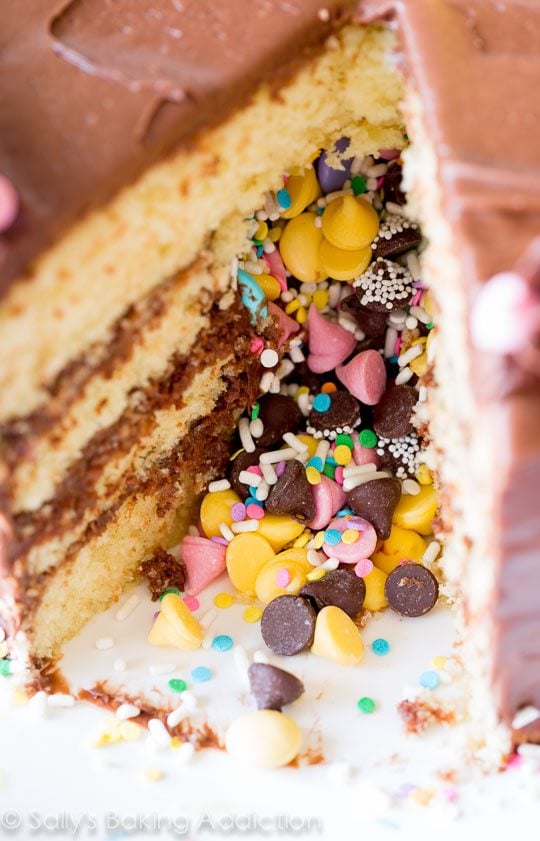
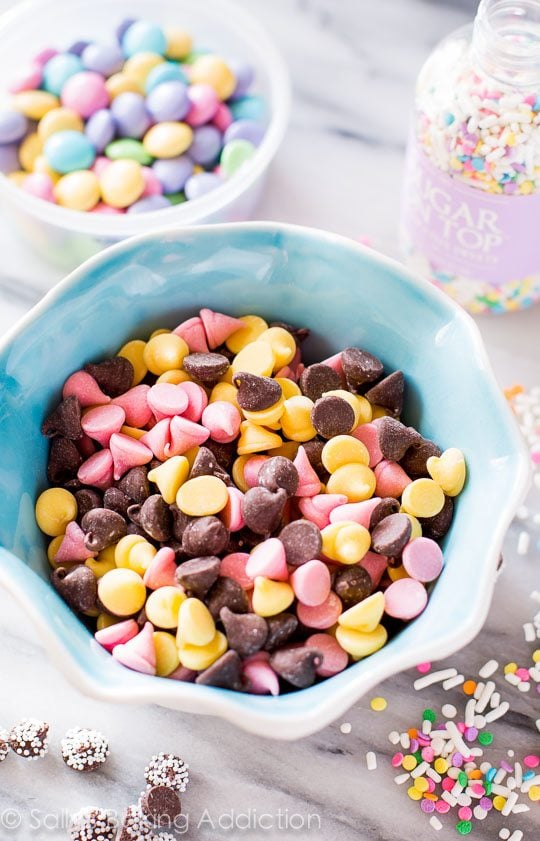
Top with the 2nd holed layer (which is the third layer of the piñata cake) and frost that too. Then, grab some candies. I used springtime chocolate morsels that came in yellow and pink, M&Ms, Sno-Caps, and sprinkles. You can use absolutely anything you, your kids, your friends, and your lucky piñata cake eaters love: chopped candy bars, white chocolate chips, gummy bears, jelly beans, candy corns, etc.
Fill the hole with the candies.
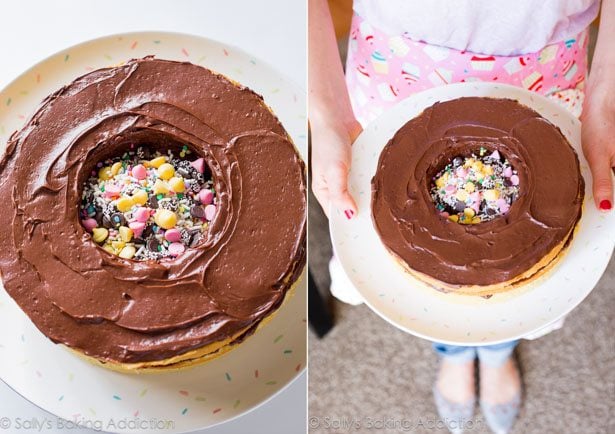
Then, top the cake with another whole cake layer. Frost the entire cake and decorate as you please. Get crazy! Get festive! And most importantly, get hungry.
So, that fudge frosting. Woo-eee. Chocolate to the max! Smooth as silk, luscious, creamy, stick-to-the-roof-of-your-mouth, “let me just eat the frosting with a spoon if ya don’t mind” fabulous. In one word, this fudgy frosting is legit.
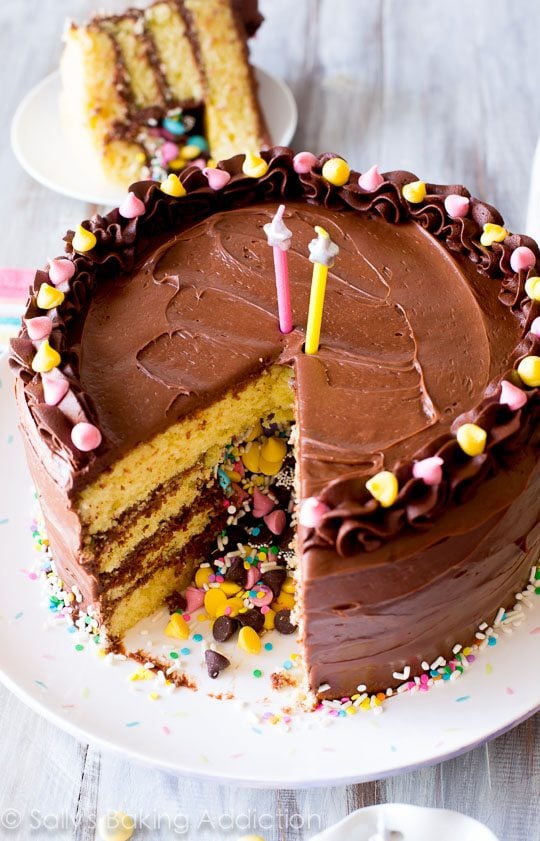
Now, the best part… drum roll please.
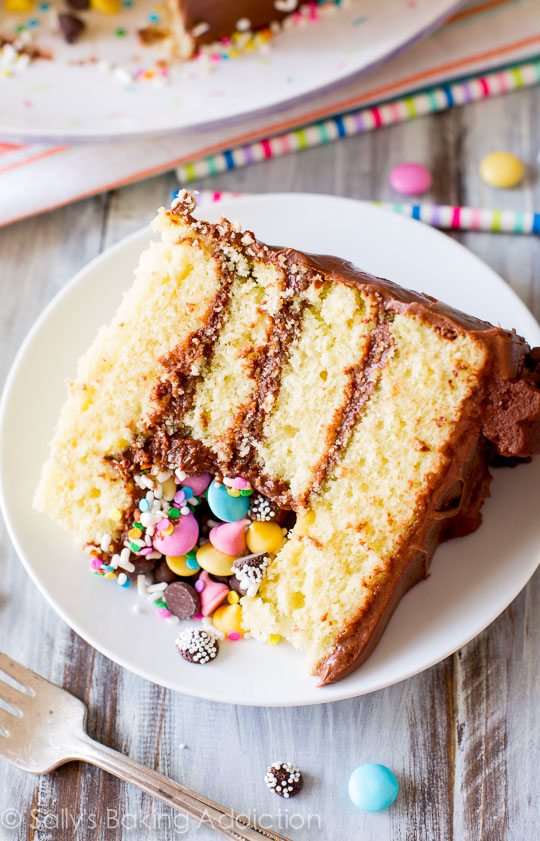
Cut into the cake and listen to the ooo’s and ahh’s as your hungry party goers discover the candies hidden inside. OMG this is the coolest cake in the world.
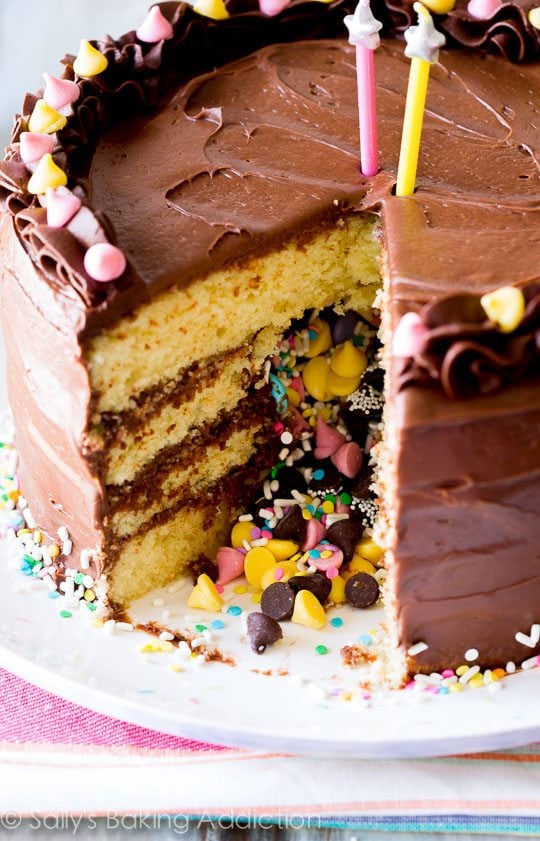
SURPRISE CANDIES! ♥
PS: For a super fun surprise, use my piñata cake as a gender reveal cake and fill it with either pink or blue M&Ms for a baby shower or other gender reveal celebration!
Print
Piñata Cake
- Prep Time: 4 hours, 30 minutes
- Cook Time: 25 minutes
- Total Time: 5 hours
- Yield: serves 14-16
- Category: Cake
- Method: Baking
- Cuisine: American
Description
This cake serves a lot so, as expected, there are high amounts of each ingredient. You will need four 9-inch round cake pans as well as a 3 and 1/2 – 4 inch circle cookie cutter or you can carefully slice a hole in the center cakes with a sharp knife.
Ingredients
Cake
- 3 and 3/4 cups (443g) sifted all-purpose flour* (spooned & leveled)
- 3/4 teaspoon baking powder
- 3/4 teaspoon baking soda
- 1 teaspoon salt
- 1 and 1/2 cups (3 sticks; 345g) unsalted butter, softened to room temperature
- 2 cups (400g) granulated sugar
- 3 large eggs, room temperature
- 4 large egg yolks, room temperature
- 3 teaspoons pure vanilla extract
- 1 and 1/2 cups (360ml) buttermilk, room temperature*
Chocolate Frosting & Assembly
- 1 cup (230g) unsalted butter, softened to room temperature
- 4 and 1/2 cups (540g) confectioners’ sugar
- 3/4 cup (62g) natural unsweetened or dutch-process cocoa powder
- 1/2 cup (120ml) whole milk
- 1 Tablespoon light corn syrup*
- 1 and 1/2 teaspoons pure vanilla extract
- 1/8 teaspoon salt
- around 2 cups assorted candies*
- optional: additional sprinkles or candies for decorating the cake
Instructions
- Preheat oven to 350°F (177°C). Grease and lightly flour 4 9-inch round cake pans*, line with parchment paper rounds, then grease the parchment paper. Parchment paper helps the cakes seamlessly release from the pans. (If it’s helpful, see this parchment paper rounds for cakes video & post.)
- Make the cake: Whisk the flour, baking powder, baking soda, and salt together in a large bowl. Set aside. Using a handheld or stand mixer fitted with a paddle attachment, beat the butter on high speed until smooth and creamy, about 1 minute. Add the sugar and beat on high speed for 5 full minutes until creamed together fairly well. Scrape down the sides and up the bottom of the bowl with a rubber spatula as needed. On medium-high speed, add 1 whole egg at a time, beating well after each addition until all 3 whole eggs are mixed in. Then, repeat with each egg yolk until all 4 egg yolks are mixed in. Beat in the vanilla extract. Scrape down the sides and up the bottom of the bowl with a rubber spatula as needed.
- With the mixer on low speed, add the dry ingredients in three additions alternating with the buttermilk, beginning and ending with the dry ingredients, and mixing each addition just until incorporated. Do not overmix this batter. The batter will be smooth, velvety, and slightly thick. Spoon/pour batter evenly into each cake pan.
- Bake for around 25 minutes or until the cakes are baked through. To test for doneness, insert a toothpick into the center of the cake. If it comes out clean, it is done. Allow cakes to cool completely in the pans set on a wire rack. The cakes must be completely cool before frosting and assembling.
- Make the frosting: Using a handheld or stand mixer fitted with a paddle attachment, beat the butter on high speed until pale, smooth, and creamy, about 2 minutes. Using a fine mesh strainer or sieve, sift the confectioners’ sugar and cocoa together. Add the sugar/cocoa mixture to the butter, then beat on low speed for 20 seconds. Stop the mixer, then add the milk, corn syrup, vanilla, and salt. Beat on medium-high speed for 2 minutes. If the frosting is too thick, beat in an extra splash of milk.
- Assemble the cake: Grab a 3 and 1/2 – 4 inch circle cookie cutter (I use a large thin-edged cup) and cut a hole into two of the cake layers. Alternatively, you can cut a piece of parchment paper that size and use a sharp knife to trace/cut the holes. Place one of the whole cakes on a cake turntable, cake stand or serving plate. Use an offset spatula or knife to frost the top of the cake, then place one of the cut/holed cakes on top. Frost the top and inside the cavity. Place the other cut/holed cake on top and, once again, frost the top and inside the cavity. Fill the cavity with candies all the way up to the top. Place the last whole cake on top and frost the top and sides of the entire cake. Decorate with frosting and additional candies however you’d like. I used a Wilton 1M tip to pipe frosting around the top.
- Slice, serve, enjoy! (Keep a spoon handy when serving. I like to pile additional candies that fall out of the center of the piñata cake onto each slice as I serve.)
Notes
- Make Ahead & Freezing Instructions: The cake layers can be baked, cooled, and covered tightly at room temperature overnight. Likewise, the frosting can be prepared then covered and refrigerated overnight. Assemble and frost the piñata cake the next day when you are ready to serve. Frosted cake can be frozen up to 2 months if you have room in the freezer. Thaw overnight in the refrigerator and bring to room temperature before serving. Honestly, it tastes much better fresh
- Special Tools (affiliate links): 9-Inch Round Cake Pans | Glass Mixing Bowl | Whisk | Electric Mixer (Handheld or Stand) | Silicone Spatula | Fine Mesh Sieve | 3.5-Inch Round Cookie Cutter | Cake Turntable | Offset Spatula | Piping Bag (Disposable or Reusable) | Wilton 1M Piping Tip | Cake Carrier (for storage)
- Flour: Make sure you sift the flour before measuring. Sifting is KEY. Otherwise, your cake layers could taste much too dense. You can also use cake flour instead of all-purpose flour. Use 4 cups sifted cake flour.
- Buttermilk: If you don’t have buttermilk, you can make a DIY sour milk substitute. Add 1 Tablespoon of white vinegar or lemon juice to a liquid measuring cup. Then add enough whole milk to the same measuring cup until it reaches 1 and 1/2 cups. (In a pinch, lower fat or nondairy milks work for this soured milk, but the cake won’t taste as moist or rich.) Stir it around and let sit for 5 minutes. The homemade “buttermilk” will be somewhat curdled and ready to use in the recipe.
- Corn Syrup: This tiny bit of corn syrup makes the frosting uniquely glossy and shiny. You can leave it out if you’d like.
- Milk in Frosting: I recommend whole milk or even half-and-half in the frosting, but lower fat or nondairy milk works in a pinch.
- Candies for Filling Cake: Favorites include M&Ms, chocolate chips, sprinkles, gummy bears, jelly beans, candy corns, chopped candy bars, and mini Reese’s cups.
- Pans: You can also use 4 8-inch cake pans. The bake time will be slightly longer for thicker layers.
- Vanilla Frosting: Simply double my vanilla buttercream recipe and use it instead of the chocolate frosting.
- BONUS! With the center circular parts of the cake that were cut out, you can frost them with any leftover frosting to make adorable mini cakes or a small layer cake.
- Inspired by Betty Crocker.
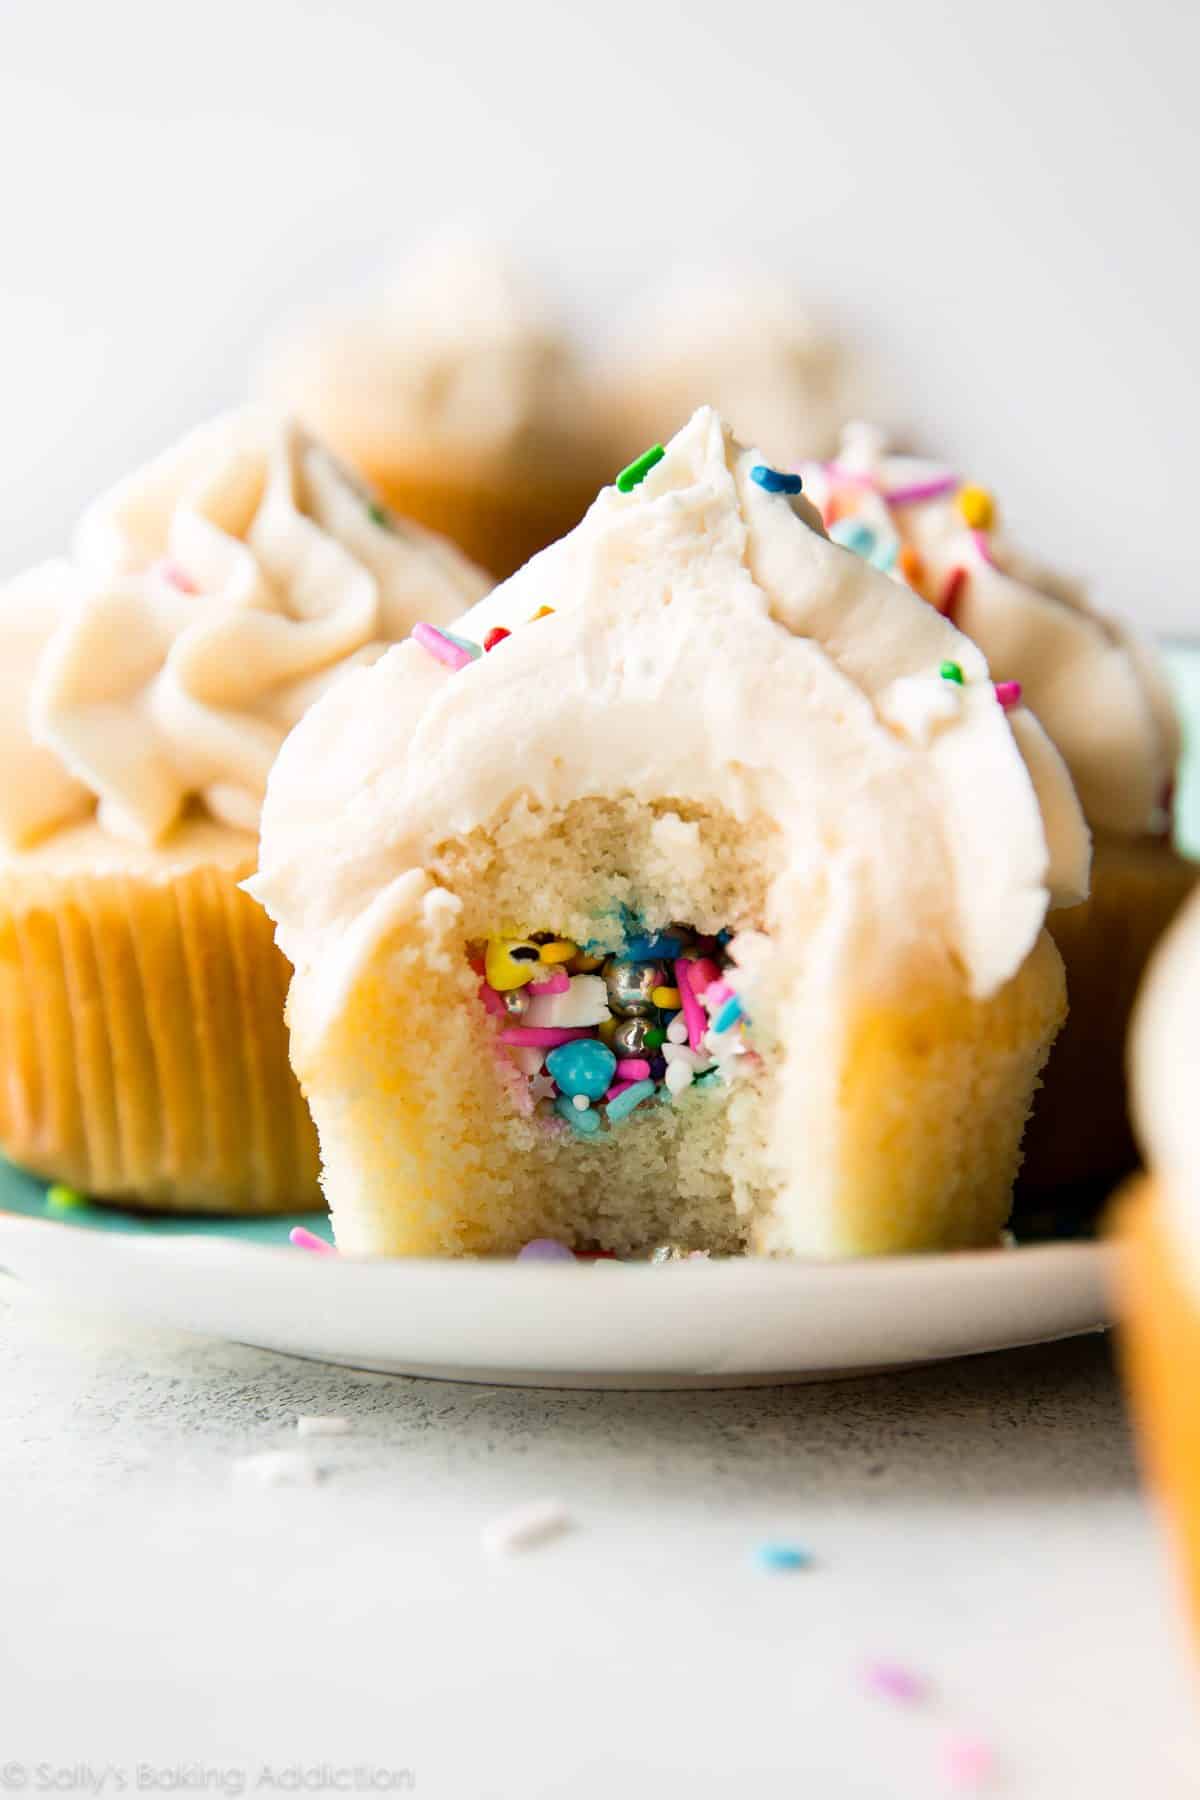
And guess what? We now have piñata cupcakes too!