Description
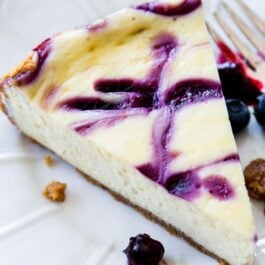
Ultra creamy homemade cheesecake swirled with sweet blueberry sauce. All on top of my favorite buttery graham cracker crust. Your guests will beg for seconds!
Ingredients
Blueberry Sauce
- 2 teaspoons (6g) cornstarch
- 1 teaspoon fresh lemon juice
- 1 Tablespoon (15ml) warm water
- 2 cups (280g) fresh or frozen blueberries*
- 2 Tablespoons (25g) granulated sugar
Crust
- 1 and 1/2 cups (180g) graham cracker crumbs (about 12 full sheet graham crackers)
- 1/4 cup (50g) granulated sugar
- 5 Tablespoons (71g) unsalted butter, melted
Filling
- 24 ounces (678g) full-fat brick cream cheese, softened to room temperature
- 1 cup (200g) granulated sugar
- 1 cup (240g) full-fat sour cream (or yogurt), at room temperature
- 2 teaspoons pure vanilla extract
- 3 large eggs, at room temperature
Instructions
- Adjust oven rack to the lower third position and preheat the oven to 350°F (177°C). Spray a 9-inch springform pan with nonstick cooking spray. Set aside.
- Make the blueberry sauce first: Whisk the cornstarch, lemon juice, and warm water together in a small bowl until the cornstarch has dissolved. Set aside. Warm the blueberries and sugar together in a small saucepan over medium heat. Stir continuously for 3 minutes until the blueberry juices begin to release. Add the cornstarch mixture and continue to stir for another 2–3 minutes, smashing some blueberries as you go. The mixture will start to thicken. Remove from heat and put the mixture through a fine mesh strainer into a small bowl (to separate the cooked berries and the juice). Keep separated and set both (the cooked berries and the juice) aside.
- Make the crust: If you’re starting out with full graham crackers, use a food processor or blender to grind them into fine crumbs. Pour into a medium bowl and stir in sugar until combined, and then stir in the melted butter. Mixture will be sandy. Try to smash/break up any large chunks. Pour into prepared pan and with medium pressure using your hand, pat the crumbs down into the bottom and partly up the sides to make a compact crust. Do not pack down with heavy force because that makes the crust too hard. Simply pat down until the mixture is no longer crumby/crumbly. Tips: You can use a small flat-bottomed measuring cup to help press down the bottom crust and smooth out the surface, but do not pack down too hard. For more shaping technique tips, see the graham cracker crust recipe page.
- Wrap aluminum foil on the bottom and tightly around the outside walls of the springform pan. Bake the crust for 10 minutes. Allow to slightly cool as you prepare the filling.
- Make the filling: Using a handheld or stand mixer fitted with a paddle attachment, beat the cream cheese and granulated sugar together on medium speed in a large bowl—about 3 full minutes until the mixture is smooth and creamy. Add the sour cream and vanilla, beat until combined. On low speed, add the eggs one at a time, beating after each addition until just blended. Do not over-mix the filling after you have added the eggs.
- Pour the filling into the crust. Drop spoonfuls of the smooth blueberry sauce onto the batter. Using a knife, gently swirl as shown in the photo above. If you have leftover blueberry sauce, mix it with the cooked blueberries you set aside. Save for topping the baked cheesecake.
- Prepare the simple water bath (see note): If needed for extra visuals, see my How to Make a Cheesecake Water Bath; the visual guide will assist you in this step. Boil a pot of water. You need 1 inch of water in your roasting pan for the water bath, so make sure you boil enough. I use an entire kettle of hot water. As the water is heating up, wrap the aluminum foil around the springform pan. Place the pan inside of a large roasting pan. Pour the cheesecake batter on top of the crust. Use a rubber spatula or spoon to smooth it into an even layer. Carefully pour the hot water inside of the pan and place in the oven. (Or you can place the roasting pan in the oven first, then pour the hot water in. Whichever is easier for you.)
- Bake for 50–60 minutes or until the center is almost set.* Turn the oven off and open the door slightly. Let the cheesecake sit in the oven for 1 hour. Remove from the oven and allow to cool completely at room temperature. Refrigerate for at least 6 hours or overnight (preferred). Loosen the cheesecake from the rim of the pan and remove the rim. Cut into slices and serve chilled. Top with remaining chunky blueberry sauce, if desired. Cover leftover cheesecake and store in the refrigerator for up to 4 days.
Notes
- Freezing Instructions: You can easily freeze this cheesecake for up to 2 months. Cover tightly and freeze. Thaw overnight in the refrigerator before serving.
- Special Tools (affiliate links): 9-inch Springform Pan | Glass Mixing Bowls | Whisk | Small Saucepan | Fine Mesh Sieve | Food Processor | Electric Mixer (Handheld or Stand) | Large Roasting Pan
- Blueberries: If using frozen blueberries, do not thaw.
- Alternate Water Bath Method: This method works as well, and you don’t have to bake the cheesecake IN water. Boil a kettle or pot of water. You need 1 inch of hot water in your roasting pan for the water bath, so make sure you boil enough. Place the cheesecake on the center oven rack of the preheated oven. Place a large metal baking or roasting pan (do not use glass—I usually use a 9×13-inch baking pan or an extra-large cast iron skillet) on the bottom rack. Pour boiling water into the empty pan, about 1 inch deep. Immediately close oven to trap the steam inside. This unique water bath adds steam to the oven without having the cheesecake sit inside the water itself. No need to wrap the springform pan in foil. See How to Make a Cheesecake Water Bath for more information.
- Avoid overbaking the cheesecake. When the cheesecake is done, there will still be a 2- or 3-inch wobbly spot in the center; the texture will smooth out as it cools.
- Non-US Readers: Don’t have graham crackers where you live? Use 200g ground digestive biscuit crumbs (about 2 cups; 13–14 biscuits), 1/3 cup (67g) granulated sugar, and 6 Tablespoons (85g) melted butter. Pre-bake the crust for a bit longer, about 12–14 minutes. And from what I understand, spreadable cream cheese sold in a tub in countries outside of the US is a little different from the spreadable cream cheese in the US. It’s thicker, sturdier, and more solid and should be OK to make this pie. I have no experience with it, but this is what I’ve heard from other non-US readers. If you try it, let us know how it turns out!