Description
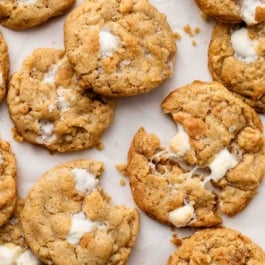
Chewy, gooey, and full of crispy cereal bits, these marshmallow crispy cookies taste like a brown butter-infused Rice Krispie treat in cookie form. The brown butter adds deep flavor, the marshmallows partially melt into caramelized pockets, and the rice cereal brings that light, crisp-crackle texture. For best results, freeze the dough balls before baking so the marshmallows stay intact and the cookies don’t overspread.
Ingredients
- 1 cup (16 Tbsp; 226g) unsalted butter, cut into 16 pieces
- 2 and 1/4 cups (281g) all-purpose flour (spooned & leveled)
- 2 teaspoons cornstarch
- 1 teaspoon baking soda
- 1/2 teaspoon salt
- 2 cups (52g) crispy rice cereal
- 1 cup (60g) mini marshmallows
- 3/4 cup (150g) packed light or dark brown sugar
- 1/2 cup (100g) granulated sugar
- 1 large egg, at room temperature
- 1 large egg yolk, at room temperature
- 2 teaspoons pure vanilla extract
- optional: flaky sea salt, for topping
Instructions
- Brown the butter: Place the sliced butter in a light-colored skillet or saucepan over medium heat. (Light-colored helps you determine when the butter begins browning.) Stir or whisk the butter constantly as it melts. Once melted, the butter will begin to foam. Keep stirring. After 5–8 minutes, the butter will begin browning—you’ll notice lightly browned specks begin to form at the bottom of the pan and it will have a nutty aroma. As soon as the butter has browned, immediately remove from heat and pour it into a medium heat-safe bowl. Scrape up the browned solids at the bottom of the skillet and add them as well. Set aside to slightly cool. After browning, you should have around 185-190g butter.
- Make the cookies: In a large bowl, whisk together the flour, cornstarch, baking soda, and salt. Fold in the rice cereal and mini marshmallows.
- Whisk the brown butter, brown sugar, granulated sugar, egg, egg yolk, and vanilla together until combined. Pour into the flour mixture and stir with a silicone spatula until fully incorporated. The dough will be greasy and a bit crumbly; that’s ok.
- Scoop the dough, about 2 Tablespoons (40g) per cookie, and use your hands to form it into a ball. Squeeze firmly to help it hold its shape. Place the dough balls on a parchment-lined baking sheet and freeze, uncovered, for 1 hour. If freezing for longer (up to 1 day), transfer the firm dough balls to an airtight container or zip-top bag.
- Preheat the oven to 350°F (177°C). Line large baking sheets with parchment paper or silicone baking mats. Set aside.
- Arrange the frozen dough balls 3 inches apart on the prepared baking sheets. Bake for 14-15 minutes, or until the cookies are lightly browned on top, the edges look crisp, and the centers still look soft. (If the cookies haven’t begun to spread by the 10-minute mark, remove the baking sheet from the oven, give it a few firm taps on the counter, then return it to the oven.) Some edges may over-spread if a marshmallow is on the outside. This is normal and expected.
- Sprinkle sea salt, if using, on top of the warm cookies right after you remove them from the oven. Let the cookies cool on the baking sheet for 10 minutes before transferring to a cooling rack to cool completely.
- Cover cooled cookies tightly and store at room temperature for up to 1 week.
Notes
- Make-Ahead & Freezing Instructions: In step 4, you can freeze the shaped cookie dough balls on a parchment-lined baking sheet for 1 hour, then transfer to a container or zip-top bag and freeze for up to 1 day before baking. This short freeze helps the marshmallows stay intact and keeps the cookies from overspreading. For longer storage, unbaked cookie dough balls can be frozen for up to 3 months. Keep in mind that the longer they’re frozen, the less they tend to spread in the oven. If you prefer a slightly wider cookie, let the frozen dough balls sit at room temperature for 10–15 minutes before baking. However, don’t thaw them fully because marshmallows soften as they warm up and can begin to dissolve into the dough when it hits the oven. Baked cookies also freeze well for up to 3 months. Thaw at room temperature.
- Special Tools (affiliate links): Light-Colored Skillet or Stainless Steel Skillet (for browning butter) | Glass Mixing Bowls | Whisk | Silicone Spatula | Baking Sheets | Silicone Baking Mats or Parchment Paper | Flaky Sea Salt or Coarse Sea Salt | Cooling Rack
- Do I Have to Brown the Butter? Yes, browning the butter adds deep, toffee-like flavor and really elevates these cookies. You can use regular melted butter, but the flavor won’t be as rich, and the texture may be slightly different. Because browning evaporates some moisture, you may need to add a little extra flour if using un-browned melted butter.
- Can I Use Regular Marshmallows Instead of Mini? Mini marshmallows work best here because they distribute evenly and melt into smaller pockets. Large marshmallows tend to melt out too much or create big empty tunnels.
- My Dough is Greasy, Is That Normal? Yes! Brown butter cookies often start out looking a bit greasy and especially since some of the dry ingredients don’t really soak up moisture (marshmallows and rice cereal). Once you squeeze the dough together to form a ball, it holds its shape beautifully.
- Can I Double the Recipe? Yes, this recipe doubles easily. You can brown the butter all at once; just use a large enough pan to prevent burning.
- Be sure to check out my top 5 cookie baking tips AND these are my 10 must-have cookie baking tools.