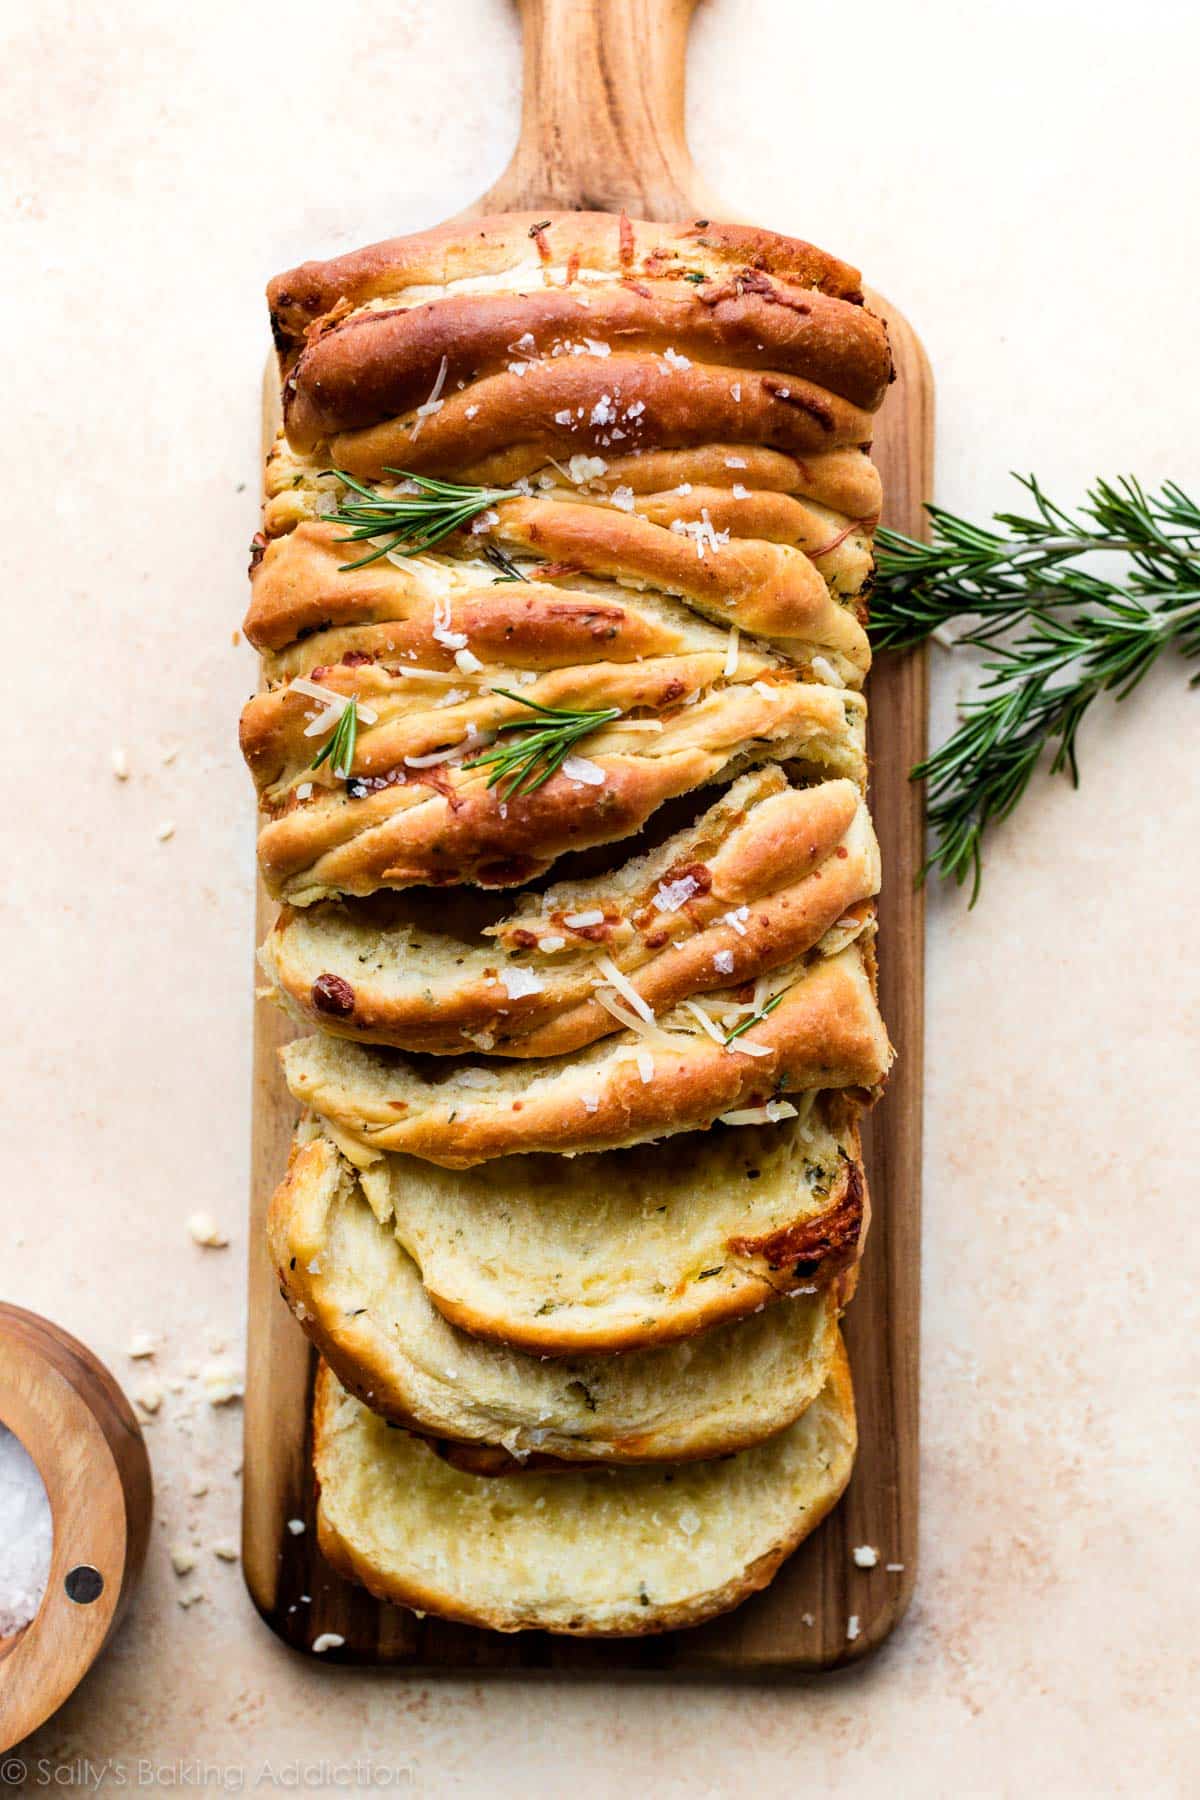
Starting from a simple rosemary-infused homemade dough, this rosemary garlic pull apart bread is shaped and assembled with butter, garlic, cheese, and herbs. Baked until golden brown and served pull-apart style, this flaky and flavorful bread is completely irresistible. Just wait until you smell it baking! Truly a favorite.
This recipe is brought to you in partnership with Red Star Yeast.
Have you ever tried my everything bagel pull apart bread? It is, without a doubt, one of the best bread recipes to come out of my kitchen. I wanted something equally as snack-y and satisfying for this holiday season, so I swapped in some everyday foolproof ingredients like rosemary, butter, and parmesan cheese.
I don’t think a finished recipe has ever disappeared faster in my house. (And I make chocolate chip cookies on the regular.)
Tell Me About This Rosemary Garlic Pull Apart Bread
- Flavor: Cheesy & garlic, rosemary & herb, salty & buttery—all packed inside the homestyle goodness of from-scratch bread. This recipe has a range of some of the BEST flavors around.
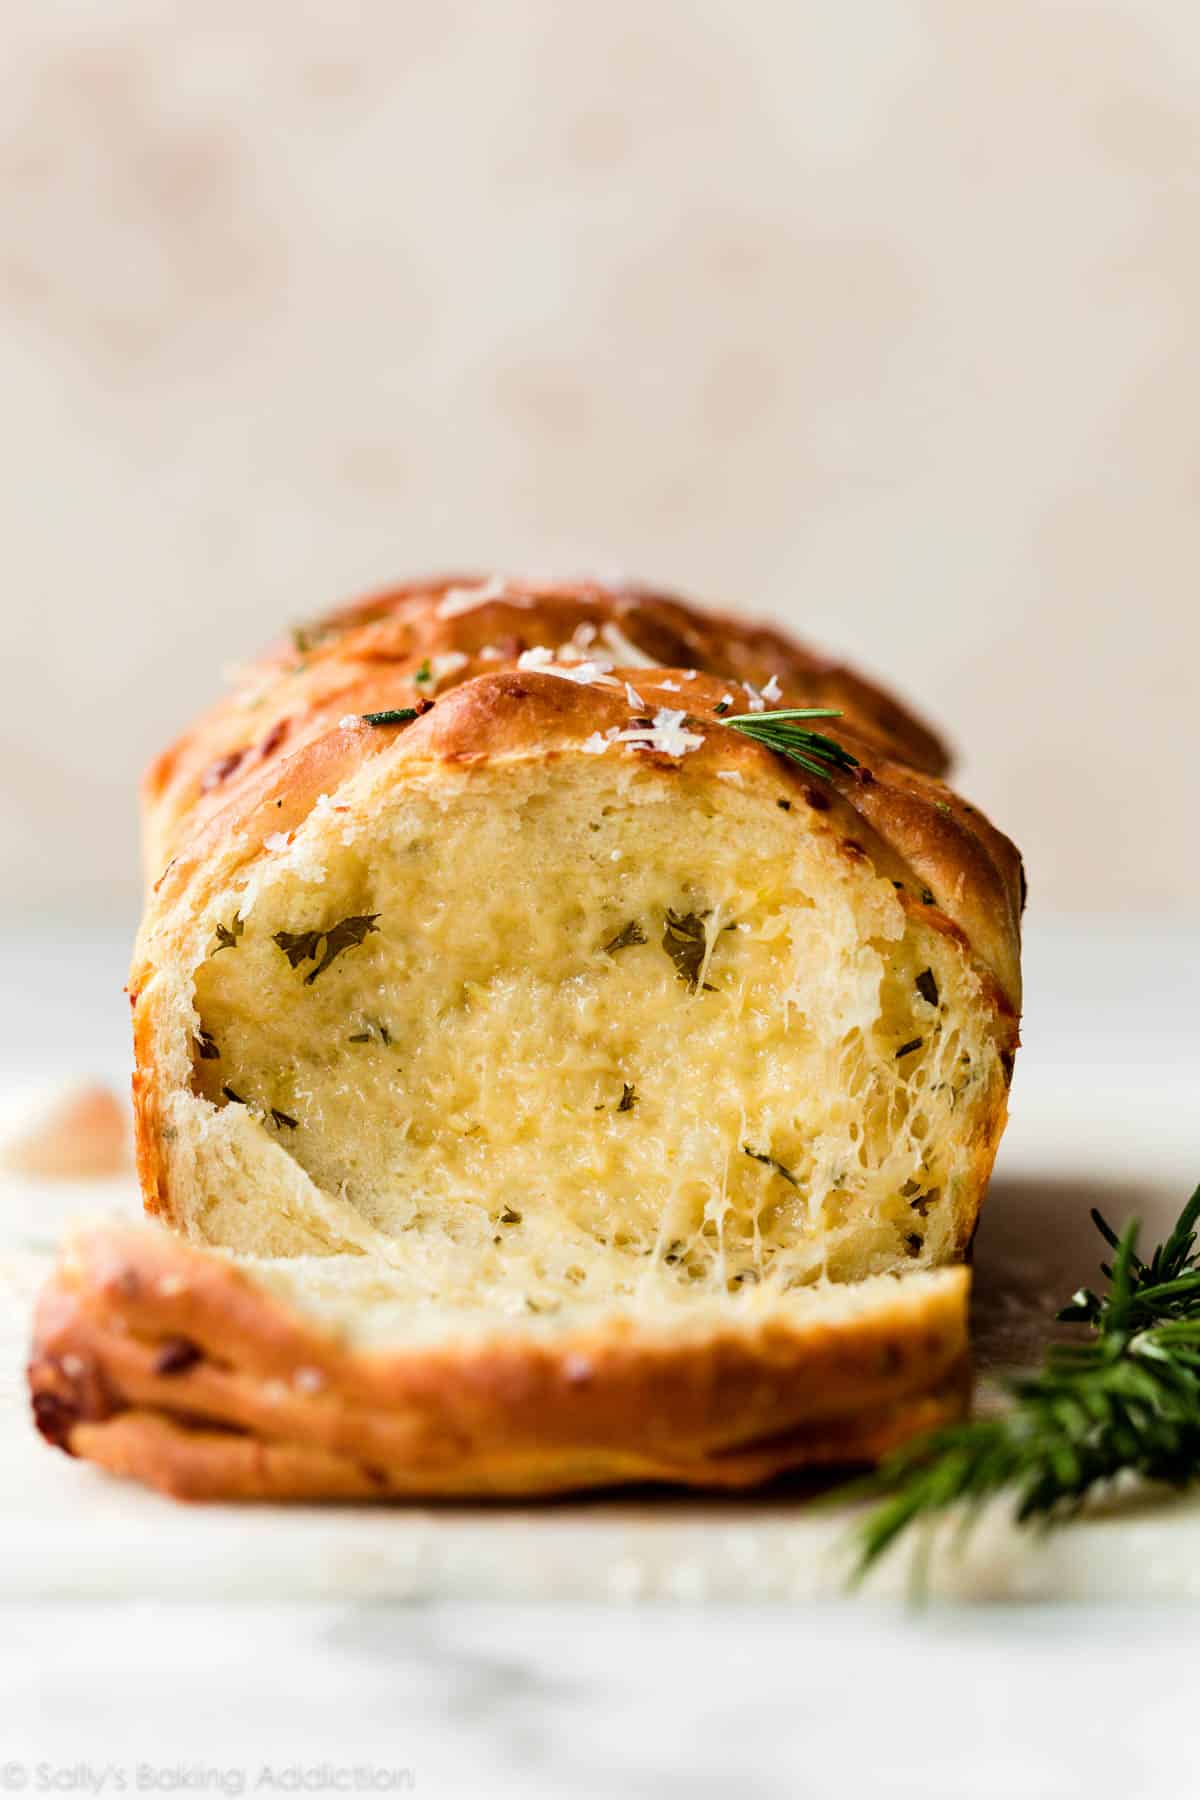
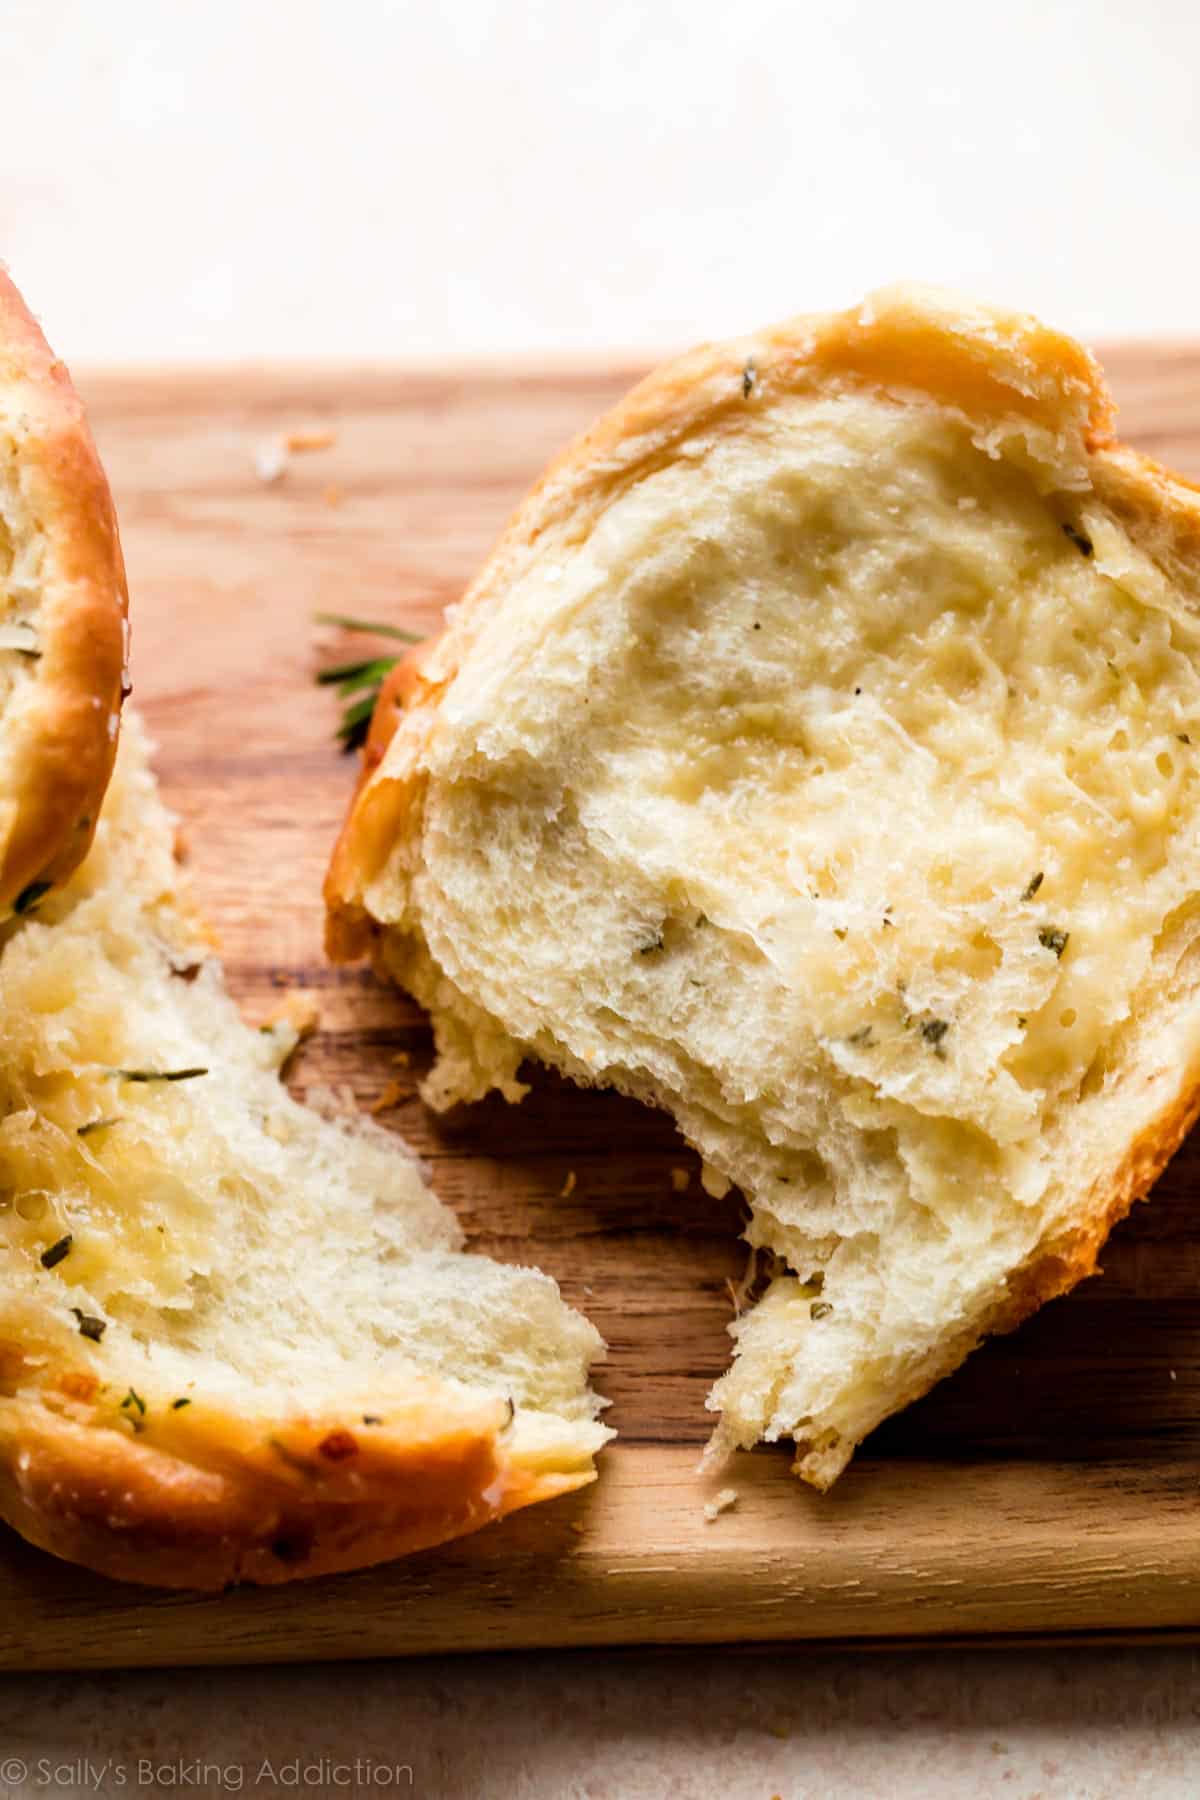
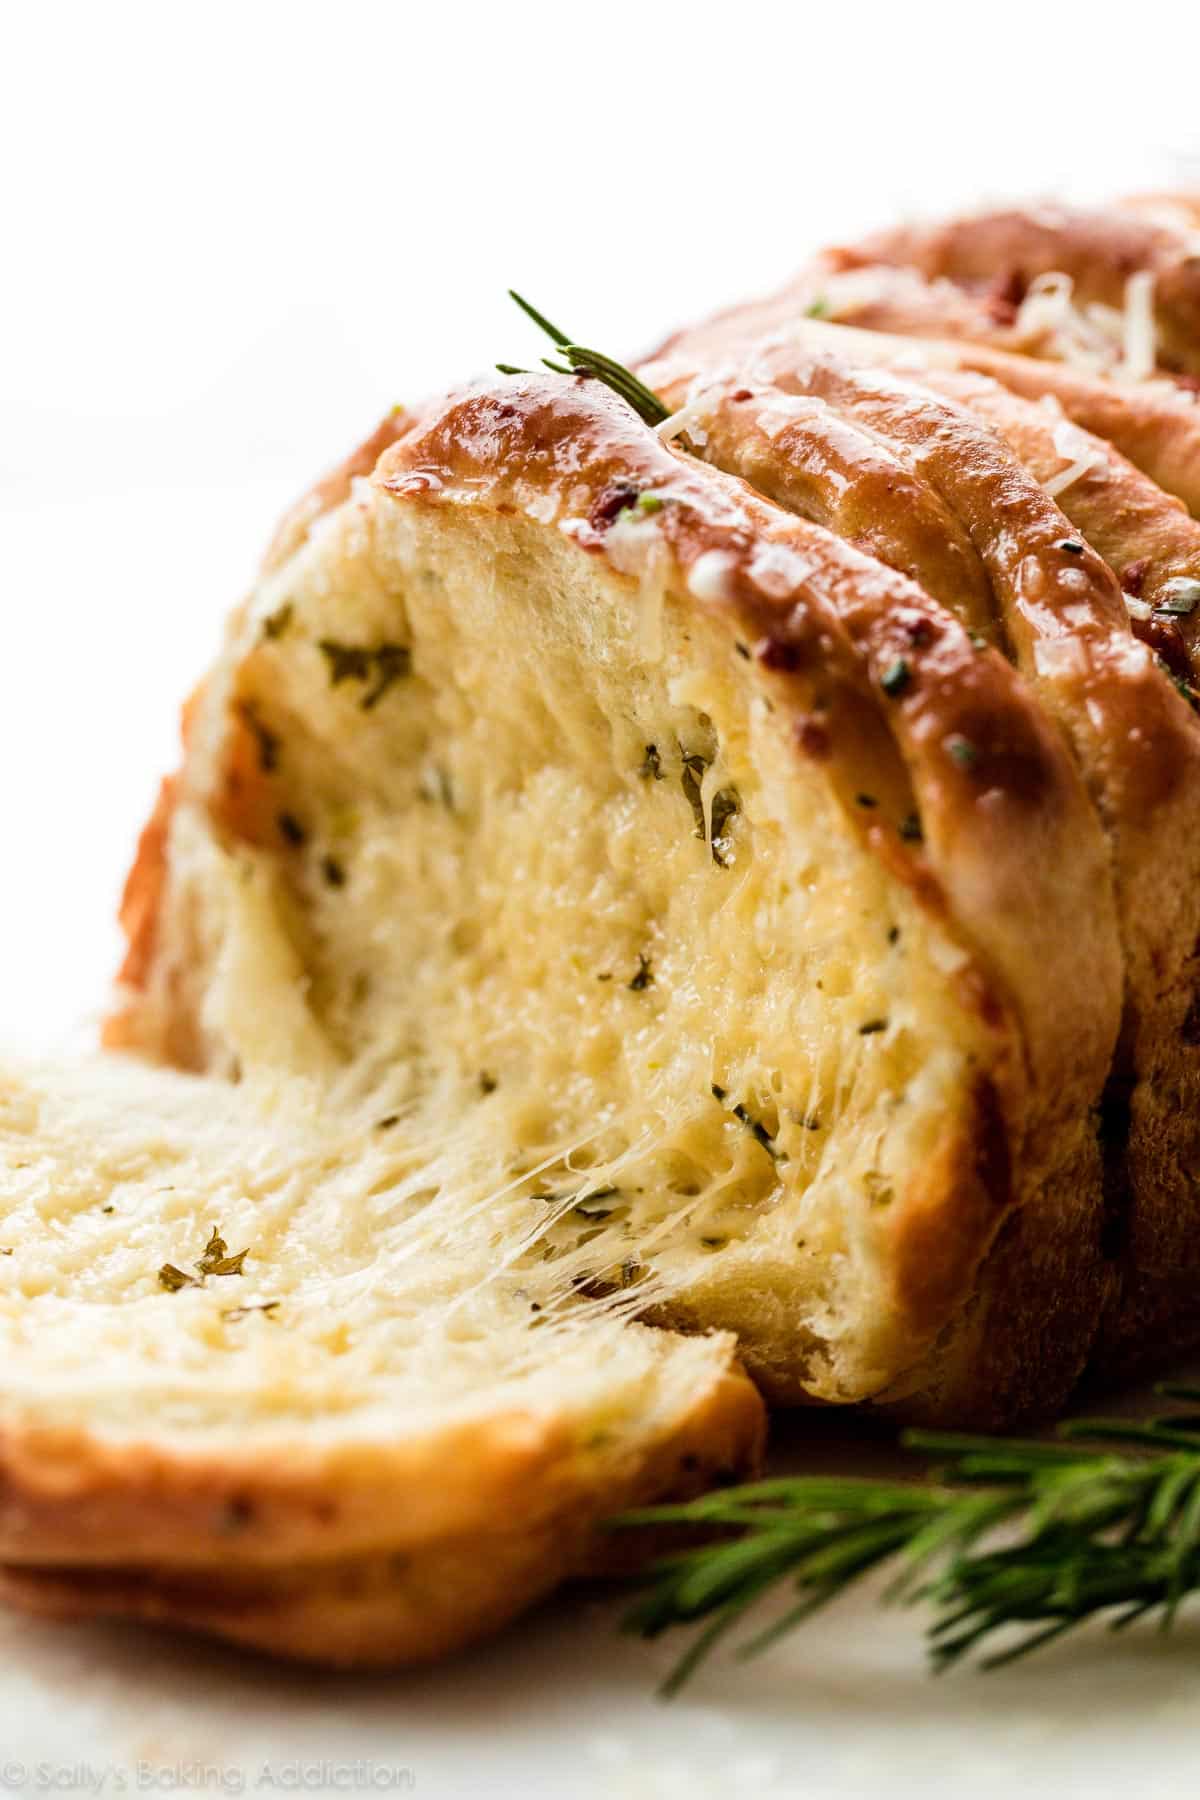
- Texture: In addition to the irresistible flavor, this pull apart bread’s texture is definitely something to write home about. The exterior is golden crisp right out of the oven, sealing in a soft and flaky center. The assembly and shape allows for many little peaks and valleys, so you have a lot more texture than, say, dinner rolls or sandwich bread. I’m happy to report that we’re almost nearing croissants in terms of flakiness. (!!)
- Ease: Many pull apart bread recipes use a loaf of bakery bread from the store and while that’s certainly easy and delicious, this recipe utilizes a 9 ingredient homemade dough. If you’ve ever been nervous to bake bread, this recipe is a great starting point. Shaping is pretty simple—the loaf can look messy going into the oven. If you’re new to baking with yeast, review my Baking with Yeast Guide. Lots of helpful information there!
- Time: There’s no arguing that homemade bread takes time, but the results are always so worth the commitment. Luckily this recipe yields 1 simple loaf and once you get the assembly process down, it moves pretty quickly. Set aside at least 4 hours from start to finish, but keep in mind most of that time is hands off as the dough rises.
Looking for rosemary & herb dinner rolls? You will love these herb skillet rolls.
Video Tutorial: How to Make Rosemary Garlic Pull Apart Bread
Let’s Review the Pull Apart Bread Dough
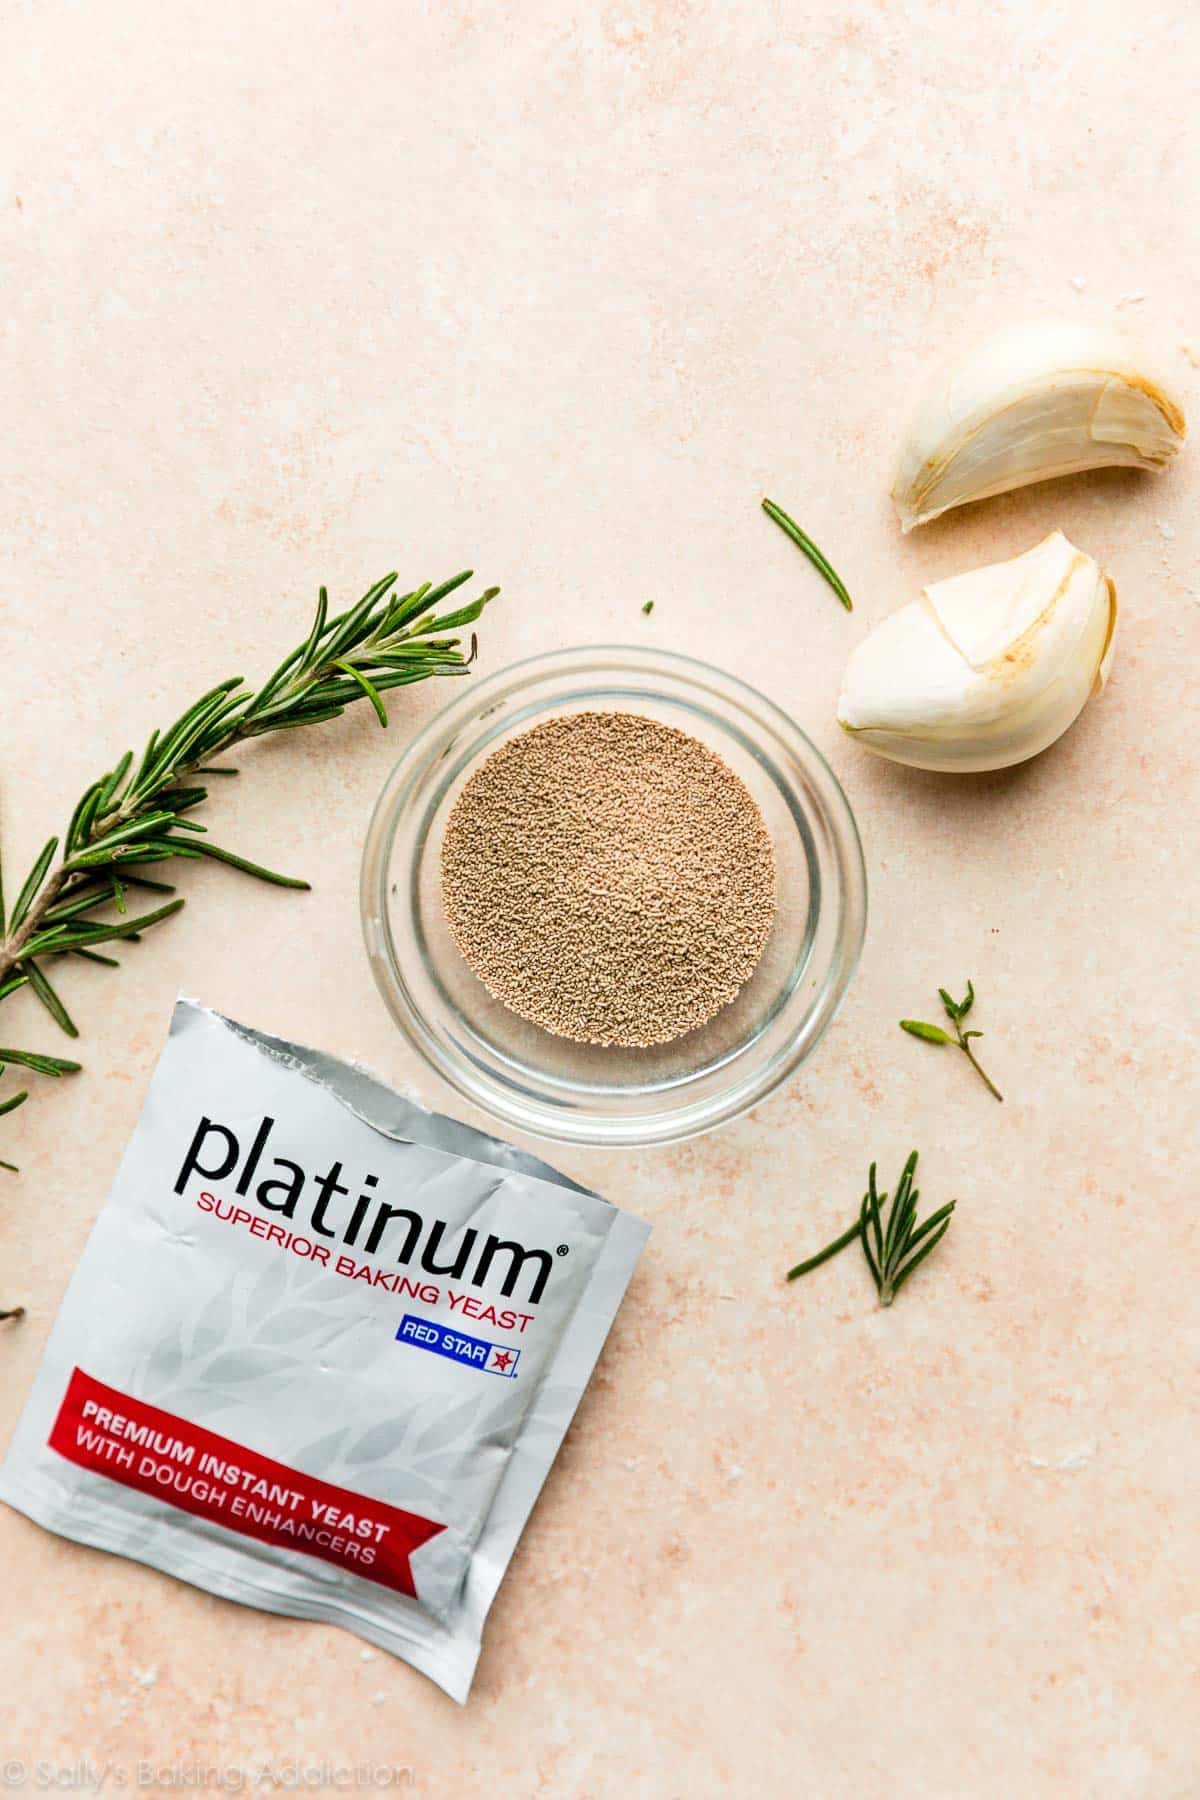
I don’t want to stand in the way of you and this carb-y perfection, so I’ll try to keep this short. This pull apart bread starts with homemade dough. You need 9 simple ingredients including: yeast, sugar, milk, butter, salt, egg, flour, rosemary and garlic powder. Sugar feeds the yeast, while milk hydrates it and gives the bread a softer texture (as opposed to water). Butter, salt, rosemary, and garlic powder add flavor. Egg contributes to the rising and provides more texture and structure.
- We’re using a superior yeast: Platinum Yeast from Red Star. This is an instant yeast that strengthens the dough and provides extra volume to the final product. It’s my preferred yeast for any and all bread baking—I use it exclusively in my kitchen because it’s always a guarantee. We only need 2 teaspoons of dry yeast which is a little less than 1 standard packet.
How to Assemble Pull Apart Bread
There are a billion ways to make and assemble pull apart bread. I use a rolling pin and biscuit cutter for my everything bagel pull apart bread and while you can definitely use that same method here, I opted for something even easier today. You won’t have leftover dough scraps this way.
- Divide dough into 12 equal pieces.
- Flatten into 4-inch circles. They don’t need to be perfect.
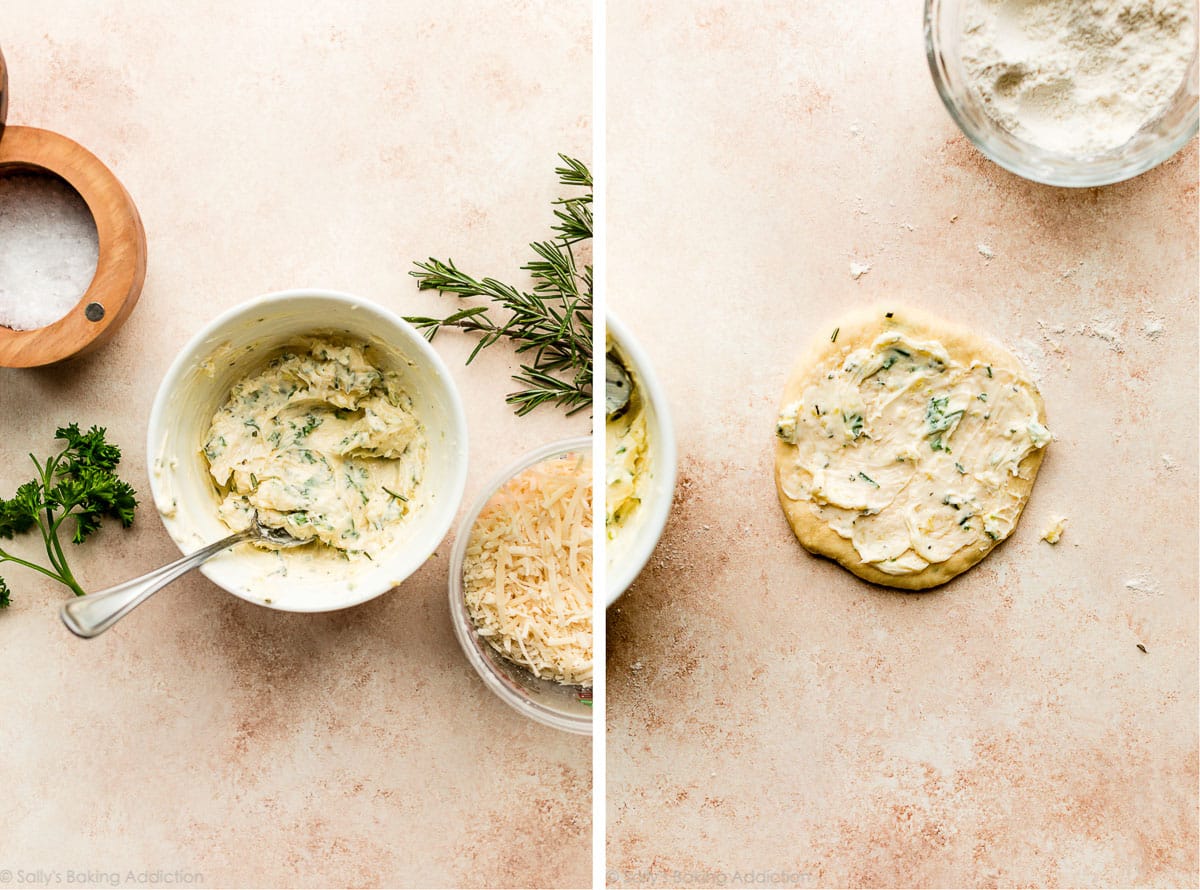
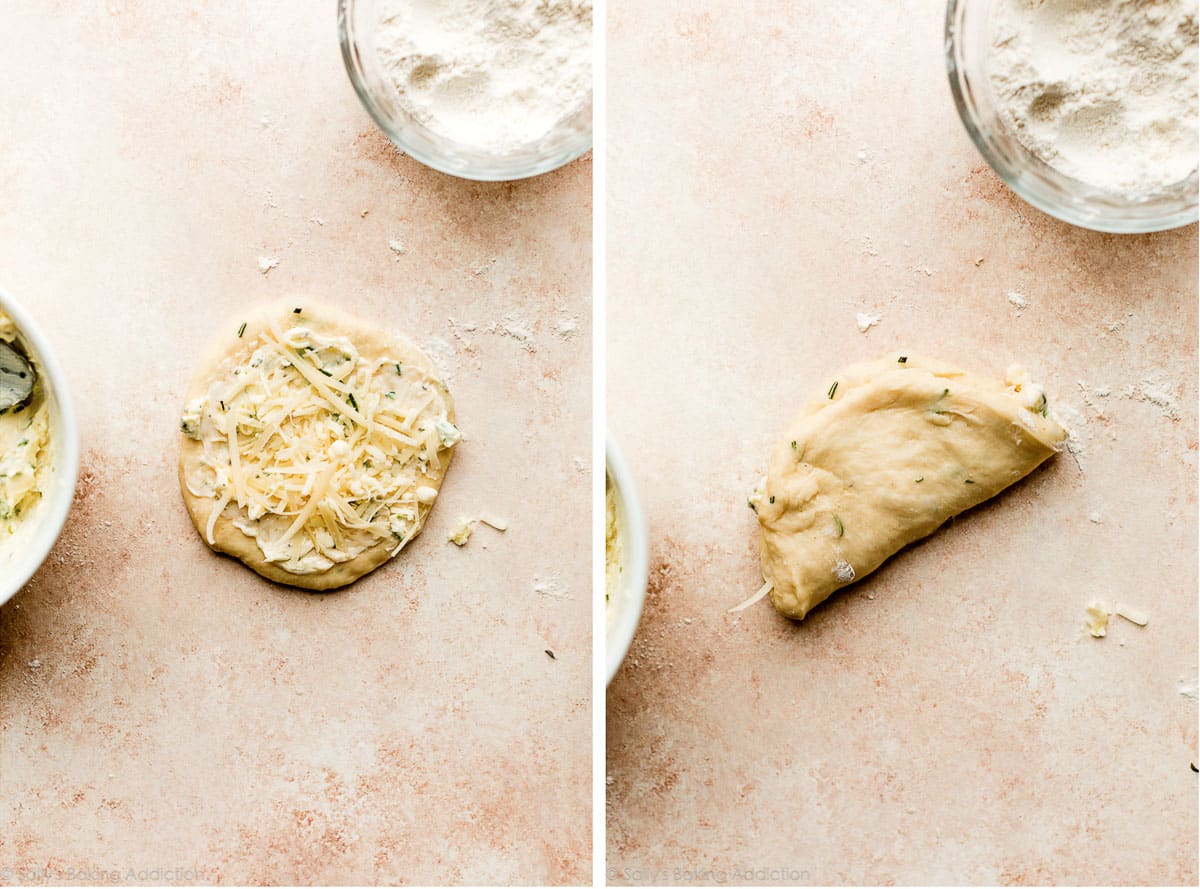
- Spread garlic herb butter on top. Sprinkle with cheese.
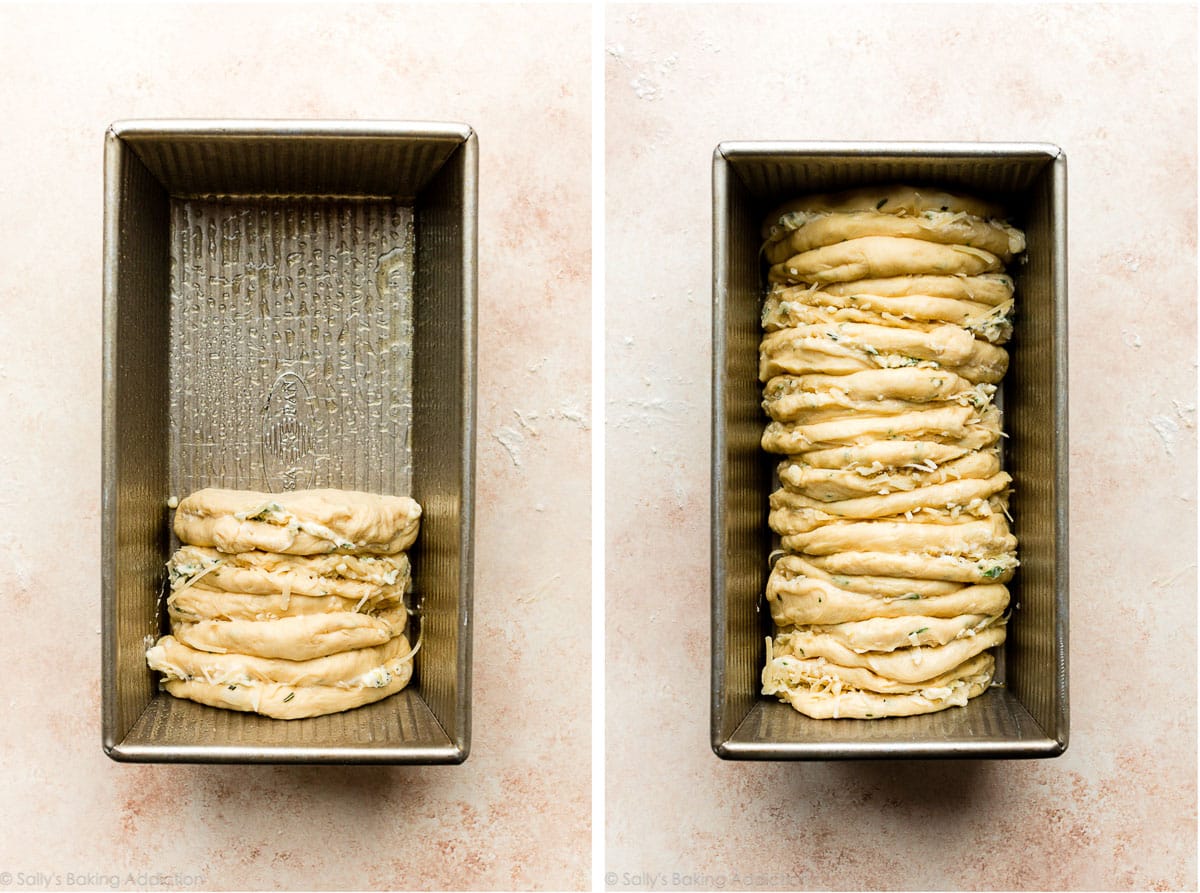
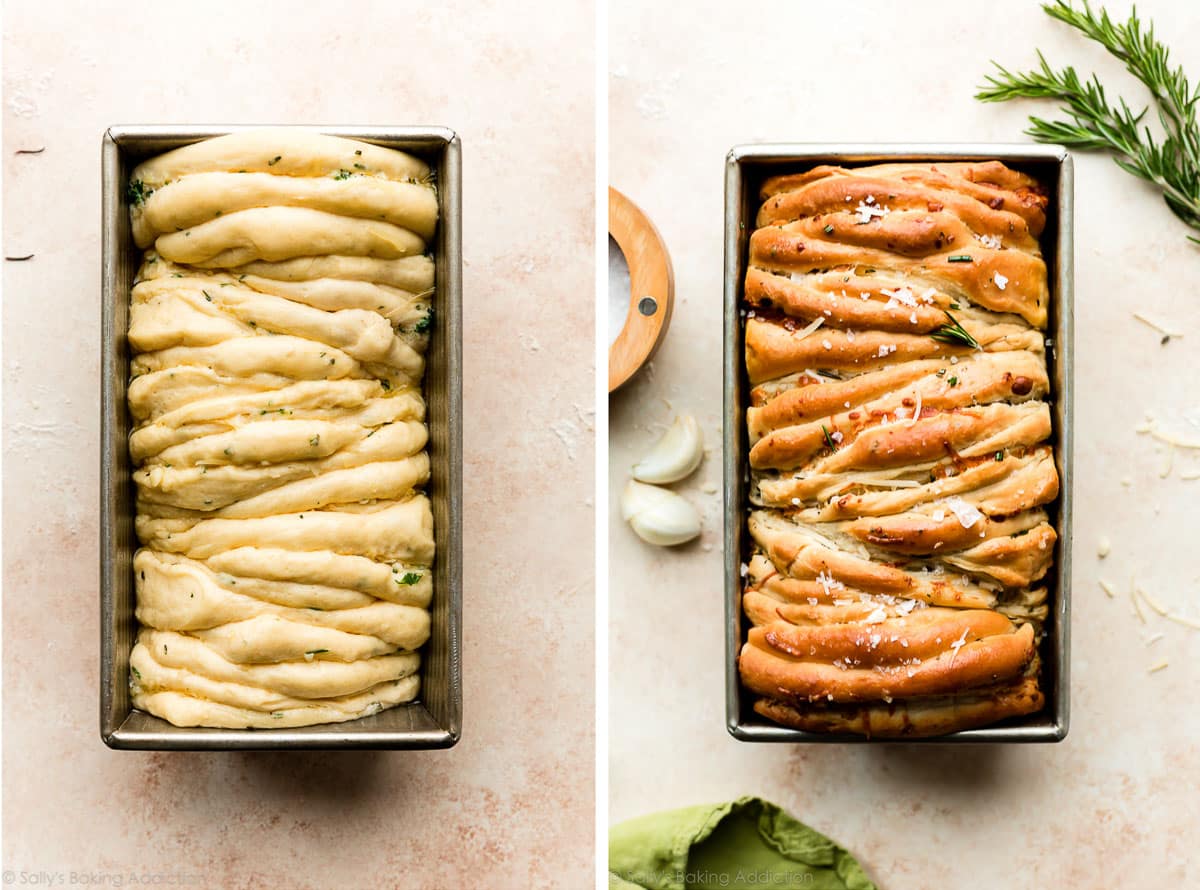
- Fold the circles in half and arrange upright in a 9×5-inch loaf pan.
*You don’t need a rolling pin, but you could certainly use one if you want.
Pull Apart Bread Step by Step Photos
When you get started, use these helpful photos as your guide.
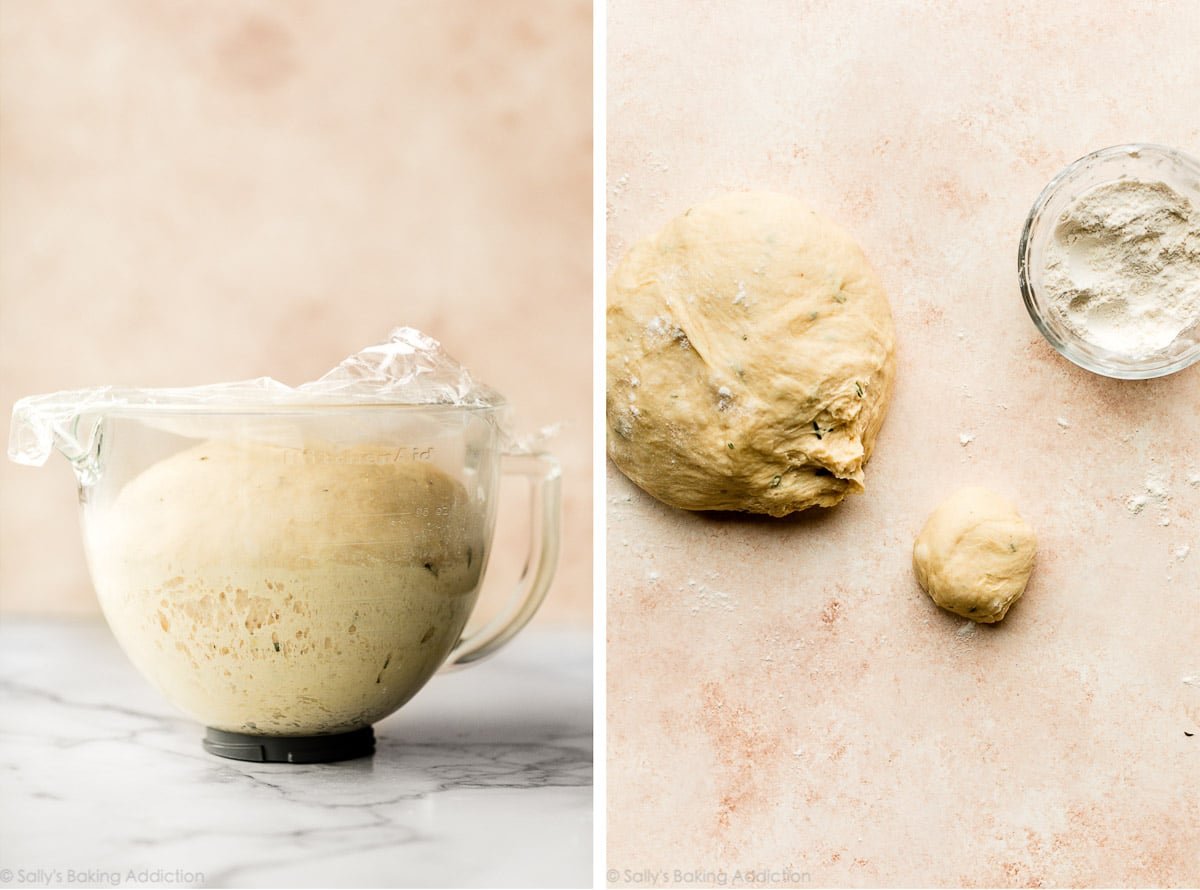
Make and knead the dough, referencing my How to Knead Dough tutorial as needed. After the dough rises, punch it down and divide into 12 pieces.
Flatten the dough rounds and spread each with garlic herb butter.
Sprinkle with cheese and fold in half to resemble a taco.
Note: I love cheesy bread, but I appreciate that it doesn’t overpower the rosemary in this recipe. If you’re looking for a heavier cheesy flavor, you will love my homemade cheese bread.
Why fold the circles in half? Folding the dough circles in half gives the bread a solid base where no butter/cheese can seep through. I had so much trouble with a similar recipe when I tried to arrange buttered squares of dough in a loaf pan. The butter leaked everywhere and the bread was a greasy mess. While some butter melts around the sides here, the bread’s base is pretty solid.
Line folded circles in a greased loaf pan.
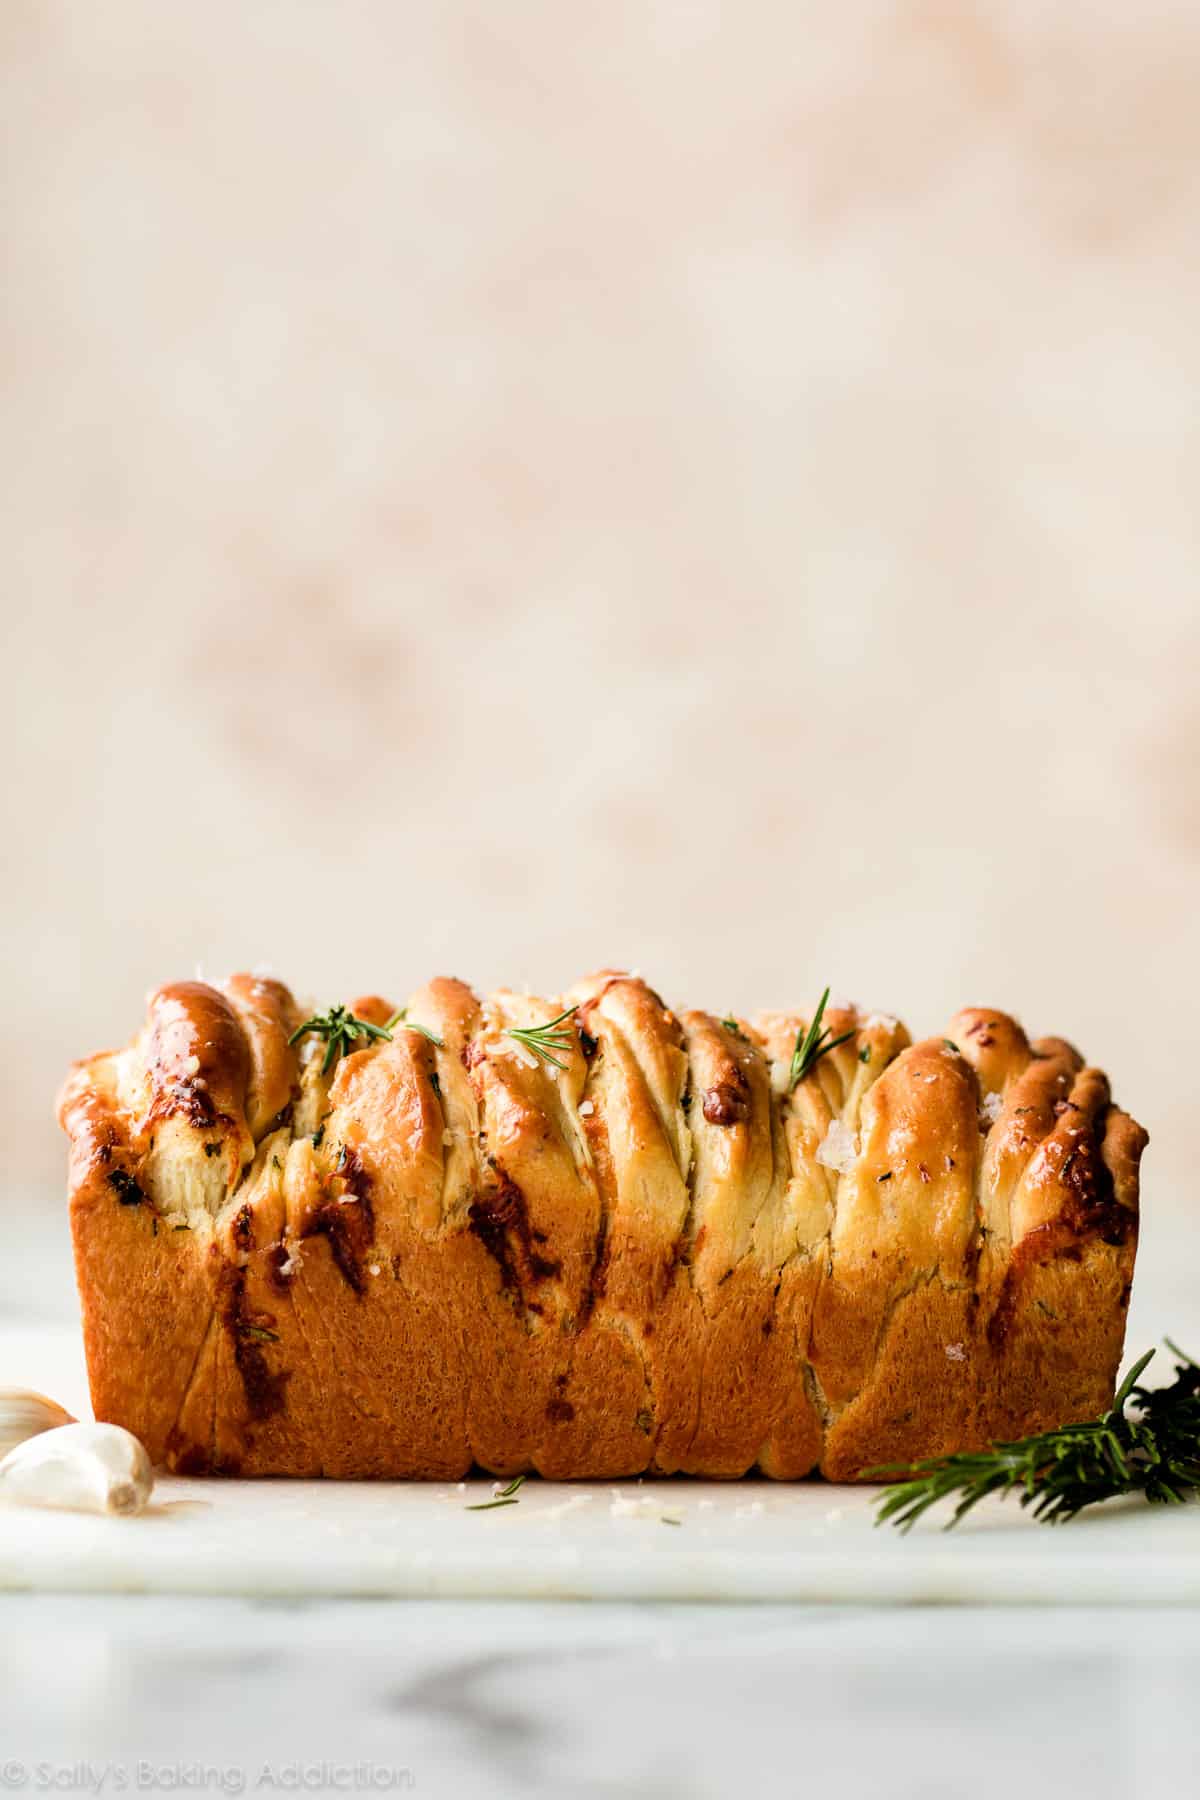
Allow to rise until puffy, then bake until golden brown.
This bread fits the bill for a snack, appetizer, or alongside dinner. You can slice the loaf or tear off pieces. Whenever or however you serve it, I’m confident every lucky taste tester will beg for seconds. If you love the garlic and herb butter flavors in this recipe, try these pizza pull apart rolls next. And if you’re craving sugar, this homemade monkey bread is equally mouthwatering and perfectly acceptable for breakfast. 😉
Print
Rosemary Garlic Pull Apart Bread
- Prep Time: 3 hours
- Cook Time: 50 minutes
- Total Time: 4 hours
- Yield: 1 loaf
- Category: Bread
- Method: Baking
- Cuisine: American
Description
Make a flavorful pull apart bread using this delicious rosemary-infused yeasted dough. You can use your favorite cheese in the filling. I love and usually use shredded parmesan.
Ingredients
Dough
- 2 teaspoons Platinum Yeast from Red Star*
- 1 Tablespoon granulated sugar
- 3/4 cup (180ml) whole milk
- 3 Tablespoons (43g) unsalted butter, softened to room temperature
- 1 large egg
- 2 and 1/3 cups (291g) all-purpose flour (spooned & leveled), plus more as needed*
- 1 teaspoon salt
- 1 teaspoon garlic powder
- 1 Tablespoon finely chopped fresh rosemary (or 2 teaspoons dried)
Filling
- 5 Tablespoons (71g) unsalted butter, extra soft (see note)
- 1 Tablespoon finely chopped fresh rosemary (or 2 teaspoons dried)
- 1 Tablespoon finely chopped fresh parsley (or 2 teaspoons dried)
- 2 garlic cloves, minced or 1/2 teaspoon garlic powder
- 1/4 teaspoon salt
- 3/4 cup (95g) shredded parmesan, mozzarella, or white cheddar cheese (or your favorite shredded cheese)
Optional Topping
- 1 Tablespoon (14g) unsalted butter, melted
- flaky/coarse sea salt for sprinkling
Instructions
- Make the dough: Place the yeast and sugar in the bowl of a stand mixer fitted with a dough hook or paddle attachment. Or, if you do not own a stand mixer, a regular large mixing bowl. Heat the milk on the stove or in the microwave until warm to touch, about 110°F (43°C). Pour warm milk on top of yeast/sugar. Whisk gently to combine, then loosely cover with a clean kitchen towel and allow to sit for 5-10 minutes. The mixture will be frothy after 5-10 minutes.
- If you do not have a mixer, you can mix the dough together with a wooden spoon or silicone spatula in this step. Add the butter, egg, flour, salt, garlic powder, and rosemary. Beat on low speed for 3 minutes. Dough will be soft.
- Knead the dough: Keep the dough in the mixer (and switch to the dough hook if using the paddle) and beat for an additional 5 full minutes, or knead by hand on a lightly floured surface for 5 full minutes. (If you’re new to bread-baking, my How to Knead Dough video tutorial can help here.) If the dough becomes too sticky during the kneading process, sprinkle 1 teaspoon of flour at a time on the dough or on the work surface/in the bowl to make a soft, slightly tacky dough. Do not add more flour than you need because you do not want a dry dough. After kneading, the dough should still feel a little soft. Poke it with your finger—if it slowly bounces back, your dough is ready to rise. You can also do a “windowpane test” to see if your dough has been kneaded long enough: tear off a small (roughly golfball-size) piece of dough and gently stretch it out until it’s thin enough for light to pass through it. Hold it up to a window or light. Does light pass through the stretched dough without the dough tearing first? If so, your dough has been kneaded long enough and is ready to rise. If not, keep kneading until it passes the windowpane test.
- 1st Rise: Shape the kneaded dough into a ball. Place the dough in a greased bowl (I use nonstick spray to grease) and cover with plastic wrap or aluminum foil. Place in a slightly warm environment to rise until doubled in size, around 60-90 minutes. (If desired, use my warm oven trick for rising. See my answer to Where Should Dough Rise? in my Baking with Yeast Guide.)
- As the dough rises, prepare the filling in the next step and grease a 9×5-inch loaf pan.
- Make the filling: In a medium bowl, mix the soft butter, rosemary, parsley, garlic, and salt together. If the butter is soft enough, you can just mix it all together with a spoon or fork. You can use an electric mixer if that’s easier too. Cover tightly and set aside until ready to use. (Don’t refrigerate unless making well in advance. It’s easiest to spread on the dough when at room temperature. If refrigerated, let it come to room temperature before spreading on dough pieces.)
- Assemble the bread: Punch down the dough to release the air. Place dough on a lightly floured work surface. Divide it into 12 equal pieces, each about 1/4 cup of dough and a little larger than a golf ball. Using lightly floured hands, flatten each into a circle that’s about 4 inches in diameter. The circle doesn’t have to be perfectly round. I do not use a rolling pan to flatten, but you certainly can if you want. Spread 1-2 teaspoons of filling mixture onto each. Sprinkle each with 1 Tablespoon of cheese. Fold circles in half and line in prepared baking pan, round side up. See photos above for a visual.
- 2nd Rise: Cover with plastic wrap or aluminum foil and allow to rise once again in a slightly warm environment until puffy, about 45 minutes.
- Adjust the oven rack to the lower third position then preheat oven to 350°F (177°C).
- Bake until golden brown, about 50 minutes. If you find the top of the loaf is browning too quickly, tent with aluminum foil. (Don’t be alarmed if there’s melted butter around the sides of the bread as it bakes, it will seep into the bread before it finishes.) Remove from the oven and place the pan on a wire rack. If desired, brush with melted butter for topping and sprinkle with sea salt.
- Cool for 10 minutes in the pan, then remove from the pan and serve warm.
- Cover and store leftovers at room temperature for up to 2 days or in the refrigerator for up to 1 week. Since the bread is extra crispy on the exterior, it will become a little hard after day 1. Reheat in a 300°F (149°C) oven for 10-15 minutes until interior is soft again or warm in the microwave.
Notes
- Make Ahead Instructions: Freeze baked and cooled bread for up to 3 months. Thaw at room temperature or overnight in the refrigerator and warm in the oven to your liking. The dough can be prepared through step 4, then after it has risen, punch it down to release the air, cover it tightly, then place in the refrigerator for up to 2 days. Continue with step 5. To freeze the dough, prepare it through step 4. After it has risen, punch it down to release the air. Wrap in plastic wrap and place in a freezer-friendly container for up to 3 months. When ready to use, thaw the dough overnight in the refrigerator. Then let the dough sit at room temperature for about 30 minutes before continuing with step 5. (You may need to punch it down again if it has some air bubbles.)
- Special Tools (affiliate links): Electric Stand Mixer or Large Glass Mixing Bowl with Wooden Spoon / Silicone Spatula | 9×5-inch Loaf Pan | Cooling Rack
- Yeast: I always use Platinum Yeast from Red Star, an instant yeast. If using active dry yeast, the rise times could be slightly longer. Reference my Baking with Yeast Guide for answers to common yeast FAQs.
- Flour: Feel free to use the same amount of bread flour instead of all-purpose flour. You can also try swapping out 1 cup of flour for whole wheat flour. Do not replace all of the flour with whole wheat flour—just 1 cup.
- Extra Soft Butter for Filling: Have you ever read my page about room temperature butter? Room temperature butter for baking should still be cool to the touch. You want room temperature butter for the dough. However, for the filling, you want extra soft butter so you can easily spread it onto the flattened dough without tearing the dough. Feel free to microwave it for 10-15 seconds to help it get extra soft.


I have made this recipe twice now and my co-worker loves it. I use a slightly melted filling so that I can just brush it on. I also spread some between the stacked layers. It helps to stack them if you prop up the end of your loaf pan so that they don’t fall over as you are stacking them.
Smelled amazing while rising, but unfortunately I found it a little bland when eaten. The dough was very light and fluffy with crispy edges. I did have to add a few extra spoonfuls of flour during mixing and kneading as it was still quite sticky.
Yummy bread
I forgot to put the cheese inside when I made it but it was still delicious! I added cheese when i pulled it out of the oven and when i reheat throughout the week I’ll add cheese then also. Great flavor and easy to do. Fresh herbs really made the difference. Thanks for another great recipe!
Accidentally melted the cheese into the filling… Hopefully it goes alright. On the 2nd proof and will update once baked!
Hello! The written instructions say to knead the dough for 5 minutes, but the video says 1 minute. Which should I do?
Hi Emme, the written recipe is correct, thank you for pointing out that discrepancy!
Thank you, Trina! It was so delicious – so much flavor and great texture!
I enjoyed making this! It is definitely a one or two piece at a time bread for me as it is very rich after that!
Smells good and tastes good.
So tasty
Insanely good. I left out the parsley, as I didn’t have any on hand, which didn’t change much. I paired it with pasta, and it was gone in half an hour.
My kids and I really enjoyed making this recipe, I did add about 1/4 cup more flour to the dough and it turned out perfectly. The bread barely had time to cool before my family devoured it and requested that I double the batch next time I make it.
Followed the recipe to the letter, and it turned out PERFECT!! I went heavy on the rosemary (I love that flavor to be the main star). Pull apart bread is my new obsession, and I can’t wait to play around with all the different flavors.
I made this with dried herbs and , while delicious, I think it would taste even better with fresh ones. That being said, I will be making it again!
Awesome recipe! I made this for my family for easter dinner and it was pretty amazing. The only thing I would recommend is removing the dough from your mixer/bowl before kneading and placing it on a lightly floured surface. Then take out a pile of flour and placing it on your counter seperate from the dough. The dough is going to be very sticky, so work in more flour a little at a time while kneading. You really want it to be like a butter slime consistency if that makes any sense. You want it to be moist, soft, and warm. After this follow the instructions and you should be all good. Mine turned out great on the first try. Hope you have similar results! And thanks Sally for the awesome recipe.
I just had to abort the mission to make this recipe. I believe your flour conversion (2 1/3 c. to grams) is incorrect. The dough was so sticky after three minutes, I added carefully by the teaspoon, quickly realizing something had to be very much off. I am an intermediate bread maker, thus I understand not wanting to add too much flour, to follow instructions very carefully. I tried to figure out what was wrong, measuring out 2 1/3 c. on my food scale to the grams. It came in at around 341 grams, not 291 g. There’s the explanation for this very sticky, by then terribly over-kneaded (Kitchenaid w/hook) dough. Bummer ! No rolls tonight, not wanting to start over. I typically love to work with metric measurement/scale for baking, but I should double-check the conversions given, go forward.
I’m trying it now I measured the flour also on scale to 291g mixed in KitchenAid mixer- it was way to wet & sticky – but from other things I made, I know usually it needs enough flour to pull away from the bowl side. Do I added flour till I thought it was right – and the rest came together. It’s in the oven now
Hi! Can I make this recipe without cheese? I am dairy-free
Hi Yaffa, yes, you can omit the cheese.
Hey there, just wanted to clarify with the overnight instructions. Should I let it rise fully (so basically also do step 4) then let it set out at room temperature for half an hour after refrigerating similar to the freezing instructions? Or do I need to let it rise even more after being in the fridge?
Hi Katherine! We just updated those instructions, sorry that was confusing. You’ll let the dough rise, then punch down, refrigerate overnight, and then let it rest 30 minutes at room temp before continuing with step 5. Thank you!
Even though I totally screwed it up and had t take it apart to get my herbs added, it tasted great.
This loaf turned out really well, although I did have to foil the top to prevent over browning.
I would definitely add more fresh garlic next time and perhaps a stronger cheese (I mixed mozzarella and Parmesan). I was trialling it as a possibility for my sons
cafe. It would be great to freeze and finish off with extra cheese before serving as a sharing plate.
Tried and true. It’s sooo good! However, it never takes 50 minutes to bake this bread. I am reading 200F at ~34 minutes. I have a standard oven. Strange, right?
I’m attempting to make this recipe tomorrow..is it ok to use a bread machine for the mixing, kneading and first rise using the dough setting? Thanks
We haven’t tested it but can’t see why not!
My family and I are all lactose intolerant, so I made this with dairy free butter and subbed in some homemade tomato sauce and mini pepperoni for the cheese. Obviously different from intended, but the base of the recipe worked perfectly! Highly recommend these changes for the lactose intolerant folks (and you can also do a one for one sub of soy cheese and it’s great, too!)