Let me show you how easy slab pies are! Unlike traditional round pies, you can roll slab pies into any shape you want as long as it fits onto a sheet pan. This mixed berry slab pie uses a super flaky all butter pie crust and extra juicy berry filling. This is a very easy way to make and serve pie!
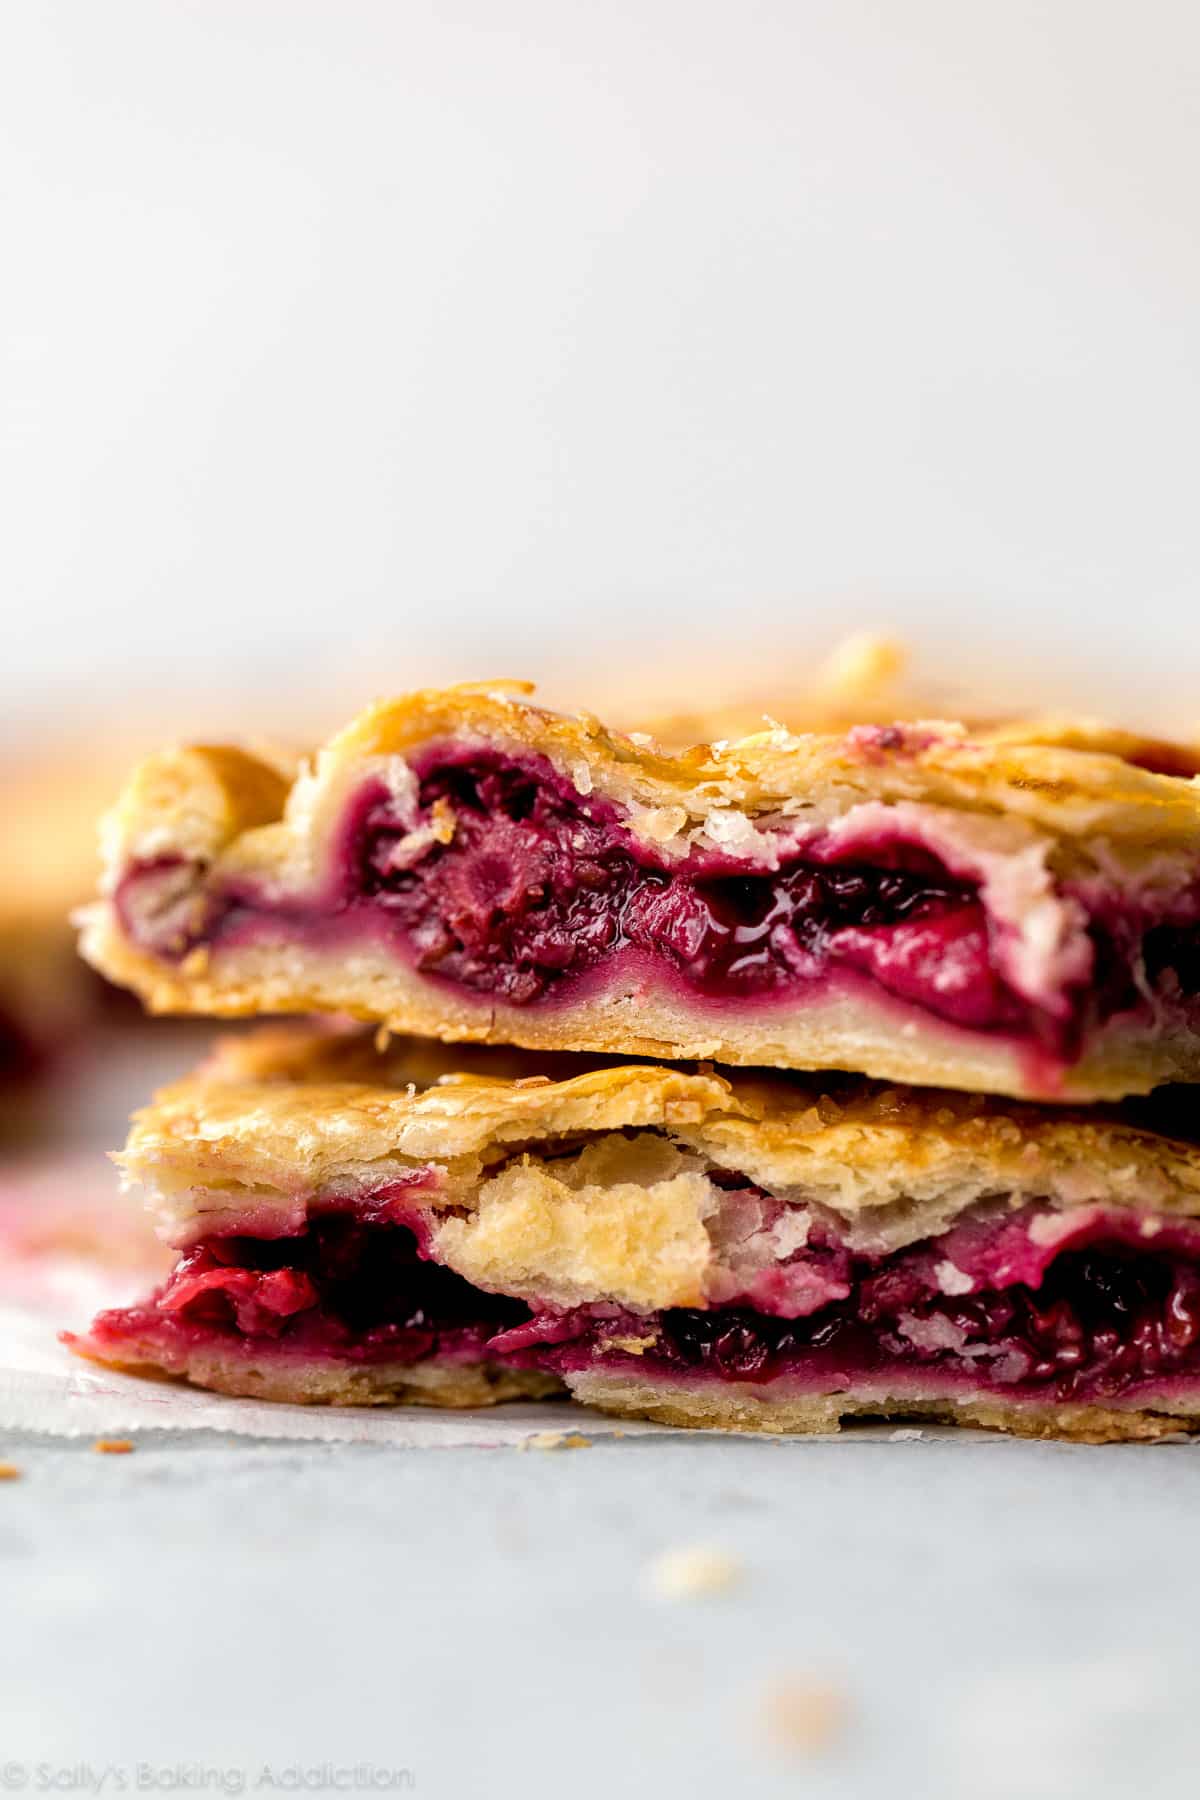
Summer pie season is here and that’s nothing to take lightly. Let’s make a free-form mixed berry slab pie with a flaky all-butter pie crust, juicy strawberries, fresh blackberries, and a squeeze of lemon to brighten up the whole dessert. I love slab pies because not only are they 100x easier than an actual pie, they’re essentially a giant pop-tart. If that doesn’t convince you, I’m not sure much else will. But I’ll give it a shot!
5 Reasons to Make Mixed Berry Slab Pie
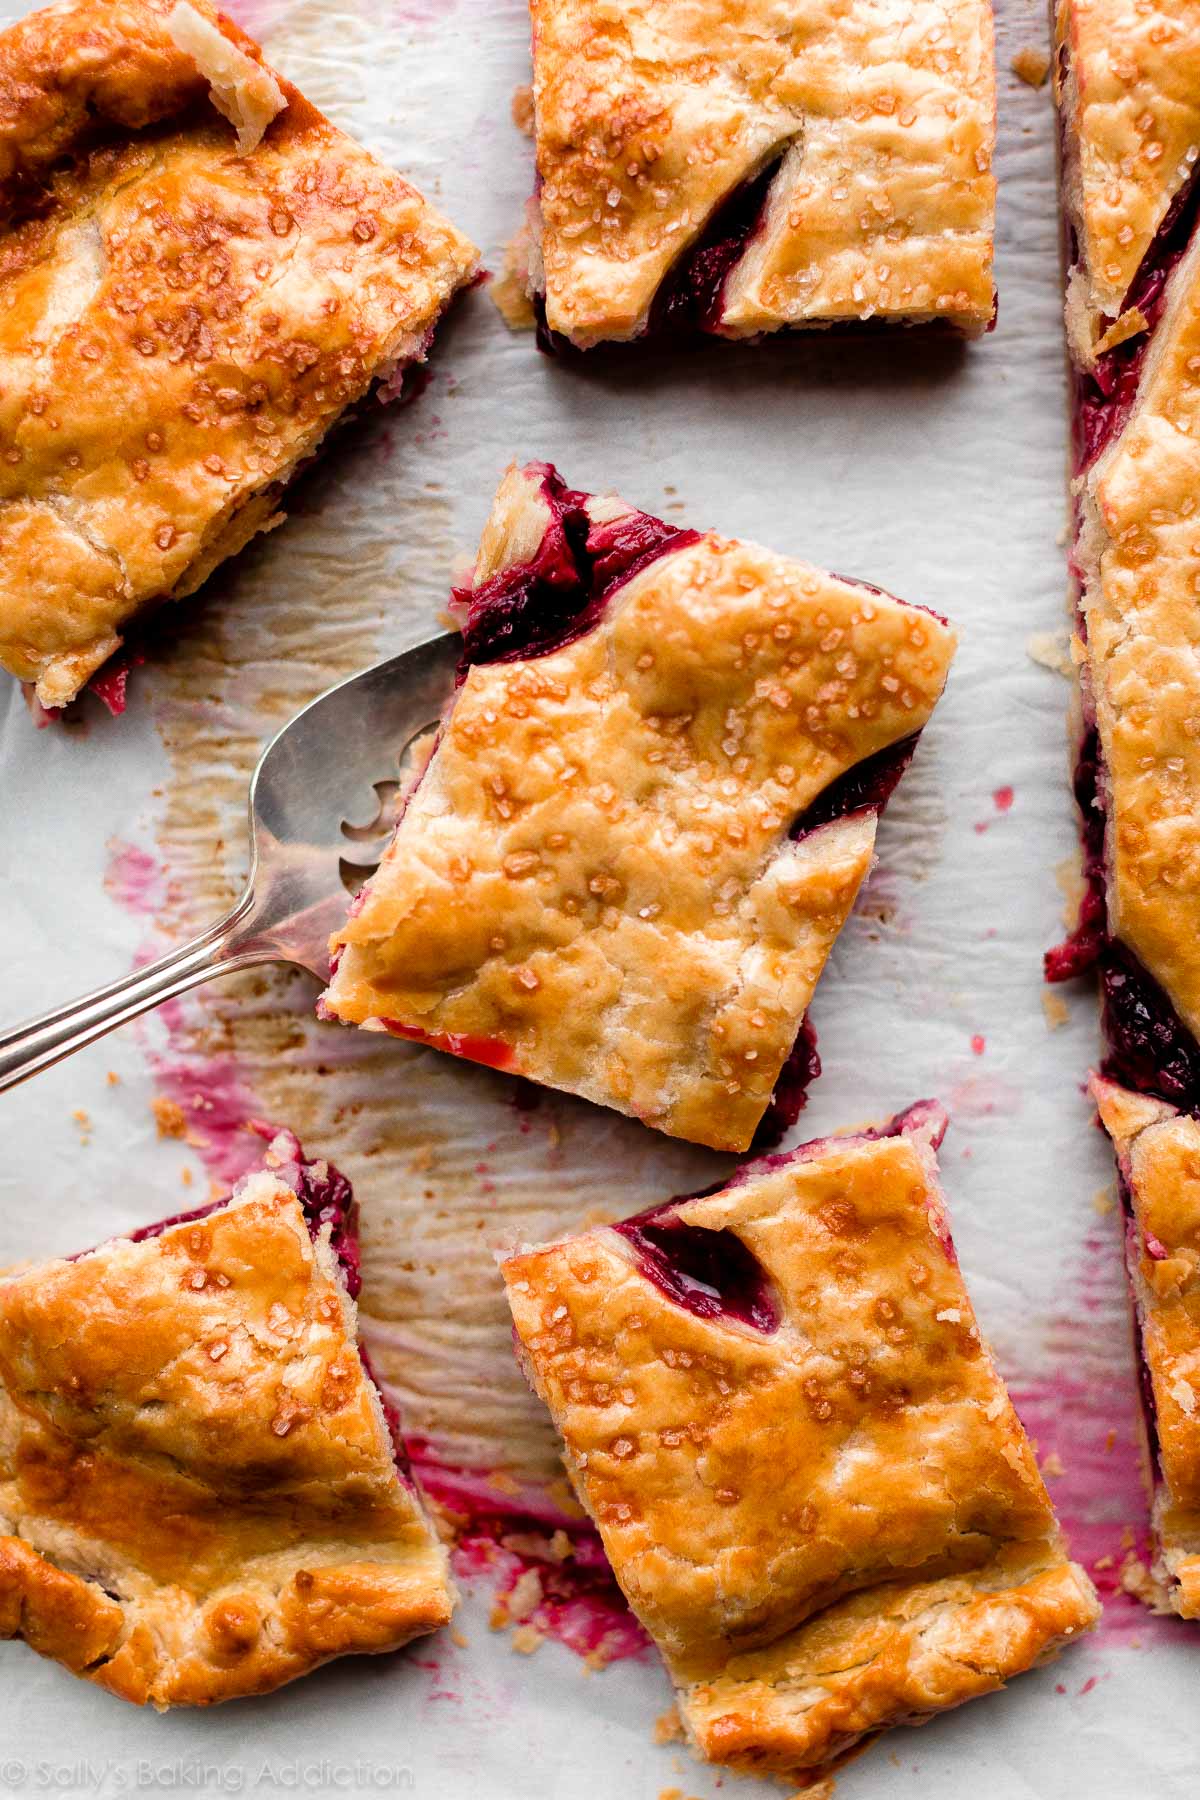
- Slab pie is cut into bars so it’s easy to slice, serve, and eat.
- Eat with a fork or hands.
- Slab pie feeds a crowd.
- Easier to freeze leftover slab pie bars compared to traditional pie slices.
- No strict measurements for rolling out the dough.
Slab Pie Crust
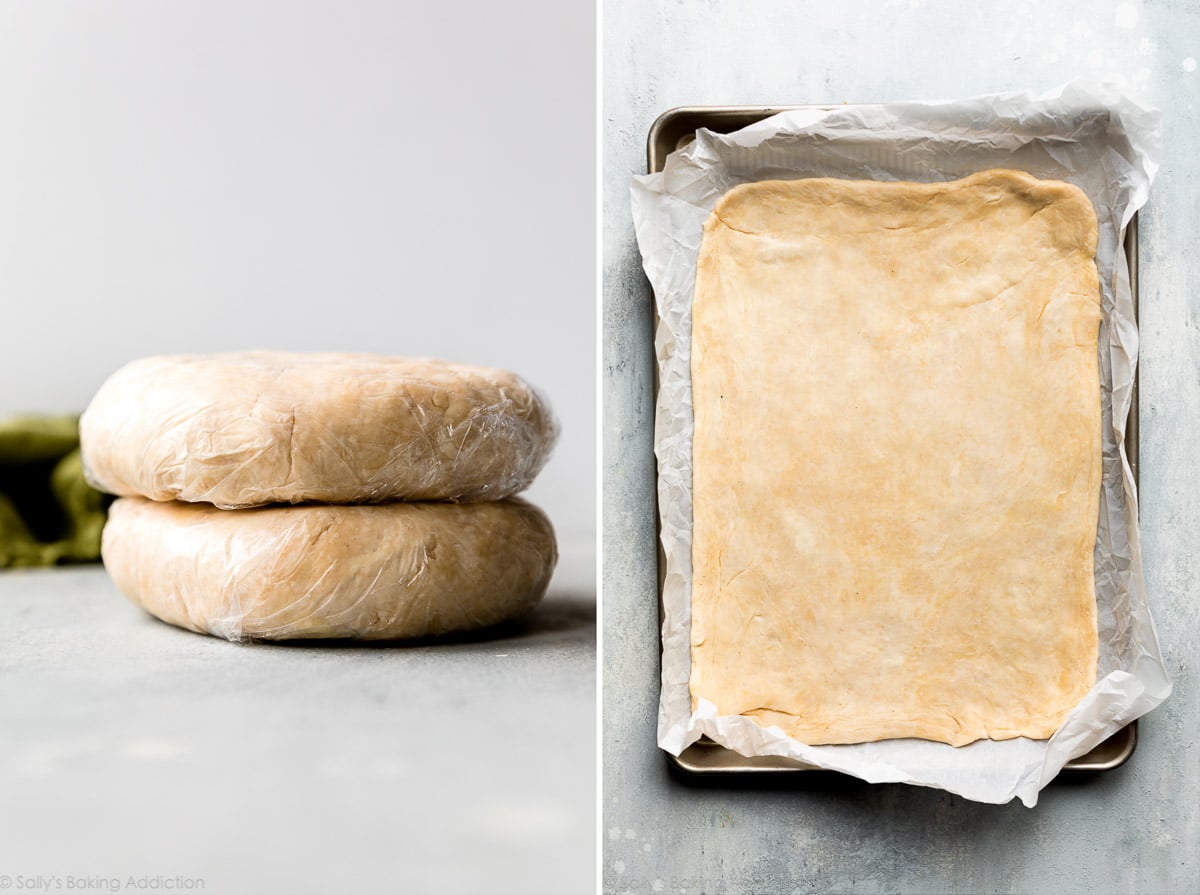
Start this recipe with the same pie crust used for apple slab pie. This pie crust recipe is essentially my traditional all butter pie crust, but it yields 3 pie crusts instead of 2. (Slab pies are larger, so we need more pie dough.) You know I’m a cheerleader for the shortening and butter combination in pie crust, but I find this particular crust is fantastic for slab pie. It’s a wonderful balance of tender and crisp and browns beautifully in the oven.
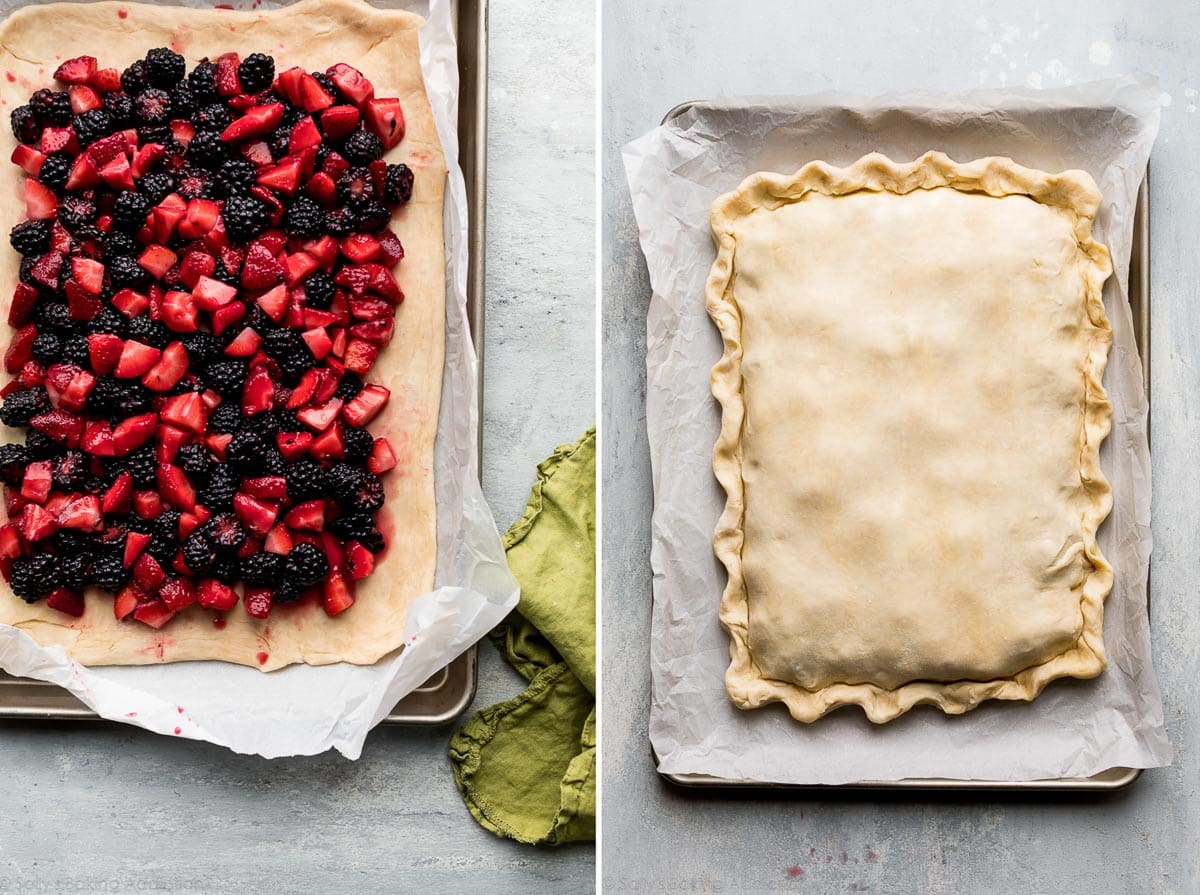
The pie dough must chill for a couple hours, so it’s easiest to prepare the crust in advance. It can hang out in the refrigerator for a few days or in the freezer for 3 months. When you’re ready to make the mixed berry slab pie, don’t stress over rolling out the pie dough. Unlike traditional round pies, slab pies are no-fuss. Let the pie dough take on whatever shape, as long as it’s about 1/8-inch thick and can fit onto your baking pan.
Use Parchment Paper to Transfer
To make transferring the rolled out dough easier, roll it out on parchment paper. Pick up the parchment and place it on your baking sheet. I recommend a rimmed baking sheet, like a jelly roll pan, so any possible filling juices don’t go overboard. You could also roll the dough out on a silicone baking mat.
Low maintenance free-form pies will be your new favorite. You’ll love my berry cobbler, too!
Mixed Berry Filling
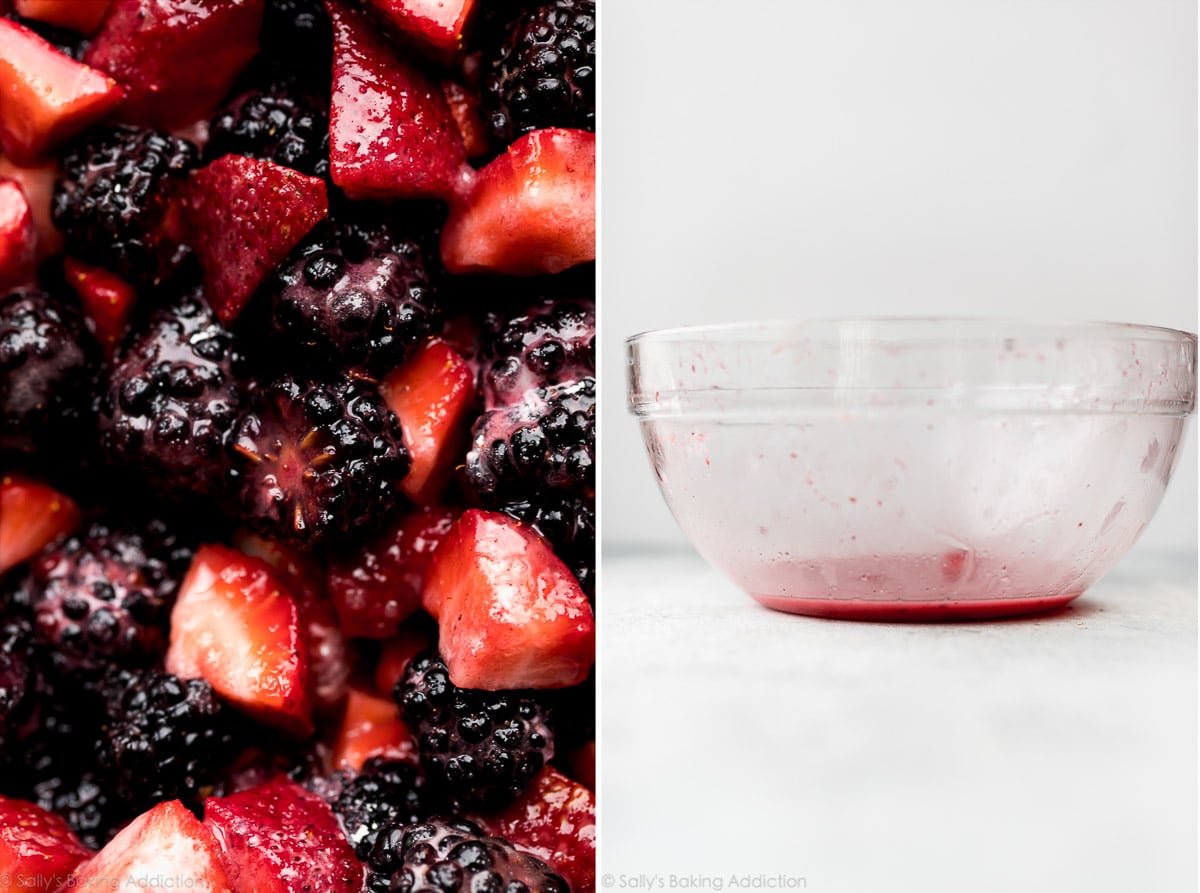
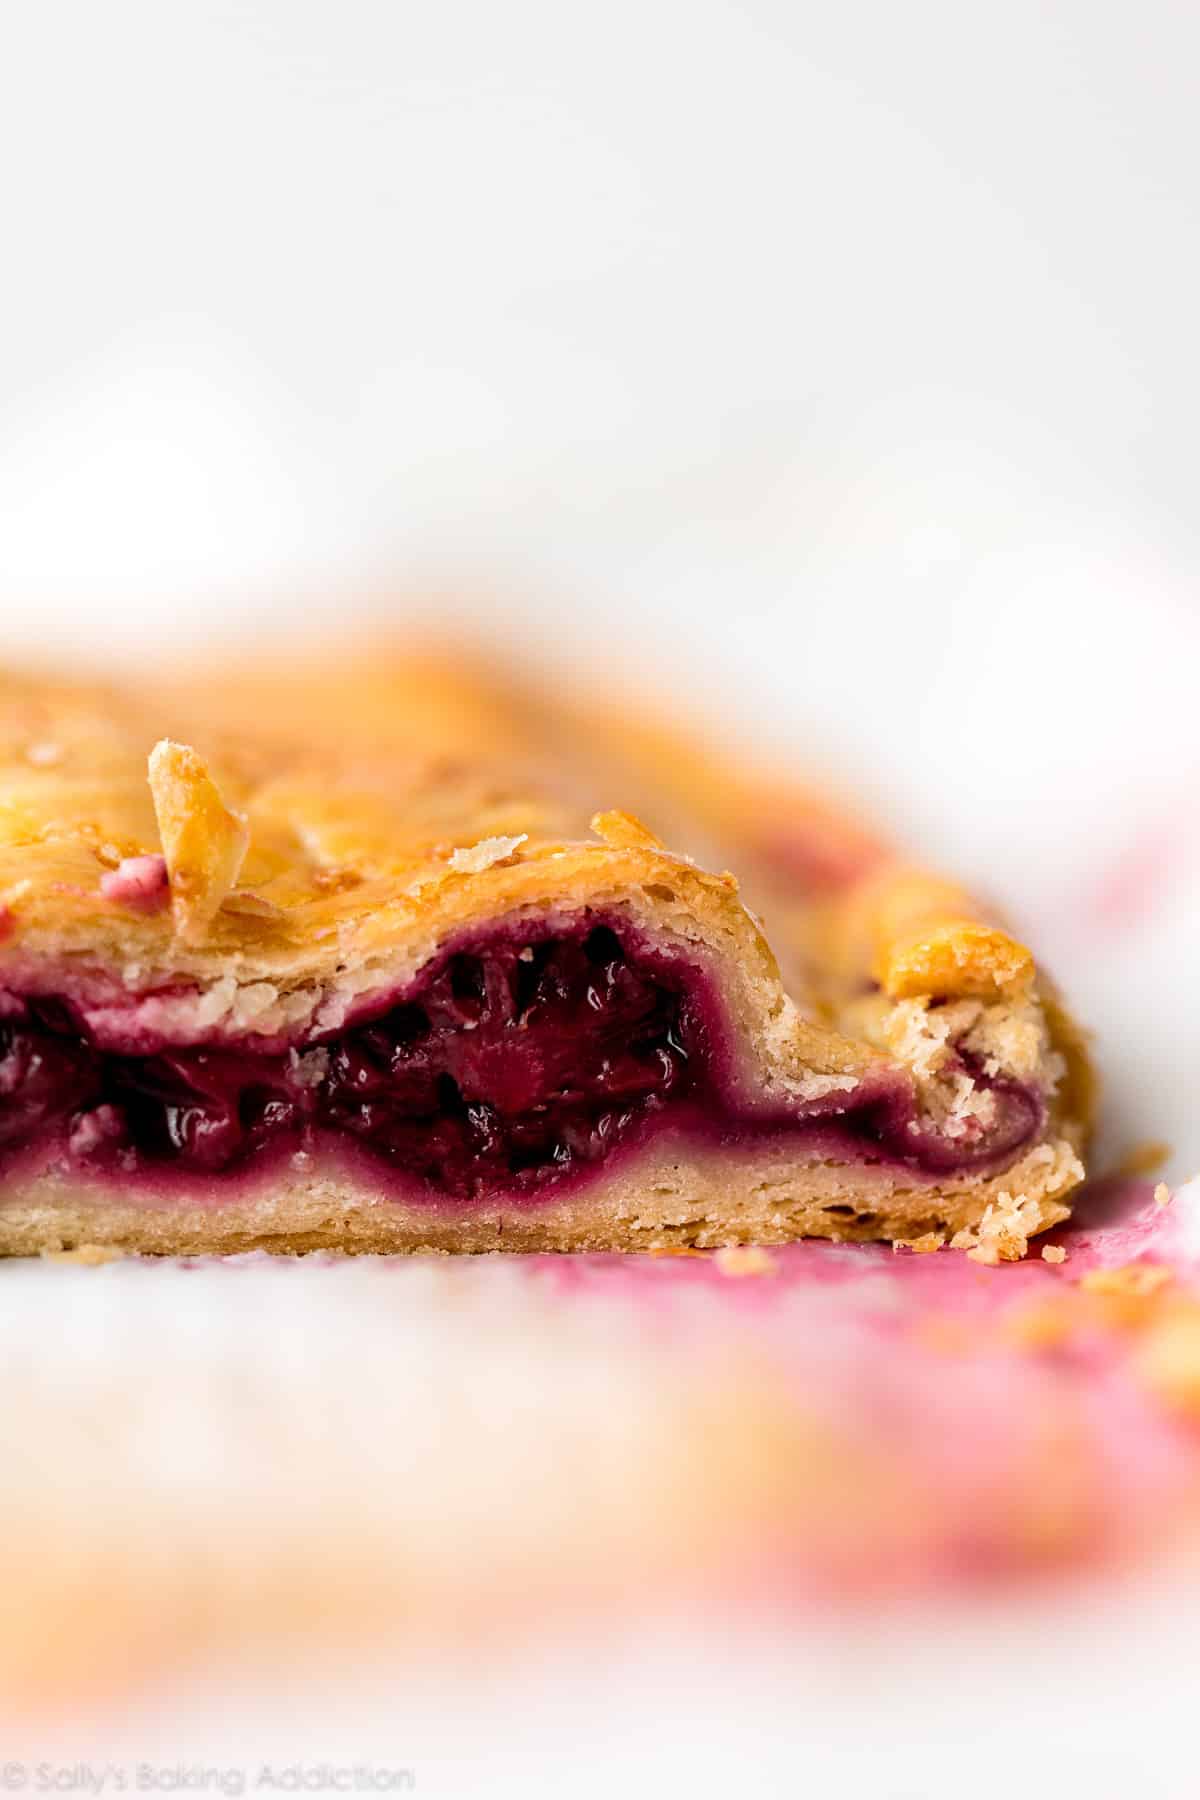
I love combining fruits to create unique pie fillings with varying textures. Juicy strawberries are the perfect match for the more sturdy blackberry. This duo yields a hot pink filling and if the giant pop-tart-ness doesn’t make you smile, this barbie pink filling will. Feel free to swap blueberries for the strawberries or blackberries.
There are some exceptions, but whenever you make pie filling, you need anywhere between 6-10 cups of fruit. For this slab pie, you need about 8 cups. Use half chopped strawberries and half blackberries. The blackberries I bought were extra large, so I chopped them in half.
My #1 Tip
Listen up! Berries are naturally juicy and will excrete even more juices after you mix the filling ingredients together. You will be tempted to pour the filling on the crust but DON’T DO THAT. There’s a lot of liquid at the bottom of the bowl—I measured about 1/3 cup—and that excess liquid leads to a soggy crust. Use a slotted spoon to transfer the filling to the pie crust, leaving excess liquid behind. Don’t worry, the baked pie filling will still be very juicy!
Finishing the Mixed Berry Slab Pie
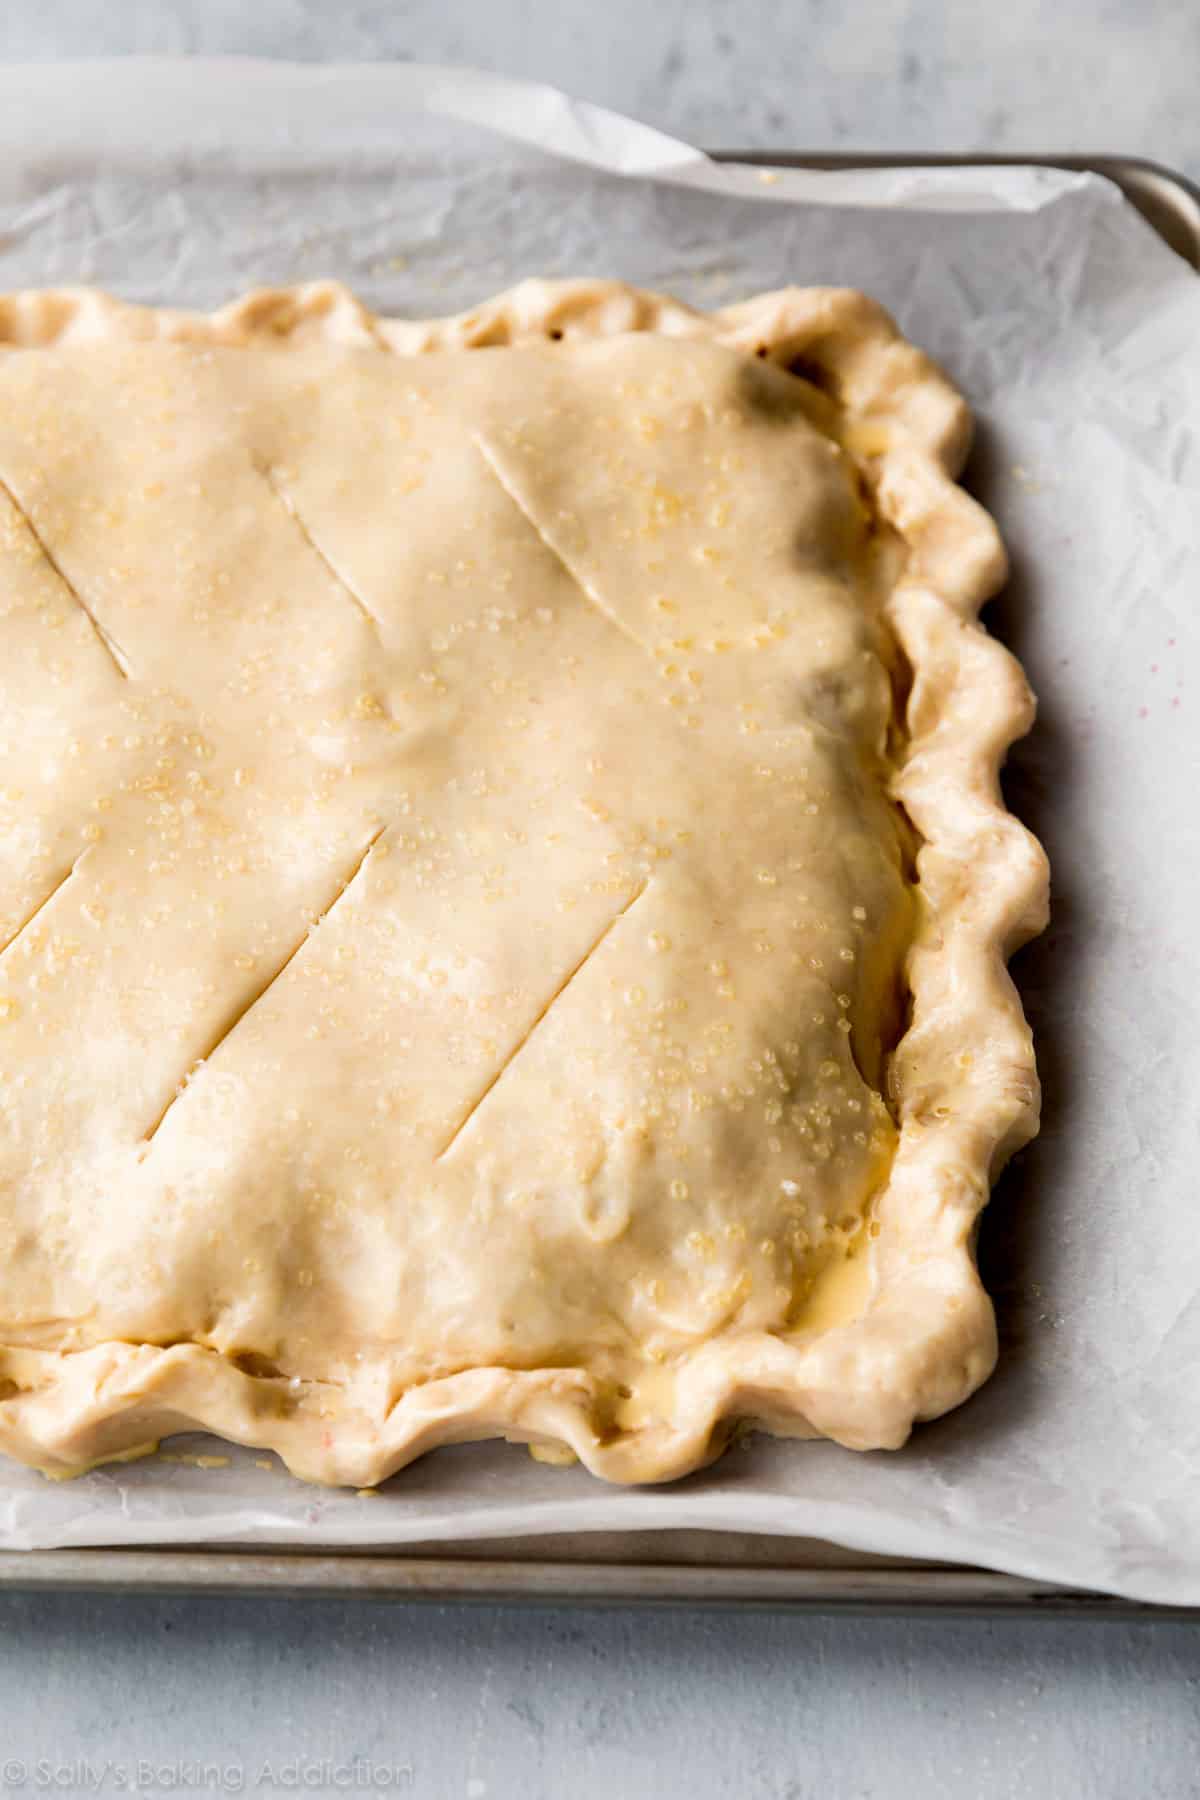
Roll out the top pie crust in the same shape as the bottom. If desired, you can cut into strips to weave a lattice pie crust topping. If topping with a full pie crust, as I do in these photos, cut a few slits in the top crust so steam can escape. For a golden sheen, brush the top crust with egg wash. And because it’s fun to be EXTRA, add some sparkle with coarse sugar. Be sure to crimp or flute the pie crust edges to seal in that filling!
Serve the mixed berry slab pie warm or wait for the whole thing to cool down and slice into bars. (You’ll get neater slices if the pie has cooled down!) If you’re simply serving on plates, cut and serve warm with a scoop of vanilla ice cream and a dollop of whipped cream.
Celebrating summer pie season just got a whole lot easier and if you’re looking for more pie recipes, I’m your gal.
More Summer Pies
Print
Strawberry Blackberry Slab Pie
- Prep Time: 3 hours
- Cook Time: 50 minutes
- Total Time: 3 hours, 50 minutes
- Yield: 14-18 slices
- Category: Pie
- Method: Baking
- Cuisine: American
Description
Simple strawberry blackberry slab pie recipe with an all butter flaky pie crust feeds a crowd! This is a free form summer pie assembled and baked on a baking sheet.
Ingredients
Crust
- 4 cups (500g) all-purpose flour (spooned & leveled)
- 1 and 1/2 teaspoons salt
- 1 teaspoon granulated sugar
- 1 and 3/4 cup (396g) unsalted butter, very cold and cubed
- 3/4 cup (180ml) ice cold water
- egg wash: 1 large egg, lightly beaten with 1 Tablespoon (15ml) milk
- optional: coarse sugar for sprinkling on top
Filling
- 4 cups (650g) hulled and chopped fresh strawberries
- 4 cups (500g) halved fresh blackberries
- 1/2 cup (100g) granulated sugar
- 1/4 cup (28g) cornstarch
- 1 Tablespoon (15ml) lemon juice
- 1 teaspoon pure vanilla extract
- pinch salt
Instructions
- Make the pie crust: Mix the flour, salt, and sugar together in a large bowl. Add the butter. Using a pastry cutter, a food processor, or two forks, cut the butter into the mixture until you have pea-size crumbles with a few larger crumbs of fat. (I prefer a pastry cutter for control, ease, and so it’s not accidentally over-mixed.) Drizzle the cold water in, 1 Tablespoon (15ml) at a time, and stir after every Tablespoon added. Do not add any more water than you need to. Stop adding water when the dough begins to form large clumps. I always use about 3/4 cup (180ml) water. Transfer the pie dough to a floured work surface. Using floured hands, fold the dough into itself until the flour is fully incorporated into the butter pieces. The dough should come together easily and should not feel overly sticky. Form dough into a ball. Divide dough in half. Flatten each half into 1-inch thick discs using your hands. Wrap each tightly in plastic wrap. Refrigerate for at least 2 hours (and up to 5 days) or freeze for up to 3 months. Thaw overnight in the fridge before using.
- Make the filling: Gently mix all of the filling ingredients together in a large bowl. Set aside.
- Preheat oven to 375°F (190°C).
- Roll out the chilled pie crust: Remove 1 disc of pie dough from the refrigerator. Keep the other in the refrigerator as you work. I highly suggest rolling the dough out onto a piece of parchment paper or silicone baking mat fitted to your baking sheet. This way you can lift the entire piece of parchment/silicone baking mat off the counter (with the rolled out dough on top) and place on the baking sheet. Roll the dough out into a rectangle or oval shape. I find anywhere around a 10×16-inch size is great, though I’ve stretched it to a 13×18-inch size. Anywhere around this measurement will work. Dough should be about 1/8-inch thick. Make sure to turn the dough about a quarter turn after every few rolls. Carefully place the dough (with parchment/silicone baking mat) onto a large rimmed baking sheet.
- Spoon filling evenly on top of crust, leaving any excess liquid in the bowl. Leave a bare 1-inch border around the edges.
- Roll out the 2nd pie dough disc in the same-ish shape as the 1st. (If desired, you can cut into strips to weave a lattice on top.) Drape over filling, then use your hands to seal the top and bottom crusts together around the edges. Flute the edges or crimp with a fork. (See my how to crimp and flute pie crust tutorial if you need extra help with this step.) Cut slits into the top of the crust, then brush with a thin coating of egg wash. Sprinkle with coarse sugar, if desired.
- Bake the slab pie for about 45-55 minutes until the crust is golden brown and you can see the filling bubbling. Remove from the oven and, if serving as handheld bars, allow to cool completely in the pan set on a wire rack. If serving on plates, allow to cool for at least 45 minutes in the pan set on a wire rack. This pie is fantastic served a little warm with vanilla ice cream or at room temperature (or as cold leftovers, yum!).
- Cover leftovers tightly and store in the refrigerator for up to 3-4 days.
Notes
- Make Ahead Instructions: The pie crust dough can be made ahead of time and stored in the refrigerator for up to 5 days or in the freezer for up to 3 months. Thaw overnight in the refrigerator before using. Baked whole pie or sliced pie bars freeze well for up to 3 months. Thaw overnight in the refrigerator and allow to come to room temperature before serving.
- Special Tools (affiliate links): Pastry Cutter | Glass Mixing Bowl | Baking Sheet | Silicone Baking Mat or Parchment Paper | Rolling Pin | Pastry Brush | Cooling Rack
- Berries: Avoid using frozen berries. Pie filling does not set when using frozen or frozen thawed berries. You’ll need about 1 and 1/2 pounds of both whole strawberries and blackberries. Feel free to substitute either berry with blueberries.


