Description
After a few additional years of testing, this is now the best blueberry pie. As the pie bakes, expect a messy, bubbly, and juicy filling. As the pie cools, the filling sets into a jammy, yet sliceable consistency. For a truly out-of-this-world summer dessert experience, serve each flavorful slice with vanilla ice cream.
Ingredients
- Homemade Pie Crust or All Butter Pie Crust (both recipes make 2 crusts, 1 for bottom and 1 for top)
- 6 cups (3 pints; about 860g) fresh blueberries*
- 2/3 cup (135g) granulated sugar*
- 1/4 cup (31g) all-purpose flour
- 2 Tablespoons (14g) cornstarch
- 1/4 teaspoon ground cinnamon
- 2 Tablespoons (30ml) lemon juice
- 1 teaspoon lemon zest
- 1 Tablespoon (14g) cold unsalted butter, cut into small cubes
- egg wash: 1 large egg beaten with 1 Tablespoon (15ml) milk
- optional: coarse sugar for sprinkling on crust
Instructions
- The crust: Prepare either pie crust recipe through step 5.
- Make the filling: Stir the blueberries, sugar, flour, cornstarch, cinnamon, lemon juice, and lemon zest together in a large bowl. Mix together until it’s no longer dry and powdery; burst a few blueberries if necessary to moisten. Set filling aside as the oven preheats. Filling can be covered and refrigerated for up to 24 hours if needed.
- Adjust the oven rack to the lower third position and preheat to 425°F (218°C). Place baking sheet on the bottom oven rack to catch any blueberry juices.
- Roll out the chilled pie dough: On a floured work surface, roll out one of the discs of chilled dough (keep the other one in the refrigerator). Turn the dough about a quarter turn after every few rolls until you have a circle 12 inches in diameter. Carefully place the dough into a 9 x 1.5 or 2-inch round pie dish. Tuck it in with your fingers, making sure it is smooth. Pour and spread filling evenly into pie dish. Dot the pieces of butter on top of the filling. Set aside at room temperature or in the refrigerator as you assemble the top pie crust.
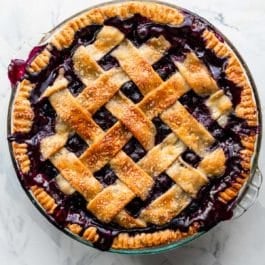
- Arrange the lattice: Remove the other disc of chilled pie dough from the refrigerator. Roll the dough into a circle that is 12 inches diameter. Using a pastry wheel, sharp knife, or pizza cutter, cut strips of dough; in the pictured pie, I cut 10 1-inch-wide strips. Carefully thread the strips over and under one another, pulling back strips as necessary to weave. (Here’s a lattice pie crust tutorial if you need visuals.) Press the edges of the strips into the bottom pie crust edges to seal. Use a small paring knife to trim off excess dough. Flute or crimp the pie crust edges with a fork.
- Lightly brush the top and edges of the pie crust with egg wash. Sprinkle the top with coarse sugar, if using.
- Bake the pie at 425°F for 25 minutes; then, keeping the pie in the oven, reduce the oven temperature down to 375°F (190°C). Place a pie crust shield (see Note for homemade shield) on the edges to prevent them from over-browning. Continue baking the pie until the filling’s juices are bubbling everywhere, including in the center, 40–50 more minutes. This sounds like a long time, but under-baking the pie means a soupy filling with paste-like flour and cornstarch chunks. If you want to be precise, the internal temperature of the filling taken with an instant read thermometer should be around 200°F (93°C) when done. Tip: If needed towards the end of bake time, remove the pie crust shield and tent an entire piece of foil on top of the pie if the top looks like it’s getting too brown.
- Remove pie from the oven, place on a cooling rack, and cool for at least 4 hours before slicing and serving. Filling will be too juicy if the pie is warm when you slice it.
- Cover leftovers tightly and store in the refrigerator for up to 5 days.
Notes
- Make Ahead & Freezing Instructions: This a great pie to make 1 day in advance, because the filling will have time to set overnight. The pie crust dough can also be prepared ahead of time and stored in the refrigerator for up to 5 days or in the freezer for up to 3 months. Feel free to prepare the filling 1 day in advance. See end of step 2. Baked pie freezes well for up to 3 months. Thaw overnight in the refrigerator and allow to come to room temperature before serving.
- Special Tools (affiliate links): Glass Mixing Bowl | Silicone Spatula or Wooden Spoon | 9-inch Pie Dish | Rolling Pin | Pastry Wheel or Pizza Cutter | Zester | Citrus Juicer | Pastry Brush | Sparkling Sugar | Pie Crust Shield | Instant Read Thermometer | Cooling Rack
- Blueberries: You need 6 cups (3 pints) of blueberries, which is about 2 lbs. (about 860g) total. I strongly suggest using fresh blueberries, not frozen. If you decide to use frozen, do not thaw first. The pie will take several more minutes in the oven if using frozen berries.
- Sugar: If your blueberries aren’t super sweet, such as in the wintertime, feel free to add another few Tablespoons of sugar. I find 2/3 cup (135g) is the perfect amount for sweet summer blueberries. You can increase to 3/4 cup (150g) if needed.
- Aluminum Foil Pie Crust Shield: You can purchase a pie crust shield or make one from aluminum foil. Cut a 14-inch square of aluminum foil. Fold in half. Cut out a 5-inch semi-circle on the folded edge. Unfold. Carefully fit the aluminum foil over the pie crust edges, securing down on the sides as best you can (careful, the pie is hot!), leaving the center of the pie exposed.
- Updated in 2022: The recipe you see above was very slightly updated in 2022 to produce a thicker, less soupy filling. The old recipe did not call for flour and instead used 1/4 cup (28g) of cornstarch. The old recipe also baked for less time (about 60 mins total), which is why the filling was often too runny. For a jammy, yet sliceable filling, bake the pie as instructed above in step 7.