Description
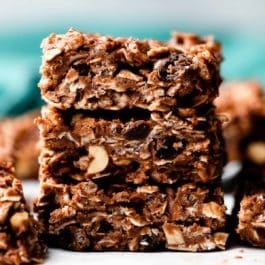
Enjoy a delightful combination of chewy-crispy-crunchy textures and salty-sweet chocolate-peanut butter flavors in every bite of these easy no-bake oat bars. Choose your favorite add-in from the suggestions in the Note below.
Ingredients
- 1/3 cup (70g) coconut oil
- 1/2 cup (90g) semi-sweet chocolate chips
- 1/2 cup (125g) crunchy or creamy peanut butter
- 1/4 cup (60ml) pure maple syrup (or honey)
- 1 and 1/4 cups (106g) old-fashioned whole rolled oats
- 3/4 cup (19g) crispy rice cereal
- 3/4 cup (about 100-120g) add-ins (such as salted or unsalted peanuts and raisins, see Note)
- optional: 1 Tablespoon unsweetened shredded coconut for topping
Instructions
- Line the bottom and sides of a 9-inch square baking pan with parchment paper, leaving an overhang on the sides to lift the bars out (makes cutting easier!). Set aside.
- In a medium pan over medium heat, melt the coconut oil and chocolate chips together, stirring often. Once chocolate chips have melted, stir in the peanut butter and maple syrup until combined. Remove from heat.
- Whisk the oats, crispy rice cereal, and add-ins together in a medium bowl. Pour the chocolate mixture on top, and stir to combine. Mixture is wet.
- Transfer mixture to prepared pan. Using the back of a flat spatula, press the mixture tightly and firmly down into the pan. Make sure it’s compact, which helps guarantee the bars will hold their shape. Sprinkle with coconut, if using.
- Refrigerate, uncovered, for at least 2 hours and up to 2 days. If refrigerating for longer than 2 hours, cover lightly.
- Lift the parchment paper out of the pan and cut into squares. Cover and store bars in the refrigerator for up to 2 weeks.
Notes
- Freezing Instructions: Layer the cut bars between sheets of parchment in a freezer-friendly bag or container. Freeze for up to 3 months. Thaw in the refrigerator.
- Special Tools (affiliate links): 9-Inch Square Baking Pan | Parchment Paper | Glass Mixing Bowls | Whisk | Silicone Spatula
- Gluten Free: Bars are gluten free if using certified gluten free oats and crispy rice cereal.
- Peanut Butter: Either creamy or crunchy peanut butter works. I usually use natural-style, but processed such as Jif or Skippy works too. You could also make these with almond butter, or use sunflower seed butter for a nut-free option.
- Can I leave out the crispy rice cereal? Yes, but you will lose some crisp texture. Replace with 2/3 cup (about 56g) of whole rolled oats.
- Add-ins: You can choose whatever add-ins you like, just use about 3/4 cup total (roughly 100–120g). I typically include salted roasted peanuts and raisins, for that crunchy-chewy texture combo, but feel free to use whatever combination of nuts, dried fruit, and/or seeds such as salted or unsalted peanuts, chopped pecans, almonds, or walnuts, pistachios, raisins, dried cranberries, dried blueberries, or dried cherries, currants, chopped dried apricots or pitted dates, unsweetened shredded coconut or coconut flakes, large seeds such as pumpkin seeds (pepitas), or chopped pretzel pieces. Or skip the add-ins and add a Tablespoon of a small seed such as chia seeds or flax seeds.
