Description
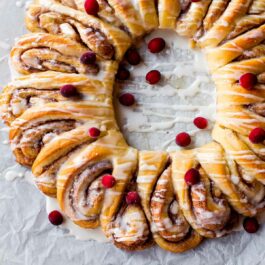
Learn how to make a warm and fluffy, ooey gooey cinnamon roll wreath!
Ingredients
- 1 cup (240ml) whole milk
- 2/3 cup (135g) granulated sugar
- 1 and 1/2 tablespoons Platinum Yeast from Red Star instant yeast (2 standard size packets)
- 1/2 cup (8 Tbsp; 113g) unsalted butter, softened to room temperature and cut into 4 pieces
- 2 large eggs, at room temperature
- 1/2 teaspoon salt
- 4 and 1/2 cups (563g) all-purpose flour (spooned & leveled), plus more for hands/work surface
Filling
- 6 Tablespoons (85g) unsalted butter, softened to room temperature
- 1/2 cup (100g) granulated sugar
- 1 and 1/2 Tablespoons ground cinnamon
Vanilla Icing
- 1 cup (120g) confectioners’ sugar
- 1/2 teaspoon pure vanilla extract
- 2 Tablespoons (30ml) milk
Instructions
- Make the dough: Heat milk to about 95°F (35°C) using a microwave or stovetop. Pour the warm milk into the bowl of a stand electric mixer fitted with the dough hook attachment (OR you can use a handheld mixer OR no mixer, but a stand mixer is ideal). With a whisk, manually whisk in the sugar and yeast. Cover with a towel and let sit until the yeast is foamy, about 5-10 minutes. If the yeast does not dissolve and foam, start over with fresh active yeast. On low speed, beat in the softened butter until it is slightly broken up. Next add the eggs, one at a time, and then the salt. The butter won’t really be mixing into the mixture, so don’t be alarmed if it stays in pieces. On low speed, gradually add the flour. Once it is all added, beat on medium speed until a soft dough forms. Increase speed to medium-high and beat until the dough is soft and supple, about 6 minutes longer. *If you do not have a stand-mixer with a hook attachment, knead the dough by hand in this step.
- Knead the dough: Keep the dough in the mixer and beat for an additional 5 full minutes, or knead by hand on a lightly floured surface for 5 full minutes. (If you’re new to bread-baking, my How to Knead Dough video tutorial can help here.) If the dough becomes too sticky during the kneading process, sprinkle 1 teaspoon of flour at a time on the dough or on the work surface/in the bowl to make a soft, slightly tacky dough. Do not add more flour than you need because you do not want a dry dough. After kneading, the dough should still feel a little soft. Poke it with your finger—if it slowly bounces back, your dough is ready to rise. You can also do a “windowpane test” to see if your dough has been kneaded long enough: tear off a small (roughly golfball-size) piece of dough and gently stretch it out until it’s thin enough for light to pass through it. Hold it up to a window or light. Does light pass through the stretched dough without the dough tearing first? If so, your dough has been kneaded long enough and is ready to rise. If not, keep kneading until it passes the windowpane test.
- Form the dough into a ball and transfer it to a lightly greased bowl. Cover the dough loosely with plastic wrap, a paper towel, or aluminum foil and let sit in a warm place until doubled in size, about 1 to 2 hours. Here’s what I do: turn the oven on to 200°F (93°C). Once heated to that temperature, turn the oven off. Stick the covered dough inside the oven and allow it to rise in this warm environment.
- Line a large baking sheet with parchment paper. Lightly flour the parchment paper. Place the dough on top and, with floured hands, pat down to roughly form a 10×20-inch rectangle. Make sure the dough is smooth and evenly thick.
- For the filling: Spread the softened butter all over the dough. In a small bowl, toss the cinnamon and sugar together until combined and then sprinkle evenly over the dough. Tightly roll up the dough to form a 20-inch long log. Cut into 20 1-inch rolls, only slicing 3/4 of the way through so they are still connected at the bottom. Use kitchen shears if you need to.
- Shape the wreath: Turn one of the end cinnamon rolls on its side. Turn the next one so that it slightly overlaps the first. Repeat with each roll, forming into a circle and overlapping each. Again, kitchen shears help to cut any dough as you’re shaping.
- Place a ramekin in the middle of the wreath. This will help it hold its shape.
- Cover the wreath loosely with plastic wrap and slide a baking sheet underneath the whole thing. Use a large one with no edges so it can slide under easily. Allow to rise again in a warm environment until puffy, about 45 minutes – 1 hour.
- Preheat the oven to 350°F (177°C). Bake for about 25 minutes, until the rolls are golden brown. Remove from the oven and allow to cool for 10 minutes before topping with icing.
- Make the icing: Whisk all of the icing ingredients together in a medium bowl. Drizzle over wreath.
Notes
- Overnight Instructions: Prepare the rolls through step 6. Instead of allowing to rise in a warm environment in step 7, place the baking sheet in the refrigerator and allow the wreath to rest for up to 14 hours before baking. When it’s time to bake the next day, allow the rolls to come to room temperature and rise for 1 hour on the counter, or until almost doubled in size. Then bake as directed.
- Freezing Instructions: You can freeze this cinnamon roll wreath for up to 3 months, and I recommend a few different methods for doing so. The first method is to freeze it after shaping (step 6), before it has its 2nd rise (step 8). Thaw in the refrigerator overnight, then let rise for 1.5–2 hours at room temperature before baking. The second method is to par-bake the risen cinnamon roll wreath for 10 minutes, let cool completely, then cover and freeze. Thaw in the refrigerator overnight, then let sit at room temperature for 30 minutes before baking. Finish baking for 15–20 minutes. You can also freeze the fully baked cinnamon roll wreath. See How to Freeze Cinnamon Rolls for more details.
- Let the wreath cool completely on the parchment paper that you baked it on and transfer to a large Tupperware (along with the parchment). Then cover with a layer of aluminum foil and freeze. Thaw overnight in the refrigerator. Transfer to a baking sheet and heat in a 350°F (177°C) oven until warmed throughout, about 20 minutes. Drizzle with icing and serve.
- Special Tools (affiliate links): Electric Stand Mixer or Large Glass Mixing Bowl with Wooden Spoon / Silicone Spatula | Whisk | Baking Sheet | Parchment Paper | Kitchen Shears | Small Ramekin
- Reference my Baking with Yeast Guide for answers to common yeast FAQs.