Description
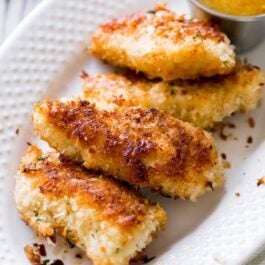
Crispy, flavorful, and simple coconut chicken using convenient pantry ingredients to make one memorable meal everyone will love.
Ingredients
- 1 and 1/2 pounds (680g) skinless, boneless chicken breasts or tenders
- 1 cup (80g) sweetened shredded coconut*
- 3/4 cup Panko*
- 1/2 cup (65g) whole wheat flour (or all-purpose)
- 1 teaspoon salt
- 1/2 teaspoon ground black pepper
- 2 large eggs
- 1/4 cup (56g) coconut oil*
- optional for garnish: chopped cilantro or parsley
Spicy Honey Orange Sauce
- 1/2 cup orange preserves (or marmalade)
- 1/4 cup (85g) honey
- 3 Tablespoons dijon mustard
- 1 teaspoon crushed red pepper flakes
- salt, to taste
Instructions
- If using chicken breasts, pound down and cut into strips. If using boneless, skinless chicken tenders (chicken tenders are the lean strips of meat found attached to the underside of chicken breasts – they can also be purchased separately), cut in half lengthwise.
- Preheat oven to 400°F (204°C). Line a large baking sheet with parchment paper or a silicone baking mat. Set aside.
- Pulse the shredded coconut in a food processor or blender to break it down into smaller pieces. Alternatively, you can chop it up. Mix it with the Panko in a medium bowl. Set aside. In a second medium bowl, whisk the flour, salt, and pepper together. In a third bowl, whisk the eggs together.
- Heat the coconut oil in a large skillet over medium-high heat.
- Coat each chicken strip in flour, shaking off any excess. Then, dip in egg and let any excess drip off. Then generously roll in the coconut mixture, shaking off any excess. Add more Panko to the dish if you are running low.
- Fry 4-6 chicken strips at a time in the coconut oil—only about 2 minutes per side until the crust is golden brown. Once each is done, place strips onto prepared baking pan.
- Bake for 6-10 minutes or until chicken is completely baked through.
- Make the sauce: Whisk all of the sauce ingredients together except for the salt. Taste. Add salt as needed.
- Serve chicken warm with the dipping sauce. Add an optional garnish like a little chopped cilantro or parsley. Store any leftover chicken in the refrigerator for up to 5 days. Reheat in a 350°F (177°C) oven for 10 minutes or until warmed through.
Notes
- Freezing Instructions: After the chicken is coated in the coconut in step 5, place chicken on a parchment paper or silicone baking mat lined baking sheet and place in freezer for 2-3 hours or until frozen solid. Then transfer them to a large freezer-friendly bag. Freeze for up to 3-4 months. When ready to eat, place frozen chicken on a parchment paper or silicone baking mat lined baking sheet and bake at 350°F (177°C) for 30 minutes or until cooked through. You can also freeze the cooked chicken strips for up to 3-4 months. Thaw on the counter or in the refrigerator then reheat to your liking.
- Special Tools (affiliate links): Baking Sheet | Silicone Baking Mat or Parchment Paper | Food Processor | Glass Mixing Bowls | Whisk | Large Skillet
- Coconut: I prefer sweetened coconut for a slightly sweet crust. You can use unsweetened coconut if you’d prefer it, though we didn’t like the unsweetened crust as much compared to sweetened coconut. I also find that the sweetened coconut browns easier and was a little crispier.
- Panko: A Japanese-style breadcrumb traditionally used as a coating for fried or baked foods. It’s available in major grocery stores near the stuffing. Panko is heavily preferred opposed to regular bread crumbs because they tend to stay crispier longer. You may buy seasoned or unseasoned and then add more/less seasonings to your breading if preferred. I use unseasoned.
- Non-Frying Option: Instead of flash frying in coconut oil in steps 4 and 6, you can simply bake the coconut chicken for around 20 minutes (flipping halfway through) and skip those two steps. However, we much preferred the taste of the chicken after being pan fried in coconut oil for that brief amount of time. It adds another layer of coconut flavor as well as ensures a crispy golden brown crust.
- Sauce adapted from All Recipes.
