Description
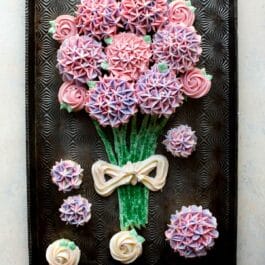
How to arrange a beautiful cupcake bouquet complete with buttercream stems and a charming buttercream bow!
Ingredients
- 1 and 1/2 cups (340g) unsalted butter, softened to room temperature
- 6 cups (720g) confectioners’ sugar
- 1/3 cup (80ml) heavy cream (milk works too but the frosting won’t be as creamy)
- 2 teaspoons pure vanilla extract
- salt, to taste
- food coloring (I prefer gel coloring)*
- 1 batch baked & cooled cupcakes (vanilla cupcakes, lemon cupcakes, chocolate cupcakes, etc)*
- optional for garnish: green sprinkles, white sugar pearls
Instructions
- With a handheld or stand mixer fitted with a paddle attachment, beat the butter on medium speed until creamy, about 2 minutes. Add confectioners’ sugar, heavy cream, and vanilla extract. Mix on low until it begins to come together, then increase to high speed and beat for 3 full minutes. Add another Tablespoon of cream if frosting is too thick. Add a pinch of salt if frosting is too sweet. (I add 1/8 tsp salt.)
- Spoon 3/4 cup of frosting into a separate bowl. Stir in a drop of green food coloring. Add to a piping bag fitted with the 352 leaf piping tip (see note). This will be for the stems and leaves. Set aside.
- Divide remaining frosting up evenly depending how many colors you are using. Tint frosting your desired colors.
- Fit a piping bag with a 1M piping tip or 2D piping tip. Add spoonfuls of frosting to the bag, alternating colors. Your piping bag will be marbled with different colors. Twist the open end shut and squeeze the frosting down to the tip. Squeeze some frosting onto a plate until you begin to see more than 1 color. (Or just pipe this onto a cupcake!)
- Hydrangeas: Place the piping tip on top of the edge of a cupcake. Using steady and medium pressure, begin piping stars all around the edges, then fill in the center. For some flair, add a few white sugar pearls to the hydrangeas!
- Roses: Place the piping tip on top of the center of the cupcake. Using steady and medium pressure, pipe a tight spiral around the cupcake. Lessen some pressure as you come to the end. If the end looks a little messy, add some leaves using the 352 leaf piping tip.
- Assemble the bouquet: Arrange cupcakes in a circular shape on a serving platter or food-safe tray. Use any extra cupcakes as decor around the bouquet or serve separately. Pipe leaves around any edges of cupcakes to fill the gaps. Pipe the stems coming out of the bottom of the bouquet. If desired, top the stems with green sprinkles. Using the 1M piping tip or 2D piping tip and any color frosting, pipe a bow on top of the stems.
- Your bouquet is ready to serve! Store any leftovers in the refrigerator for up to 4-5 days.
Notes
- Make Ahead Instructions: Make frosting 1 day in advance, cover it tightly and store in the refrigerator until ready to use the next day. Beat it on medium speed with the mixer for a minute or two before using.
- Special Tools (affiliate links): Electric Mixer (Handheld or Stand) | Piping Bags (Reusable or Disposable) | Pastel Gel Paste Color Kit | Regular Gel Paste Color Kit | Wilton 1M Open Star Tip | Wilton 410 Round Tip | Wilton 352 Leaf Tip | White Sugar Pearls
- Food Coloring: Gel food coloring colors I used are dusty rose, mint green, and violet.
- Cupcakes: One batch of my homemade vanilla cupcakes (what I used) yields 12 standard, plus 12 mini cupcakes. I loved the variation of cupcake sizes for the cupcake bouquet presentation, but you can keep them all the same size if you prefer.
- How To Make Stems: I created a few different cupcake bouquets and was never pleased with my stems. I settled on using a round tip, then flattened the stems out with a spoon so they looked less messy. Use any round or flat piping tip for the stems, but be sure to use a coupler so you can easily switch between your stem tip and leaf tip. You could even use the leaf tip for the stems and if that’s the case, you don’t need a coupler. 🙂