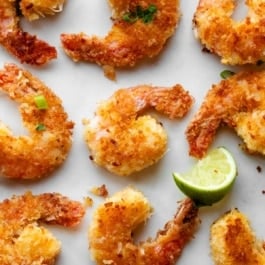
Description
Golden, crispy coconut shrimp made with sweetened coconut, Panko breadcrumbs, and juicy shrimp. Coat raw shrimp in a flour mixture, then dunk into beaten eggs, then cover in your coconut breadcrumbs topping before frying. Ready in about 30 minutes and perfect as an appetizer, snack, or easy dinner with a sweet-and-spicy dipping sauce.
Ingredients
- 1/3 cup (42g) all-purpose flour (spooned & leveled)
- 1/2 teaspoon salt
- 1/2 teaspoon ground black pepper
- 2 large eggs, beaten
- 3/4 cup (50g) Panko breadcrumbs
- 1 cup (85g) sweetened shredded coconut
- 1 pound (454g) raw large shrimp, peeled and deveined with tails attached
- 3–4 Tablespoons coconut oil, vegetable oil, or avocado oil*
Optional Dipping Sauce & Serving Garnish
- 3 Tablespoons Thai chili sauce
- 6 Tablespoons (120g) orange, peach, or apricot jam or preserves
- Optional, for serving: chopped scallions, cilantro, and/or lime wedges
Instructions
- Start with 3 medium bowls. Combine flour, salt, and pepper in one. Beat the eggs in the second bowl. Combine Panko and coconut in the third bowl.
- Coat each shrimp in the flour mixture, then the eggs, and finally the coconut mixture, pressing gently so the coating adheres. You want plenty of coconut on each shrimp. Place the coated shrimp on a plate or baking sheet while you coat the remaining shrimp.
- Add enough oil to cover the bottom of a large skillet over medium heat. Fry the coconut shrimp in batches, such as 7–8 shrimp at a time, and do not crowd them in the pan. Flip after 2 minutes and fry the other side for 2 minutes or until golden brown. If you prefer the shrimp a little darker, fry each side for about 2:30–3 minutes. Place the finished coconut shrimp on a paper towel–lined plate and continue cooking the remaining batches.
- Mix Thai chili sauce and preserves together and serve alongside the shrimp. Garnish with chopped scallions, cilantro, and/or lime wedges, if desired.
- Store leftover shrimp tightly covered in the refrigerator for up to 3 days.
Notes
- Freezing Instructions: Fried coconut shrimp freezes well, up to 2 months. Reheat for 10 minutes in a 350°F (177°C) oven or until thawed and warm.
- Special Tools (affiliate links): Glass Mixing Bowls | Large Skillet | Tongs
- Shrimp: Large raw shrimp that are peeled, deveined, and have the tails attached are best for this recipe. The tails make the shrimp easier to prep, coat, and handle, especially if serving as an appetizer. If using frozen shrimp, thaw completely and pat dry before beginning. Feel free to remove the tails before starting if desired.
- Can I Use Cooked, Frozen Shrimp? I don’t recommend it. For the best texture and flavor, start with raw shrimp. If using frozen raw shrimp, thaw completely and pat dry before coating.
- Oil: I prefer frying the coconut shrimp in coconut oil for the best taste. You need enough to coat the bottom of your skillet, usually about 3 or 4 Tablespoons.
- Air-Fry or Oven Bake: Many readers have swapped the traditional stove-top frying method for baking or air-frying instead. I have not personally tried them in an air-fryer. You’ll lose a lot of crispiness baking them in the oven, but feel free to try it in a 400°F (204°C) oven. Spread out onto a lined baking sheet, bake for 10 minutes, then flip each and bake for another 7–8 minutes.
- Serving Sauce: We especially love serving coconut shrimp with the simple orange chili sauce included in the recipe, but this dipping sauce is another similar option!