Description
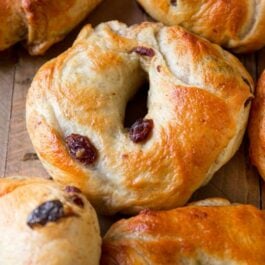
Learn how to make homemade cinnamon raisin bagels with this simple recipe tutorial. Don’t skip the water bath and egg wash- both provide an extra chewy and golden brown crust.
Ingredients
- 1 and 1/2 cups (360ml) warm water
- 2 and 3/4 teaspoons instant or active dry yeast*
- 4 cups (520g) bread flour (spooned & leveled), plus more for work surface and hands*
- 1 Tablespoon (13g) packed light or dark brown sugar (or barley malt syrup)*
- 2 teaspoons salt
- 1 teaspoon pure vanilla extract
- 3/4 cup (110g) raisins
- 3 Tablespoons (38g) granulated sugar
- 1 teaspoon ground cinnamon
- coating the bowl: nonstick spray or 1 Tablespoon olive oil
Water Bath
- 2 quarts water
- 1/4 cup (85g) honey (or barley malt syrup)*
Egg Wash
- 1 egg white beaten with 1 Tablespoon water
Instructions
- Prepare the dough: Whisk the warm water and yeast together in the bowl of your stand mixer fitted with a dough hook attachment. Cover and allow to sit for 5 minutes.
- Add the flour, brown sugar, salt, and vanilla extract. Beat on low speed for 2 minutes, then beat in the raisins until combined. The dough is very stiff and will look somewhat dry.
- Mix the sugar and cinnamon together and sprinkle onto a clean surface. Place the dough on top. Knead the dough for 5 minutes, picking up all that cinnamon sugar. Work as much of the cinnamon sugar mixture as you can into the dough. The dough may become a little wet from the added sugar– that’s ok.
- Lightly grease a large bowl with oil or nonstick spray. Place the dough in the bowl, turning it to coat all sides in the oil. Cover the bowl with aluminum foil, plastic wrap, or a clean kitchen towel. Allow the dough to rise at room temperature for 60-90 minutes or until double in size.
- Line two large baking sheets with parchment paper or silicone baking mats.
- Shape the bagels: When the dough is ready, punch it down to release any air bubbles. Divide the dough into 8 equal pieces. (Just eyeball it– doesn’t need to be perfect!) Shape each piece into a ball. Press your index finger through the center of each ball to make a hole about 1.5 – 2 inches in diameter. Watch video below for a visual. Loosely cover the shaped bagels with kitchen towel and rest for a few minutes as you prepare the water bath.
- Preheat oven to 425°F (218°C).
- Water bath: Fill a large, wide pot with 2 quarts of water. Whisk in the honey. Bring water to a boil, then reduce heat to medium-high. Drop bagels in, 2-4 at a time, making sure they have enough room to float around. Cook the bagels for 1 minute on each side.
- Using a pastry brush, brush the egg wash on top and around the sides of each bagel. Place 4 bagels onto each lined baking sheet.
- Bake for 20-25 minutes, rotating the pan halfway through. You want the bagels to be a dark golden brown. Remove from the oven and allow bagels to cool on the baking sheets for 20 minutes, then transfer to a wire rack to cool completely.
- Slice, toast, top, whatever you want! Cover leftover bagels tightly and store at room temperature for a few days or in the refrigerator for up to 1 week.
Notes
- Overnight Make Ahead Instructions: Prepare the dough through step 4, but allow the dough to rise overnight in the refrigerator instead of at room temperature for 60-90 minutes. The slow rise gives the bagels wonderful flavor! In the morning, remove the dough from the refrigerator and let the dough rise for 45 minutes at room temperature. Continue with step 5. I don’t recommend shaping the bagels the night before as they may puff up too much overnight.
- Freezing Make Ahead Instructions: Baked bagels freeze wonderfully! Freeze them for up to 3 months, thaw overnight in the refrigerator or at room temperature, then warm to your liking. You can also freeze the bagel dough. After punching down the dough in step 6, wrap the dough tightly in plastic wrap, then a layer of aluminum foil. Freeze for up to 3 months. Thaw overnight in the refrigerator, then punch the dough down again to release any air bubbles. Continue with the rest of step 6.
- Special Tools (affiliate links): Stand Mixer | Baking Sheets | Parchment Paper or Silicone Baking Mats | Large Pot (such as a large 5.5 quart dutch oven) | Pastry Brush
- Yeast: Use instant or active dry yeast. If using active dry yeast, the rise time may be up to 2 hours. 1 standard packet is about 2 and 1/4 teaspoons, so you will need a little more than 1 packet of yeast. Reference my Baking with Yeast Guide for answers to common yeast FAQs.
- Bread Flour: Bagels require a high protein flour. Bread flour is a must. Here are all my recipes using bread flour if you want more recipes to use it up. All-purpose flour can be used in a pinch, but the bagels will taste flimsy and won’t be nearly as chewy.
- Barley Malt Syrup: This ingredient can be a little hard to find, but truly gives bagels that traditional malty flavor we all know and love. Most natural food stores carry it. I offer alternatives such as brown sugar in the dough and honey in the water bath; I’ve made bagels with these alternatives AND with barley malt syrup and honestly love both versions.
- Bread Machine: Place the dough ingredients into the pan of the machine. Program the machine to dough or manual, then start. After 9-10 minutes, the dough will be quite stiff. Allow the machine to complete its cycle, then continue with the recipe.
- Halve or Double: You can halve this dough recipe by simply halving all of the dough ingredients (do not halve the water or honey for the boiling step). No changes to the recipe instructions. For best taste and texture and to not overwhelm your mixer with excess heavy dough, I do not recommend doubling this dough recipe. Instead, make separate batches of dough.
- Adapted from a mix of recipes I’ve tried: King Arthur Flour, Cook’s Illustrated, and Complete Book of Breads