Description
Learn how to make a thick, buttery homemade graham cracker crust with only 3 ingredients.
Ingredients
- 1 and 1/2 cups (180g) graham cracker crumbs (about 12 full sheet graham crackers)
- 1/4 cup (50g) granulated sugar
- 6 Tablespoons (85g) unsalted butter, melted
Instructions
- If you’re starting out with full graham crackers, use a food processor or blender to grind them into fine crumbs. You can also place them in a zip-top bag and crush them into fine crumbs with a little arm muscle and a rolling pin.
- Stir the graham cracker crumbs and granulated sugar together in a medium bowl, and then stir in the melted butter. The mixture will be thick, coarse, and sandy. Try to smash/break up any large chunks.
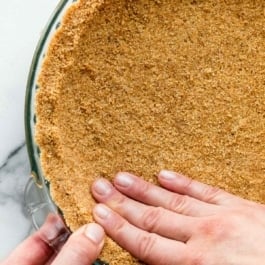
- Pour the mixture into an ungreased 8-inch, 9-inch, or 10-inch pie dish, cake pan, springform pan, or square pan. With medium pressure using your hand, pat the crumbs down into the bottom and up the sides to make a compact crust. Do not pack down with heavy force because that makes the crust too hard. Simply pat down until the mixture is no longer crumby/crumbly. Tip: You can use a small flat-bottomed measuring cup to help press down the bottom crust and smooth out the surface, but do not pack down too hard. If making a pie, run a spoon around the bottom “corner” where the edge and bottom meet to help make a rounded crust—this helps prevent the crust from falling apart when you cut slices.
- For a baked dessert, pre-bake this crust per your filling recipe’s directions. I usually pre-bake for 10 minutes at 350°F (177°C). For a no-bake dessert, cool the crust completely before using, unless your filling’s recipe instructs otherwise.
Notes
- Make Ahead & Freezing Instructions: It’s freezer friendly! Freeze the prepared crust in your pan for up to 3 months. Thaw before using in your recipe. For shorter storage, keep the prepared crust in the refrigerator for up to 3 days before using in your recipe.
- Special Tools (affiliate links): Food Processor | Glass Mixing Bowl
- What Size Pan Does This Crust Fit? Use an 8-inch, 9-inch, or 10-inch pie dish, cake pan, springform pan, or square pan for this recipe. It’s not enough for a 9×13-inch pan. If you’re making a 9×13-inch dessert, I recommend 1.5x the recipe.
- Graham Crackers: Use cinnamon, honey, or chocolate flavor graham crackers depending on your dessert recipe. I usually use honey flavor because it is the standard graham cracker flavor. If I’m baking a chocolate treat, I like to use the chocolate graham crackers. The best graham crackers to use for this crumb crust are the Nabisco Honey Maid brand (not sponsored, just our conclusions!).
- Other Cookies/Crackers: You can substitute the graham cracker crumbs for vanilla wafer or Ritz cracker crumbs. For an easy Oreo crust, see my Oreo Crust recipe.
- Non-US Readers: Don’t have graham crackers where you live? Use 200g ground digestive biscuit crumbs (about 2 cups; 13–14 biscuits), 1/3 cup (67g) granulated sugar, and 6 Tablespoons (85g) melted butter. You may need to add a few extra minutes to the pre-baking time, as digestive biscuits are not quite as crispy-crunchy as graham crackers.