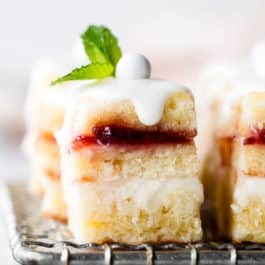
Description
Delicate and sweet, these lemon berry petit fours are bite-size mini cakes perfect for weddings, parties, tea time, bridal and baby showers. Topped with a simple white chocolate garnish, this petit four recipe is easy and approachable. See video in blog post for a visual of the assembly.
Ingredients
- 1 and 1/2 cups (340g) unsalted butter, softened to room temperature
- 8 ounces (226g) full-fat brick cream cheese, softened to room temperature
- 2 cups (400g) granulated sugar
- 1/3 cup (80g) sour cream, at room temperature
- 1 and 1/2 teaspoons pure vanilla extract
- 6 large eggs, at room temperature
- 3 cups (354g) cake flour (spooned & leveled)
- 1 teaspoon baking powder
- 1/8 teaspoon salt
- 3 Tablespoons (45ml) fresh lemon juice (about 1 lemon)
- 1/4 cup raspberry jam
- 1/4 cup (60g) lemon curd
Vanilla Buttercream Filling
- 3/4 cup (12 Tbsp; 170g) unsalted butter, softened to room temperature
- 3 cups (360g) confectioners’ sugar
- 2 Tablespoons (30ml) heavy cream or whole milk
- 1 teaspoon pure vanilla extract
- pinch of salt
White Chocolate Topping
- two 4 ounce bars (226g) white chocolate, coarsely chopped*
- 2 teaspoons canola, vegetable, or coconut oil
- optional garnish: white sixlets, mint leaves, edible flowers, berries, and/or sprinkles
Instructions
- Preheat oven to 325°F (163°C). Grease a 12×17-inch half sheet pan, then line with parchment paper. Pan size is imperative. This batter won’t fit into anything smaller. Likewise, the cake would be too thin if baked in larger pans.
- Make the cake: Using a handheld or stand mixer fitted with a paddle or whisk attachment, beat the butter on high speed until smooth and creamy, about 2 minutes. Scrape down the sides and up the bottom of the bowl with a rubber spatula. Add the cream cheese and beat on high speed until completely smooth and combined, about 1 minute. Add the sugar and beat on high speed until combined, about 1 minute, then add the sour cream and vanilla and beat on high speed until combined and creamy. Scrape down the sides and up the bottom of the bowl with a rubber spatula.
- On low speed, beat the eggs in 1 at a time allowing each to fully mix in before adding the next. Careful not to overmix after the eggs have been added. Once the 6th egg is combined, stop the mixer and add the cake flour, baking powder, and salt. Beat on medium speed *just* until combined, then beat in the lemon juice. Try not overmix. Using a rubber spatula or sturdy whisk, give the batter a final turn to make sure there are no lumps at the bottom of the bowl. The batter will be thick and creamy.
- Pour/spoon batter evenly into prepared pan. Bang the pan on the counter once or twice to bring up any air bubbles. Bake for 26-31 minutes. Use a toothpick to test for doneness. Once it comes out completely clean, the cake is done.
- Remove cake from the oven and allow to cool inside the pan. The cake will shrink down from the sides.
- Cut cake into sections: Watch video tutorial above for a visual on the entire petit fours assembly. Once cool, invert the cake onto a cutting board or the counter with the long side facing you. With a sharp knife (I find serrated knife is best here) or pizza cutter, slice cake in half horizontally. Then cut each long rectangle into 3 smaller rectangles. You’ll now have 6 rectangles. Very carefully and slowly slice each in half as shown in the video above—as if you were making a 1 layer cake a 2 layer cake. You now have 12 thin rectangles.
- Make the vanilla buttercream: With a handheld or stand mixer fitted with a paddle attachment, beat the butter on medium speed until creamy, about 2 minutes. Add confectioners’ sugar, heavy cream, and vanilla extract. Beat on low speed for 30 seconds, then increase to high speed and beat for 3 full minutes. Add up to 1/4 cup more confectioners’ sugar if frosting is too thin or another Tablespoon of cream if frosting is too thick. Add a pinch of salt if frosting is too sweet. (I always add a pinch.)
- Add fillings: With a sharp knife, trim the ends off the rectangles that touched the pan. They’re a little harder and uneven, which would create lopsided petit fours. Spread vanilla buttercream in a thick even layer on 4 rectangles. Spread both lemon curd and raspberry jam on 4 rectangles. (The remaining 4 rectangles are plain because they are the tops.) Go a little lighter on the raspberry jam and lemon curd compared to the vanilla buttercream. If there’s too much, it creates a big mess when cutting the petit fours.
- Layer the petit fours: Place the lemon curd/raspberry jam rectangles on top of the vanilla buttercream rectangles. Layer the plain rectangle on top. Loosely cover each and chill in the refrigerator for at least 2 hours or freeze for 1 hour. They must chill before cutting into tiny petit fours.
- Cut into tiny petit fours: Once cold, slice each into 12 little squares. Arrange on a baking sheet and chill in the refrigerator or freezer as you melt the white chocolate.
- Add the topping/garnish: Melt the white chocolate and oil together in a double boiler or in the microwave in 20 second increments, stopping and stirring after each until smooth and melted. If it seems too thick, add another drop of oil to thin out. Spoon or drizzle over petit fours. Top with optional garnish if desired.
- Cover and store petit fours in the refrigerator for up to 5 days.
Notes
- Make Ahead & Freezing Instructions: To make ahead, complete the recipe through step 9. Cover the rectangles tightly and refrigerate for up to 2 days or freeze for up to 3 months. Thaw, then continue with the recipe. Prepared petit fours freeze well for up to 3 months without white chocolate topping. Top with white chocolate prior to serving. Thaw in the refrigerator or on the counter.
- Special Tools (affiliate links): 12×17-inch Half Sheet Pan | Electric Mixer (Handheld or Stand) | Silicone Spatula | Glass Mixing Bowl or Double Boiler
- White Chocolate: Use real white chocolate or white chocolate made for melting, not white chocolate chips. I use Ghirardelli brand white vanilla flavored melting chips. White chocolate chips DO NOT melt down into the proper consistency; it will be too thick and taste grainy. White baking chocolate is usually sold in 4 ounce bars in the baking aisle. I love Ghirardelli, Bakers, or Nestle brands.