Description
This is wholesome multigrain bread with an irresistibly soft and fluffy interior. For best success, take the time to review the recipe notes before starting. Though not required, an instant read thermometer is helpful in a few of these steps.
Ingredients
- 1/2 cup (60g) dry multigrain cereal mix or old-fashioned whole rolled oats (see note)
- 1 and 3/4 cups (410ml) boiling water
- 2 and 1/4 teaspoons (7g) instant or active dry yeast (1 standard packet)
- 3 Tablespoons (37g) packed light or dark brown sugar
- 3 Tablespoons (43g) unsalted butter, softened to room temperature
- 1 and 1/2 teaspoons salt
- 3 and 1/3 cups (433g) bread flour (spooned and leveled), plus more as needed and for hands/work surface
- optional: 1/2 cup (60g) sunflower seeds, chopped nuts, pepitas, raisins, or dried cranberries
Instructions
- Prepare the dough: Place cereal mix in a large heatproof bowl (you can also use the bowl of your stand mixer). Pour boiling water on top. Let the mixture cool until a digital thermometer reads about 110°F (43°C). This usually takes 20 minutes. Pay attention to the temperature because if it’s too hot, it will kill the yeast. If it became too cool, however, it’s not a problem—the dough may just take a few extra minutes to rise.
- Whisk the yeast, sugar, and all of the warm water/cereal mixture in the bowl of your stand mixer fitted with a dough hook or paddle attachment. Cover and allow to sit for 5-10 minutes or until foamy and bubbly on the surface.
- Add the butter, salt, and 1 cup (about 130g) flour. Beat on low speed for 30 seconds, scrape down the sides of the bowl with a silicone spatula, then add another cup of flour. Beat on medium speed until relatively incorporated (there may still be chunks of butter). Add all of the remaining flour and the seeds/nuts (if using), then beat on medium speed until the dough comes together and pulls away from the sides of the bowl, about 2 minutes. If it seems too sticky, add more flour, 1 Tablespoon at a time until it begins to pull away from the sides of the bowl. *If you do not own a mixer, you can mix this dough with a large wooden spoon or silicone spatula. It will take a bit of arm muscle!*
- Knead the dough: Keep the dough in the mixer and beat for an additional 3-5 full minutes, or knead by hand on a lightly floured surface for 3-5 full minutes. (If you’re new to bread-baking, my How to Knead Dough video tutorial can help here.) If the dough becomes too sticky during the kneading process, sprinkle 1 teaspoon of flour at a time on the dough or on the work surface/in the bowl to make a soft, slightly tacky dough. Do not add more flour than you need because you do not want a dry dough. After kneading, the dough should still feel a little soft. Poke it with your finger—if it slowly bounces back, your dough is ready to rise. You can also do a “windowpane test” to see if your dough has been kneaded long enough: tear off a small (roughly golfball-size) piece of dough and gently stretch it out until it’s thin enough for light to pass through it. Hold it up to a window or light. Does light pass through the stretched dough without the dough tearing first? If so, your dough has been kneaded long enough and is ready to rise. If not, keep kneading until it passes the windowpane test.
- 1st Rise: Lightly grease a large bowl with olive oil or nonstick spray. Place the dough in the bowl, turning it to coat all sides in the oil. Cover the bowl with aluminum foil, plastic wrap, or a clean kitchen towel. Allow the dough to rise in a relatively warm environment for 1-2 hours or until double in size. (I always let it rise on the counter. Takes about 2 hours. For a tiny reduction in rise time, see my answer to Where Should Dough Rise? in my Baking with Yeast Guide.)
- Grease a 9×5-inch loaf pan.
- Shape the bread: When the dough is ready, punch it down to release the air. Lightly flour a work surface, your hands, and a rolling pin. Roll the dough out into a large rectangle, about 8×15 inches. It does not have to be perfect– in fact, it will probably be rounded on the edges. That’s ok! Roll it up into an 8 inch log and place in the prepared loaf pan.
- 2nd Rise: Cover shaped loaf with aluminum foil, plastic wrap, or a clean kitchen towel. Allow to rise until it’s about 1-2 inches above the top of the loaf pan, about 1 hour. (See photo above for a visual.)
- Adjust oven rack to a lower position and preheat oven to 350°F (177°C). (It’s best to bake the bread towards the bottom of the oven so the top doesn’t burn.)
- Bake the bread: Bake for 35-40 minutes– if you notice the top browning too quickly during bake time, loosely tent the pan with aluminum foil. How to test for doneness– give the loaf a light tap. If it sounds hollow, it’s done. For a more accurate test, the bread is done when an instant read thermometer reads the center of the loaf as 195°F-200°F (90°C-93°C).
- Remove from the oven and allow bread to cool for a few minutes before slicing and serving. Feel free to let it cool completely before slicing, too.
- Cover leftover bread tightly and store at room temperature for 2-3 days or in the refrigerator for up to 10 days.
Notes
- Freezing Instructions: This dough isn’t ideal for freezing. The dough has a hard time rising after thawing. Instead, try the overnight instructions (next) or freeze the baked loaf. To freeze the baked loaf, allow the bread to cool completely, then freeze for up to 3 months. Thaw in the refrigerator or at room temperature, then reheat as desired.
- Overnight Instructions: Prepare the recipe through step 7. Lightly cover the shaped bread and refrigerate for up to about 15 hours. At least 2 hours before you need the bread the next day, remove from the refrigerator, keep covered, and allow to rise on the counter for about 1 hour before baking. Alternatively, you can let the dough have its 1st rise in the refrigerator overnight. Cover the dough tightly and place in the refrigerator for up to 12 hours. Remove from the refrigerator and allow the dough to fully rise for 2 more hours. Continue with step 6.
- Special Tools (affiliate links): Electric Stand Mixer | 9×5-inch Loaf Pan | Rolling Pin | 7 Grain Hot Cereal
- Grain Cereal: Use dry multigrain cereal that you would use to make hot cereal, such as 5 grain, 7 grain, or 10 grain cereal. You can also use quick or whole oats, but I do not recommend steel cut oats. There are many variations of hot cereal available in grocery stores– a multigrain version may include rye, barley, oats, whole wheat, and/or more. Honestly any grain cereal you mix with hot water works assuming there’s no flavors or sugars added (for example, don’t use brown sugar cinnamon oatmeal mix). If you can’t find any multigrain hot cereals at the store, you can purchase online– or just use plain oats. I really like this 7 grain + flax seed hot cereal. Multigrain baby cereal works too.
- Yeast: You can use active-dry or instant yeast. The instructions are the same no matter which you use.
- Flours: If you have both bread flour and all-purpose flour on hand, I recommend using bread flour. All-purpose flour definitely works, but you get a sturdier and more bread-like texture from bread flour. I love using whole wheat flour when I can, but this dough is not fit for all whole wheat flour. In my recipe testing, I found that replacing up to 1 cup (around 130g) of the bread/all-purpose flour with whole wheat flour worked just fine. The bread was a bit denser, but had great flavor. I usually make it with 3 cups of bread flour and 1/3 cup whole wheat flour.
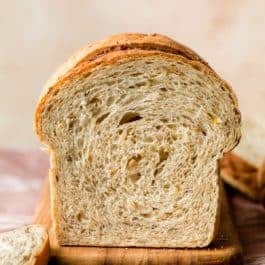
- Seeds/Add-Ins: The pictured loaf was prepared with 1/2 cup (60g) of sunflower seeds. I love extra flavor and texture, so I’ve been increasing that amount to 2/3 cup (80g). Use any of the suggested add-ins like sunflower seeds, pecans, walnuts, pepitas, raisins, dried cranberries, or a blend of these. If you want to use smaller seeds, such as poppy, chia, flax, or sesame, I recommend reducing the amount to 2 or 3 Tablespoons. You could, however, blend these smaller seeds with larger seeds/nuts/dried fruit for a total of 1/2 or 2/3 cup (60 or 80g).
- Multigrain rolls: Make the dough as written above through the first rise (steps 1-5), then follow steps 5-10 in my dinner rolls recipe. Bake time is 25-26 minutes.
- If You Want to Top with Oats or Seeds: If you want to top the dough with oats or seeds prior to baking, carefully brush the dough after the 2nd rise (step 8) with 1 egg white beaten with 1 Tbsp water, then sprinkle 2 Tbsp of oats or seeds on top. Neither will stick without the egg white brushed on first. I did this with the pictured rolls.
- Doubling this recipe: For best results, I recommend making two separate batches of dough. However, if you want to double the recipe all in 1 mixing bowl, double all of the ingredients except for the yeast. Use 2 and 1/4 teaspoons yeast. This amount of dough may overwhelm your stand mixer, so I recommend mixing the dough with a large wooden spoon or silicone spatula instead. It will take a bit of arm muscle.