Description
This jar dessert recipe combines a 2 ingredient graham cracker crust with an easy no-bake cheesecake filling. For best results, read through the recipe and watch the video tutorial above before beginning. See blog post for cheesecake filling flavors and see recipe notes or blog post for topping and garnish suggestions.
Ingredients
- 2 Tablespoons (28g) unsalted butter, melted
- 1 cup (100g) graham cracker crumbs (about 8 graham crackers)
- 1 cup (240ml) heavy cream or heavy whipping cream, cold
- 8 ounces (226g) full-fat brick cream cheese, softened to room temperature
- 1/3 cup (65g) granulated sugar
- 2 Tablespoons (30g) sour cream, at room temperature
- 1 teaspoon lemon juice
- 1/2 teaspoon pure vanilla extract
- toppings & garnishes (see note)
Instructions
- Have your jars ready to go and lined up. This recipe yields about 6 8-ounce jars or 10 6-ounce jars.
- Crust: Melt the butter in the microwave in a medium heat-proof bowl or use the stove. Stir in the graham cracker crumbs. The mixture will resemble wet sand. Spoon a generous spoonful into each jar, about 2 Tablespoons into the 8-ounce jars and 1 and 1/2 Tablespoons into the 6-ounce jars. If there’s any crust leftover, sprinkle into the jars to use up or discard. Set jars aside.
- Filling: Using a hand mixer or a stand mixer fitted with a whisk attachment, whip the cold heavy cream into stiff peaks on medium-high speed, about 3-4 minutes. Set aside.
- Using a hand mixer or a stand mixer fitted with a whisk or paddle attachment, beat the cream cheese, sugar, sour cream, lemon juice, and vanilla extract together on medium-high speed until smooth and creamy. Make sure there are no large lumps of cream cheese. If there are lumps, keep beating until smooth.
- Using your mixer on low speed or a silicone spatula, fold the whipped cream into the cheesecake filling until combined. This takes several turns of your silicone spatula. Combine slowly as you don’t want to deflate all the air in the whipped cream.
- Layer a couple large spoonfuls of filling on top of the crust in the jars. Use about 1/4 – 1/3 cup filling in the 8 ounce jars and 3 Tablespoons (or however much you can pack in!) into the 6 ounce jars. Make sure to leave room for the topping.
- The cheesecake jars are at room temperature at this point, but if you’d like to serve chilled, chill for at least 30 minutes and up to 3 days before adding the topping. (Cover if chilling for longer than 30 minutes.) I recommend adding the topping when serving or up to 2 hours in advance. The topping can seep down into the layers, so that’s why I recommend adding it soon before serving.
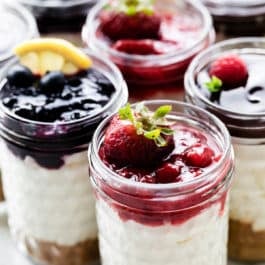
- Spoon topping and garnishes on top of filling, then serve.
- Cover and store leftover cheesecake jars in the refrigerator for up to 5 days.
Notes
- Make Ahead Instructions: These cheesecake jars can be made 1-3 days in advance. They can be refrigerated in step 7 for up to 3 days before serving. You can also make & layer the crust 1-2 days ahead of time. Another way to make these cheesecake jars ahead of time is to freeze them before adding the toppings. Seal jars with the lids and freeze up to 3 months. Thaw in the refrigerator before topping and serving. You can also freeze the cheesecake filling as a whole. Cover tightly and freeze up to 3 months. Thaw in the refrigerator before layering on top of crust.
- Special Tools (affiliate links): 8-ounce Glass Jars (pictured), 8-ounce Glass Jars (vintage fruit design), 6-ounce Glass Jars (hexagon shape), or 6-ounce Glass Jars (smooth surface) | Glass Mixing Bowls | Electric Mixer (Handheld or Stand) | Silicone Spatula
- Toppings: Chocolate Ganache, Strawberry Topping, Blueberry Sauce, Whipped Cream, Cherry Pie Filling, Lemon Curd, Salted Caramel, Hot Fudge Sauce
- Garnishes: Fresh berries, chopped fruit, nuts, chocolate chips, lemon slices, lime slices, shredded coconut, sprinkles, mint, or whatever you desire.
- More Cheesecake Jars: This recipe can easily be doubled, tripled, or quadrupled. Keep in mind the whipping and beating times will increase with the added volume.