Description
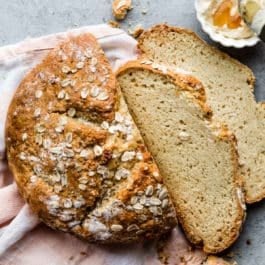
This dense, chewy, and satisfying no yeast bread rises with baking soda and buttermilk. Before beginning, review the blog post above, recipe notes below, as well as the video tutorial.
Ingredients
- 4 and 1/4 cups (531g) all-purpose flour (spooned & leveled), plus more for hands and surface
- 1 and 1/2 teaspoons salt
- 1 and 1/2 teaspoons baking soda
- 4 Tablespoons (1/4 cup; 60g) unsalted butter, melted
- 2 Tablespoons honey (43g) or granulated sugar (25g)
- 1 and 3/4 cups (420ml) buttermilk, plus 1 Tablespoon for brushing the dough
- optional: 1 Tablespoon whole oats and/or a sprinkle of coarse sea salt or flaky sea salt for topping
Instructions
- Preheat oven to 400°F (204°C). There are options for the baking pan. Line a baking sheet with parchment paper or a silicone baking mat, use a seasoned 10-12 inch cast iron skillet, or grease a 9-10 inch cake pan or pie dish. Set aside. Feel free to pre-heat the skillet in the oven too, though that’s not necessary.
- Whisk the flour, salt, and baking soda together in a large bowl. Set aside.
- Whisk the melted butter and honey/sugar together. Pour into the flour mixture and toss to combine. (The mixture won’t fully combine yet since there’s so little wet ingredients and so much flour.) In 2-3 additions, pour in the buttermilk mixing for 15-20 seconds after each addition. After all of the buttermilk has been added, mix gently to form a shaggy, stiff, and slightly moist dough. If you used honey, there could be little specks of honey/butter in spots. That’s ok! Those will be extra flavorful specks in your bread.
- Pour the shaggy dough and any flour crumbles that haven’t been incorporated onto a lightly floured work surface. With floured hands, work the dough into a ball and flatten into a (approximately) 7-8 inch disc as best you can (make it about 2 inches tall). If the dough is too sticky, add a little more flour.
- Transfer the disc to the prepared skillet/pan. Brush the whole loaf with 1 Tablespoon buttermilk. Using a very sharp knife, score a 3/4 inch deep X into the top. (Without scoring, the bread can’t bake properly in the center.) Sprinkle optional oats and/or coarse sea salt or flaky sea salt on top of the loaf.
- Bake until the bread is golden brown and center appears cooked through, about 45 minutes. Loosely cover the bread with aluminum foil halfway through bake time to protect the crust from over-browning before the center has a chance to cook.
- Remove from the oven and allow bread to cool for 5 minutes before slicing. For best taste, though, let the bread cool for at least 30 minutes before slicing and serving. If you made a plain loaf, the slices are delicious spread with honey butter or your desired spreads. Slices taste wonderful toasted, too!
- Cover and store bread at room temperature for 3 days or in the refrigerator for up to 1 week.
Notes
- Freezing Instructions: Baked and cooled bread freezes well up to 3 months. Freeze the whole loaf or individual slices. Thaw in the refrigerator or at room temperature, then reheat as desired.
- Special Tools (affiliate links): Baking Sheet, Cast Iron Skillet, Round Cake Pan, or Pie Dish | Silicone Baking Mat or Parchment Paper (if using baking sheet) | Glass Mixing Bowl | Whisk | Wooden Spoon or Silicone Spatula | Pastry Brush | Coarse Sea Salt or Flaky Sea Salt
- Buttermilk: Using cold buttermilk is best. Buttermilk is key to the bread’s flavor, texture, and rise. The bread will not rise without it. If you don’t have any buttermilk on hand, you can make a homemade DIY buttermilk substitute. Whole milk or 2% milk is best, though lower fat or nondairy milks work in a pinch. Add 1 Tablespoon of lemon juice or white vinegar to a liquid measuring cup. Add enough milk to make 1 and 3/4 cup. Whisk together, then let sit for 5 minutes before using in the recipe.
- Alternative Flours: Instead of all-purpose flour, you can use the same amount of bread flour with no other changes needed to the recipe. If you’d like to use all whole wheat flour instead of all-purpose flour, expect an extremely dense and heavy loaf. Instead, I recommend using half all-purpose flour and half whole wheat flour. Still, the bread will taste pretty heavy. If you’re interested, here are all my recipes using whole wheat flour. I have not tested this bread with any gluten free alternatives, so I’m unsure of the result. Let me know if you do! If you’re interested, here are all my gluten free recipes.
- Optional Flavor Additions: Feel free to add flavor to this bread by mixing any of the following or a combination of them in with the flour in step 2: 2 Tablespoons chopped fresh rosemary or other chopped fresh herb, 1 cup freshly grated parmesan cheese or other shredded cheese, 1/2 teaspoon freshly ground black pepper, 1 diced jalapeño, 2 teaspoons Italian seasoning or other ground seasoning/herb, 2 cloves minced garlic, or 1 cup dried cranberries, raisins, or other small dried fruit. Sometimes I add 1 extra Tablespoon of sugar/honey, 1 cup raisins, and 2 teaspoons ground cinnamon.
- Best Baking Pan to Use: I like using a regular sheet pan because it’s easy, convenient, and universal to most kitchens. I do not recommend a loaf pan because the loaf may not bake evenly inside. This dough is best as a flatter loaf. See blog post above for different pans.