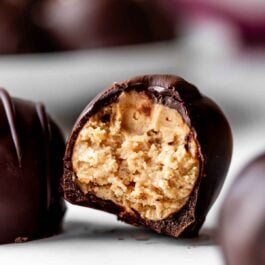
Description
Using only a few simple ingredients, these peanut butter balls come together in a snap. Follow the recipe closely and review the chocolate dipping success tips, as well as the recipe notes below before beginning.
Ingredients
- 6 Tablespoons (85g) unsalted butter, softened to room temperature
- 1 cup (250g) creamy peanut butter (not natural style)
- 2 and 1/2 cups (300g) confectioners’ sugar
- 1/2 teaspoon pure vanilla extract
- 1/8 teaspoon salt
- 12 ounces (three 4-ounce bars) semi-sweet chocolate bars (339g), coarsely chopped*
- 1 teaspoon vegetable oil (see Note)
- optional: sprinkles for topping
Instructions
- Line a large baking sheet with parchment paper or a silicone baking mat. Set aside.
- With a handheld or stand mixer fitted with a paddle attachment, beat the butter on medium-high speed until creamy and smooth, about 2 minutes. Add the peanut butter and beat until combined, about 1 minute. If you notice any small chunks of butter, don’t worry—the mixture will smooth out. Add the confectioners’ sugar, vanilla extract, and salt, and beat on low speed for 2 minutes until everything is combined. The mixture will be a little soft and crumbly.
- Roll peanut butter dough into 1-inch balls (about 1 scant Tablespoon or 18g of dough each) and place on the baking sheet. Keep working and rolling the dough in your hands until the peanut butter balls come together. You should have about 32–35 balls total. The mixture can be a little crumbly, but the warmth of your hands will bring it together. If you find the peanut butter mixture becoming too soft to handle, chill in the refrigerator for 15 minutes. Alternatively, you can powder your hands with confectioners’ sugar, which helps prevent the filling from sticking to your hands.
- Chill the shaped peanut butter balls in the refrigerator for at least 1 hour and up to 1 day. During the last few minutes of the chilling time, begin melting the chocolate and oil together. You can melt it in a double boiler or the microwave. If using the microwave: place the chocolate and oil in a medium heat-proof bowl. I recommend using a liquid measuring cup because its depth makes dipping really easy. Melt in 20-second increments in the microwave, stirring after each increment, until completely melted and smooth. Let the warm chocolate sit for 6–8 minutes to cool slightly before dipping, otherwise it will melt the shaped peanut butter balls.
- Coat with chocolate: Remove peanut butter balls from the refrigerator. Working with 1 at a time, submerge into the chocolate, then carefully lift out using a fork or the spiral candy dipping tool. Tap the fork/tool gently on the side of the bowl/measuring cup to rid excess chocolate. If you used a fork, use a toothpick or a 2nd fork to help you slide the ball off of the fork and onto the baking sheet. If you used the dipping tool, just invert the ball onto the baking sheet. (See video tutorial for how I do this.) I reheat any leftover chocolate and use a spoon or squeeze bottle to drizzle on top of the coated balls. If desired, lightly sprinkle each with sprinkles while chocolate is still wet.
- Refrigerate coated peanut butter balls for 30 minutes or until chocolate has completely set before serving.
- Store in an airtight container at room temperature for 2 days or in the refrigerator for up to 2 weeks. The filling can get a little soft, so they taste best right out of the refrigerator. We love them right out of the freezer, too!
Notes
- Make Ahead & Freezing Instructions: You can start this recipe 1 day ahead of time. The shaped filling can be chilled in the refrigerator for up to 1 day prior to coating. The coated peanut butter candies can be frozen. Freeze the coated candies for up to 3 months. Thaw overnight in the refrigerator.
- Special Tools (affiliate links): Electric Mixer (Handheld or Stand) | Baking Sheet | Silicone Baking Mat or Parchment Paper | Medium Cookie Scoop or Digital Scale | Double Boiler or Liquid Measuring Cup | Candy Dipping Tool | Squeeze Bottle
- Butter: I use unsalted butter in this recipe, though I’ve made them plenty of times before with salted butter. No need to adjust the salt in the filling, though feel free to taste the filling before adding the salt and only add a pinch if desired. Because the filling and coating are so sweet, I never adjust the salt if using salted butter.
- Can I Use Crunchy Peanut Butter? Creamy/smooth is best because crunchy yields a very crumbly filling that’s difficult to mold. If crunchy is all you have, you can make it work in a pinch—just be warned the filling mixture will be super crumbly and you’ll really have to work it with your hands to mold into balls.
- Chocolate: For the best looking and tasting candies, use 4-ounce “baking chocolate” bars found in the baking aisle. I prefer Baker’s or Ghirardelli brands. You need three 4-ounce bars for this recipe, 12 ounces total. You can use milk, semi-sweet, or bittersweet chocolates. You could also use chocolate melting wafers, such as Ghirardelli brand. Candy melts or almond bark work too, but they don’t taste like real chocolate. Do not use chocolate chips because they contain stabilizers preventing them from melting into the correct consistency for coating.
- Coating/Melting Chocolate: See all my troubleshooting tips above in the post.
- Oil: Vegetable oil helps thin out the chocolate so it easily coats the candies. If you’re using chocolate melting wafers, you do not need to add oil. Coconut oil works, but the chocolate isn’t quite as thin. I’ve found vegetable oil is the best choice. Do not use butter.
- Do Not Temper: I do not recommend tempering the chocolate for this recipe. Tempered chocolate should not be refrigerated and due to the fresh ingredients in the filling, these candies must be refrigerated.
- Update in 2023: I slightly updated the filling in 2023. The recipe used to call for 8 Tablespoons butter (113g) and 3 cups confectioners’ sugar (360g). I reduced both slightly to the amounts you see above, for less sweetness, and more peanut butter flavor. The filling now matches my popular peanut butter eggs.