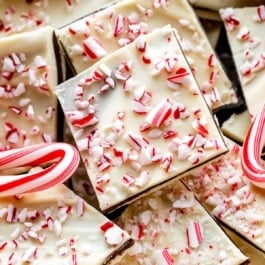
Description
Incredibly simple white chocolate and semi-sweet chocolate layered bark flavored with peppermint and topped with crushed candy canes. Review recipe Notes before starting.
Ingredients
- 12 ounces (339g) white chocolate, coarsely chopped and divided*
- 6 ounces (170g) semi-sweet or bittersweet chocolate, coarsely chopped*
- 1 and 1/2 teaspoons vegetable oil or coconut oil, divided
- 1/2 teaspoon peppermint extract, divided
- 2–3 regular-size candy canes (24–36g total), crushed
Instructions
- Line the bottom and sides of a 8-inch or 9-inch square baking pan with parchment paper or aluminum foil, smoothing out any wrinkles. Or use a lined baking sheet. Set aside.
- Bottom layer: There are a few ways you can melt the chocolate. You can use a double boiler over just barely simmering water or you can use the microwave. The microwave is a little more convenient for most, so my directions are for a microwave. (If using a double boiler, follow this recipe, but melt the chocolate layers in your double boiler over simmering water.) Place 6 ounces of white chocolate in a small heatproof bowl or a liquid measuring cup. Add 1/2 teaspoon of oil. Melt in 20-second increments, stirring vigorously with a silicone spatula or spoon after each increment, until completely melted and smooth. White chocolate and chocolate overheat easily, so it’s important to do this in increments. Once melted, stir in 1/4 teaspoon peppermint extract. Pour melted white chocolate into the prepared baking pan, and, with an offset spatula or spoon, spread into a thin smooth layer. (If using a baking sheet, make it as thin as you’d like… I usually spread it out to about 8×12 inches.) Place the baking pan in the refrigerator for 10–15 minutes or until almost completely set. If it sets completely, the bark layers could separate.
- Middle layer: Place semi-sweet chocolate in a small heatproof bowl or a liquid measuring cup. Add 1/2 teaspoon of oil. Repeat melting, just as you did with the white chocolate in step 2. Once melted, stir in remaining 1/4 teaspoon peppermint extract. Pour all of the semi-sweet chocolate over the white chocolate layer and spread it into a smooth layer. Place the baking pan back in the refrigerator for 10–15 minutes or until almost completely set.
- Top layer: Place the remaining white chocolate in a small heatproof bowl or a liquid measuring cup. Add last 1/2 teaspoon of oil. Repeat melting, just as you did with the other layers. Pour over the bark layers and spread into a smooth layer. (This layer will not have peppermint extract.) Sprinkle evenly with crushed candy canes. To crush, place the unwrapped candy canes in a sealed zipped-top bag and roll or bang with a rolling pin or meat mallet until crushed.
- Refrigerate the bark until completely set, about 1 hour. Once hardened, remove from the pan and peel off the foil or parchment. Break or cut into pieces as large or as small as you want. If your bark chilled in the refrigerator for longer than 3–4 hours, let it sit at room temperature for 10–15 minutes to slightly soften before breaking/slicing. (Or else the layers might separate.)
- Cover and store leftover bark in the refrigerator for up to 3 weeks. The bark can be left at room temperature for a few days in colder months, but it gets a little soft.
Notes
- Special Tools (affiliate links): 8-inch Square Baking Pan, 9-inch Square Baking Pan, or Baking Sheet | Parchment Paper or Aluminum Foil | Double Boiler | Heat-Proof Bowl or Liquid Measuring Cup | Silicone Spatula | Offset Spatula | Rolling Pin (to crush candy canes)
- Chocolate: Since there are so few ingredients, it’s important to use quality chocolate. Chocolate chips and white chocolate morsels are fabulous in cookies, but are not ideal for melting into bark. And while candy melts are great for coating cake pops, in a recipe like this, you’ll really taste the difference between actual chocolate and candy melts. I recommend Ghirardelli, Guittard, or Baker’s brand bars of chocolate. You can find them in the baking aisle of most grocery stores and they’re usually sold in 4-ounce bars. (Guittard brand is usually sold in 6-ounce bars.)
- What is the purpose of the oil? Oil helps thin out the melted chocolate so it’s easy to pour and spread. It also helps keep the set chocolate on the softer side, rather than crumbly and hard.
- Can I temper the chocolate for this bark? I prefer melting the chocolate without tempering for this easy bark recipe. You can temper the chocolate instead if you’d like, which results in a harder chocolate bark with a little “snap” to it. Here is a helpful tempering chocolate tutorial. Do not refrigerate the layers or the finished bark; let the layers set at room temperature.
- Can I make this only 2 layers? Yes. Use about 8 ounces of each chocolate. Let the bottom layer almost set, then top with the other melted chocolate. Continue with step 5.
- Can I double or triple this recipe? Yes. Double or triple all of the ingredients. Use a large lined baking sheet. All of the instructions are the same, including the setting times.