Description
Get inspired with these 4 fun, festive, and beautiful pie crust designs! Homemade pie has never looked so stunning on the dessert table.
Ingredients
- pie dough (I use this homemade pie crust, which makes 2 discs of dough)
- all-purpose flour, as needed for rolling dough
- egg wash: 1 large egg beaten with 1 Tablespoon (15ml) of milk or water
- optional: coarse sugar
Instructions
- Note Before You Begin: These designs, with the exception of the baked cookie cutter shapes design (step 3 below), all go on top of an unbaked pie. So start with your pie already filled and ready for a pie dough topping. After topping with your designed top crust, bake according to the pie recipe you’re using, such as this apple pie, apple cranberry pie, caramel pear pie, or other pie recipe.
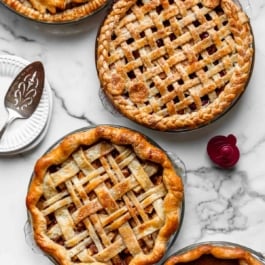
- Wavy Lattice With Braided Edge: Watch the video tutorial below before you start. You need 1.5 discs of pie dough for this top crust design, in addition to the bottom crust (another disc). Start with 1 disc of pie dough (keep the remaining dough, and the filled pie, in the refrigerator until you’re ready for them). On a lightly floured surface with a lightly floured rolling pin, roll the disc of dough into a circle that is about 12 inches (30cm) in diameter. Using a scalloped pastry wheel or fondant ribbon cutter, cut 18 wavy strips. Remove the second disc of dough from the refrigerator and cut it in half. (Save the other half for another use.) Roll it out into a tall oblong shape, close to 14 inches long. With a sharp knife, pizza cutter, or the flat edge of a pastry wheel, cut 6 1/4-inch-wide, 14-inch-long strips of dough. Using gentle force because the dough is delicate, tightly braid 3 strips together (see my how to braid pie crust tutorial for more details). Repeat with remaining 3 strips, so you have 2 braids. Cut 2–3 cookie cutter shapes out of any extra rolled-out dough. Remove the filled pie from the refrigerator and carefully thread the 18 wavy pie dough strips over and under one another, pulling back strips as necessary to weave. Press the edges of the strips into the bottom pie crust edges to seal. Use kitchen shears to trim off any excess dough. Carefully place one braid around half of the pie and press lightly to secure. Repeat with 2nd braid, then attach the 2 braids by pressing one into the other. Lightly press the cookie cutter shapes on top of where the braids connect. Brush it all with egg wash and sprinkle with coarse sugar. Follow your pie recipe’s baking instructions.
- Baked Cookie Cutter Shapes: Watch the video tutorial below before you start. Start with a fully baked pie. You need 1/2 disc of pie dough for these cut-outs. On a lightly floured surface with a lightly floured rolling pin, roll out the dough to about 1/8-inch thickness. Using cookie cutters, cut out shapes. Place the shapes onto a parchment paper- or silicone baking mat-lined baking sheet. Brush with egg wash. Bake at 350°F (177°C) for 10 minutes or until lightly browned. Allow to cool before placing on top of cooled pie.
- Thick & Thin Lattice: Watch the video tutorial below before you start. You need 1 disc of pie dough for this top crust design. On a lightly floured surface with a lightly floured rolling pin, roll the disc of dough into a circle that is about 12 inches (30cm) in diameter. With a pizza cutter or pastry wheel, cut 10 strips of dough, about 1 inch wide. Cut every other dough strip in half, lengthwise, so you have 6 thick strips and 8 thin strips. Weave the lattice, alternating 1 wide strip and 2 skinny strips, as shown in the video. You should have 3 thick strips and 4 thin strips in each direction. Trim excess dough around the edges, if needed, then tuck in and flute the pie crust edges with your fingers. Brush with egg wash and sprinkle with coarse sugar. Follow your pie recipe’s baking instructions.
- Autumn Leaves Crust: This look is not shown in the video (but it’s very easy!). You need 1 disc of pie dough for this top crust design. On a lightly floured surface with a lightly floured rolling pin, roll the disc of dough into a circle that is about 12 inches (30cm) in diameter, about 1/8-inch thickness. Use a leaf cookie cutter or pie impression cutter to cut out leaves. Arrange the pie dough leaves on top of the filled pie, slightly overlapping. Crimp the pie crust edges with a fork. Brush with egg wash and sprinkle with coarse sugar. Follow your pie recipe’s baking instructions.
Notes
- Special Tools (affiliate links): Rolling Pin | 9-inch Pie Dish | Fondant Cutter | Pastry Wheel | Pizza Cutter | Leaf Pie Crust Cutters | Leaf Cookie Cutters | Fall Pie Punches | Harvest Impression Cutters | Kitchen Shears | Pastry Brush | Coarse Sugar
- Can I Use Store-bought Pie Dough? Yes, you can use store-bought or any homemade pie dough recipe that you prefer. The one linked above holds shape nicely in the oven.