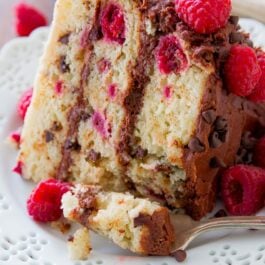
Description
A creamy, rich chocolate frosting is the perfect match for my super-moist chocolate chip cake. Throw in some raspberries and this cake will surely be a show-stopper!
Ingredients
Cake
- 3 and 1/4 cups (406g) all-purpose flour (spooned & leveled)
- 1 teaspoon baking powder
- 1/2 teaspoon baking soda
- 3/4 teaspoon salt
- 1 cup (16 Tbsp; 226g) unsalted butter, melted
- 1 and 3/4 cups (350g) granulated sugar
- 2 large eggs, room temperature
- 2 cups (480ml) buttermilk, at room temperature
- 2 teaspoons pure vanilla extract
- 1 and 1/4 cups (155g) raspberries, fresh or frozen (not thawed)
- 3/4 cup (135g) mini or regular semi-sweet chocolate chips
Milk Chocolate Frosting
- 1 cup (16 Tbsp; 226g) unsalted butter, softened to room temperature
- 3-4 cups (360-480g) confectioners’ sugar
- 3/4 cup (62g) unsweetened cocoa powder
- 3 – 5 Tablespoons (45-75ml) heavy cream or half-and-half
- 1 teaspoon pure vanilla extract
- salt, to taste
- optional: chocolate chips and raspberries for decoration
Instructions
- Preheat oven to 350°F (177°C). Grease three 9-inch round baking pans, line with parchment paper rounds, then grease the parchment paper. Parchment paper helps the cakes seamlessly release from the pans. (If it’s helpful, see this parchment paper rounds for cakes video & post.)
- Make the cake: Whisk the flour, baking powder, baking soda, and salt together in a large bowl. Set aside. In a large bowl, melt the butter in the microwave. Vigorously whisk in the granulated sugar, then the eggs, milk, and vanilla extract. Slowly whisk the wet ingredients into the dry ingredients until hardly any lumps remain. The batter will be very thick – try not to overmix. Fold in the raspberries and chocolate chips – be gentle; you don’t want to break the raspberries and have them bleed into the batter.
- Divide batter evenly between prepared cake pans. Bake for 22-24 minutes, making sure to loosely cover the cakes with aluminum foil halfway through to prevent the tops from getting too brown. Cakes are done when a toothpick inserted in the center comes out clean. Allow to cool completely in the pans on a wire rack.
- Make the frosting: Cream the butter with a hand or stand mixer on medium speed for 3-4 minutes. This will create a nice creamy base for the frosting. Add 3 cups of confectioners’ sugar and 3/4 cup of cocoa powder. Mix on low. Add 3 Tablespoons of heavy cream and 1 teaspoon of vanilla extract. If your frosting is too thin, add up to 1 more cup of confectioners’ sugar. If your frosting is too thick, add up to 2 more Tablespoons of heavy cream. Taste and add salt if you prefer – I usually add about 1/4 teaspoon. Add more cocoa powder if the frosting is not chocolate-y enough. (This frosting recipe is forgiving. Add more/less of each ingredient to obtain the consistency and taste you desire.)
- Assemble and frost: First, using a large serrated knife, trim the tops off the cake layers to create a flat surface. Place 1 layer on your cake turntable, cake stand, or serving platter. Evenly cover the top with frosting. Top with 2nd layer, more frosting, then the third layer. Top with frosting and spread around the sides. Top with raspberries and/or chocolate chips for garnish if desired.
- Slice, serve, enjoy!
Notes
- Make Ahead & Freezing Instructions: The cake layers can be baked, cooled, and covered tightly at room temperature overnight. Likewise, the frosting can be prepared then covered and refrigerated overnight. Assemble and frost the cake the next day when you are ready to serve. Frosted cake can be frozen up to 2 months if you have room in the freezer. Thaw overnight in the refrigerator and bring to room temperature before serving. Honestly, it tastes much better fresh.
- Special Tools (affiliate links): 9-inch Round Cake Pans | Parchment Paper | Glass Mixing Bowls | Whisk | Silicone Spatula | Electric Mixer (Handheld or Stand) | Cake Turntable, Cake Stand, or Serving Platter | Icing Spatula | Cake Carrier (for storage)
- Buttermilk: You can either use 2 cups (480ml) buttermilk OR 1 and 1/2 cups (360ml) whole milk and 1/2 cup (120g) plain yogurt or sour cream. I have used both options and they both work wonderfully. It’s important to have an acidic ingredient here (the buttermilk or the yogurt/sour cream). For the whole milk + yogurt/sour cream version, you can use lower fat or nondairy milk instead of whole milk, but the cake won’t taste as moist or rich.