Description
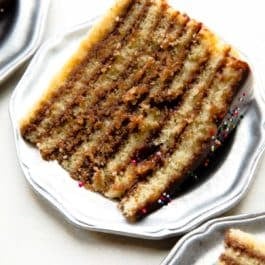
Smith Island cake is the official dessert of Maryland. This stunning cake features 9 delicious yellow cake layers and chocolate icing layers. The chocolate icing seeps down into the cake layers creating the most deliciously moist cake you’ll ever taste. Garnish with sprinkles for an extra special treat!
Ingredients
Chocolate Icing
- 6 Tablespoons (85g) unsalted butter, cut into 6 pieces
- one 4 ounce bar (113g) bittersweet chocolate, coarsely chopped*
- 1 and 2/3 cups (335g) granulated sugar
- 1 cup (240ml) heavy cream
- 2 teaspoons corn syrup (optional, for shine)
- 1 teaspoon pure vanilla extract
- pinch salt
Cake
- 3 and 3/4 cups (443g) sifted all-purpose flour* (spooned & leveled)
- 1 teaspoon baking powder
- 3/4 teaspoon baking soda
- 1 teaspoon salt
- 1 and 1/2 cups (340g) unsalted butter, softened to room temperature
- 2 cups (400g) granulated sugar
- 5 large eggs, at room temperature
- 2 and 1/2 teaspoons pure vanilla extract
- 1 and 3/4 cups (420ml) buttermilk, at room temperature*
- optional: rainbow sprinkles for garnish
Instructions
- Make the icing first: The icing needs to completely cool and thicken, so prepare it first. Combine the butter, chocolate, granulated sugar, heavy cream, and corn syrup together in a medium saucepan over medium heat. Stir constantly until butter has melted. Once melted, stir occasionally as the sugar dissolves and the mixture comes to a boil. Allow to boil for 1 minute. Remove from heat and stir in the vanilla extract. Taste (it’s warm, so be careful!) Add a sprinkle of salt, if desired. I always add a pinch. Leave uncovered and set aside to thicken and cool for at least 1-2 hours or until it has a spreadable consistency. This is enough time to bake and cool the cake layers. See make ahead tip if you want to prepare ahead of time. Yields about 2 and 1/4 cups icing.
- Preheat oven to 350°F (177°C). Grease three 9-inch cake pans, line with parchment paper rounds, then grease the parchment paper. Parchment paper helps the cakes seamlessly release from the pans; they may crack and crumble otherwise. (If it’s helpful, see this parchment paper rounds for cakes video & post. You can also reuse the parchment for each of the 9 cakes or cut 9 individual circles.)
- Make the cake: Whisk the flour, baking powder, baking soda, and salt together in a large bowl. Set aside. Using a handheld or stand mixer fitted with a paddle or whisk attachment, beat the butter and sugar together on high speed until smooth and creamy, about 3 minutes. Scrape down the sides and up the bottom of the bowl with a rubber spatula as needed. On medium-high speed, add 1 egg at a time, beating well after each addition. Beat in the vanilla extract. Scrape down the sides and up the bottom of the bowl with a rubber spatula as needed. Scrape down the sides and up the bottom of the bowl with a rubber spatula as needed.
- With the mixer on low speed, add the dry ingredients in three additions alternating with the buttermilk, beginning and ending with the dry ingredients, and mixing each addition just until incorporated. Do not overmix this batter. The batter will be smooth, velvety, and slightly thick.
- (There are 8 cups of batter total, so each of the 9 cakes will have slightly less than 1 cup of batter. Leave unused batter loosely covered at room temperature as cakes bake.) Pour slightly less than 1 cup of batter into prepared cake pans. Bake for 12 minutes or until a toothpick inserted comes out clean. The cakes are VERY thin, so they shouldn’t take much longer than that. Allow to cool for a couple minutes, then carefully invert the cake onto the counter. Peel off the parchment to reuse (or use a new parchment round). Grease the warm cake pans, line with parchment, and grease the parchment. Repeat with slightly less than 1 cup of batter per cake pan. Repeat baking, cooling, and releasing the cakes from the warm pans. Grease the warm cake pans, line with parchment, and grease the parchment. Repeat one final time. Allow all 9 layers to cool completely, about 45 minutes.
- Assemble cake: Carefully place one layer on a serving platter, cake turntable, or cake stand. Spoon and spread 1/4 cup of icing on top, then repeat with the rest of the cake layers and icing. Some icing will spill over the sides and that’s ok! Makes a beautiful cake! Decorate the top with sprinkles, if desired.
- Set cake aside for at least 30 minutes before slicing and serving. This gives the icing a chance to adhere to the cake and makes slicing a little easier.
- Cover and store leftover cake at room temperature for 1-2 days or in the refrigerator for up to 1 week.
Notes
- Make Ahead Instructions: The cake layers can be baked, cooled, and covered tightly at room temperature overnight. Likewise, the icing can be prepared then covered and refrigerated overnight. Set the icing out at room temperature for an hour to soften up before using. The assembled cake can be frozen up to 2-3 months. Thaw overnight in the refrigerator and bring to room temperature before serving. Tastes better fresh though!
- Special Tools (affiliate links): Medium Saucepan | 9-inch Round Cake Pans | Whisk | Glass Mixing Bowl | Electric Mixer (Handheld or Stand) | Cake Turntable | Cake Carrier (for storage)
- 9 Layers: The 9 cake layers are baked individually instead of baking 3 or 4 thick cakes and slicing them horizontally to create layers. Baking each cake layer individually doesn’t take any longer since the thinner cakes take less time in the oven, about 12 minutes each. Baking 3 at a time, they’ll be done in less than 40 minutes. This method also ensures that each layer is baked evenly. Baking 3 thicker cakes risks over or under-baking and the cakes are more likely to sink in the centers because they’re so thick. If you have more than 3 9-inch cake pans, bake more cakes at once. I baked 4 cakes 2x then 1 cake by itself. If you have fewer than 3 9-inch cake pans, simply bake in batches until all 9 cakes are baked.
- Icing: For a sweeter icing, use semi-sweet chocolate. For dark chocolate icing, use bittersweet chocolate. For very dark chocolate icing, use unsweetened chocolate. I prefer bittersweet chocolate.
- Flour: Sift flour before measuring.
- Buttermilk: Buttermilk (an acid) is required for this cake recipe. If you don’t have any, you can make a DIY buttermilk substitute. Add 1 Tablespoon of white vinegar or lemon juice to a liquid measuring cup. Then add enough whole milk to the same measuring cup until it reaches 1 and 3/4 cups. (In a pinch, lower fat or nondairy milks work for this soured milk, but the cake won’t taste as moist or rich.) Stir it around and let sit for 5 minutes. The homemade “buttermilk” will be somewhat curdled and ready to use in the recipe.