Description
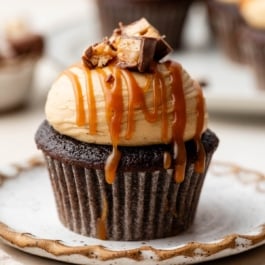
These ultimate Snickers cupcakes are made with ultra-moist chocolate cupcakes, salted caramel filling, creamy peanut butter frosting, and chopped Snickers bars on top. Every bite tastes like your favorite candy bar in cupcake form.
Ingredients
Chocolate Cupcakes
- 1 cup (125g) all-purpose flour (spooned & leveled)
- 1/2 cup (42g) unsweetened natural cocoa powder*
- 1 teaspoon baking soda
- 1/2 teaspoon baking powder
- 1/2 teaspoon salt
- 1/3 cup (75g/80ml) vegetable oil
- 1 cup (200g) granulated sugar
- 1 large egg, at room temperature
- 1 teaspoon pure vanilla extract
- 1/2 cup (120g/ml) buttermilk*, at room temperature
- 1/2 cup (120g/ml) hot water or hot coffee (decaf is fine)
Peanut Butter Frosting
- 5 Tablespoons (71g) unsalted butter, softened to room temperature
- 1 cup (250g) creamy peanut butter
- 1 cup (120g) confectioners’ sugar
- 1/3 cup (80g/ml) heavy cream
- 1 teaspoon pure vanilla extract
- 1/4 teaspoon salt
Filling & Topping
- 1/2 cup (145g) store-bought or homemade caramel sauce (cooled & thickened)*
- 5–6 fun-size Snickers bars, chopped
Instructions
- Make the cupcakes: Preheat the oven to 350°F (177°C). Line a 12-cup muffin pan with cupcake liners. This recipe yields about 15 cupcakes, so line a second muffin pan with 3 more liners or bake in batches.
- Whisk the flour, cocoa powder, baking soda, baking powder, and salt together in a medium bowl. Set aside. In a large bowl, preferably with a pour spout, whisk the oil, sugar, egg, vanilla extract, and buttermilk together until combined. Pour the dry ingredients into the wet ingredients, add the hot coffee/water, and whisk until the batter is completely combined. The batter is thin.
- Pour/spoon the batter into the liners, filling only 2/3 full to avoid spilling over the sides. You should have enough batter for 15 cupcakes.
- Bake for 20–22 minutes, or until a toothpick inserted in the center comes out clean.
- Allow the cupcakes to cool in the pan for 10 minutes, then transfer to a wire rack to cool completely. Cupcakes must be completely cooled—and even chilled for 20–30 minutes in the refrigerator if they’re particularly sticky on top—before assembling.
- Make the frosting: Using a handheld or stand mixer fitted with a paddle attachment, beat the softened butter on medium speed for 1 minute until completely smooth and creamy. Add the peanut butter and beat on medium-high speed until completely combined. Add the confectioners’ sugar, cream, vanilla extract, and salt. Beat on low speed for about 20 seconds, then increase to high speed and beat for 1 minute.
- Fill the cupcakes: Using a sharp knife, cut a circle into the center of the cooled cupcakes to create a little pocket about 1 inch deep. The piece you removed will be roughly cone-shaped. Spoon cooled salted caramel sauce inside each carved-out cupcake; use however much will fit. (Usually you can fit between 1–2 teaspoons of caramel in each.) Slice/tear off the pointed end of the “cone” piece of cupcake you removed, and gently press the round piece back on top of the filling. See my How to Fill Cupcakes post if you need extra visuals or help with this step.
- Frost the cupcakes: Pipe or spread the peanut butter frosting on top of the cupcakes. I used a Wilton #1A round tip. Top with a drizzle of caramel sauce and chopped Snickers bars.
- Serve immediately or store covered in the refrigerator for up to 1 day before serving. (Bring to room temperature before serving.) Cover and store leftover cupcakes in the refrigerator for up to 3 days. I recommend a cupcake carrier for storing and transporting decorated cupcakes.
Notes
- Make Ahead & Freezing Instructions: Cupcakes can be made ahead 1 day in advance, covered, and stored in the refrigerator. Frosting can also be made 1 day in advance, covered, and stored in the refrigerator until ready to use. (Beat the cold frosting with an electric mixer on medium speed to loosen it up, if needed.) Salted caramel sauce can be made ahead and stored in a tightly covered jar or container in the refrigerator for up to 1 month. Fill and frost cupcakes the day you plan to serve them. Unfrosted, unfilled cupcakes can be frozen for up to 3 months. Thaw overnight in the refrigerator and then continue with step 7.
- Special Tools (affiliate links): 12-count Muffin Pan | Cupcake Liners | Mixing Bowl (with a pour spout) or Glass Mixing Bowls | Whisk | Electric Mixer (Handheld or Stand) | Piping Bag (Reusable or Disposable) | Wilton #1A Round Tip | Cupcake Carrier
- Cocoa Powder: Do not use Dutch-process cocoa in this recipe. Dutch-process cocoa is treated with an alkali to neutralize its acids and therefore will not react with the alkaline baking soda in the batter. Learn more about the difference between Dutch-process vs natural cocoa powder here.
- Cupcakes Sinking: The cupcakes may look like they’re sinking in the center while they’re baking, but they should pop back up by the time baking is finished. Cocoa powder is not as structurally strong as flour, so sinking is a common issue with chocolate cupcakes. It doesn’t matter all that much if they sink a bit in the center, though, because you’re cutting out the middles and filling them with caramel!
- Buttermilk: Buttermilk is required for this recipe. You can make your own DIY buttermilk substitute if needed. Add 1 teaspoon of white vinegar or lemon juice to a liquid measuring cup. Then add enough whole milk to the same measuring cup until it reaches 1/2 cup. (In a pinch, lower-fat or nondairy milks work for this soured milk, but the cupcakes won’t taste as moist or rich.) Stir it around and let sit for 5 minutes. The homemade “buttermilk” will be somewhat curdled and ready to use in the recipe.
- Hot Coffee or Hot Water: Hot liquid enhances the cocoa powder’s flavor. It also encourages it to bloom and dissolve appropriately. I promise these cupcakes don’t taste like coffee at all! If you don’t drink coffee, you can use hot water. For deeper and richer flavor, though, use coffee (regular or decaf, but make sure it’s black with no sugar or cream). You can either brew it in a coffee maker or use instant coffee.
- Caramel Sauce: If using my homemade caramel sauce, keep in mind this is a salted caramel. For a sweeter caramel, reduce salt in that recipe to 1/2 teaspoon. Make sure the caramel sauce has cooled and thickened before filling the cupcakes, otherwise it will be too thin. You can make the caramel sauce in advance—see make-ahead tip in the caramel recipe.
- More Success Tips: Be sure to check out my How to Use Piping Tips post for instructions on how to fill a piping bag, and my How to Fill Cupcakes post for troubleshooting tips and a video tutorial. And you can also read my 10 Tips for Baking the BEST Cupcakes.