Description
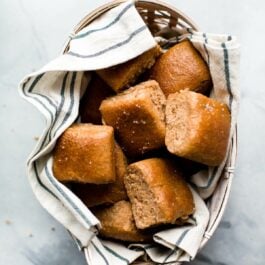
Soft, hearty, and sweet homemade honey whole wheat dinner rolls.
Ingredients
- 1 cup (240ml) whole milk, warmed to about 110°F (43°C)
- 2 and 1/4 teaspoons Platinum Yeast from Red Star instant yeast
- 1/2 cup (8 Tbsp; 113g) unsalted butter, softened to room temperature (cut into 4 pieces)
- 1/3 cup (113g) honey
- 2 large eggs
- 1/2 teaspoon salt
- 3 and 1/2 cups (420g) whole wheat flour (spooned & leveled), plus more for kneading/shaping
Topping
- 2 Tablespoons (28g) unsalted butter, melted
- 2 teaspoons honey
- sea salt for sprinkling
Instructions
- Make the dough: Pour the warm milk over yeast in the bowl of a stand mixer fitted with a dough hook attachment. Or, if you don’t have a stand mixer, a regular large mixing bowl. Whisk together, cover bowl with a towel, and allow to sit for 5 minutes. The mixture will be frothy and foamy after 5 minutes.
- On low speed, beat in the softened butter until it is slightly broken up. Then beat in the honey, eggs, and salt. The butter won’t really be mixing into the mixture, so don’t be alarmed if it stays in pieces. On low speed, gradually add the flour. Once it is all added, beat on medium speed until a soft dough forms.
- Knead the dough: Keep the dough in the mixer and beat for an additional 6-8 full minutes, or knead by hand on a lightly floured surface for 6-8 full minutes. (If you’re new to bread-baking, my How to Knead Dough video tutorial can help here.) If the dough becomes too sticky during the kneading process, sprinkle 1 teaspoon of flour at a time on the dough or on the work surface/in the bowl to make a soft, slightly tacky dough. Do not add more flour than you need because you do not want a dry dough. After kneading, the dough should still feel a little soft. Poke it with your finger—if it slowly bounces back, your dough is ready to rise.
- Transfer the dough to a lightly floured surface (if you kneaded with your mixer) and knead it with your hands for 1 minute. Form the dough into a ball, coat your mixing bowl with nonstick spray or olive oil, and place the dough back in and turn it over so all sides of the dough are coated with the oil/spray. Cover the dough/bowl loosely with plastic wrap, a paper towel, or aluminum foil and let sit in a warm place until doubled in size, about 1.5 – 2 hours. Here’s what I do: turn the oven on to 150°F (66°C). Once heated to that temperature, turn the oven off. Stick the covered dough inside the oven and allow it to rise in this warm environment.
- Grease the bottom and sides of a 9×13-inch baking dish. Set aside.
- Shape the rolls: Punch the dough down to release any air bubbles and turn it out onto a lightly floured work surface. Using floured hands, stretch the dough into a 9×13 rectangle (doesn’t need to be exact, it can be a little smaller). Use a pizza cutter and cut into 15 rolls. See photo above for a visual. Round out the edges of the rolls since they stretched a bit as you cut them. Arrange in prepared pan. Loosely cover the rolls and allow to rise in a warm environment again until puffy and double in size, about 1 hour.
- Bake the rolls: Preheat the oven to 375°F (191°C). Bake rolls for about 25 minutes or until they are golden brown. About halfway through the bake time, I like to cover the rolls loosely with aluminum foil so the tops don’t brown too much. Remove pan from the oven and allow to cool on a wire rack for 5 minutes.
- Top the rolls: Meanwhile, mix the melted butter and honey together. Brush over warm rolls. Sprinkle with sea salt. Serve warm.
- Cover any leftover rolls and store at room temperature for a few days or in the refrigerator for up to 1 week.
Notes
- Make Ahead & Freezing Instructions: After dough has risen two hours in step 4, punch it down inside the mixing bowl and cover the bowl tightly with plastic wrap. Refrigerate overnight or for up to 2 days, then remove from the refrigerator and continue with step 5. Or freeze the dough for up to 2 months, then allow to thaw overnight in the refrigerator and continue with step 5. You can also freeze the baked dinner rolls. Allow them to cool completely, then freeze for up to 3 months. Thaw in the refrigerator or at room temperature, then reheat as desired. If reheating the whole pan, lightly cover and reheat in a 300°F (149°C) oven for about 10 minutes or until warm.
- Special Tools (affiliate links): Electric Stand Mixer | Whisk | Pastry Brush | Pizza Cutter | 9×13-inch Baking Pan
- Milk: Lower fat milk can be substituted, but the rolls won’t taste as soft. I strongly suggest whole milk.
- Honey Butter: Don’t leave off that honey butter/sea salt topping. The rolls will be lacking a little flavor without it. I prefer spreading the honey butter on the rolls after they bake as opposed to before they bake. Brushing butter on top of the delicate, airy unbaked roll weighs them down and encourages them to deflate. Best to spread on the honey butter right after baking.
- Reference my Baking with Yeast Guide for answers to common yeast FAQs.