Description
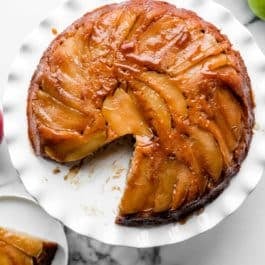
This stunning apple upside down cake combines a soft cinnamon-spiced cake with a delicious buttery caramel topping. Pack those apples into the pan—this cake can hold a lot and you won’t regret those extra slices!
Ingredients
Topping
- 6 Tablespoons (85g) unsalted butter
- 1/2 cup (100g) packed light or dark brown sugar
- 1/4 teaspoon ground cinnamon
- 1/4 teaspoon pure vanilla extract
- 2 medium apples, peeled and sliced into 1/4-inch slices (1.5–2 cups, or 188–250g, apple slices)*
Cake
- 1 and 1/2 cups (188g) all-purpose flour (spooned & leveled)
- 1 and 1/2 teaspoons baking powder
- 1 and 1/2 teaspoons ground cinnamon
- 1/4 teaspoon ground nutmeg
- 1/2 teaspoon salt
- 1/2 cup (8 Tbsp; 113g) unsalted butter, softened to room temperature
- 1/2 cup (100g) granulated sugar
- 1/2 cup (100g) packed light or dark brown sugar
- 2 large eggs, at room temperature
- 1 teaspoon pure vanilla extract
- 6 Tablespoons (90ml) whole milk, at room temperature*
Instructions
- Preheat oven to 350°F (177°C).
- Prepare topping first: Combine butter and brown sugar together in a small saucepan over medium heat. Whisk occasionally until butter has melted. Cook, whisking constantly, for 1 minute as mixture thickens. Remove from heat and whisk in the cinnamon and vanilla extract. Pour into an ungreased 9×2 inch pie dish or round cake pan. (Make sure the pan is 2 inches deep. I recommend this pie dish, which is 1.8 inches deep but I never have an overflow issue.) Arrange the apple slices neatly on top, overlapping where necessary. See photo above. Place pan in the refrigerator for a few minutes as you prepare the cake batter. This helps solidify or “set” the topping’s arrangement.
- Make the cake batter: Whisk the flour, baking powder, cinnamon, nutmeg, and salt together. Set aside.
- Using a handheld or stand mixer fitted with a paddle or whisk attachment, beat the butter on high speed until smooth and creamy, about 1 minute. Add both sugars and beat on high speed until creamed together, about 1 minute. Scrape down the sides and up the bottom of the bowl with a rubber spatula as needed. On high speed, beat in the eggs and vanilla extract until combined. Scrape down the sides and up the bottom of the bowl as needed. Pour the dry ingredients into the wet ingredients. Turn the mixer onto low speed and as the mixer runs, slowly pour in the milk. Beat on low speed just until all of the ingredients are combined. Do not over-mix. You may need to whisk it all by hand to make sure there are no lumps at the bottom of the bowl. The batter will be slightly thick.
- Remove topping from the refrigerator. Pour and spread cake batter evenly over topping.
- Bake for 40–46 minutes, tenting foil on top of the cake halfway through bake time to prevent the top from over-browning before the center has a chance to fully cook. The cake is done when a toothpick inserted into the center of the cake comes out mostly clean—a couple moist crumbs are OK. Don’t be alarmed if your cake takes longer or if the cake rises up and sticks to the foil. (We serve the cake upside down anyway!)
- Remove cake from the oven and cool on a wire rack for just 15 minutes. Invert the slightly cooled cake onto a cake stand or serving plate. Some of the juices from the topping will seep over the sides—that’s ok. You can slice and serve the cake warm, but the slices will be messy. I find it’s best to cool the cake completely at room temperature before slicing and serving. Do not refrigerate the cake to speed up the cooling process because it could end up tasting overly dense.
- Cover leftover slices and store for up to 3 days in the refrigerator or 3 months in the freezer. Thaw at room temperature. I don’t recommend freezing the cake as a whole because the topping arrangement doesn’t thaw very nicely. See make ahead instructions below.
Notes
- Make Ahead Instructions: You can refrigerate the topping in step 2 for up to 1 day. If refrigerating for longer than 1 hour, cover it tightly. Other than that, this isn’t the best cake to make ahead of time or freeze because the apples will settle down into the cake—while still tasty, the presentation won’t be as pleasing. You can, however, prepare the cake batter’s wet ingredients (cover and refrigerate) and dry ingredients (cover at room temperature) separately up to 1 day ahead of time, then continue with the recipe the next day. Let the wet ingredients come to room temperature before mixing.
- Special Tools (affiliate links): Saucepan | Whisk | 9-inch Pie Dish | Glass Mixing Bowl | Electric Mixer (Handheld or Stand) | Cooling Rack
- Old Recipe: The current cake recipe was updated in 2020. If you loved the old cake recipe, originally published in 2012, here it is: increase the topping’s butter to 1/2 cup (1 stick; 115g) and add 1/4 teaspoon each of ground cloves and ground nutmeg when you stir in the cinnamon. Sprinkle 1/4 cup of walnuts on top of the apples before pouring/spreading on the cake batter. In the cake batter, reduce the milk to 1/4 cup (60ml).
- Apples: Use your favorite variety of apple. I typically use Granny Smith, Fuji, or Honeycrisp. Here’s more on the best apples to use for baking.
- Milk: Whole milk is best, but you can use lower fat or nondairy milk if needed.
- Why is everything at room temperature? All refrigerated items should be at room temperature so the batter mixes together easily and evenly. Read more about the importance of room temperature ingredients.
