Description
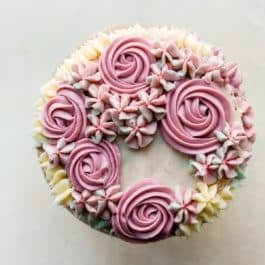
This 6 inch birthday cake is complete with easy buttercream flowers and swirls. Follow the recipe and video tutorial to recreate at home!
Ingredients
- 1 and 3/4 cups (207g) cake flour (spooned & leveled)
- 3/4 teaspoon baking powder
- 1/4 teaspoon baking soda
- 1/4 teaspoon salt
- 1/2 cup (8 Tbsp; 113g) unsalted butter, softened to room temperature
- 1 cup (200g) granulated sugar
- 3 large egg whites, at room temperature
- 1/2 cup (120g) full-fat sour cream, at room temperature
- 2 teaspoons pure vanilla extract
- 1/2 cup (120ml) whole milk, at room temperature
- 1/2 cup rainbow sprinkles
Vanilla Buttercream
- 1 and 1/2 cups (340g) unsalted butter, softened to room temperature
- 6 cups (720g) confectioners’ sugar
- 1/3 cup (80ml) heavy cream or whole milk
- 2 teaspoons pure vanilla extract
- 1/8 teaspoon salt
Instructions
- Preheat oven to 350°F (177°C). Grease three 6-inch cake pans, line with parchment paper rounds, then grease the parchment paper. Parchment paper helps the cakes seamlessly release from the pans. (If it’s helpful, see this parchment paper rounds for cakes video & post.)
- Make the cake: Whisk the cake flour, baking powder, baking soda, and salt together. Set aside.
- Using a handheld or stand mixer fitted with a paddle or whisk attachment, beat the butter and sugar together on high speed until smooth and creamy, about 3 minutes. Scrape down the sides and up the bottom of the bowl with a silicone spatula as needed. Beat in the egg whites on high speed until combined, about 2 minutes, then beat in the sour cream and vanilla extract. Scrape down the sides and up the bottom of the bowl as needed. With the mixer on low speed, add the dry ingredients just until combined. With the mixer still running on low, pour in the milk and mix just until combined. You may need to whisk it all by hand to make sure there are no lumps at the bottom of the bowl. Gently fold in the sprinkles. The batter will be slightly thick.
- Pour batter evenly into cake pans. Bake for around 18-21 minutes or until the cakes are baked through. To test for doneness, insert a toothpick into the center of the cake. If it comes out clean, it’s done. Allow cakes to cool completely in the pans set on a wire rack. The cakes must be completely cool before frosting and assembling.
- Make the frosting: In a large bowl using a hand-held mixer or stand mixer fitted with a whisk or paddle attachment, beat the butter on medium speed until creamy, about 2 minutes. Add confectioners’ sugar, heavy cream, vanilla extract, and salt with the mixer running on low. Increase to high speed and beat for 3 minutes. Add more confectioners’ sugar if frosting is too thin, more cream if frosting is too thick, or a pinch more of salt if frosting is too sweet.
- Assemble and decorate: Using a large serrated knife, slice a thin layer off the tops of the cakes to create a flat surface. Discard (or crumble over ice cream!). Place 1 cake layer on your cake stand, cake turntable, or serving plate. Evenly cover the top with about 3/4 cup of frosting. Top with 2nd cake layer and evenly cover the top with about 3/4 cup of frosting. Top with the third cake layer. Spread the remaining frosting all over the top and sides or, to replicate the decoration in the pictures and video, follow my directions in the recipe notes below. Refrigerate for at least 30-45 minutes before slicing. This helps the cake hold its shape when cutting.
- Cover leftover cake tightly and store in the refrigerator for 5 days.
Notes
- Make Ahead Instructions: The cake layers can be baked, cooled, and covered tightly at room temperature overnight. Likewise, the frosting can be prepared then covered and refrigerated overnight. Let the frosting sit at room temperature to slightly soften for 10 minutes before assembling and frosting. Frosted cake or unfrosted cake layers can be frozen up to 2-3 months. Thaw overnight in the refrigerator and bring to room temperature before decorating/serving.
- Special Tools (affiliate links): 6-inch Round Cake Pans | Glass Mixing Bowl | Whisk | Electric Mixer (Handheld or Stand) | Cake Turntable | Pastel Americolor Gel Kit | Regular Americolor Gel Kit | Bench Scraper | Icing Spatula | Piping Bags (Reusable or Disposable) | Wilton 1M Open Star Piping Tip | Ateco 844 Closed Star Piping Tip | Confetti Quin Sprinkles | Cake Carrier (for storage)
- Cake Flour: Sift cake flour before measuring. If you can’t get your hands on cake flour, you can make this homemade cake flour substitute. I suggest doing this 2x, then remove 1/4 cup since you need 1 and 3/4 cups in this recipe.
- Milk: Whole milk and full-fat sour cream are strongly recommended for the best taste and texture. A full-fat plain yogurt would work instead, though the cake may not be as light. Same goes with a lower fat milk.
- Why is Everything at Room Temperature? All refrigerated items should be at room temperature so the batter mixes together easily and evenly. Read more about the importance of room temperature ingredients.
- Sprinkles: Avoid using nonpareils (the little balls) as they bleed their color into the cake batter. I used these pastel confetti quins.
- Buttercream: This yields a lot of frosting. If looking to decorate the cake without the floral detail, follow these white cake ratios for vanilla buttercream.
- To Decorate Exactly as Pictured: Once cake has been assembled with frosting between the layers, spread a thin layer of frosting, called a crumb coat, all over the top and sides. I recommend a bench scraper to smooth the sides and top. Divide the remaining frosting into 4 bowls. Tint frosting your desired colors. I used mauve and dusty pink from this gel food coloring kit and a very tiny drop of sky blue from this gel food coloring kit. I kept the rest of the frosting white. Grab 3 piping bags. Fit piping bags with star piping tips. I used two Wilton 1M star piping tips (2D piping tip is similar) and one Ateco 844 star piping tip. Add spoonfuls of two different colored frostings to each piping bag, alternating colors. Your piping bag will be marbled with different colors. (Note: I kept one piping bag only the mauve color.) Twist the open end of the piping bag shut and squeeze the frosting down to the tip. Squeeze some frosting onto a plate until you begin to see more than 1 color. Pipe swirls, roses, and hydrangea-looking flowers all over the cake, starting at the bottom and working your way up. You can watch me decorate my cake in the helpful video above.
- Looking For a Bigger Birthday Cake? I recommend making this 9-inch 2 layer vanilla cake and adding 2/3 cup sprinkles.