Description
Learn how to make real homemade caramel apples with this from-scratch recipe. For best success, watch the video tutorial, read the post, and review the recipe before beginning.
Ingredients
- 8-9 cold apples
- 1 and 3/4 cups (420ml) heavy cream
- 1 cup (240ml) light corn syrup
- 2 cups (400g) packed light or dark brown sugar
- 1/4 cup (4 Tbsp; 56g) unsalted butter, at room temperature
- 1/2 teaspoon salt
- 1/2 teaspoon pure vanilla extract
Instructions
- Prep the apples: Rinse the apples with water, then wipe completely dry. Removing the slippery waxy coating will help the caramel seal to the apple. Remove the apple stem and insert a caramel apple stick about 3/4 down into the apple.
- Line a large baking sheet with a silicone baking mat (preferred) or grease the pan with butter. Caramel usually sticks to parchment or wax paper.
- Make the caramel: Combine the heavy cream, corn syrup, brown sugar, butter, and salt in a 3-quart heavy-duty saucepan over medium heat. Do not turn the temperature up or down—keep at medium the entire time the caramel cooks. Stir constantly with a wooden spoon until the butter is melted. Once melted, brush down the sides of the pan with a water-moistened pastry brush and attach a candy thermometer to the pan, making sure the bulb is not touching the bottom of the pan (as you’ll get an inaccurate reading).
- Without stirring, let the mixture cook and bubble until it reaches 235°F (113°C). Some readers have been cooking to 240°F (116°C) and saying the caramel sticks much better to the apples that way. Stick with anywhere between 235°F – 240°F. Reaching this temperature should take about 15 – 20 minutes, though don’t use time as your guide because it depends on your stove. Don’t be alarmed if your caramel is taking longer, just use the candy thermometer as your guide. The temperature will heat up slowly, then move quickly, so keep your eye on the pot. Once at 235°F – 240°F, remove caramel from heat and stir in the vanilla. Avoid over-stirring which can create air bubbles in the caramel (and then on the apple). Allow caramel to cool for 10-15 minutes until slightly thickened. If caramel is too thin to coat apples, let it cool and thicken for 5-10 minutes longer.
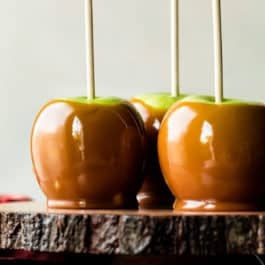
- Dip the apples: Holding the caramel apple stick, dip the apple into the warm caramel, tilting the pot as needed to coat all sides of the apple. Lift the apple up and swirl it around or gently tap it against the side of the pot to let excess caramel drip off. Place coated apple on prepared pan. Repeat with remaining apples. Enjoy immediately or allow caramel to set, about 45-60 minutes. If you want to wrap the caramel apples in cellophane treat bags for travel/gifting, wait until the caramel has completely set.
- If desired, you can add toppings. Immediately after coating in caramel and before the caramel sets, roll the caramel dipped apples in finely chopped nuts, toffee pieces, mini M&Ms, sprinkles, or coconut. You can even drizzle with melted chocolate or white chocolate, too.
- For displaying or serving, I recommend placing on wax paper or another nonstick surface. Even when the caramel has completely set, caramel apples may slightly stick to a serving dish. To eat a caramel apple, you can bite right into it or sit it upright on a cutting board and cut slices around the stick. (Or pull out the stick and slice.) These are great for sharing!
- Loosely cover and store the leftover dipped apples in the refrigerator for up to 1 week.
Notes
- How to clean a sticky saucepan: It’s not always easy or fun, but I have a helpful solution! When you’re finished making sticky caramel, simply fill the dirty saucepan with water until the water covers all of the candy residue. Place the saucepan on the stove over low heat. Let the warm water simmer and melt the sugar off the sides of the pan. Pour out the warm water, then let the tools sit until cool enough to handle. Rinse clean.
- Special Tools (affiliate links): Caramel Apple Sticks | Baking Sheet | Silicone Baking Mat | 3-quart Heavy Duty Saucepan (I recommend this one and this one) | Wooden Spoon | Pastry Brush | Candy Thermometer (I recommend this one or this one) | Cellophane Treat Bags
- Caramel Candies: Follow step 3 in this recipe. Then without stirring, cook the mixture until it reaches 245°F (118°C). Immediately remove from heat, then stir in the vanilla. Then follow steps 5 and 6 in my soft caramel candies recipe.
- Double Batch: I don’t recommend halving, doubling, or tripling candy recipes, especially this caramel. Increasing or decreasing the quantity may work for baking, but the extra or decreased volume could prevent the candy from cooking properly. Make separate batches instead.