Description
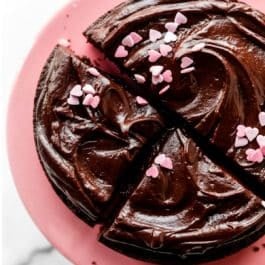
This 1-layer 6-inch chocolate cake serves 4, so it’s perfect for any occasion calling for a scaled-down cake. You can also use this chocolate cake batter to make a small batch of 6 chocolate cupcakes. For best success, review the recipe Notes before starting.
Ingredients
- 1/2 cup (63g) all-purpose flour (spooned & leveled)
- 1/4 cup (21g) unsweetened natural cocoa powder
- 1/4 teaspoon baking soda
- 1/2 teaspoon espresso powder (optional)
- 1/4 teaspoon salt
- 1/4 cup (60ml) vegetable oil
- 1/2 cup (100g) granulated sugar
- 1 large egg, at room temperature
- 1/2 teaspoon pure vanilla extract
- 1/4 cup (60ml) buttermilk, at room temperature
Chocolate Ganache
- one 4-ounce (113g) quality semi-sweet or bittersweet chocolate bar, finely chopped
- 1/2 cup (120ml) heavy cream or heavy whipping cream
- optional garnish: raspberries, mint, and/or sprinkles
Instructions
- Preheat oven to 350°F (177°C). Grease a 6-inch round cake pan, line with a parchment paper round, then grease the parchment paper. Parchment paper helps the cake seamlessly release from the pan. (If it’s helpful, see this parchment paper rounds for cakes video & post.)
- Make the cake: Whisk the flour, cocoa powder, baking soda, espresso powder, and salt together in a large bowl. In a medium bowl, whisk the oil, sugar, egg, vanilla extract, and buttermilk together in a medium bowl. Pour the wet ingredients into the flour mixture and whisk until smooth and combined.
- Pour the cake batter evenly into prepared cake pan.
- Bake for around 27–30 minutes or until the cake is baked through. To test for doneness, insert a toothpick into the center of the cake. If it comes out clean, it’s done. Avoid over-baking. Cake is thick and moist, so the center may slightly sink. That’s normal. Allow cake to cool in the pan set on a wire cooling rack. Cool completely before frosting.
- Make the chocolate ganache as the cake cools because the ganache must cool too: Place chopped chocolate in a medium heat-proof bowl. Heat the cream in a small saucepan over medium heat until it begins to gently simmer. (Do not let it come to a rapid boil—that’s too hot!) Pour over chocolate, then let it sit for 2–3 minutes to gently soften the chocolate. With a metal spoon or small silicone spatula, very slowly stir until completely combined and chocolate has melted. Ganache will be thin, so let it cool and thicken for at least 30–60 minutes before using. Refrigerating speeds this up, but the ganache will not cool evenly. Stir it a few times as it sets in the refrigerator so it remains smooth. You can also let the ganache fully cool and thicken (takes about 2 hours). After 2 hours, you can whip the cooled ganache with a handheld or stand mixer fitted with a whisk attachment until light in color and texture, about 3–4 minutes on medium-high speed. (Whipped ganache can be spread or piped. It is pictured on the cupcakes in the post above. I used Wilton 1M piping tip.)
- Spread ganache on cooled cake. If ganache has cooled and thickened enough (or if you whipped it), you could pipe it with a piping bag/tip. Decorate with optional garnishes, if desired. Slice and serve.
- Cover leftover cake tightly and store at room temperature for 1 day or in the refrigerator for up to 5 days.
Notes
- Make Ahead & Freezing Instructions: The cake can be baked, cooled, and covered tightly at room temperature overnight. Frosted or unfrosted cake can be frozen up to 2–3 months. If desired, see my How to Freeze Cakes post. Thaw cake overnight in the refrigerator and bring to room temperature before decorating/serving. For make-ahead instructions for the chocolate ganache, see step 5 in my chocolate ganache post.
- Special Tools (affiliate links): 6-inch Round Cake Pan | Glass Mixing Bowls | Whisk | Cooling Rack | Saucepan | Silicone Spatula | Electric Mixer (Handheld or Stand) *optional for whipping ganache | Piping Bag (Reusable or Disposable) | Wilton 1M Piping Tip
- Cocoa Powder: Use natural cocoa powder, not dutch-process. (See dutch-process vs natural cocoa powder for more information.)
- Espresso Powder: Espresso powder will not make the cake taste like coffee. Instead, it deepens the chocolate flavor. You can find it in the coffee aisle at the grocery store or online. It’s optional, but for best taste, I highly recommend it. You can use the same amount of instant coffee (the powder) instead of espresso powder if desired.
- Amount of Sugar: I tested this recipe with 6 Tablespoons of sugar and the cake wasn’t as sweet, of course, but it tasted pretty plain. I recommend sticking with 8 Tbsp (1/2 cup). Topping with chocolate ganache definitely balances out the sweetness.
- Buttermilk: Buttermilk is required for this recipe. You can make your own DIY buttermilk substitute if needed. Add 1/2 teaspoon of white vinegar or lemon juice to a liquid measuring cup. Then add enough whole milk to the same measuring cup until it reaches 1/4 cup. (In a pinch, lower-fat or nondairy milks work for this soured milk, but the cake won’t taste as moist or rich.) Stir it around and let sit for 5 minutes. The homemade “buttermilk” will be somewhat curdled and ready to use in the recipe.
- 6 Cupcakes: Preheat oven to 350°F (177°C). Line a standard muffin pan with 6 liners. Prepare the batter as directed in step 2 above. Pour or spoon the batter into the liners. Fill each 2/3 full to avoid spilling over the sides or sinking. Bake for 20–22 minutes, or until a toothpick inserted in the center comes out clean. Don’t over-bake, which will dry out the cupcakes. Allow the cupcakes to cool completely before frosting.
- Chocolate in Ganache: Ganache will only set if the correct chocolate is used. You can use high-quality chocolate chips if needed (I prefer Ghirardelli semi-sweet chocolate chips), but I recommend using pure chocolate baking bars. You can find them right next to the chocolate chips in the baking aisle. They are sold in 4-ounce (113g) bars. I like Bakers or Ghirardelli brands. You can use other varieties of chocolate too, such as milk chocolate (aka German chocolate), bittersweet, or dark chocolate. If using white chocolate, reduce the cream to 1/3 cup (80ml). White chocolate is softer, so you need less cream.
- Dairy-Free Alternative for Heavy Cream in Ganache: Use 1/2 cup full-fat canned coconut milk. Shake it up before opening and measuring. Whisk on the stove as it heats and bring to a simmer.
- 8-inch Pan or 2-Layer Cake: You can use this cake batter in an 8-inch round cake pan in step 1. The cake will be thinner and the bake time is about 24–25 minutes, but use a toothpick to test for doneness just as instructed above. I don’t recommend doubling this recipe to make a 2-layer cake because it will be quite thick and taste heavy. Instead, divide the batter between 2 6-inch cake pans (bake time would be shorter) or divide the batter from these chocolate cupcakes in 2 6-inch cake pans. Start checking with a toothpick at 26 minutes.