Description
This perfect coconut cake sets the bar for homemade cakes everywhere. It’s supremely moist with a soft fluffy crumb and intense coconut flavor. For success, follow this recipe carefully including using cake flour, egg whites, sour cream, and canned coconut milk.
Ingredients
- 2 and 1/2 cups (285g) cake flour (spooned & leveled)
- 2 teaspoons baking powder
- 1/2 teaspoon baking soda
- 1 teaspoon salt
- 3/4 cup (12 Tbsp; 170g) unsalted butter, softened to room temperature
- 1 and 2/3 cups (330g) granulated sugar
- 5 large egg whites, at room temperature
- 1/2 cup (120g) sour cream, at room temperature
- 2 teaspoons pure vanilla extract
- 1 teaspoon coconut extract
- 1 cup (226g/240ml) unsweetened canned coconut milk, at room temperature*
- 1 cup (80g) sweetened shredded coconut
Coconut Cream Cheese Buttercream
- 1 cup (16 Tbsp; 226g) unsalted butter, softened to room temperature
- 8 ounces (226g) full-fat brick cream cheese, softened to room temperature*
- 5 cups (600g) confectioners’ sugar
- 2 Tablespoons (30ml) canned coconut milk
- 1/2 teaspoon pure vanilla extract
- 1/2 teaspoon coconut extract
- 1/8 teaspoon salt
- 2 cups (160g) sweetened shredded coconut
Instructions
- Preheat oven to 350°F (177°C). Grease three 8-inch cake pans, line with parchment paper rounds, then grease the parchment paper. Parchment paper helps the cakes seamlessly release from the pans. (If it’s helpful, see this parchment paper rounds for cakes video & post.)
- Make the cake: Whisk the cake flour, baking powder, baking soda, and salt together. Set aside.
- Using a handheld or stand mixer fitted with a paddle or whisk attachment, beat the butter and sugar together on medium-high speed until smooth and creamy, about 2 minutes. Scrape down the sides and up the bottom of the bowl with a rubber spatula as needed. Beat in the egg whites until combined, then add the sour cream, vanilla extract, and coconut extract. Beat until combined. Mixture will look curdled as a result of the varying textures and solid butter combining. Scrape down the sides and up the bottom of the bowl as needed. With the mixer on low speed, slowly add the dry ingredients and coconut milk. Beat on low speed until combined, then add the shredded coconut. Whisk it all by hand to make sure there are no butter lumps at the bottom of the bowl. The batter will be slightly thick.
- Pour batter evenly into cake pans. Weigh them to ensure accuracy, if desired. Bake for 21–24 minutes or until the cakes are baked through. To test for doneness, insert a toothpick into the center of the cake. If it comes out clean, it’s done. Allow cakes to cool in the pans set on a cooling rack for 1 hour, then remove from the pans and place the cakes directly on the rack to continue cooling. The cakes must be completely cool before frosting and assembling.
- Make the frosting: In a large bowl using a handheld or stand mixer fitted with a whisk or paddle attachment, beat the butter and cream cheese together on medium speed until creamy and smooth, about 2 minutes. Add confectioners’ sugar, coconut milk, vanilla extract, coconut extract, and salt with the mixer running on low. Increase to high speed and beat for 3 minutes. Add more confectioners’ sugar if frosting is too thin, more coconut milk if frosting is too thick, or an extra pinch of salt if frosting is too sweet.
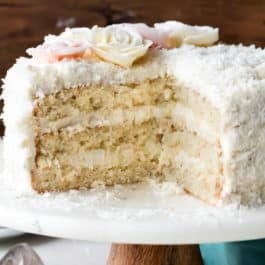
- Assemble and decorate: Using a large serrated knife, slice a thin layer off the tops of the cakes to create a flat surface. Discard (or crumble over ice cream!). Place 1 cake layer on your cake stand, cake turntable, or serving plate. Evenly cover the top with 1 heaping cup (about 250–300g) of frosting. Top with second cake layer and evenly cover the top with another heaping cup of frosting. Top with the third cake layer. Spread the remaining frosting all over the top and sides. I use and recommend an icing spatula to apply the frosting and a bench scraper to smooth the sides. Sprinkle coconut on top of the cake and apply it to the sides. This can get a little messy and you can watch me do it in the video tutorial. See blog post above about buttercream rose decoration.
- Refrigerate cake for at least 20 minutes before slicing. This helps the cake hold its shape when cutting, though it’s still a pretty fluffy cake!
- Cover leftover cake tightly and store in the refrigerator for up to 5 days.
Notes
- Make Ahead & Freezing Instructions: The cake layers can be baked, cooled, and covered tightly at room temperature overnight. Likewise, the frosting can be prepared, then covered and refrigerated overnight. When ready to decorate, let the frosting sit at room temperature to slightly soften for about 15 minutes, then give it one more mix with the mixer on medium speed for about 1 minute before frosting cake. Frosted cake or unfrosted cake layers can be frozen for up to 2–3 months. Thaw overnight in the refrigerator and bring to room temperature before decorating/serving.
- Special Tools (affiliate links): 8-inch Cake Pans | Electric Mixer (Handheld or Stand Mixer) | Glass Mixing Bowls | Whisk | Cake Stand or Cake Turntable | Icing Spatula | Bench Scraper | Cake Carrier (for storing)
- Cake Flour: For the best results, I strongly recommend cake flour. You can find cake flour in the baking aisle and I have many more recipes using it. If you can’t find it, try making this cake flour substitute.
- Egg Whites: Egg whites (no yolks) are KEY to the cake’s fluffy texture. For best success, I recommend using fresh eggs instead of carton egg whites. (Using an egg separator is really handy!) Here are all my recipes using leftover egg yolks. Success tip: Eggs separate much easier when they’re cold.
- Canned Coconut Milk: Canned coconut milk is a cooking ingredient, not a beverage. It is usually unsweetened, so make sure you’re using unsweetened. It’s usually found in the grocery store near the Thai food products. Do not use refrigerated carton coconut milk beverage. You need 1 cup for the cake, not the entire can. You use 2 more Tablespoons in the frosting.
- Sweetened Shredded Coconut: I recommend using sweetened shredded/flaked coconut. It’s moister than unsweetened coconut and that makes a big difference in the cake’s texture. If desired, pulse the coconut shreds in a food processor to chop them up so they aren’t as long inside and outside of the cake. Chopping the coconut is optional.
- Cream Cheese: Use brick cream cheese, not cream cheese spread. If desired, you can use this vanilla buttercream instead (no cream cheese). Use canned coconut milk instead of milk and add 1/2 teaspoon coconut extract.
- 9×13-Inch Sheet Cake: Simply pour the batter into a greased and lightly floured 9×13-inch pan and bake for 40 minutes or until a toothpick inserted in the center comes out clean.
- 2-Layer Cake: Prepare two 9-inch cake pans in step 1. Divide batter between pans and bake for 24–26 minutes or until a toothpick inserted in the center comes out clean.
- Bundt Cake: This cake batter will fit into a greased 10-cup or larger Bundt pan. I’m unsure of the exact bake time (likely around an hour); use a toothpick to test for doneness. Same oven temperature.
- Cupcakes: Fill cupcake liners 2/3 full. Bake at 350°F (177°C) for 19–21 minutes. Yields about 2–3 dozen. Or try my vanilla cupcakes recipe and substitute canned coconut milk for whole milk, 1/2 teaspoon coconut extract for the vanilla bean, and add 3/4 cup (60g) of sweetened shredded coconut.
- Why is everything at room temperature? All refrigerated items should be at room temperature so the batter mixes together easily and evenly. Read more about the importance of room temperature ingredients.