Description
Use this tutorial to guide you through a key step in yeast bread baking: kneading dough. See recipe Notes, and watch the video tutorial to help. If you’re new to working with yeast, reference my Baking with Yeast Guide for simple answers to common yeast FAQs.
Ingredients
- Extra flour for hands, work surface, and dough
- Dough that requires kneading, such as sandwich bread dough
Instructions
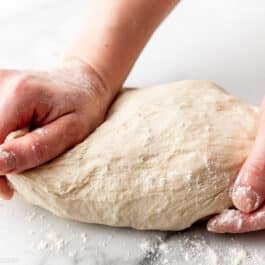
- Lightly flour your hands, work surface, and dough. Using the heels of your hands, gently push the dough away from you in a rocking motion, alternating hands as you go. You want to put some energy into it, to really stretch out the dough. The dough may get sticky as you knead, and that’s fine. Just sprinkle a little more flour on your hands. Do not add any more flour than you really need—use just enough to prevent it from sticking too much to your hands and work surface. Dough should still feel a little tacky.
- As you knead, you’ll start to feel the texture of the dough change; it will begin to smooth out and feel softer and more elastic. The length of time a dough requires kneading depends on the recipe. Some doughs take just 3–5 minutes, while others can take up to 10–15 minutes. For those longer knead times, if your arms are getting tired and you have a stand mixer, feel free to pop the dough into your stand mixer bowl and use the mixer’s dough hook attachment for a few minutes to give your hands a break.
- How to know when to stop kneading: There are 2 ways to check whether the dough has been kneaded enough and is ready to rise, and you can use either or both. The first way to check is to simply poke the dough with your finger. If the dough bounces back without sticking to your finger, it’s been kneaded enough. If it doesn’t, you need to keep kneading. The second way to check is something called the “windowpane test.” Tear off a small (roughly golfball-size) piece of dough and gently stretch it out until it’s thin enough for light to pass through it. Hold it up to a window or light. Does light pass through the stretched dough without the dough tearing first? If so, your dough has been kneaded long enough and is ready to rise per your recipe’s instructions (such as sandwich bread). If not, keep kneading.
Notes
- If you have an especially soft, wet, or sticky dough, there’s another kneading technique you can use. I use this method primarily with extra-soft rich doughs. Rich doughs have more fat in them (for example, milk, butter, and egg), as opposed to lean doughs like pizza dough. With the heel of your hand, push the dough out, then fold it back. Give the folded dough a quarter turn, and repeat. Push it out, fold it back, and turn. This method is a little more gentle, and I find it works better when you have a particularly wet, sticky dough.
- Can I Knead Dough With a Hand Mixer? No, I do not recommend it. The dough will just get stuck in the beaters. Use a stand mixer or knead by hand.