Description
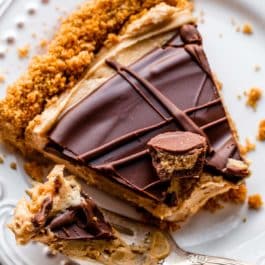
This peanut butter cup tart features a crunchy graham cracker crust, mega creamy peanut butter filling, and a smooth chocolate topping. The filling and chocolate topping are no-bake, but the crust requires time in the oven in order to properly set.
Ingredients
Graham Cracker Crust
- 1 and 1/3 cups (160g) graham cracker crumbs (about 10–11 full sheet graham crackers)
- 1/4 cup (4 Tbsp; 56g) unsalted butter, melted
- 2 Tablespoons (25g) granulated sugar
Filling
- 6 Tablespoons (85g) unsalted butter, softened to room temperature
- 1 cup (120g) confectioners’ sugar
- 1 teaspoon pure vanilla extract
- 1/8 teaspoon salt
- 1 and 1/4 cups (315g) creamy peanut butter*
Topping
- 6 ounces (170g) semi-sweet, bittersweet, or milk chocolate (see Note)
- 3 Tablespoons (45g) creamy peanut butter
Instructions
- Preheat oven to 350°F (177°C).
- Make the crust: Stir the graham cracker crust ingredients together. Pour into a 9-inch tart pan and pack in very tightly. The tighter it’s packed, the less likely it will fall apart. I recommend using the bottom of a flat-bottomed measuring cup to pack it into the bottom and around the sides. Bake for 13–15 minutes or until very lightly browned around the edges. Remove from the oven and allow to cool for 15 minutes before adding the filling. It’s best if the crust is still slightly warm so the filling can properly adhere.
- Make the filling: Using a hand mixer or a stand mixer fitted with paddle attachment, beat the softened butter on medium-high speed until completely smooth and creamy, about 2 minutes. Add the confectioners’ sugar, vanilla extract, and salt, and beat until combined, about 1 minute. Scrape down the sides and up the bottom of the bowl as needed. Add the peanut butter and beat until smooth and combined.
- Spread filling evenly into tart crust. Set aside as you prepare the topping.
- Make the topping: Using a double boiler or microwave, melt the chocolate and peanut butter together until smooth. If using the microwave, stop and stir every 15 seconds until melted. Pour and spread over filling. (For the pictured tart, I saved 1–2 Tablespoons of the topping and drizzled it on top after the topping set.)
- Chill in the refrigerator, uncovered, for 4–6 hours (or up to 2 days) before slicing. If chilling for longer than 6 hours, cover it. This crust is crumbly no matter what, but chilling for 6+ hours helps the tart slice a little neater.
- Cover leftovers tightly and refrigerate for up to 1 week.
Notes
- Make Ahead Instructions: You can bake and cool the crust up to 3 days in advance. Cover and refrigerate until ready to fill. You can also assemble the entire tart, cover, and refrigerate for up to 2 days before serving. Tart freezes well up to 3 months. Thaw in the refrigerator before serving.
- Special Tools (affiliate links): Food Processor (for graham cracker crumbs) | Glass Mixing Bowl | 9-inch Tart Pan | Electric Mixer (Handheld or Stand) | Double Boiler (optional)
- Crust: Feel free to swap out the graham cracker crust for an Oreo cookie crust (or you could even use Nutter Butter cookies). Reduce butter to 3 Tablespoons and leave out the sugar. Process about 15–16 whole Oreos or Nutter Butters (cookie + filling) into crumbs. Stir in melted butter. Bake for about 12 minutes. For a more traditional tart crust, use the peanut crust from my Snickers caramel tart recipe; follow crust ingredients and steps 2 & 3 from that recipe.
- Peanut Butter: If you don’t mind some crunchy nuts in the filling and topping, feel free to use crunchy peanut butter instead. I strongly suggest using a processed peanut butter such as Jif or Skippy. Natural-style peanut butter works in a pinch, but the tart may take longer to set up in the refrigerator and the topping could be oily.
- Chocolate: You need 6 ounces of pure chocolate. Pure baking chocolate is typically sold in 4-ounce (113g) bars, so you need 1.5 bars. I recommend Baker’s or Ghirardelli brands, both sold in 4-ounce bars in the baking aisle. Instead, you can use 3/4 cup chocolate melting wafers (I like Ghirardelli brand), or chocolate chips.
- Can I Make This Without a Tart Pan? I don’t recommend it. The tart will be very difficult to cut. Instead, try my peanut butter pie or the mini peanut butter cup tarts detailed above. A 9-inch springform pan would likely work, though I haven’t tested it.