

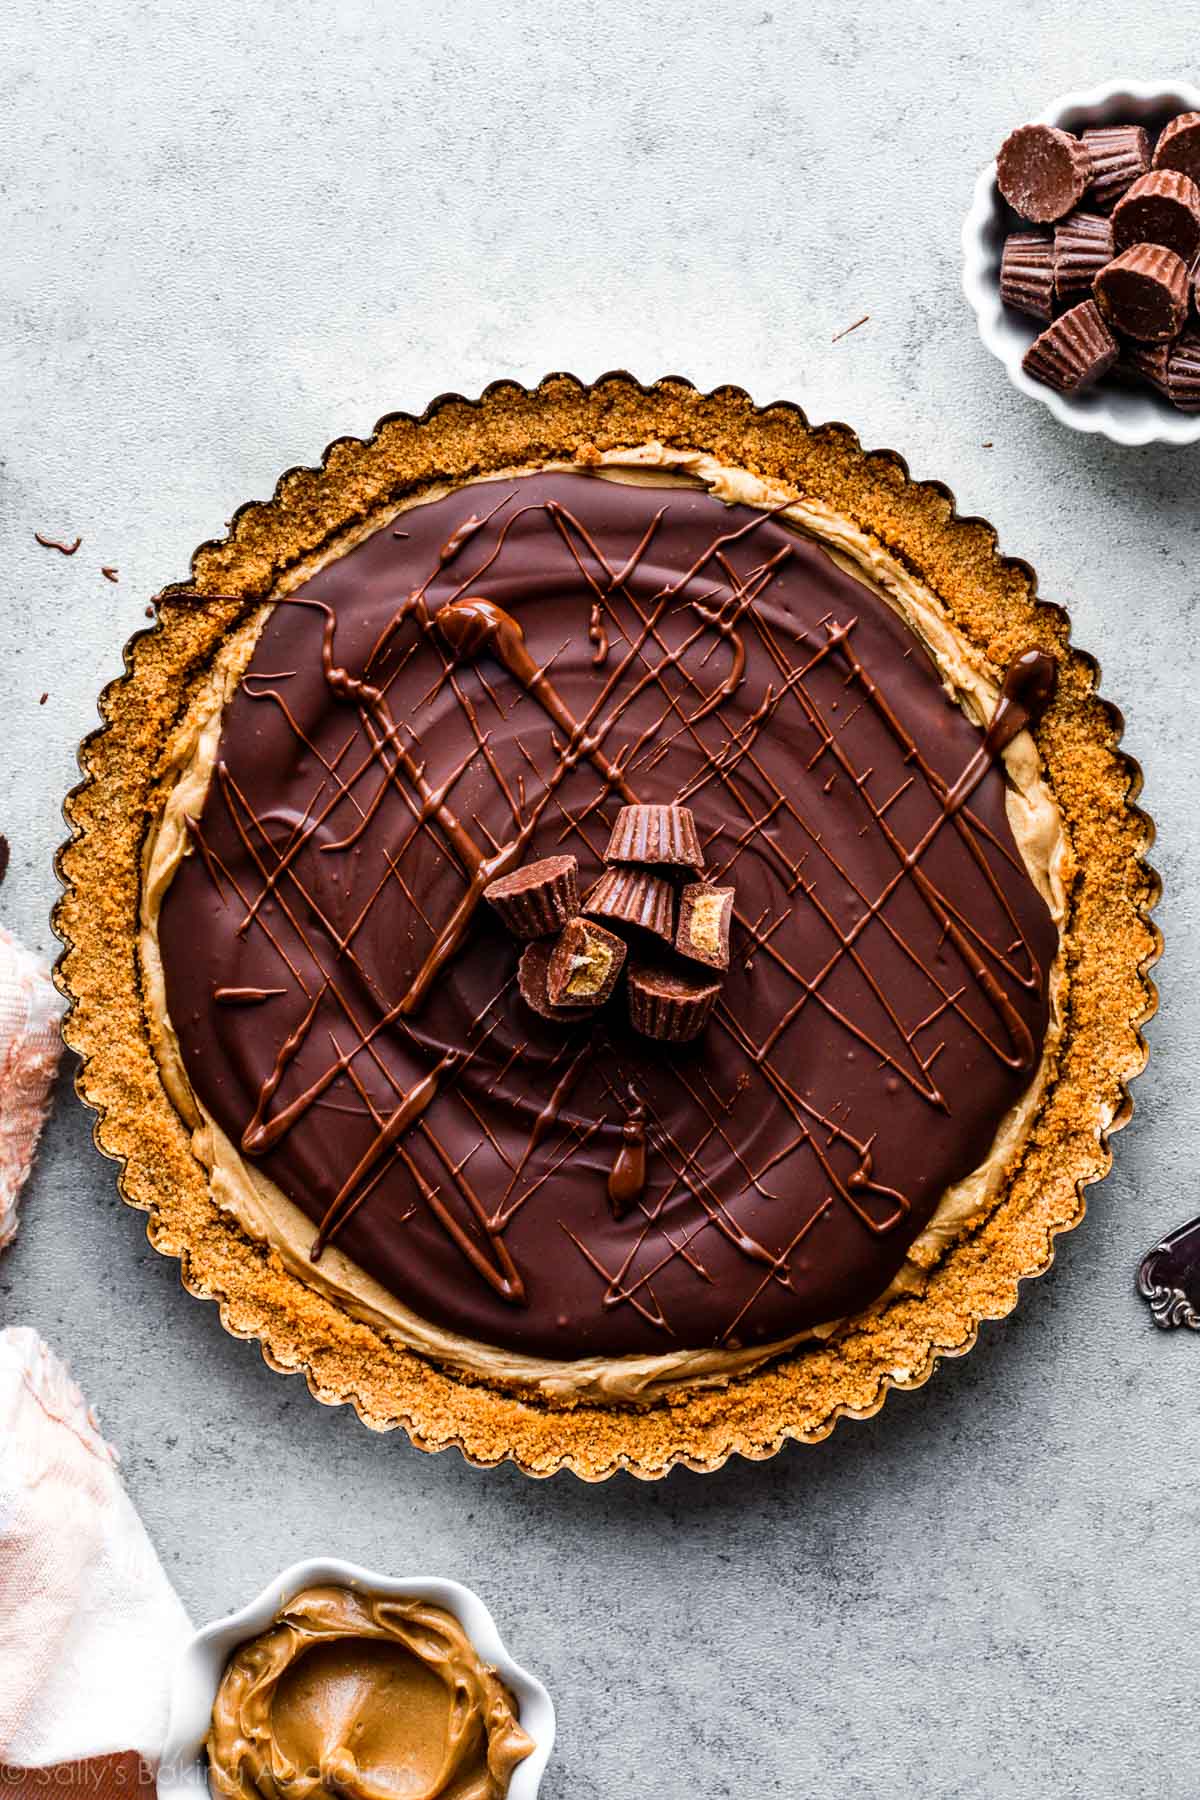
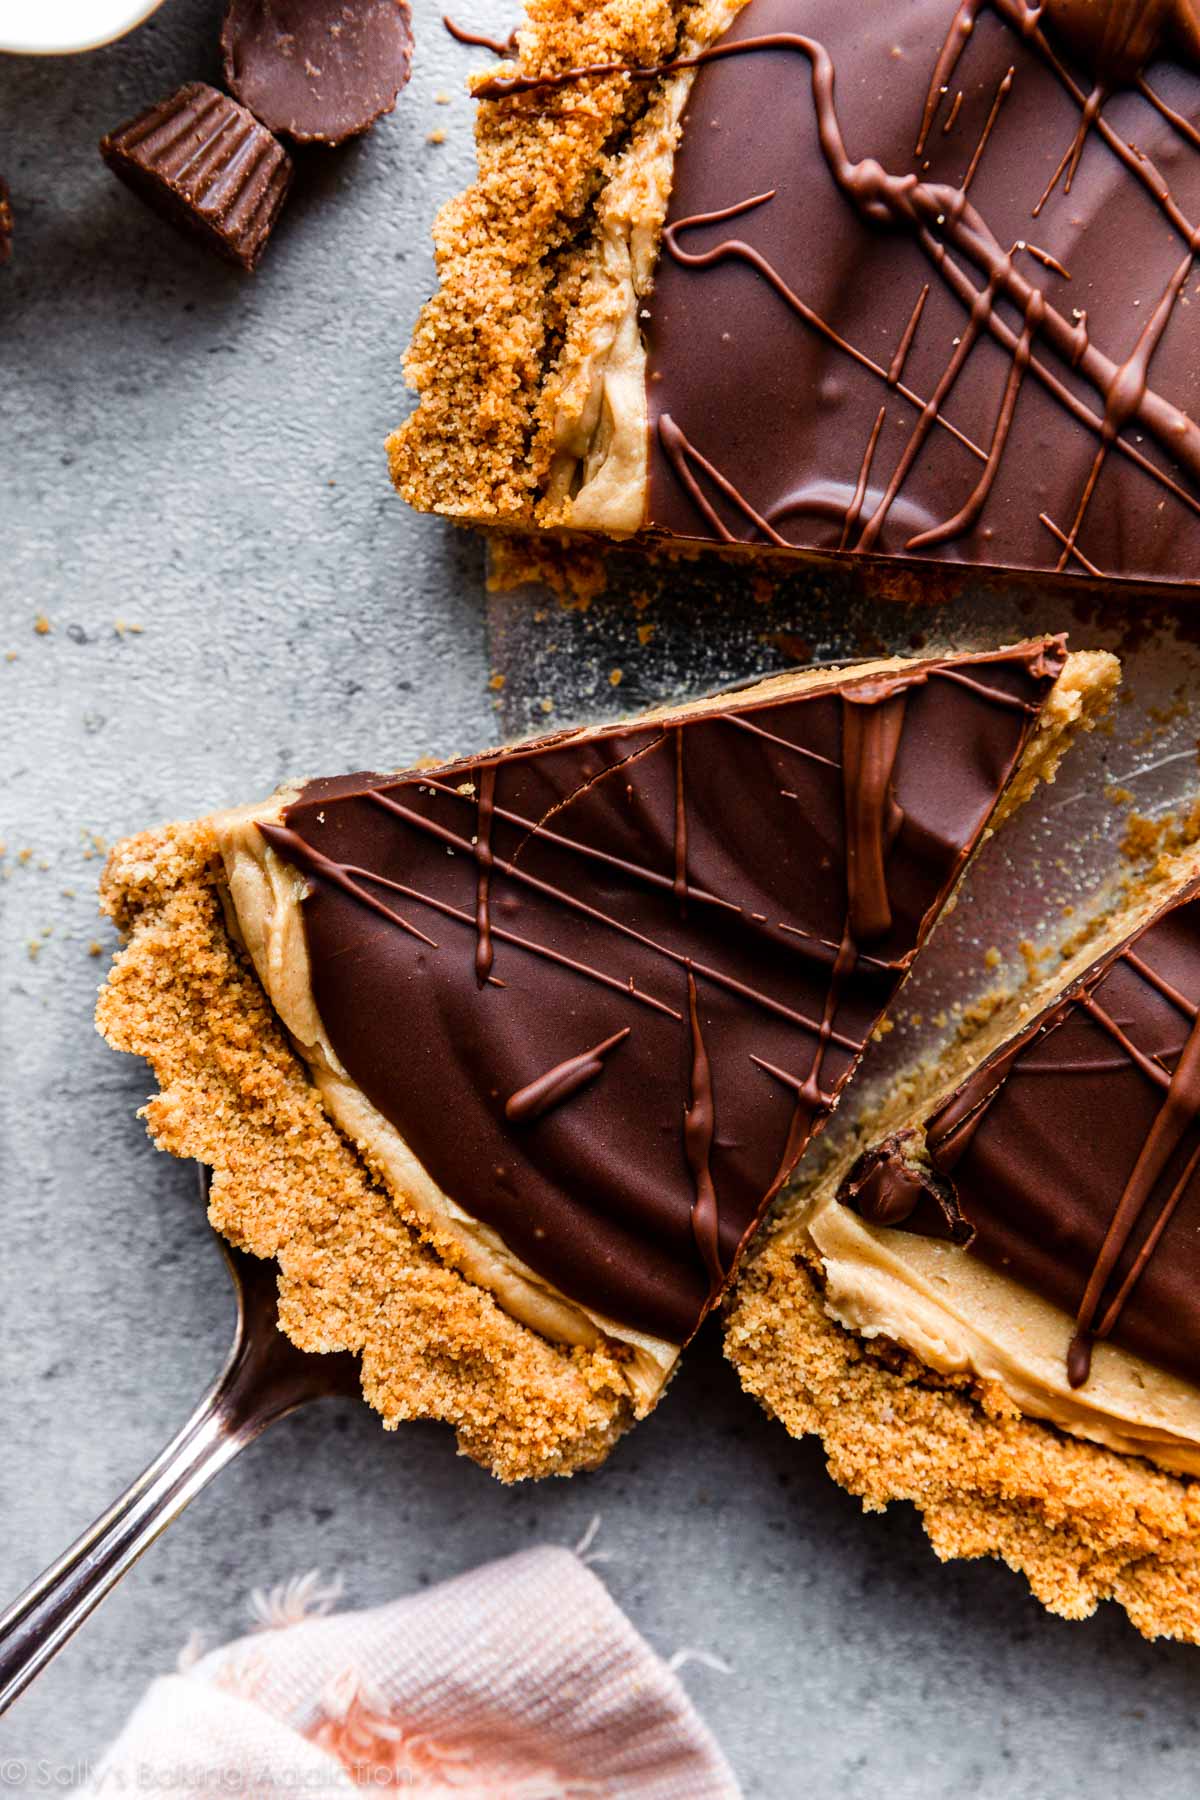
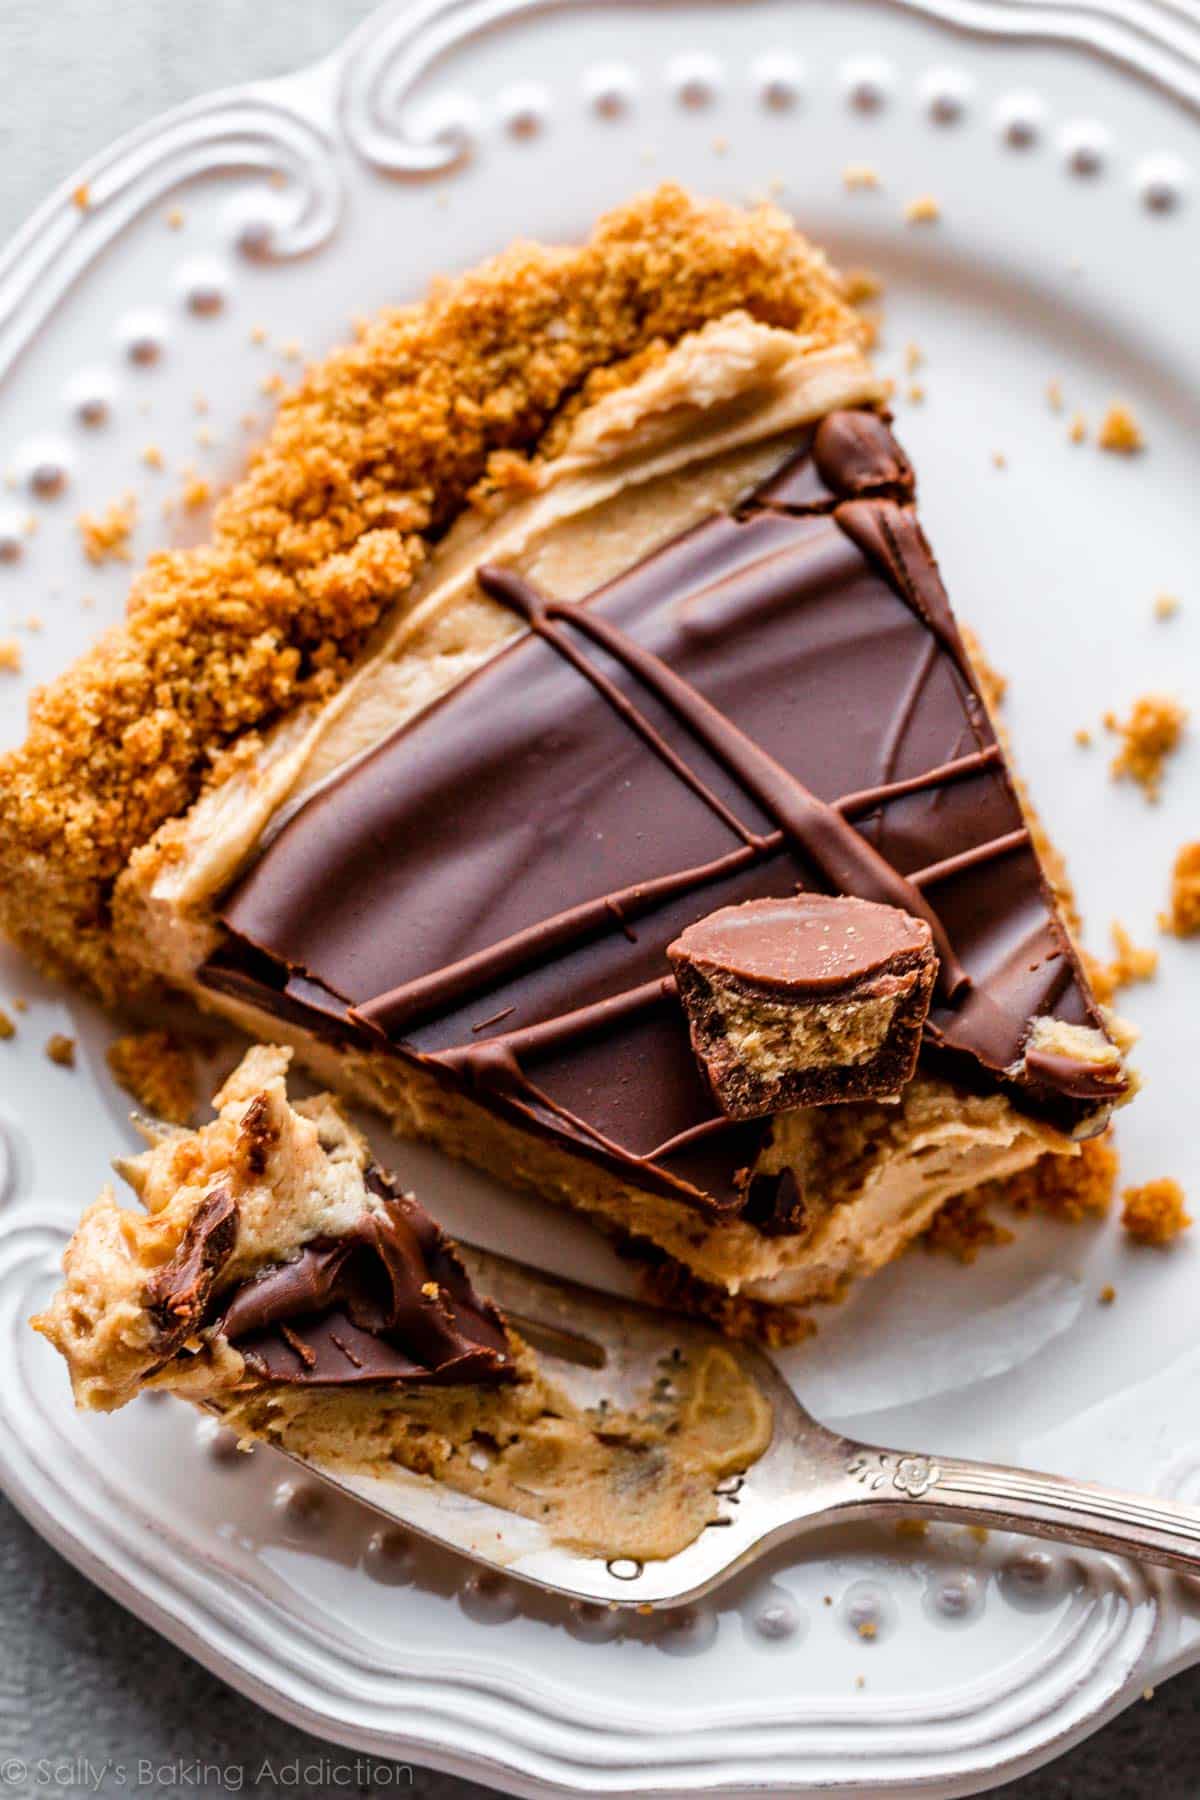
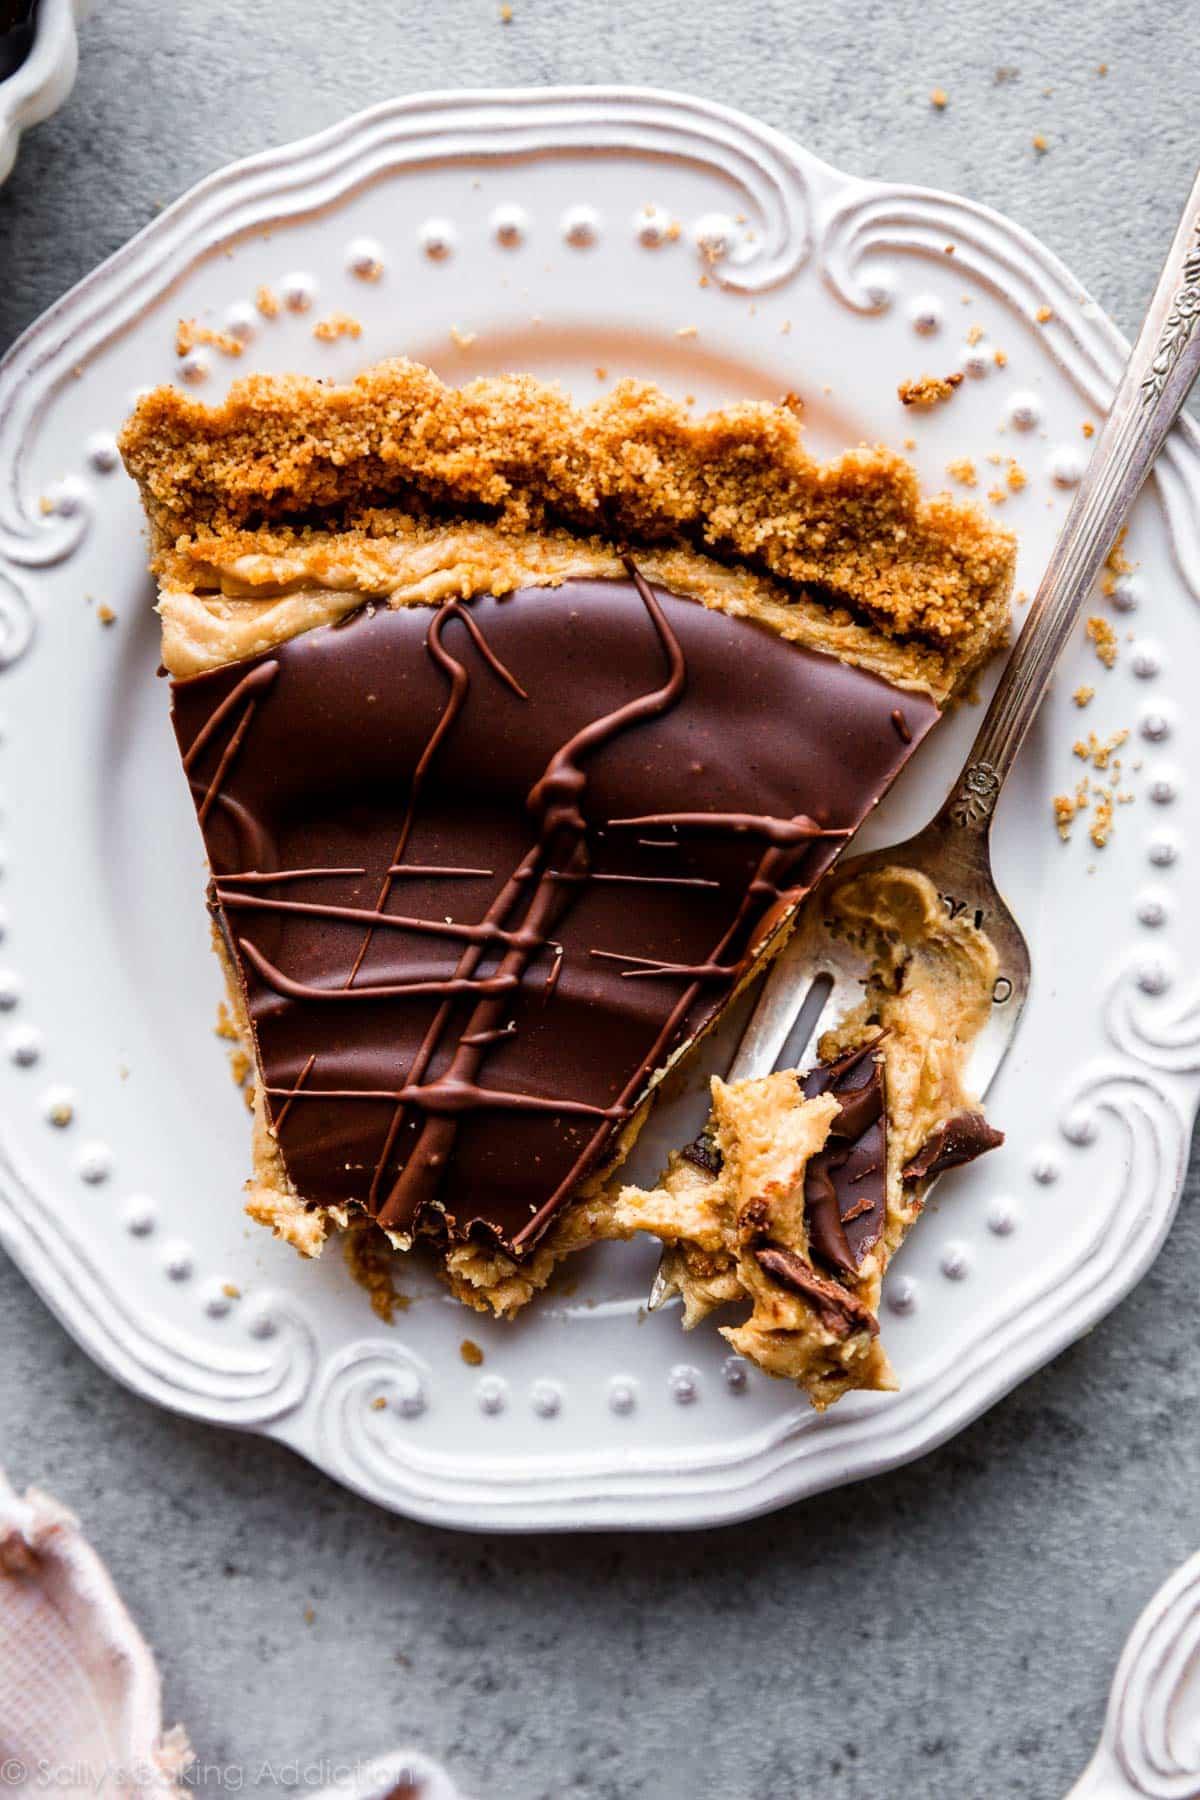
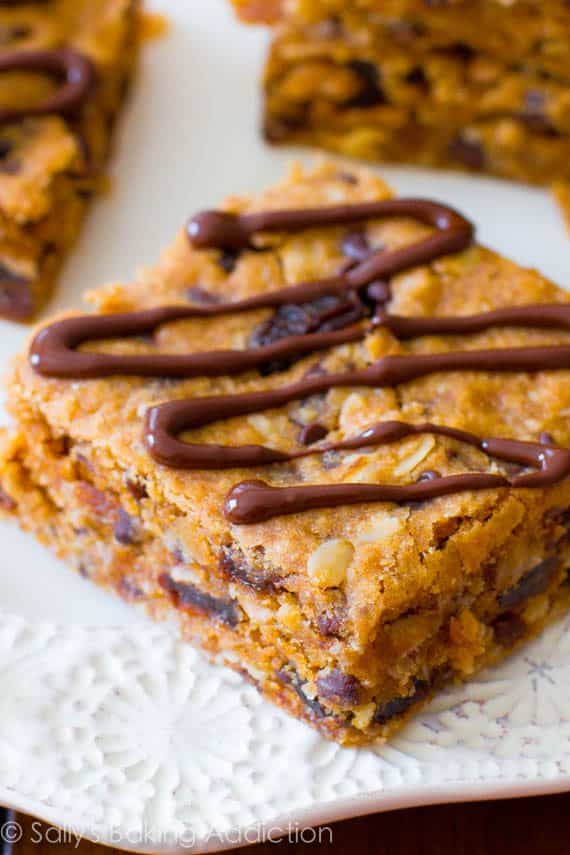
This peanut butter cup tart features a crunchy graham cracker crust, mega creamy peanut butter filling, and a smooth chocolate topping. You only need 8 ingredients to get started. The peanut butter filling and chocolate topping are no-bake, but the crust requires time in the oven in order to set. Warning: this dessert is incredibly rich. A small slice goes a long way!
Are there 4 more beautiful words than “giant peanut butter cup?” Honestly.
This dessert is always fun for holidays, and I’ve served it along side Father’s Day recipes, Mother’s Day recipes, Valentine’s Day, anniversaries, a random Sunday (why not?), you name it. It’s always devoured!
One reader, Carla, commented: “What a great recipe! Comes together quickly and does not disappoint! It truly tastes like a giant peanut butter cup! Will definitely be making it again. ★★★★★”
Tell Me About This Peanut Butter Cup Tart
- Texture: It’s like eating a giant peanut butter cup, only the filling is much creamier and you have a delightful crunch from the crumbly crust.
- Ease: I’m confident a beginner could do this. Mix the crust together with a spoon, use a mixer for the 5-ingredient peanut butter filling, then melt chocolate and peanut butter together for the topping. Simple to assemble, too.
- Baking: The filling and topping are no-bake, but the crust does require a short visit to the oven. Bake it for 13–15 minutes to help it set. Cool it, then spread in the filling and pour on the topping.
- Time: What it lacks in bake time, it makes up for in refrigerator time. The tart must chill in the refrigerator before slicing and serving. 4 hours is good enough, but 6 hours is ideal. Torture I tell ya!
Best Ingredients to Use & Why
- Graham Cracker Crumbs: I tested this recipe with an Oreo crust at first. It was incredible, as you can imagine, but I prefer it with a graham cracker crust. Oreos almost overwhelmed the peanut butter flavor. Graham crackers are more neutral and take on a toasty flavor after baking. Keeping that in mind, feel free to substitute with Oreo cookie crumbs if you’d like. See recipe note. Or try making my peanut butter Butterfinger cheesecake recipe instead. Lots of the same great flavors we love here!
- Butter: Use melted butter in the crust and softened butter in the filling.
- Sugar: Granulated sugar melts down and binds the crust together.
- Confectioners’ Sugar: Just as we do when making peanut butter bars and peanut butter balls, use confectioners’ sugar in the filling.
- Vanilla Extract & Salt: Both add flavor. If you love the slightly salted peanut butter filling of peanut butter cups, you’ll flip for this.
- Peanut Butter: Peanut butter is the main ingredient and we use it in both the filling and topping layers. For best texture, I suggest a processed creamy peanut butter such as Jif or Skippy. Natural style peanut butter works, but the tart may take longer to set up in the refrigerator.
- Chocolate: Use pure baking chocolate, chocolate melting wafers, or high quality chocolate chips. More on this next.
Peanut Butter Cup Tart Chocolate Topping
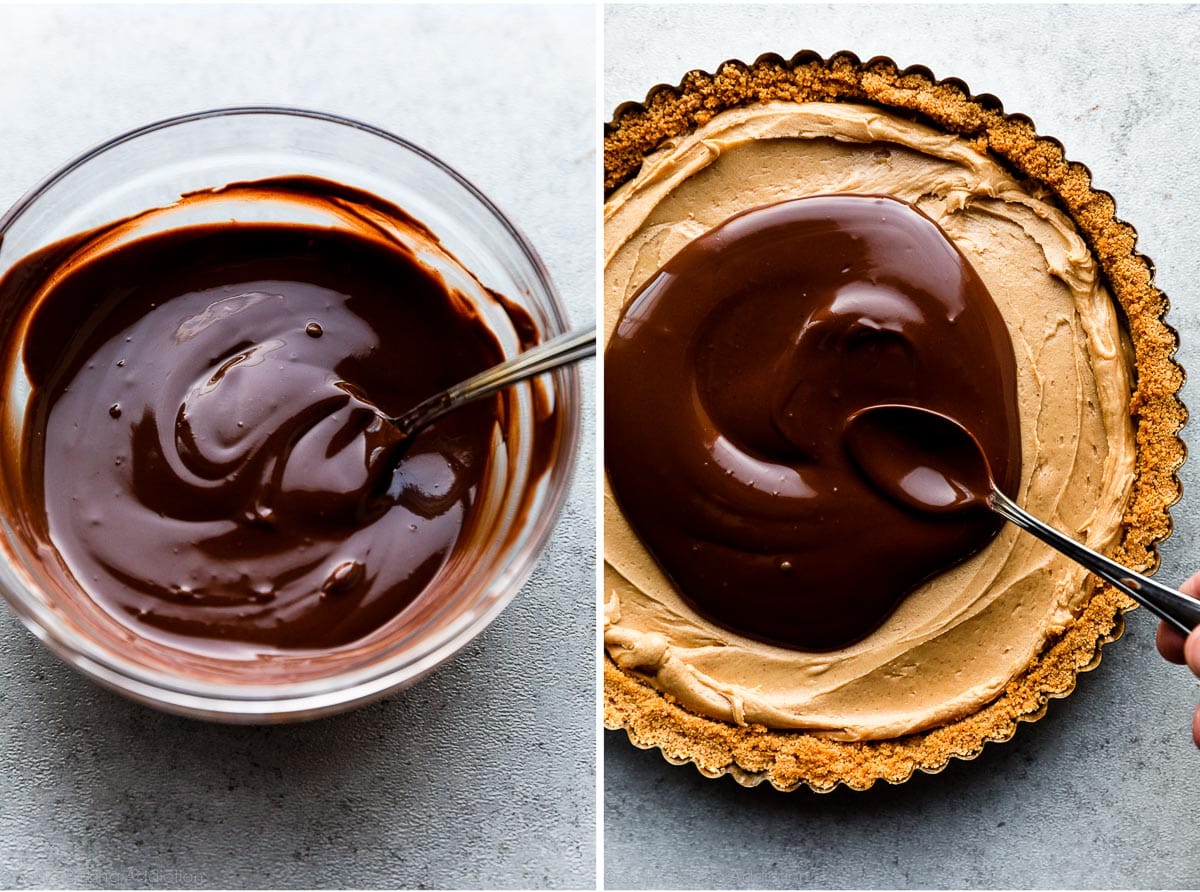
I make a tart similar to this—my snickers caramel tart. Have you ever tried it? When I first tested that recipe, I used melted chocolate (by itself) as the topping. When pure chocolate sets, it becomes pretty hard. As I cut the slices, all the filling squished out the sides. By melting the chocolate with a little fat (peanut butter), the topping is softer. It still sets, but isn’t a rock hard shell on top. It’s how we make the chocolate topping for peanut butter bars, too.
- I recommend 6 ounces of pure chocolate, such as 1.5 4-ounce baking bars (Baker’s or Ghirardelli brands are great) or use 3/4 cup chocolate melting wafers or chocolate chips.
Can I Make This Without a Tart Pan?
You need a (affiliate link) 9-inch tart pan for this recipe. I don’t recommend making this recipe in a regular pie dish because the tart will be very difficult to cut and remove from the pan. Instead, try my creamy peanut butter pie, peanut butter ice cream pie, or try the mini peanut butter cup tarts, detailed next. A 9-inch springform pan would likely work, though I haven’t tested it.
How to Make Mini Peanut Butter Cup Tarts
Don’t have a tart pan or maybe you don’t need a full size tart on your hands? Try using this recipe for about 12 mini tarts either in a mini tart pan or use a lined muffin pan. Divide crust mixture between each, press firmly into the bottom of the mini tart pans or muffin liners, and bake for 8 minutes to help set the crust. Cool completely, then fill each nearly full with filling and spread chocolate topping on top. Chill for at least 2-3 hours before serving.
This recipe is part of Sally’s Pie Week, an annual tradition where I share a handful of new recipes that fit into the pie/crisp/tart category. Join the community below!
Print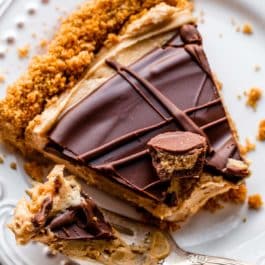
Peanut Butter Cup Tart
- Prep Time: 45 minutes (includes crust cooling)
- Cook Time: 15 minutes
- Total Time: 5 hours (includes chilling)
- Yield: serves 8-10
- Category: Dessert
- Method: Baking
- Cuisine: American
Description
This peanut butter cup tart features a crunchy graham cracker crust, mega creamy peanut butter filling, and a smooth chocolate topping. The filling and chocolate topping are no-bake, but the crust requires time in the oven in order to properly set.
Ingredients
Graham Cracker Crust
- 1 and 1/3 cups (160g) graham cracker crumbs (about 10–11 full sheet graham crackers)
- 1/4 cup (4 Tbsp; 56g) unsalted butter, melted
- 2 Tablespoons (25g) granulated sugar
Filling
- 6 Tablespoons (85g) unsalted butter, softened to room temperature
- 1 cup (120g) confectioners’ sugar
- 1 teaspoon pure vanilla extract
- 1/8 teaspoon salt
- 1 and 1/4 cups (315g) creamy peanut butter*
Topping
- 6 ounces (170g) semi-sweet, bittersweet, or milk chocolate (see Note)
- 3 Tablespoons (45g) creamy peanut butter
Instructions
- Preheat oven to 350°F (177°C).
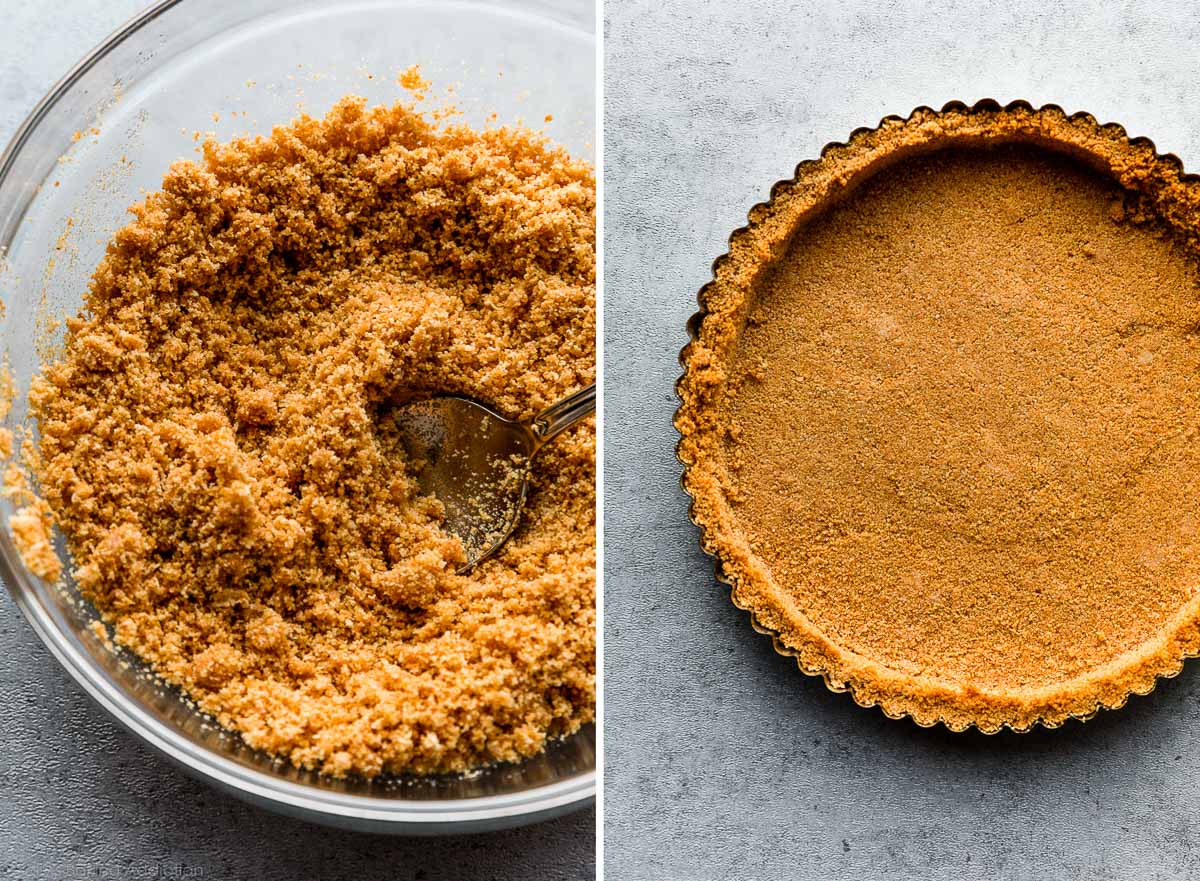
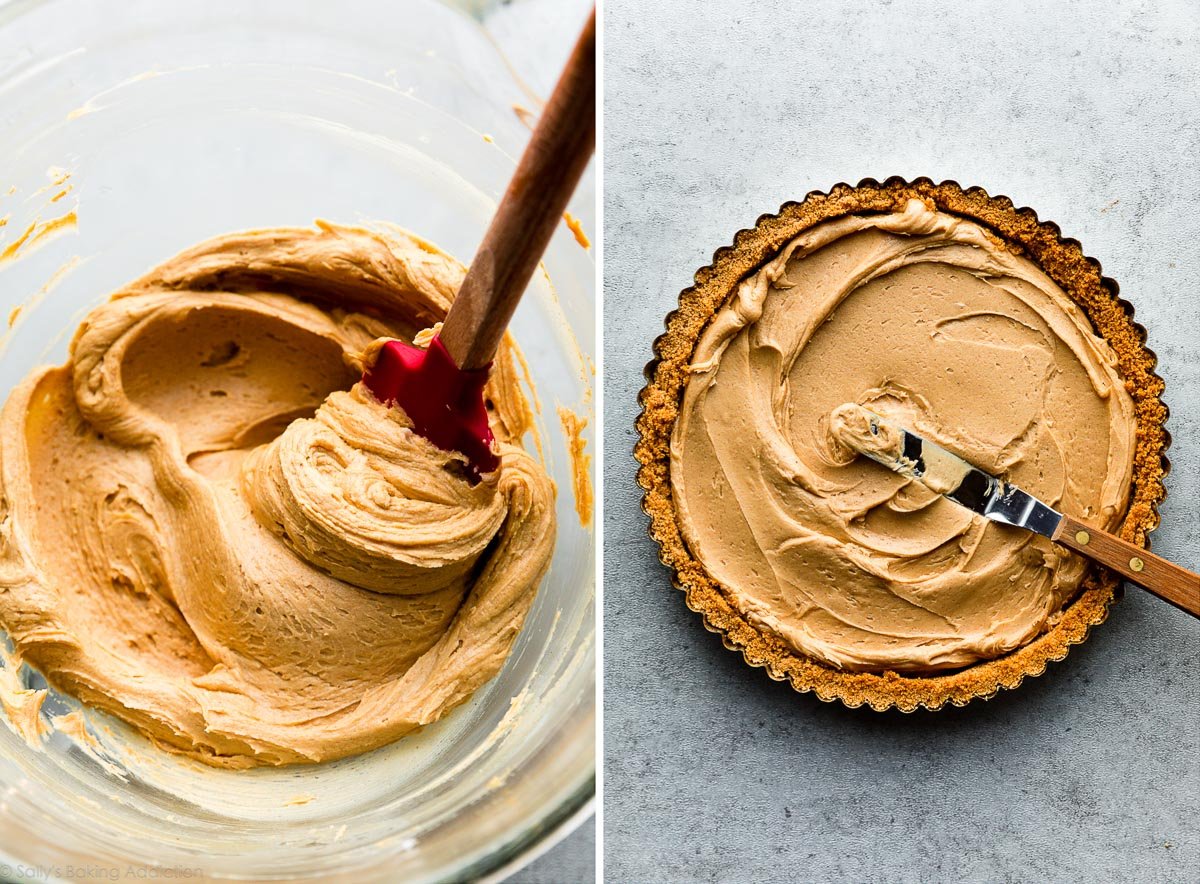
- Make the crust: Stir the graham cracker crust ingredients together. Pour into a 9-inch tart pan and pack in very tightly. The tighter it’s packed, the less likely it will fall apart. I recommend using the bottom of a flat-bottomed measuring cup to pack it into the bottom and around the sides. Bake for 13–15 minutes or until very lightly browned around the edges. Remove from the oven and allow to cool for 15 minutes before adding the filling. It’s best if the crust is still slightly warm so the filling can properly adhere.
- Make the filling: Using a hand mixer or a stand mixer fitted with paddle attachment, beat the softened butter on medium-high speed until completely smooth and creamy, about 2 minutes. Add the confectioners’ sugar, vanilla extract, and salt, and beat until combined, about 1 minute. Scrape down the sides and up the bottom of the bowl as needed. Add the peanut butter and beat until smooth and combined.
- Spread filling evenly into tart crust. Set aside as you prepare the topping.
- Make the topping: Using a double boiler or microwave, melt the chocolate and peanut butter together until smooth. If using the microwave, stop and stir every 15 seconds until melted. Pour and spread over filling. (For the pictured tart, I saved 1–2 Tablespoons of the topping and drizzled it on top after the topping set.)
- Chill in the refrigerator, uncovered, for 4–6 hours (or up to 2 days) before slicing. If chilling for longer than 6 hours, cover it. This crust is crumbly no matter what, but chilling for 6+ hours helps the tart slice a little neater.
- Cover leftovers tightly and refrigerate for up to 1 week.
Notes
- Make Ahead Instructions: You can bake and cool the crust up to 3 days in advance. Cover and refrigerate until ready to fill. You can also assemble the entire tart, cover, and refrigerate for up to 2 days before serving. Tart freezes well up to 3 months. Thaw in the refrigerator before serving.
- Special Tools (affiliate links): Food Processor (for graham cracker crumbs) | Glass Mixing Bowl | 9-inch Tart Pan | Electric Mixer (Handheld or Stand) | Double Boiler (optional)
- Crust: Feel free to swap out the graham cracker crust for an Oreo cookie crust (or you could even use Nutter Butter cookies). Reduce butter to 3 Tablespoons and leave out the sugar. Process about 15–16 whole Oreos or Nutter Butters (cookie + filling) into crumbs. Stir in melted butter. Bake for about 12 minutes. For a more traditional tart crust, use the peanut crust from my Snickers caramel tart recipe; follow crust ingredients and steps 2 & 3 from that recipe.
- Peanut Butter: If you don’t mind some crunchy nuts in the filling and topping, feel free to use crunchy peanut butter instead. I strongly suggest using a processed peanut butter such as Jif or Skippy. Natural-style peanut butter works in a pinch, but the tart may take longer to set up in the refrigerator and the topping could be oily.
- Chocolate: You need 6 ounces of pure chocolate. Pure baking chocolate is typically sold in 4-ounce (113g) bars, so you need 1.5 bars. I recommend Baker’s or Ghirardelli brands, both sold in 4-ounce bars in the baking aisle. Instead, you can use 3/4 cup chocolate melting wafers (I like Ghirardelli brand), or chocolate chips.
- Can I Make This Without a Tart Pan? I don’t recommend it. The tart will be very difficult to cut. Instead, try my peanut butter pie or the mini peanut butter cup tarts detailed above. A 9-inch springform pan would likely work, though I haven’t tested it.


Reader Comments and Reviews
This recipe sounds yummy. I have tried a lot of your recipes and have never been disappointed. Can’t wait to try this with my chocolate chip tart cups.
Made a chocolate for pie day…family enjoyed the pie. I did convert the graham cracker crust to a chocolate graham cracker crust. Have you thought of creating a recipe for a chocolate graham cracker crust rather than an Oreo crust. Coming from you, I know it would be good. Even good for this peanut butter tart
How would I increase this for an 11in tart pan since that is only what I have?
Hi Rachel, you could stretch this to fit an 11-inch tart pan, but it will be pretty thin. You could also try 1.5x the recipe for a thicker tart. Bake the crust for a few extra minutes. Let us know how it turns out!
I ended up making this with the Oreo crust because I really wanted the extra chocolate… and to go along with the peanut butter cup idea. Also decorated with crushed Reese’s Pieces as shown on the peanut butter pie recipe. Wow, this was delicious! Great peanut butter flavor without being overwhelming, and it was great with the Oreo crust. I’d still like to try it with the graham cracker crust sometime.
Hi, I’ve made your graham cracker crust & its variations several times, but always in a pie dish. I’ve never had trouble with it crumbling apart when serving… after reading the comments, is there a reason it would be more crumbly in this recipe? The tart pan, or the filling? Trying to decide between baking this or the Unbelievable PB Pie… or just using an Oreo crust here, if it would be more sturdy. Any thoughts would be appreciated. Thank you!
Hi Shannon, if you’ve never had trouble with graham crust in the past, you shouldn’t have any here! Make sure to press it in well. Oreo crust would also be delicious here.
This was a fail! the crust didn’t set at all.. it was like sand.. the filling slid around on it after it was fully set. the filling had barely any peanut butter flavor.. too sweet and flavorless.. tasted like mostly butter.
Great recipe! It turned out perfect and my family has not stopped talking about it and have asked me to make it again!
I love the e pies so much. I think I will bake it at home because it looks so delicious.
I have been making this pie for a long time and its everyone’s favorite. I make the crust using Sally’s very peanut butter cookie recipe. I also pipe chocolate peanut butter frosting around the edges
Hello Sally! Thank you for this recipe ! I am from Los Angeles and I love to make baked sweets for my loved ones. My boyfriend loves peanut butter and he will be thrilled to try the peanut butter cup tart.
Made this last night and it was absolutely delicious. Used GF graham cracker crumbs but otherwise followed the directions precisely. Divine! Thank you for another amazing recipe. This is also one of my Mom’s favorite recipes on your website 🙂