Description
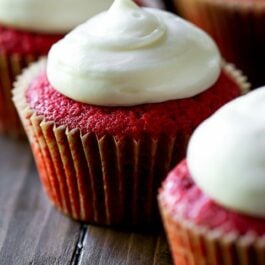
Fluffy and moist, these buttery red velvet cupcakes are my favorite. The tangy cream cheese frosting puts them over the top!
Ingredients
- 2 large eggs, room temperature and separated
- 1 and 1/3 cups (166g) all-purpose flour* (spooned & leveled)
- 1/4 cup (32g) cornstarch*
- 1/2 teaspoon baking soda
- 4 teaspoons (7g) natural unsweetened cocoa powder
- 1/4 teaspoon salt
- 1/4 cup (4 Tbsp; 56g) unsalted butter, softened to room temperature
- 1 cup (200g) granulated sugar
- 1/2 cup (120ml) canola or vegetable oil
- 2 teaspoons pure vanilla extract
- 1/2 teaspoon distilled white vinegar
- liquid or gel red food coloring*
- 1/2 cup (120ml) buttermilk, room temperature*
- cream cheese frosting for topping
Instructions
- Preheat oven to 350°F (177°C). Line a 12-count muffin pan with cupcake liners. This recipe makes 14 cupcakes, so you will have 2 cupcakes to bake in a 2nd batch.
- With a handheld or stand mixer fitted with a whisk attachment, beat 2 egg whites on high speed in a medium bowl until soft peaks form, about 2-3 minutes. Set aside.
- Sift the flour and cornstarch together to make sure it is evenly combined. Whisk this, along with baking soda, cocoa powder, and salt together in a medium bowl. Set aside.
- Using a handheld or stand mixer fitted with a paddle attachment, beat the butter on high speed until smooth and creamy—about 1 minute. Add the sugar and beat on high speed for 2 minutes until creamed together fairly well. Scrape down the sides and up the bottom of the bowl with a silicone spatula as needed. Add the oil and beat on high for 2 minutes. The butter may look “piece-y” and not completely combine with the oil. This is normal and ok.
- Add 2 egg yolks and the vanilla. Beat on medium-high speed until combined. Scrape down the sides and up the bottom of the bowl with a rubber spatula as needed. Beat in the vinegar and the food coloring, until you reach your desired color. I use 2 Tablespoons. With the mixer on low speed, add the dry ingredients in three additions alternating with the buttermilk, beginning and ending with the dry ingredients, and mixing each addition just until incorporated. Do not overmix. Fold whipped egg whites into cupcake batter with a rubber spatula or wooden spoon. The batter will be silky and slightly thick. (If there are still pieces of butter—and there were in 1 test batch for me—again, this is ok. They will melt inside as the cupcakes bake, making them even more buttery.)
- Spoon batter into cupcake liners filling 1/2 – 2/3 of the way full. Bake for 20-21 minutes or until the tops of the cupcakes spring back when gently touched and a toothpick inserted in the center comes out clean. Don’t overbake; your cupcakes will dry out. Allow to cool in the pan for 5 minutes, then transfer to a rack to cool completely.
- Prepare cream cheese frosting. Frost cooled cupcakes immediately before serving. I used a Wilton #12 tip; I don’t recommend a star tip. This frosting is a little too thin.
Notes
- Make Ahead & Freezing Instructions: Cupcakes can be made ahead 1 day in advance, covered, and stored at room temperature. Frosting can also be made 1 day in advance, covered, and stored in the refrigerator until ready to use. Decorate/assemble cupcakes immediately before serving. Leftover cupcakes keep well covered tightly at room temperature or in the refrigerator for 3 days. Unfrosted cupcakes can be frozen up to 2-3 months. Thaw overnight in the refrigerator.
- Special Tools (affiliate links): 12-count Muffin Pan | Cupcake Liners | Electric Mixer (Handheld or Stand) | Fine Mesh Sieve | Glass Mixing Bowl | Whisk | Silicone Spatula or Wooden Spoon | Cooling Rack | Piping Bag (Reusable or Disposable) | Wilton #12 Piping Tip | Cupcake Carrier (for storage)
- Cake Flour: I use a combination of sifted flour + cornstarch to produce cake flour. However, if you keep cake flour in the pantry, use 1 and 2/3 cups (about 195g) instead of all-purpose flour and cornstarch. Here is all you need to know about the homemade cake flour substitute.
- Food Coloring: The amount of red food coloring is up to you. I tested with varying amounts. To get the dark red color you see here, use 2 Tablespoons of liquid food coloring. Dye the batter until you are pleased with the color. Of course, you don’t have to dye the batter at all if you don’t want to. I haven’t tested this recipe with a natural alternative.
- Buttermilk: Buttermilk is required for this recipe. You can make your own DIY buttermilk substitute if needed. Add 1 teaspoon of white vinegar or lemon juice to a liquid measuring cup. Then add enough whole milk to the same measuring cup until it reaches 1/2 cup. (In a pinch, lower fat or nondairy milks work for this soured milk, but the cupcakes won’t taste as moist or rich.) Stir it around and let sit for 5 minutes. The homemade “buttermilk” will be somewhat curdled and ready to use in the recipe.
- Layer Cake: Here is my recipe for Red Velvet Cake.
- Mini Cupcakes: For around 36 mini cupcakes, line mini cupcake pans with liners or spray with nonstick spray. Prepare cupcakes and frosting as directed. Bake mini cupcakes for 12-13 minutes or until a toothpick inserted in the center comes out clean.
- Why Room Temperature Ingredients? Here’s everything you need to know about the importance of room temperature ingredients.
- Be sure to check out my 10 tips for baking the BEST cupcakes before you begin!