Description
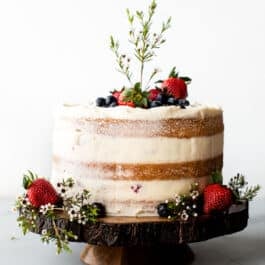
This naked cake is simply stunning with fresh berries, vanilla cake, and vanilla buttercream.
Ingredients
- 3 and 3/4 cups (443g) sifted all-purpose flour* (spooned & leveled)
- 2 teaspoons baking powder
- 3/4 teaspoon baking soda
- 1 teaspoon salt
- 1 and 1/2 cups (340g) unsalted butter, softened to room temperature
- 2 cups (400g) granulated sugar
- 5 large eggs, at room temperature
- 1 Tablespoon pure vanilla extract (yes, Tbsp!)
- 1 and 3/4 cups (420g/ml) buttermilk, at room temperature*
- optional: 1–2 cups (120–250g) fresh raspberries (or other berry, see Note)
Vanilla Buttercream
- 1 and 1/2 cups (340g) unsalted butter, softened to room temperature
- 5.5–6 cups (660–720g) confectioners’ sugar
- 5–6 Tablespoons (75–90g/ml) heavy cream
- 1 teaspoon pure vanilla extract
- 1/4 teaspoon salt
- optional garnishes (see post above for inspiration!)
Instructions
- Preheat oven to 350°F (177°C). Grease three 9-inch round cake pans, line with parchment paper rounds, then grease the parchment paper. Parchment paper helps the cakes seamlessly release from the pans. (If it’s helpful, see this parchment paper rounds for cakes video & post.)
- Make the cake: In a large bowl, whisk the flour, baking powder, baking soda, and salt together. Set aside. Using a handheld or stand mixer fitted with a paddle or whisk attachment, beat the butter and sugar together on medium-high speed until smooth and creamy, about 3 minutes. Scrape down the sides and bottom of the bowl with a silicone spatula as needed. On medium-high speed, add 1 egg at a time, beating well after each addition. Beat in the vanilla extract. Scrape down the sides and bottom of the bowl as needed.
- With the mixer on low speed, add the dry ingredients in three additions, alternating with the buttermilk, beginning and ending with the dry ingredients, and mixing each addition just until incorporated. Do not over-mix. The batter will be smooth, velvety, and slightly thick.
- Pour the batter evenly into the prepared pans and smooth the tops. For even cake layers, use a kitchen scale and weigh the cake pans for accuracy. You should have around 8 cups of batter total (a little over 1800g), so each cake pan should have about 2 and 2/3 cups (a little more than 600g) of batter.
- Bake for 25–26 minutes or until the cakes are baked through. To test for doneness, insert a toothpick into the center of the cake. If it comes out clean, it’s done. Allow cakes to cool completely in the pans set on a cooling rack. The cakes must be completely cool before frosting and assembling.
- Make the frosting: In a large bowl using a handheld mixer or stand mixer fitted with a whisk or paddle attachment, beat the butter on medium speed until creamy—about 2 minutes. Add 5 and 1/2 cups (660g) confectioners’ sugar, 5 Tablespoons (75g) heavy cream, vanilla extract, and salt with the mixer running on low speed. Gradually increase to high speed and beat for 3 full minutes. Add 1/2 cup (60g) more confectioners’ sugar if frosting is too thin, 1 more Tablespoon cream if frosting is too thick, or a pinch more salt if frosting is too sweet. Yields about 4.5 cups (1080g) of frosting.
- Assemble and decorate the cake: Watch the video for a tutorial on assembling and decorating this naked cake. First, using a large serrated knife, slice a thin layer off the tops of the cakes to create a flat surface. Discard (or crumble over ice cream!). Place 1 cake layer on your cake stand, cake turntable, or serving plate. Spread 1 and 1/2 cups (360g) of frosting evenly on top. If using, dot half of the raspberries around the rim. Flatten them down into the frosting as best you can so the cake layer on top is sturdy. Top with 2nd cake layer and evenly cover the top with another 1 and 1/2 cups of frosting and more (flattened!) raspberries around the rim. You can sprinkle a few leftover raspberries in the center, too. (Like I did in the video.) Top with the third cake layer. Spread the remaining frosting on top and all around the sides using an icing spatula. Use a bench scraper to smooth out the frosting on the sides of the cake. If you’re making a fully naked cake, spread the remaining frosting on just the top of the cake. If you have leftover frosting, you can freeze it for up to 3 months.
- Decorate the cake with garnishes.
- Refrigerate the cake for at least 2–3 hours or up to 1 day before slicing and serving. If chilling for more than a few hours, loosely cover with plastic wrap (or the lid of a cake carrier) after 1 hour of refrigeration. (The frosting will “set” after about 1 hour and the plastic wrap won’t really ruin your frosting at that point.) And if you’re chilling for more than a few hours, I suggest decorating with garnishes right before serving, so they look fresh.
- Cover and store leftover cake at room temperature for up to 1–2 days or in the refrigerator for up to 1 week.
Notes
- Make Ahead Instructions: The cake layers can be baked, cooled, and covered tightly at room temperature overnight. Likewise, the frosting can be prepared then covered and refrigerated overnight. Assemble and frost the cake the next day when you are ready to serve. The frosted cake can be refrigerated for up to 1 day—see step 8. The frosted cake can also be frozen for up to 2–3 months. Thaw overnight in the refrigerator and bring to room temperature before serving.
- Special Tools (affiliate links): Electric Mixer (Handheld or Stand) | Glass Mixing Bowls | Whisk | 9-inch Round Cake Pans | Icing Spatula | Bench Scraper | Cake Turntable | Cake Carrier (for storage)
- Flour: Sift flour before measuring.
- Buttermilk: If you don’t have buttermilk, you can make a DIY buttermilk substitute. Add 1 Tablespoon (15g/ml) of white vinegar or lemon juice to a liquid measuring cup. Then add enough whole milk to the same measuring cup until it reaches 1 and 3/4 cups (420g/ml). (In a pinch, lower-fat or nondairy milks work for this soured milk, but the cake won’t taste as moist or rich.) Stir it around and let sit for 5 minutes. The homemade “buttermilk” will be somewhat curdled and ready to use in the recipe.
- Raspberries: The raspberries will leak some juice around the edges after a day or so. Leave the berries out if you’re making this cake in advance for a party or celebration.
- Room-Temperature Ingredients: All refrigerated items should be at room temperature so the batter mixes together easily and evenly. Learn more about why room-temperature ingredients are important.
- I used this cake recipe for my checkerboard cake. The cake layers are slightly thicker here because this cake is 3 layers instead of 4. If you want to make the naked cake as a 4-layer cake, divide the batter evenly among 4 cake pans and bake for 23–24 minutes or until a toothpick comes out clean.