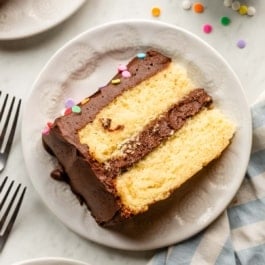
Description
After years of recipe testing, this is the best yellow cake I’ve ever had. Soft, buttery, and incredibly moist, it’s made with cake flour, whipped egg whites, extra egg yolks, and buttermilk for the ultimate homemade birthday cake. See above for different pan options. For best success, follow this recipe closely and don’t make any ingredient substitutions.
Ingredients
- 2 and 1/2 cups (285g) cake flour (spooned & leveled)*
- 2 and 1/2 teaspoons baking powder
- 1/4 teaspoon baking soda
- 1/2 teaspoon salt
- 3/4 cup (170g) unsalted butter, softened to room temperature*
- 1 and 3/4 cups (350g) granulated sugar
- 1/3 cup (75g/80ml) vegetable oil
- 4 large egg yolks, at room temperature
- 1 Tablespoon pure vanilla extract
- 1 cup (240g/ml) buttermilk, at room temperature*
- 2 large egg whites, at room temperature
- 1/8 teaspoon cream of tartar*
Chocolate Buttercream
- 1 and 1/4 cups (282g) unsalted butter, softened to room temperature
- 3 and 1/2 cups (420g) confectioners’ sugar
- 3/4 cup (65g) unsweetened cocoa powder (natural or Dutch-process)
- 3–5 Tablespoons (45–75g/ml) heavy cream (or half-and-half or milk), at room temperature
- 1 teaspoon pure vanilla extract
- 1/4 teaspoon salt
- optional for decoration: sprinkles
Instructions
- Preheat the oven to 350°F (177°C). Grease two 9-inch round cake pans, line with parchment paper rounds, then grease the parchment paper. Parchment paper helps the cakes seamlessly release from the pans. (If it’s helpful, see this parchment paper rounds for cakes video & post.) I recommend using nonstick spray for greasing.
- In a medium bowl, whisk the cake flour, baking powder, baking soda, and salt together. Set aside.
- In a large bowl using a handheld or stand mixer fitted with a paddle attachment, beat the butter and sugar together on medium-high speed until light and creamy, about 3 minutes. Scrape down the sides of the bowl with a silicone spatula as needed. (Here’s a helpful tutorial if you need guidance on how to cream butter and sugar.) Add the oil and beat for 1 minute until combined. Beat in the 4 egg yolks one at a time, letting each egg yolk fully incorporate before adding the next. Beat in the vanilla extract until combined.
- Add about 1/3 of the dry ingredients and 1/2 of the buttermilk and beat on low speed until combined. Add 1/3 more of the dry ingredients and the rest of the buttermilk and beat on low speed until combined. Add the rest of the dry ingredients and beat on low speed until combined. The batter will be very thick. You may need to whisk it all by hand to make sure there are no lumps at the bottom of the bowl. Set aside.
- In another large bowl using a handheld or stand mixer fitted with a whisk attachment, beat the egg whites and cream of tartar together on high speed until fluffy, medium-stiff peaks form, about 3 minutes.
- Fold the whipped egg whites into the cake batter. Work slowly and gently, as you don’t want to deflate the egg whites. Pour/spoon the batter evenly into the prepared pans.
- Bake for 27–31 minutes or until a toothpick inserted in the center of the cake comes out clean. Cool the cakes in the pans set on a cooling rack for 1 hour. Run a knife around the edges to loosen the sides, remove the cakes from the pans, peel off the parchment, and place on the rack to finish cooling. The edges of the cakes can be crumbly; this is normal. The cakes must be completely cool before frosting and assembling.
- Make the frosting: In a large bowl with a handheld or stand mixer fitted with a paddle attachment, beat the butter on medium speed until creamy, about 2 minutes. Add confectioners’ sugar, cocoa powder, 3 Tablespoons of heavy cream, salt, and vanilla extract. Beat on low speed for 30 seconds, then increase to high speed and beat for 1 full minute. Do not over-whip. Add 1/4 cup (30g) more confectioners’ sugar if frosting is too thin or 1–2 more Tablespoons of cream if frosting is too thick. Taste. Add another pinch of salt if desired.
- Assemble and frost: (For additional help with this step, see this how to assemble a layer cake video & post.) First, using a large serrated knife, slice a thin layer off the tops of the cakes to create a flat surface. Discard (or crumble over ice cream!). Place one cake layer on your cake stand, cake turntable, or serving plate. Spread about 3/4–1 cup (180–240g) of frosting in an even layer on top. Top with the second cake layer and spread about 1 cup (240g) of buttercream in a very thin layer over the top and sides to make the crumb coat. If desired, run a bench scraper around the cake to help smooth out the frosting on the sides. Refrigerate the cake until the crumb coat has set, about 20 minutes. Finish by spreading the top and sides with the remaining buttercream. Decorate the cake with sprinkles, if desired. For extra neat slices, refrigerate the cake for 30–60 minutes before slicing. This helps the cake hold its shape when cutting.
- Cover leftover cake tightly and store at room temperature for up to 1 day or in the refrigerator for up to 5 days. If the cake has been stored in the refrigerator, let the cake sit out at room temperature for at least 30 minutes to soften up again before serving.
Notes
- Make Ahead & Freezing Instructions: Prepare cake through step 8. Wrap the individual baked and cooled cake layers tightly and keep at room temperature for 1 day or freeze up to 3 months. Bring to room temperature (if frozen), then continue with step 9. Frosting can also be made 1 day ahead of time. Cover tightly and refrigerate overnight. Bring frosting to room temperature, then beat the frosting on medium speed for a few seconds so it’s creamy again. Adding a splash of cream or milk will help thin the frosting out, if needed. Frosted cake freezes well, up to 3 months. Thaw overnight in the refrigerator, then bring to room temperature before serving. See How to Freeze Cakes.
- Special Tools (affiliate links): 9-inch Round Cake Pans | Glass Mixing Bowls | Whisk | Electric Mixer (Handheld or Stand) | Silicone Spatula | Cooling Rack | Cake Turntable | Icing Spatula | Bench Scraper | Cake Carrier (for storage)
- Update in 2026: The original recipe called for 1 cup (226g) of butter and no oil. We reduced the butter and added a little oil to lighten the crumb and help prevent the cake from becoming overly dense.
- Cake Flour: Cake flour is key in this recipe. Do not use any cake flour substitutes.
- Eggs: You need 4 egg yolks and 2 egg whites in this cake batter, which means you’ll start with 4 whole eggs and have 2 egg whites leftover for another use. It’s easiest to separate eggs when they’re cold. The eggs must be at room temperature to whip properly, so after you separate the eggs, cover the yolks and egg whites separately and let them sit at room temperature for at least 20 minutes before beginning the recipe.
- Buttermilk: Buttermilk is required for this recipe. You can make your own DIY buttermilk substitute by measuring 1 Tablespoon of lemon juice or white vinegar in a measuring glass. Add enough milk (whole milk is best—lower-fat or nondairy milks work in a pinch, but the cake won’t taste as moist or rich) in the same measuring glass to reach 1 cup. Stir it around and let sit for 5 minutes. The soured milk will be somewhat curdled and ready to use in your recipe.
- Cream of Tartar: This is an important ingredient that helps the egg whites whip into lofty, fluffy peaks and hold their shape when folded into the heavy cake batter. You can skip it if needed and whip the egg whites by themselves, but the cake will be a little denser.
- Amount of Cake Batter: This recipe yields about 5–6 cups of batter, which is helpful if you need it for different Cake Pan Sizes & Conversions. This recipe is too large for two 8-inch round cake pans.
- 9×13-Inch Pan: You can bake this batter in a 9×13-inch baking pan (bake time will be longer, around 30–35 minutes), but we recommend this similar recipe for yellow sheet cake, which uses mostly the same ingredients.
- 3-Layer Cake: You can also prepare this cake as a 3-layer cake. Divide the batter between three 8-inch or 9-inch cake pans and bake for 22–25 minutes or until a toothpick inserted in the center comes out clean. The frosting recipe written will be enough for thin layers of frosting; you can double my chocolate buttercream recipe (simply double each ingredient) if you want a lot of frosting.
- Yellow Cupcakes: Here is my favorite yellow cupcakes recipe, which includes directions for mini cupcakes too. Same unbelievable texture as this cake! If you need more than 1 dozen yellow cupcakes, use this yellow cake recipe for between 2–3 dozen and follow the same baking instructions as my yellow cupcakes.