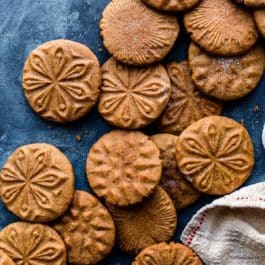
Description
Sweetened mostly with brown sugar and spiced with cinnamon, ginger, nutmeg, and cardamom, these stamped cookies are just as flavorful as they are beautiful. Chill the cookie dough in the refrigerator for at least 2 hours. Feel free to skip the cookie stamp and bake them as round cookie dough balls.
Ingredients
- 2 cups (250g) all-purpose flour (spooned & leveled), plus extra as needed for stamping
- 1/2 teaspoon baking soda
- 1/2 teaspoon salt
- 2 and 1/2 teaspoons ground cinnamon
- 1/2 teaspoon ground nutmeg
- 1/2 teaspoon ground ginger
- 1/4 teaspoon ground cardamom
- 1/2 cup (8 Tbsp; 113g) unsalted butter, softened to room temperature
- 3/4 cup (150g) packed light or dark brown sugar
- 1/3 cup (65g) granulated sugar
- 1 Tablespoon (15ml) unsulphured or dark molasses (do not use blackstrap; I prefer Grandma’s brand), maple syrup, or honey
- 1 large egg, at room temperature
- 1 teaspoon pure vanilla extract
Instructions
- Whisk the flour, baking soda, salt, cinnamon, nutmeg, ginger, and cardamom together in a medium bowl. Set aside.
- Using a hand mixer or a stand mixer fitted with paddle attachment, beat the softened butter, brown sugar, and granulated sugar together on medium-high speed until creamy, about 3 minutes. (Here’s a helpful tutorial if you need guidance on how to cream butter and sugar.) Scrape down the sides and bottom of the bowl as needed. Add the molasses, egg, and vanilla extract and mix on high speed until combined, about 1 minute. Scrape down the sides and bottom of the bowl again as needed.
- Add the flour mixture to the wet ingredients, then mix on low speed until combined. Cover and chill the dough in the refrigerator for at least 2 hours (and up to 4 days). If chilling for longer than a few hours, allow to sit at room temperature for at least 15 minutes before rolling because the dough will be quite hard.
- Preheat oven to 350°F (177°C). Line baking sheets with parchment paper or silicone baking mats. Set aside.
- Roll and stamp: Measure 1 Tablespoon (20g) of chilled cookie dough per cookie and roll into balls. The dough may seem crumbly, but will come together as you roll. Arrange dough balls 3 inches apart on the baking sheets. Place the cookie stamp directly on top of each cookie dough ball, centering the ball as best as you can, then firmly press down until the dough extends nearly to the edges of the cookie stamp. Lift straight up. If your cookie dough is sticking to the cookie stamp (mine does!), lightly dip the cookie stamp in a bowl of flour before stamping the cookie dough ball. If dipped lightly, the flour bakes right off the cookie.
- Bake cookies until the edges are set, about 13 minutes.
- Remove from the oven and allow cookies to cool on the baking sheet for 5 minutes before transferring to a wire rack to cool completely.
- Cover leftover cookies tightly and store at room temperature for up to 1 week.
Notes
- Make Ahead & Freezing Instructions: You can make the cookie dough and chill it in the refrigerator for up to 4 days (step 3). Baked cookies freeze well for up to 3 months. Unbaked cookie dough balls freeze well for up to 3 months. Thaw completely at room temperature, then stamp and bake as directed in the recipe. Read my tips and tricks on how to freeze cookie dough.
- Special Tools (affiliate links): Glass Mixing Bowl | Whisk | Electric Mixer (Handheld or Stand) | Baking Sheets | Silicone Baking Mats or Parchment Paper | Cookie Stamps (here are some options: Starry Nights (pictured), Snowflakes, Geo Shapes, and Greetings) | Cooling Rack
- Spices: Feel free to make spice substitutions as needed, keeping in mind some spices have a stronger flavor than others. For best results, I recommend following the spices and measurements listed.