Description
Making a pie from scratch is a labor of love, and if you’re taking the time to make a homemade pie, you want it to be a success. Crimping or fluting the edges of the pie crust creates a beautiful edge, helps to seal in the filling of your pie, and also helps prevent the edge from sinking down into the pie dish. We’re adding both flair and function here!
Ingredients
- pie dough such as homemade pie crust (recipe makes 2 crusts)
- all-purpose flour, as needed for rolling out dough
- egg wash: 1 large egg beaten with 1 Tablespoon (15ml) milk
- coarse sugar for sprinkling on crust, optional
Instructions
- Make the pie dough: Prepare and chill your pie dough for at least 2 hours. If using the linked recipe, prepare pie crust through step 5.
- Roll out the chilled pie dough: On a floured work surface, roll out one of the discs of chilled dough (if you’re making a double-crust pie, keep the other one in the refrigerator until you need it). Turn the dough about a quarter turn after every few rolls until you have a circle 12 inches in diameter. Carefully place the dough into a 9-inch pie dish. Tuck it in with your fingers, making sure it is completely smooth.
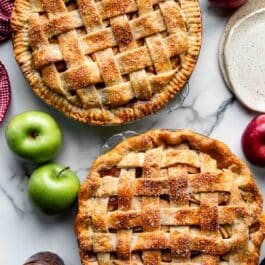
- After you fit the pie dough into the pie dish, use a sharp knife or kitchen shears to trim the excess pie dough overhang. I like to keep around 1.5 inches of dough overhanging. You can do this before or after you add your pie filling; it really doesn’t make a difference. If you’re making a double-crust pie, you can do this after you add the filling and top pie crust. (Here’s my how to lattice pie crust tutorial if you’re interested.)
- Fold the overhang back over and pinch it to make a nice, compact edge. If you’re working with a double-crust pie, roll and pinch the top and bottom crusts together. Now, decide if you want to crimp or flute the edges, and proceed with either step next.
- Crimping: To crimp the edges of the pie, you just need a regular fork. Place your index finger on top of the fork, and press the tines down into the edges of the crust, continuing all the way around the pie crust.
- Fluting: Use the knuckle of your index finger on your dominant hand, and your index finger and thumb of your non-dominant hand. With the non-dominant hand, pinch the edges of the dough around the knuckle of your dominant hand. Turn the pie dish as you go around the edges. Lightly flour your fingers if the pie dough becomes sticky.
- Brush the edges, as well as the top (if using a double-crust pie) with egg wash. If making a sweet pie, and to add a little sparkle and crunch, you can sprinkle the dough with a little coarse sugar.
- Proceed with your pie recipe, such as a double-crust pie like apple pie, chicken pot pie, cherry pie, strawberry rhubarb pie, peach pie, or blueberry pie; or a single-crust pie like pumpkin pie, banana cream pie, coconut cream pie, lemon meringue pie, French silk pie, or quiche.
Notes
- Special Tools (affiliate links): Rolling Pin | 9-inch Pie Dish | Kitchen Shears | Pastry Brush | Coarse Sugar | For more tools you may need to completely assemble and bake your pie, see my 10 Best Pie Baking Tools list.