Description
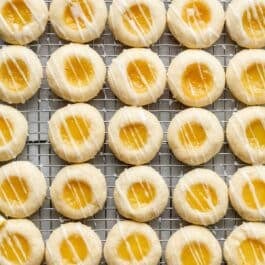
Sweet, soft lemon thumbprints are filled with lemon curd and drizzled with lemon icing. Instead of homemade lemon curd, you can use store-bought; or substitute raspberry, strawberry, or apricot preserves/jam. This is a very soft and creamy butter cookie dough, so refrigerating it before shaping is imperative. A quick chill after shaping as the oven preheats is helpful, too.
Ingredients
Dough
- 2 and 1/4 cups (281g) all-purpose flour, spooned and leveled
- 1 Tablespoon (8g) cornstarch
- 1/4 teaspoon salt
- 14 Tablespoons (200g) unsalted butter, softened to room temperature (see Note)
- 3/4 cup (150g) granulated sugar
- 1 Tablespoon fresh lemon zest
- 1 Tablespoon fresh lemon juice
- 1 large egg, at room temperature
- 1 teaspoon vanilla bean paste (or vanilla extract)
Coating & Filling
- 1/2 cup (100g) granulated sugar
- 1/2 cup (140g) homemade lemon curd or store-bought
Icing
- 1 cup (120g) confectioners’ sugar
- 2 Tablespoons (30ml) fresh lemon juice
Instructions
- Make the dough: In a medium bowl, whisk together the flour, cornstarch, and salt until combined. Set aside.
- In a large bowl using a handheld or a stand mixer fitted with a paddle attachment, beat the butter and 3/4 cup (150g) granulated sugar together on medium-high speed until creamed, about 3 minutes. (Here’s a helpful tutorial if you need guidance on how to cream butter and sugar.) Add the lemon zest, lemon juice, egg, and vanilla bean paste and beat on high speed until combined, about 1 minute. The wet ingredients will look curdled, but will smooth out when you add the dry ingredients. Scrape down the sides and up the bottom of the bowl and beat again as needed to combine.
- Add the dry ingredients to the wet ingredients and mix on low speed until combined. Dough will be very creamy. Cover and refrigerate for at least 3 hours, and up to 3 days. Chilling is imperative for this soft dough.
- Line large baking sheets with parchment paper or silicone baking mats. Make room in the refrigerator for baking sheets, so the shape cookies can chill as the oven preheats in step 7.
- Shape & coat the dough: Place granulated sugar in a small bowl. Scoop cold dough (about 1 Tablespoon (18g) of dough each) and roll into balls. Roll each dough ball in granulated sugar and place 2 inches apart on lined baking sheets.
- Fill the cookies: Use your thumb to make an indentation in the center of each cookie dough ball. Fill each with 1/2 teaspoon of lemon curd.
- Preheat oven to 350°F (177°C). Place baking sheets with unbaked cookies in the refrigerator while the oven preheats. (Or transfer all cookies to 1 baking sheet, or a few plates, if your refrigerator doesn’t have room. I recommend chilling the shaped cookies for a few minutes, to prevent over-spreading.)
- Once oven preheats, bake shaped cookies for 12–13 minutes, or until edges appear set and are very lightly beginning to brown. Remove from the oven and allow cookies to cool on the baking sheet for 5 minutes, then transfer to a wire rack to cool completely.
- Make the icing: In a small bowl, whisk together confectioners’ sugar and lemon juice. Drizzle over cooled cookies. (You can use a spoon or fork for this, or a squeeze bottle.) Icing will set at room temperature after about 30 minutes, and then you can stack, store, transport, and gift the cookies.
- Cookies stay fresh covered at room temperature for up to 1 week.
Notes
- Make Ahead & Freezing Instructions: You can make the cookie dough and chill it in the refrigerator for up to 3 days. Unbaked shaped cookie dough balls (that are not coated in sugar and filled with curd) freeze well up to 3 months. Thaw for 30 minutes, and then coat in sugar, carefully indent and fill, and then bake. See this post on how to freeze cookie dough for more information and a video tutorial. Baked and cooled cookies freeze well for up to 3 months. Thaw in the refrigerator or at room temperature.
- Special Tools (affiliate links): Citrus Juicer | Citrus Zester | Electric Mixer (Handheld or Stand) | Glass Mixing Bowl | Whisk | Vanilla Bean Paste | Baking Sheets | Silicone Baking Mats or Parchment Sheets | Cooling Rack | Squeeze Bottle (optional for drizzling icing)
- Butter: The dough recipe calls for 14 Tablespoons (200g) of butter, so not quite 1 full cup. In testing, the cookies overspread when using a full cup (2 sticks/226g) of butter.
- Vanilla: I love using vanilla bean paste in these cookies because it combines both extract AND vanilla bean seeds, and adds extra flavor. You can, of course, use pure vanilla extract instead. If you want that extra vanilla bean flavor, feel free to add the seeds scraped from 1/2 of a vanilla bean. (This is in addition to the liquid vanilla extract.)
- Lemon Curd: You need about 1/2 cup (140g) of lemon curd. I recommend making the whole recipe for homemade lemon curd. You can freeze the leftover lemon curd for up to 3-6 months, or enjoy on yogurt, toast, waffles/pancakes, biscuits, and scones.
- Instead of Lemon Curd: Instead or lemon curd, try raspberry, apricot, or strawberry preserves/jam. Keep in mind that the lemon flavor won’t be as strong without the lemon curd, so I recommend keeping the lemon icing on top. (For that pop of lemon flavor!)
- Be sure to check out my top 5 cookie baking tips AND these are my 10 must-have cookie baking tools.