

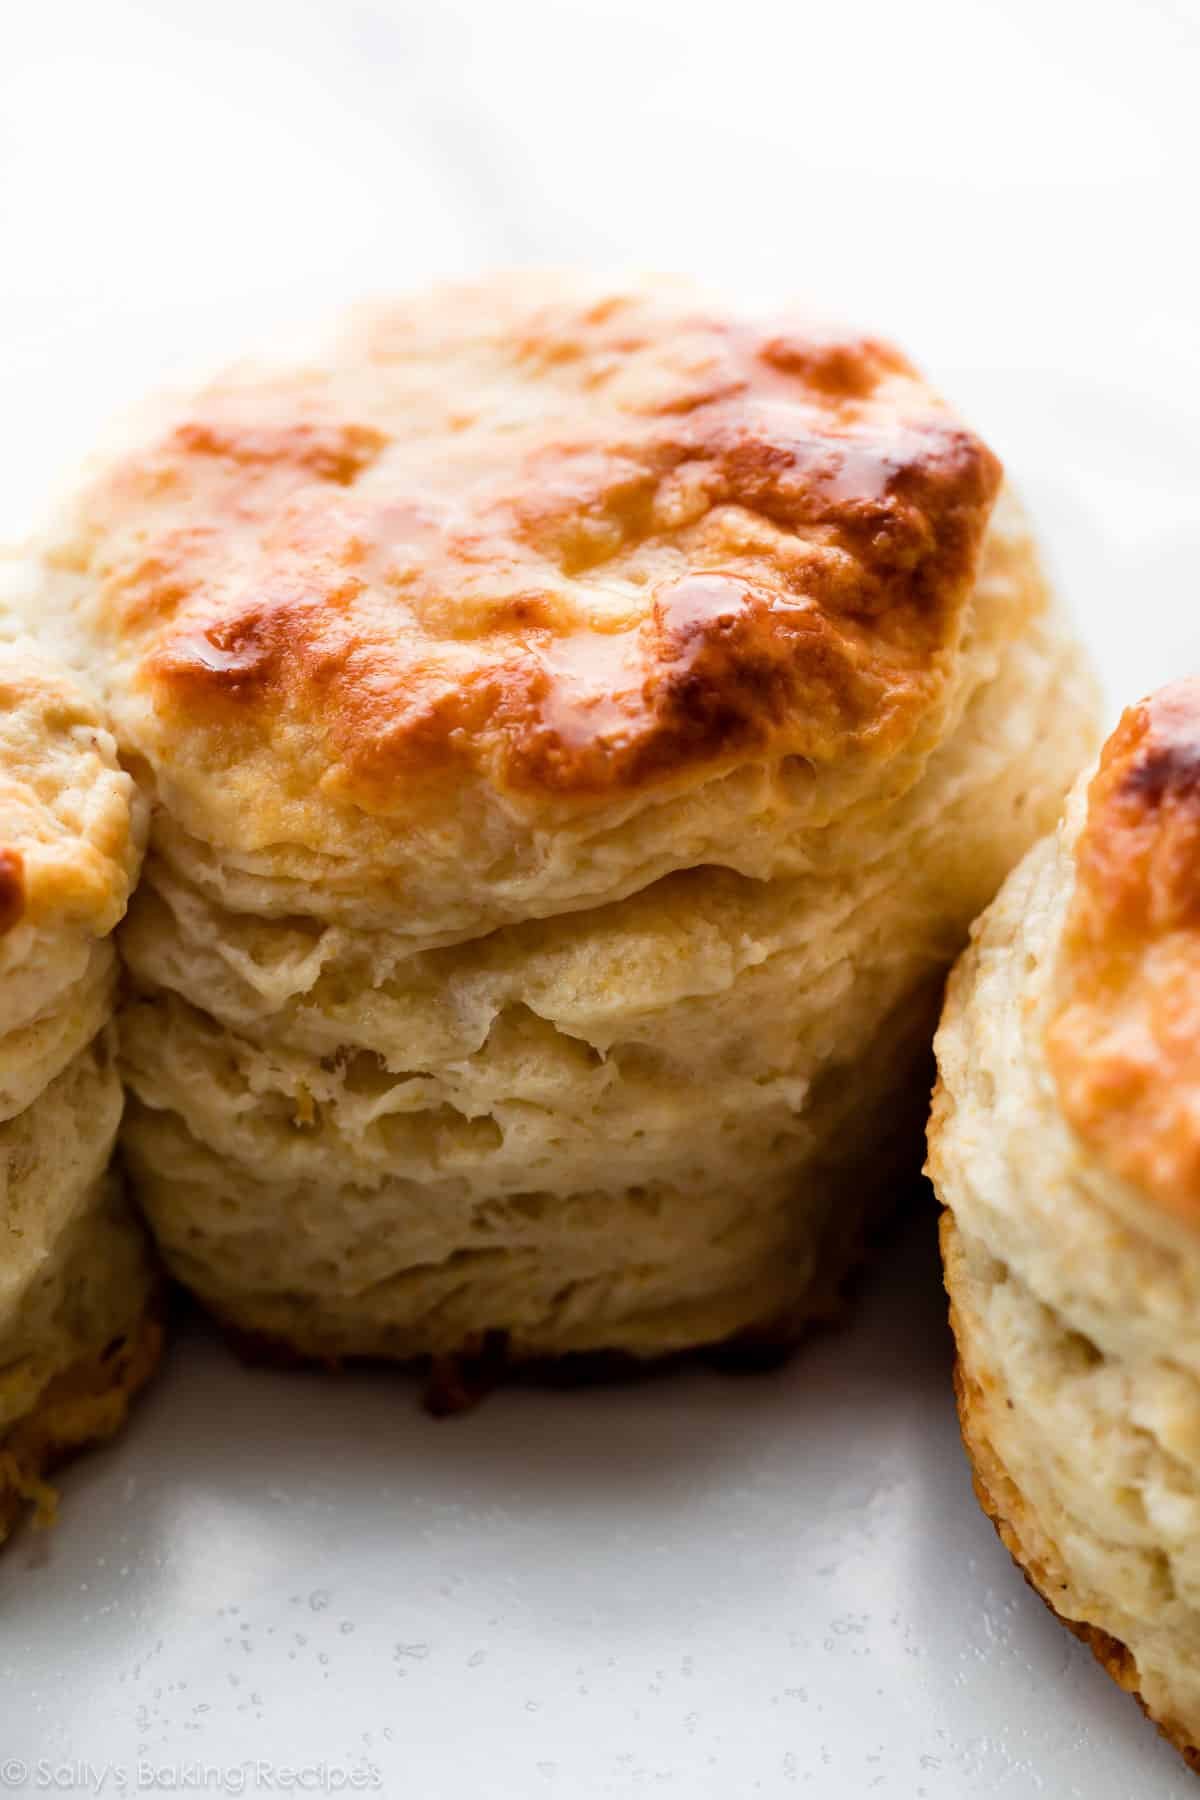
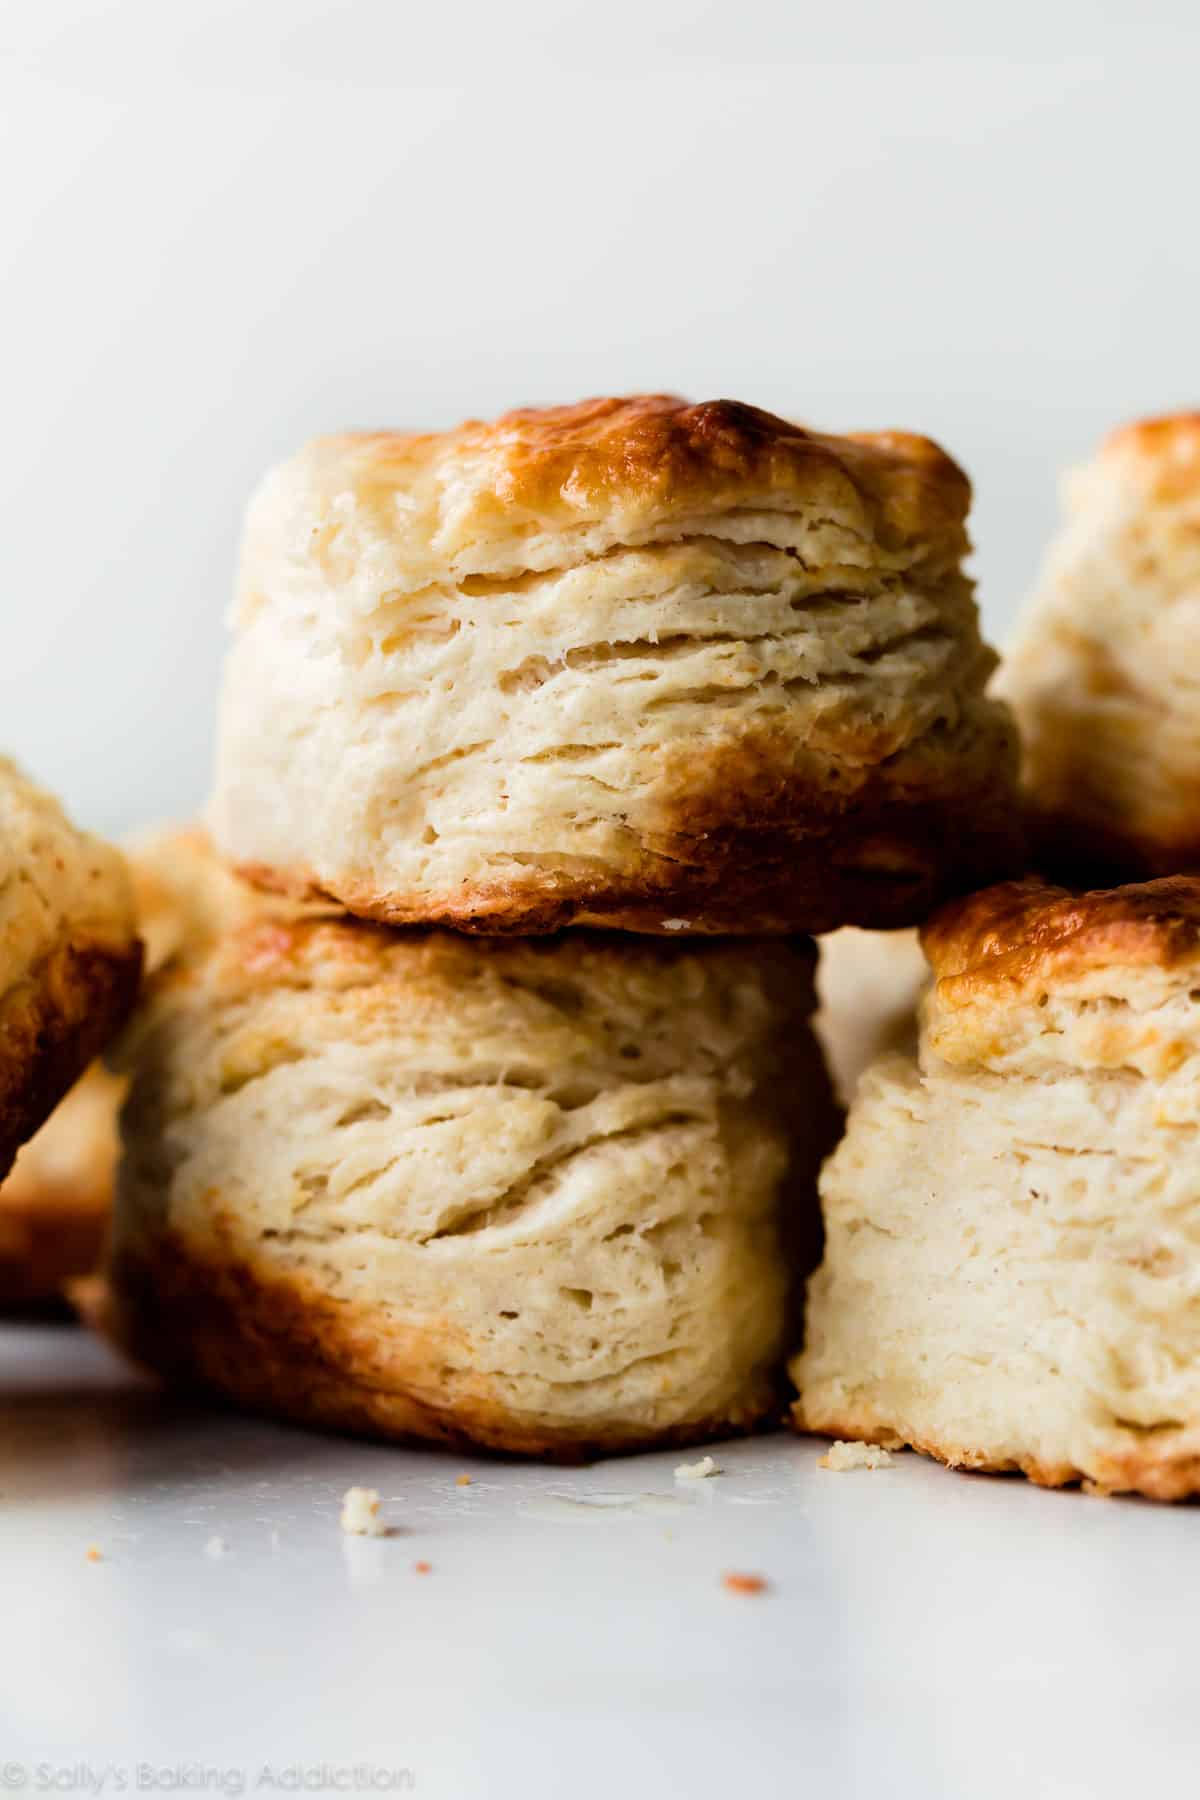
These homemade biscuits are soft and buttery with dozens of flaky layers. This biscuit recipe requires just 7 ingredients and they’re ready in about 35 minutes.

I originally published this recipe in 2017 and have since added new photos, a video tutorial, and more helpful success tips.
One reader, Marcia, commented: “Finally, a biscuit recipe that worked for me. I especially appreciated the notes which, in fact, had me change some things I had been doing. The detail at all levels, both visual and written, is very helpful. ★★★★★“
Another reader, Maggie, commented: “One of my favorite biscuit recipes! They are so consistently flaky and delicious, every single time! ★★★★★“
It’s quite serendipitous that this “side dish” may taste even more remarkable than the main event. No, no… it WILL taste more remarkable. Just look at the big buttery layers! Nothing can compete.
What Are Biscuits?
The term “biscuits” has different meanings depending on where you live in the world. In the U.S., biscuits are similar to a dinner roll, but are denser and flakier because they aren’t (typically) made with yeast. Since there’s usually no yeast and the rising agent is either baking soda, baking powder, or both, biscuits are considered a quick bread, like banana bread and no-yeast bread. In other parts of the world, people may consider these American-style biscuits to be more similar to scones, and what they call “biscuits” are more like what we call cookies.
7 Key Ingredients in Homemade Biscuits
You need just 7 basic ingredients for my homemade biscuits recipe:
- All-Purpose Flour
- Baking Powder
- Baking Soda
- Salt
- Cold Butter
- Cold Buttermilk
- Honey
With so few ingredients, it’s important to reach for quality ingredients and avoid any substitutions.
Baking Powder AND Baking Soda
Until recently, this biscuits recipe called for just baking powder as the leavening agent. In recent years, I’ve found that the texture, color, and flavor excels when using a combination of both baking powder AND baking soda. If you’ve always made this recipe using 2 Tablespoons of baking powder, you can certainly continue to do so! However, by reducing the baking powder to 1 Tablespoon and adding 1/2 teaspoon of baking soda, the biscuits brown more, have a flakier texture, crispier edges, and you don’t risk a bitter chemical aftertaste.

Success Tips for the Best Homemade Biscuits
After perfecting this recipe over the past 8 years and developing other biscuit recipes, let me share what I’ve learned along the way. I’ve made plenty of mistakes so you don’t have to. These tried-and-true tricks will turn your flat, dry biscuits into the best biscuits ever. And that’s a guarantee.
- Cold Fat: For flaky layers, use cold butter. When little pieces of butter melt as the biscuits bake, they release steam and create little pockets of air—this makes the biscuits airy and flaky on the inside while remaining crisp on the outside. It’s the same thing that happens when making these ham & cheese scones.
- Buttermilk & Honey for Flavor: Buttermilk and a teeny drizzle of honey balance out the salt. Buttermilk creates the most tender biscuit! I have plenty more on this topic in my Baking With Buttermilk post (including a buttermilk substitute recipe).
- Don’t Over-Mix: Never overwork biscuit dough. Overworking and over-handling biscuit dough will result in tough, hard, and flat biscuits. Mix the ingredients together *just* until combined. Dough will be crumbly; that’s normal.
- Flatten & Fold Method: The most important step of all is folding the dough together. Turn the scrappy dough out onto a work surface and flatten it with your hands. Fold, flatten, turn, and repeat.
- Don’t Twist the Biscuit Cutter: When cutting the dough with a biscuit cutter, do not twist the cutter. Press the cutter down into the dough firmly. Twisting it will seal off the biscuit edges, preventing the biscuits from rising.
- Bake Close Together: Biscuits rise up nice and tall when they are touching, pressed snuggly against one another in the oven.
How to Make Your Homemade Biscuits
Whisk the dry ingredients together, then add the cubed butter. Cut the butter into the dry ingredients with a pastry cutter, like when making pie crust or this savory quick bread, or pulse in a food processor. Cut/blend in the butter until you have coarse crumbles, like this:

Add the buttermilk and honey. Mix everything together until you have a shaggy dough, like this:

Pour it out onto a work surface and bring the dough together with your hands. It will be dry and shaggy with some moist spots. That’s all perfectly normal:

Fold & Flatten the Dough
Flattening and folding biscuit dough creates multiple flaky layers, just as it does when we make homemade croissants, rough puff pastry, homemade cruffins, mille-feuille, and croissant bread. This step will take you no more than 2 minutes and you’ll be rewarded with the flakiest biscuits in the world. First, shape dough into a rectangle, about 3/4-inch thick:

Then fold one side into the center:

Then the other side:

Turn the folded dough 90 degrees so it’s now horizontal, gently flatten, and repeat that folding process 2 more times.

After you’ve folded and flattened 3 times, flatten into a 3/4-inch rectangle once again, then use a biscuit cutter to shape into rounds. If you don’t have a biscuit cutter, you can cut into 8 to 10 squares.

Arrange close together in a cast iron skillet (no need to preheat it), or on a lined baking sheet. Again, make sure the biscuits are touching so they will rise nice and tall.
Before baking, brush the biscuits with buttermilk to help the tops brown evenly.
Honey Butter Topping
The honey butter topping is optional, but will set your biscuits apart from the rest. When the biscuits come out of the oven, brush with melted butter + honey. You use both ingredients in the biscuit dough, keeping the count at 7 ingredients total.

Serve your homemade biscuits with jam or homemade raspberry sauce, cinnamon butter, or biscuits and gravy—I love this particular recipe. Or a swipe of homemade honey butter really kicks it up a notch! You could also create delicious breakfast sandwiches with these breakfast sausages.
So Many Variations
I bake biscuits often, and use the same process and success tips when making all of my favorite variations including cheddar biscuits, cornbread biscuits, everything bagel biscuits, and zucchini biscuits. I also make biscuit-topped vegetable pot pie and biscuit breakfast casserole. And you can absolutely turn these into dessert with my recipes for biscuit-topped berry cobbler and homemade strawberry shortcake.
I make these biscuits on almost a weekly basis, and what makes them a hit every single time is the combination of very cold butter and buttermilk. Additionally, the careful folding and flattening method helps produce dozens and dozens of flaky layers. Follow the recipe below closely.
Bake the biscuits in a cast iron skillet, which helps the edges crisp up beautifully. Additionally, use a pastry brush to coat the tops of the biscuits with a little buttermilk before baking.
You can use a food processor to cut the cold butter into the dry ingredients, but if you do not own one, you can use a pastry cutter instead. A pastry cutter is an extremely helpful baking tool.


Homemade Biscuits (Popular Recipe!)
- Prep Time: 15 minutes
- Cook Time: 20 minutes
- Total Time: 35 minutes
- Yield: 8-11 biscuits
- Category: Bread
- Method: Baking
- Cuisine: American
Description
These homemade biscuits are soft and buttery with hundreds of flaky layers! This biscuit recipe only requires 7 simple ingredients and they’re ready in about 35 minutes.
Ingredients
- 2 and 1/2 cups (313g) all-purpose flour (spooned & leveled), plus more as needed for hands and work surface
- 1 Tablespoon baking powder (see Note)
- 1/2 teaspoon baking soda (see Note)
- 1 teaspoon salt
- 1/2 cup (8 Tbsp; 113g) unsalted butter, cubed and very cold
- 1 cup + 2 Tablespoons (270ml/g) cold buttermilk, divided
- 2 teaspoons (14g) honey
Optional Topping
- 2 Tablespoons (28g) butter, melted
- 1 Tablespoon (21g) honey
Instructions
- Preheat oven to 425°F (218°C).
- Make the biscuits: Place the flour, baking powder, baking soda, and salt in a large bowl or in a large food processor. Whisk or pulse until combined. Add the cubed butter and cut into the dry ingredients with a pastry cutter or by pulsing several times in the processor. Cut/pulse until coarse crumbs form.
- If you used a food processor, pour the mixture into a large bowl. Make a well in the center. Pour 1 cup (240ml/g) buttermilk into the well and drizzle honey on top. Using a large spoon or spatula, fold until it begins to come together. Do not overwork the dough. The dough will be shaggy and crumbly with some wet spots.
- Pour the dough and any dough crumbles onto a floured work surface and gently bring together with generously floured hands. The dough will become sticky as you bring it together. Have extra flour nearby and use it often to flour your hands and work surface as needed in this step. Using floured hands, flatten into a 3/4-inch-thick rectangle as best you can. Fold one side into the center, then the other side on top. Turn the dough 90 degrees, so it’s now horizontal. Gently flatten into a 3/4-inch-thick rectangle again. Repeat the folding again. Turn the dough horizontally one more time. Gently flatten into a 3/4-inch-thick rectangle. Repeat the folding one last time. Flatten into the final 3/4-inch-thick rectangle.
- Cut into 2.5- or 3-inch circles with a biscuit cutter. (Tip: Do not twist the biscuit cutter when pressing down into the dough because this seals off the edges of the biscuit which prevents them from fully rising.) Re-roll scraps until all the dough is used. You should have about 8–11 biscuits. Arrange in a 10-inch cast iron skillet (see Note) or close together on a parchment paper-lined baking sheet. Make sure the biscuits are touching.
- Brush the tops with remaining buttermilk. Bake for 18–20 minutes or until tops are golden brown.
- Remove from the oven. If adding the optional topping, whisk the melted butter and honey together. Using a pastry brush, brush the warm biscuits with honey butter topping. Serve warm.
- Cover leftovers tightly and store at room temperature or in the refrigerator for up to 5 days.
Notes
- Make Ahead & Freezing Instructions: Baked biscuits freeze well for up to 3 months. Thaw at room temperature or in the refrigerator, then warm up to your liking before serving. You can also freeze the biscuit dough. Prepare the dough in steps 2 through 4. Wrap up tightly in plastic wrap (plastic wrap is best for freshness) and freeze for up to 3 months. Thaw overnight in the refrigerator, then continue with step 5. Also, after step 4, you can wrap the dough in plastic wrap and refrigerate for up to 2 days before continuing with step 5.
- Special Tools (affiliate links): Pastry Cutter or Food Processor | 2.5- or 3-inch Biscuit Cutter | 10-inch Cast Iron Skillet (or Baking Sheet with Parchment Paper) | Pastry Brush
- Baking Powder: In 2025, I updated this recipe to use both baking powder and baking soda. I’ve found that the texture, color, and flavor excels when using a combination of both. If you’ve always made this recipe using 2 Tablespoons of baking powder, you can certainly continue to do so! However, by reducing the baking powder to 1 Tablespoon and adding 1/2 teaspoon of baking soda, the biscuits brown more, have a flakier texture, crispier edges, and you don’t risk a bitter chemical aftertaste.
- Butter: Cut into 1/2-inch cubes. Keep butter as cold as possible until you need it. I recommend placing the cubed butter in the freezer for about 15 minutes before you begin.
- Buttermilk: You can substitute whole milk for buttermilk if desired. However if you’d like the tangy flavor, which I highly recommend, you can make your own DIY buttermilk substitute. Add 2 teaspoons of fresh lemon juice or white vinegar to a liquid measuring cup. Add enough milk to make 1 cup. (You need 1 cup in the recipe, plus 2 Tbsp for brushing—you can use regular milk to brush on top.) Whisk together, then let sit for 5 minutes before using in the recipe. Whole milk is best for the DIY sour milk substitute, though lower-fat or nondairy milks work in a pinch. (In my testing, the biscuits don’t taste as rich or rise quite as tall using lower-fat or nondairy milks.)
- Cast Iron Skillet: If your cast iron skillet isn’t well seasoned, I recommend greasing it with a little vegetable oil or melted butter. Brush a thin layer of either on the bottom and around the sides. No need to heat the cast iron skillet before using, though you certainly can. Place in the preheated oven for 15 minutes before arranging the shaped biscuits in it.
- Flavors: Try my flavorful biscuit variations: cheddar biscuits, zucchini biscuits, and everything bagel biscuits.
Nutrition
- Serving Size: 1 biscuit
- Calories: 212
- Sugar: 2.4 g
- Sodium: 283.5 mg
- Fat: 9.7 g
- Carbohydrates: 27.5 g
- Protein: 4.1 g
- Cholesterol: 25.4 mg


Reader Comments and Reviews
These are hands down the best biscuits every time!!
what can i use if i dont have a cast iron skillet?
Hi Rebecca! If you don’t have a cast iron skillet, arrange the biscuits close together on a parchment paper-lined baking sheet. (Make sure they’re touching.) The bottoms may not be quite as crispy.
My 1st time making biscuits. So easy and delicious!! Thank you so much!! I’ll never buy Grands again.
I just wanted to say that I have been using this recipe for YEARS. I’m originally from the south but live elsewhere now and I always use these biscuits to break the ice for people who’ve never had them before! 10/10 solid biscuit recipe; read the added notes, follow the directions, and enjoy
is there anything to substitute the buttermilk
Hi Matthew, buttermilk creates the most tender biscuit. We strongly recommend using buttermilk or the buttermilk substitute in the recipe Notes.
My mother in law was the true southern woman who made homemade biscuits. Unfortunately, she has passed away. When I make these, they remind my husband of his mother’s biscuits. Thank you, Sally! You’ve passed the southern biscuit test. These are the real deal!
I have tried so many biscuit recipes but these are seriously the best biscuits I have ever made. I used the cast iron skillet and they were perfection.
Biscuits came out amazing. Recipe was easy to follow.
What temperature should I bake frozen biscuits? Do I need to thaw them or can I bake them from frozen? Thanks!
Hi Martha, see the Recipe Notes (#1) above for the Make Ahead & Freezing Instructions to bake from frozen. Enjoy!
Probably a hard no, but I’m trying to cook for sick people and my ingredients here are kind of dismal. Is there anyway at all I can substitute the honey for something else?
Hi Fiona, regular granulated sugar could work in its place in the dough. You can skip the honey in the butter topping, or replace with maple syrup. (Maple syrup would also work in the dough.) Hope this helps!
Oh my gosh, perfect!! Thank you so much!
I tried the recipie but as someone whos never made biscuits before i cant help but wonder if maybr a step was missing or if i misunderstood. When i whisked together my dry ingredients and then added butter there wasnf nearly enough to mix it all together and no amount of mixing made it work. I didnt get anything resembing dough until i folded in the buttermilk and then in the end it never raised. I ended up with hard bricks of disappointment. Did i miss a step?
Hi Atlas, we highly recommend watching the video tutorial above for a visual of the process if you’ve never made biscuits or cut in butter before (the step photos in the post above help too!). If your biscuits did not rise, they could have been over-worked, or perhaps your baking powder or baking soda could be getting old. Thank you for giving this recipe a try!
An update to my comment from yesterday, these biscuits were such a hit with the family that they requested more today! Even better the second time around!
My first time trying to make homemade biscuits in 20+ years and this recipe exceeded my expectations. So soft, fluffy, and crispy in the best ways!
Wonderful! With each time I try this recipe, I am getting better and better results. I now know what the ‘shaggy’ dough is. I tend to overwork in past- trying to channel ‘less is more’.
Side note- I usually have about 12 tabs of my browser to Sallys recipes on hand, tried and like as well as with on deck to make. I bring creations to meetings and friend gatherings- Thank you for sharing your food secrets!
These are delicious. I used milk instead as I did not have any buttermilk and they turned out perfectly. They taste great with butter and strawberry jam too! Thanks Sally!
Biscuits I ever made, tasted and great with my sausage gravey.
These are the best biscuits I’ve ever made. Been trying so many recipes because I haven’t found “the one” and this is officially it! Printed and put in recipe book already.
This is my favorite biscuit recipe. I use a frozen stick of butter and grate it in so it baked into each layer and it never disappoints.
Using a cheese grater for very very cold butter is another good way to cut it in.