

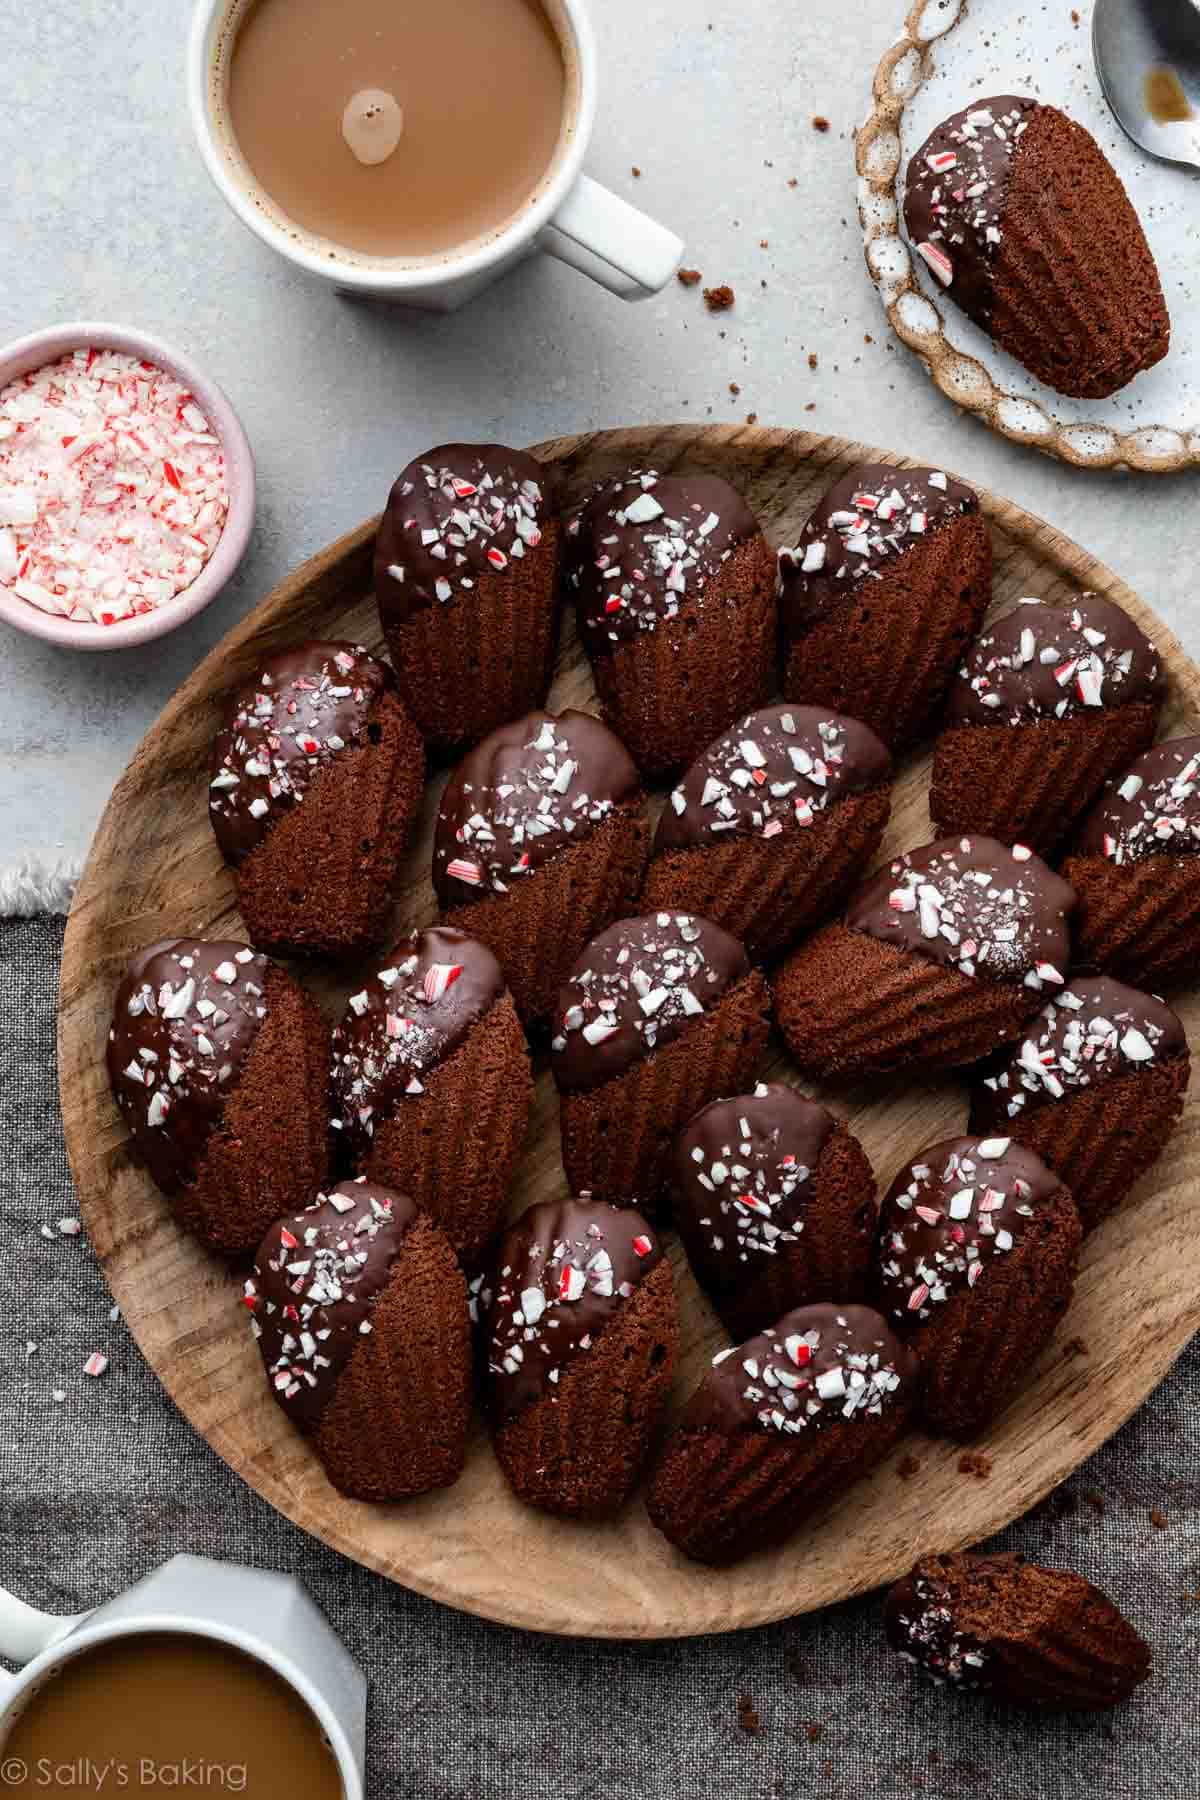
Elegant and festive, these chocolate peppermint madeleines are guaranteed to impress, but are surprisingly easy (and fairly quick!) to make. And because it’s the holidays, we’re finishing them with a dip in melted chocolate and a sprinkle of crushed candy canes. If you have a madeleine pan and a mixer, you can make these French patisserie-worthy treats!

If you’ve ever had the pleasure of biting into a madeleine, you’ll know that this classic French tea-time treat is a delicately sweet miniature sponge cake that falls somewhere between a cookie (those crisp buttery edges!) and a cupcake (that springy crumb!). Today we are dressing them up for the holidays with rich cocoa, cool peppermint, and a dip in glossy chocolate. And don’t forget the candy cane crunch, just like we love on these peppermint meltaways!
Why You’ll Love These Chocolate Peppermint Madeleines
- Soft, tender, cake-like texture with a light, spongey crumb.
- Rich chocolate flavor, without being overly sweet. The flavor reminds me of peppermint hot cocoa.
- Naturally elegant, and perfect for gifting or holiday dessert trays.
- Ready in about an hour, chill time included! The perfect dessert for when you want something impressive but don’t have a ton of time.

If you’ve never made madeleines before, this just may be the recipe that convinces you they are absolutely worth investing in a madeleine pan. These little shell-shaped cakelets look like they came from a fancy bakery, but behind the scenes? They’re made with simple ingredients, require just a short chill, and bake in 10 minutes.
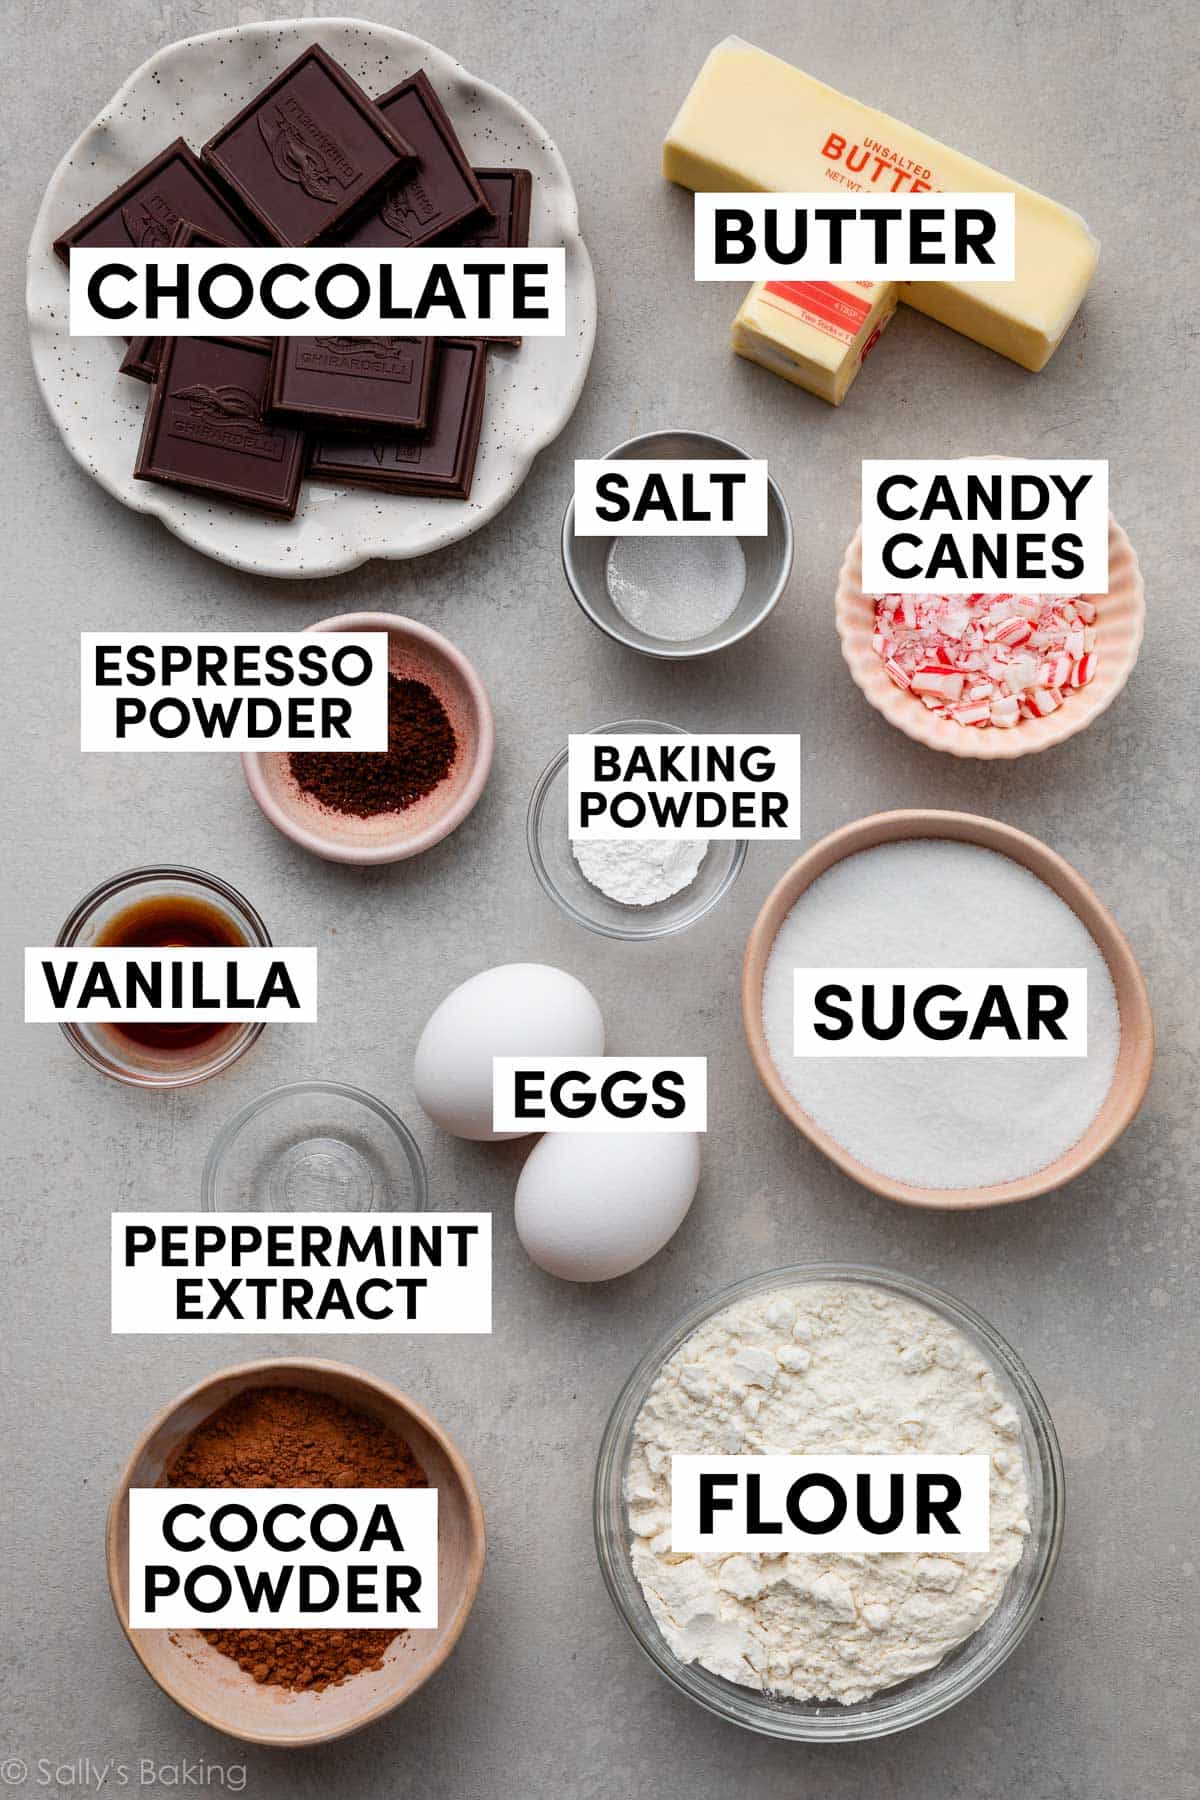
Key Ingredients (and Why They Matter)
- Eggs: Start with eggs that are room temperature, so they whip up to greater volume, trapping more air and creating a more stable foam.
- Melted Butter: Adds richness and that unmistakable buttery flavor. Melt it first, so it has time to cool slightly before you fold it into the batter.
- All-Purpose Flour: You don’t need much—just enough to add some structure.
- Cocoa Powder: For the smoothest chocolate flavor, use Dutch-processed cocoa in these madeleines. If you can’t find it, you can use natural cocoa powder instead, but the flavor is best with Dutch cocoa (which has been alkalized to neutralize its acidity—read more about the difference between Dutch-processed and natural cocoa powder here).
- Espresso Powder: This is optional; it helps deepen the chocolate flavor.
- Peppermint Extract: A little goes a long way. Start small and adjust next time if you want stronger mint flavor.
You also need granulated sugar, baking powder, salt, and vanilla extract. (The chocolate and candy canes are for topping the baked chocolate peppermint madeleines.)
Testing The Recipe
We tested this recipe several times, starting with my classic madeleine base and gradually working cocoa powder into the batter. Because cocoa can dull sweetness and weigh down the rise, we ended up increasing the sugar for better balance and introducing the high-heat “thermal shock” to prevent the madeleines from baking up flat. (More on that below!)
How to Make Chocolate Peppermint Madeleines
Madeleines are known for their signature hump on one side. The keys to achieving that proud belly bump: properly whipping your eggs and sugar, folding with a light hand, chilling the batter, and reducing the oven temperature during baking. Once you’ve nailed those steps, you’ll wonder why madeleines ever seemed intimidating.
The full printable recipe is below, but let me walk you through the steps here, with some visuals to help you along the way.
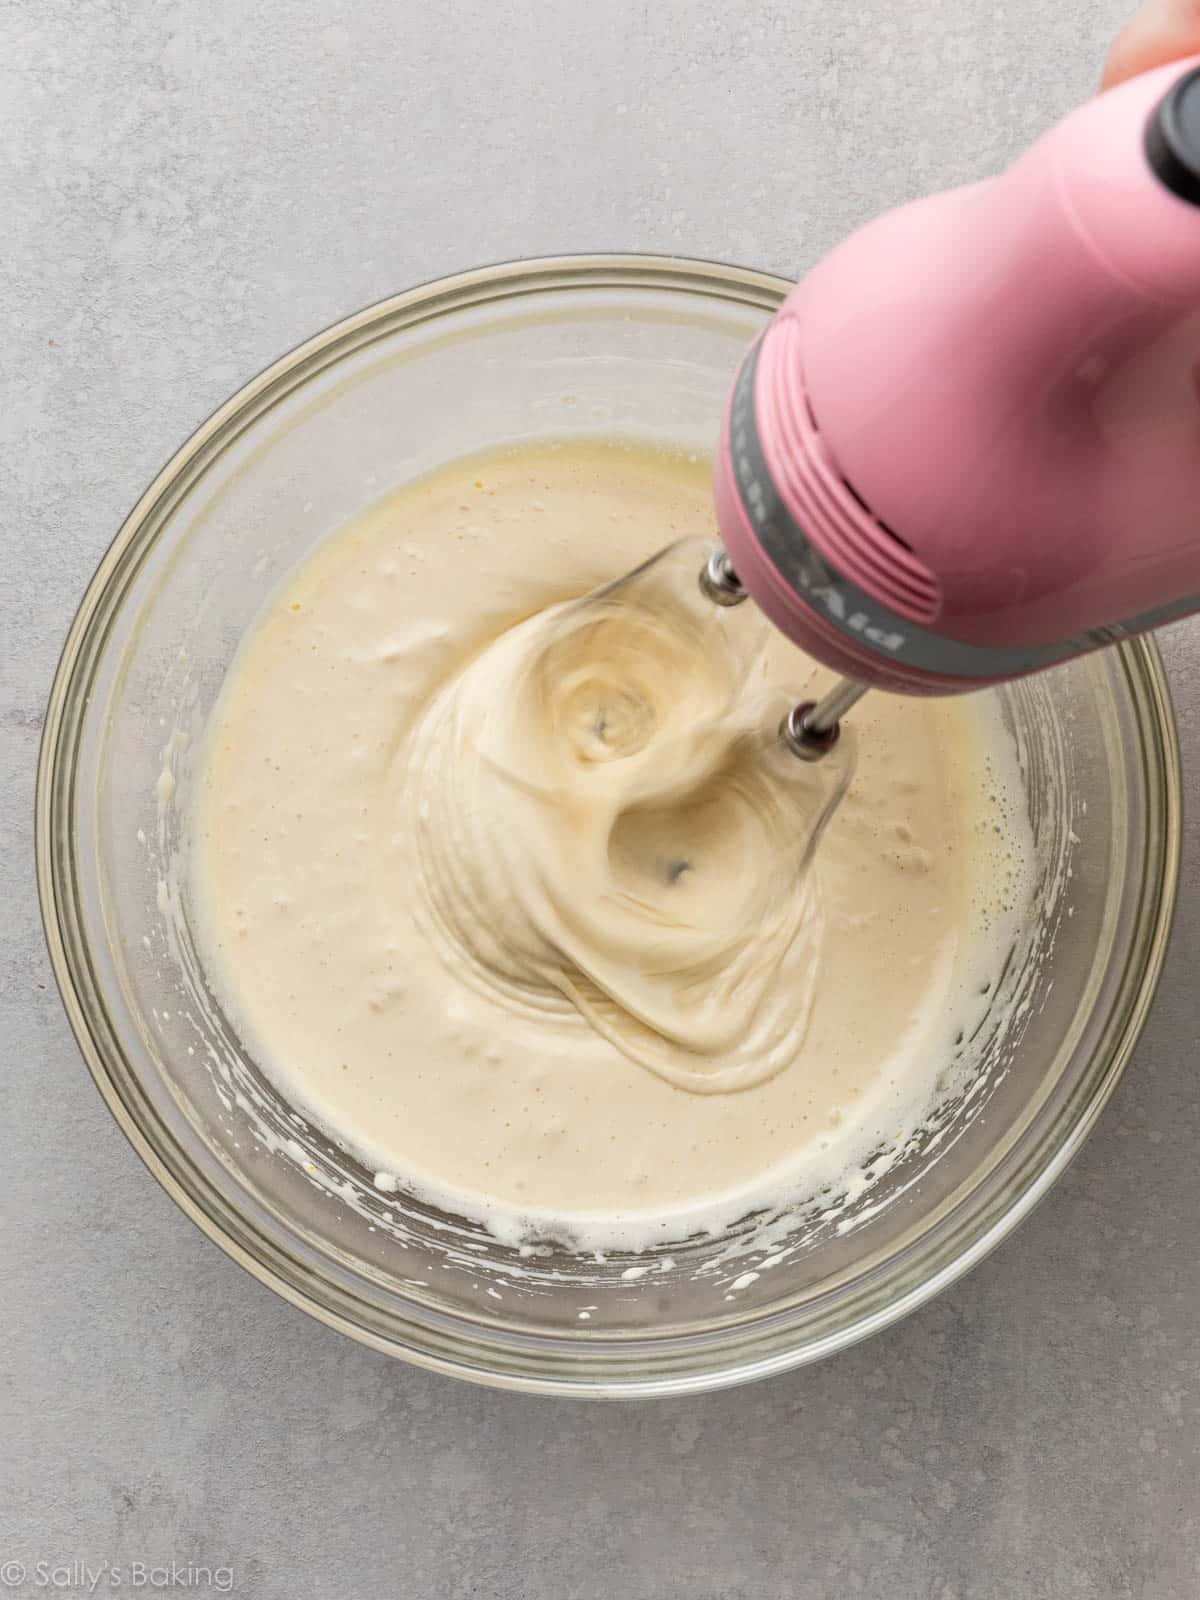
Start by whipping the eggs + sugar together for a while (at least 8 minutes). Incorporating air here creates the lifted, tender structure madeleines are known for. Don’t skip or shorten this step! Then, beat in the peppermint and vanilla extracts.
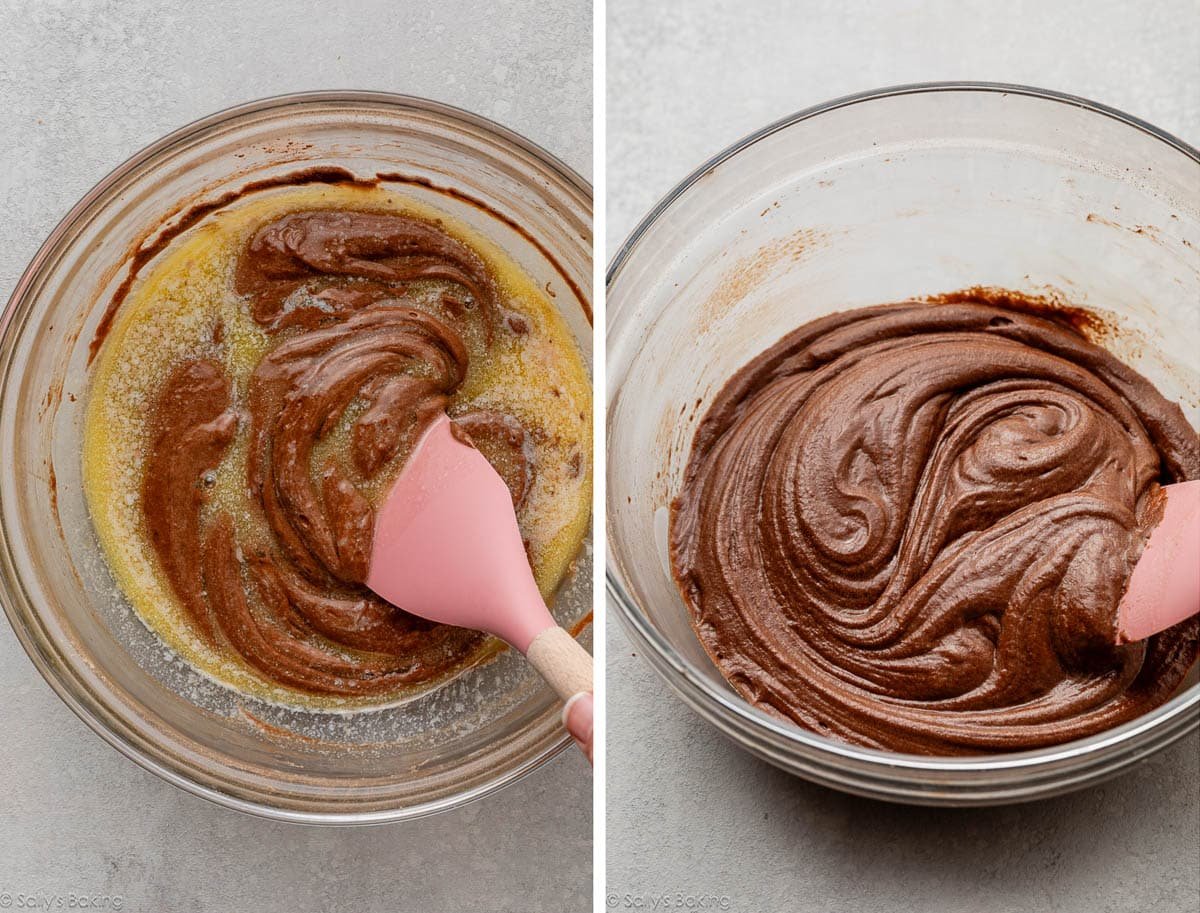
Next, sift and then fold in the dry ingredients:

Fold in melted butter. The batter will be glossy and smooth. It will begin to thicken quickly because of the butter solidifying, and that’s completely normal.
Chill the Batter
Just like many of our cookie dough recipes, madeleine batter needs to chill a bit before baking. Letting the batter rest in the refrigerator ultimately helps the madeleines puff up taller in the oven. Taller usually means fluffier, which is exactly what we’re shooting for.
I find around 45 minutes in the refrigerator is the sweet spot.
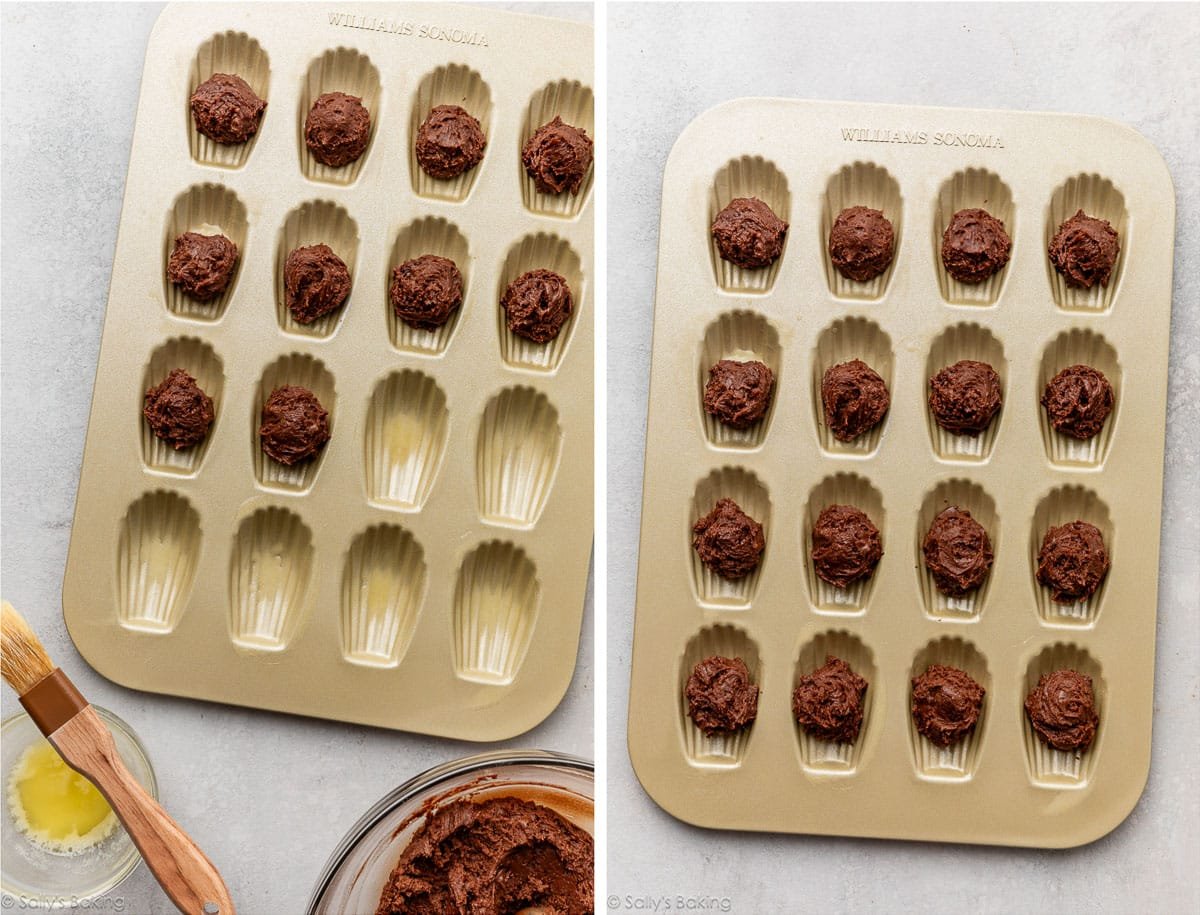
Prepare the Madeleine Pan
Melt a bit more butter, and use a pastry brush to brush it in the scalloped wells of the pan.
How much batter per madeleine? I found 1 heaping Tablespoon was plenty. If you have a small cookie scoop, that works great here, but you can really use any Tablespoon and just dollop a mound of batter right into the center of the shell, like this:
Bake for 3 minutes at a high temperature (425°F). This “thermal shock” helps set the shape of the madeleines, lifting that hump straight up. (Sound familiar? This is the same trick we use for tall muffin tops!) Then reduce the temperature (to 350°F) and bake for another 6 minutes, or until the surface springs back when lightly poked.
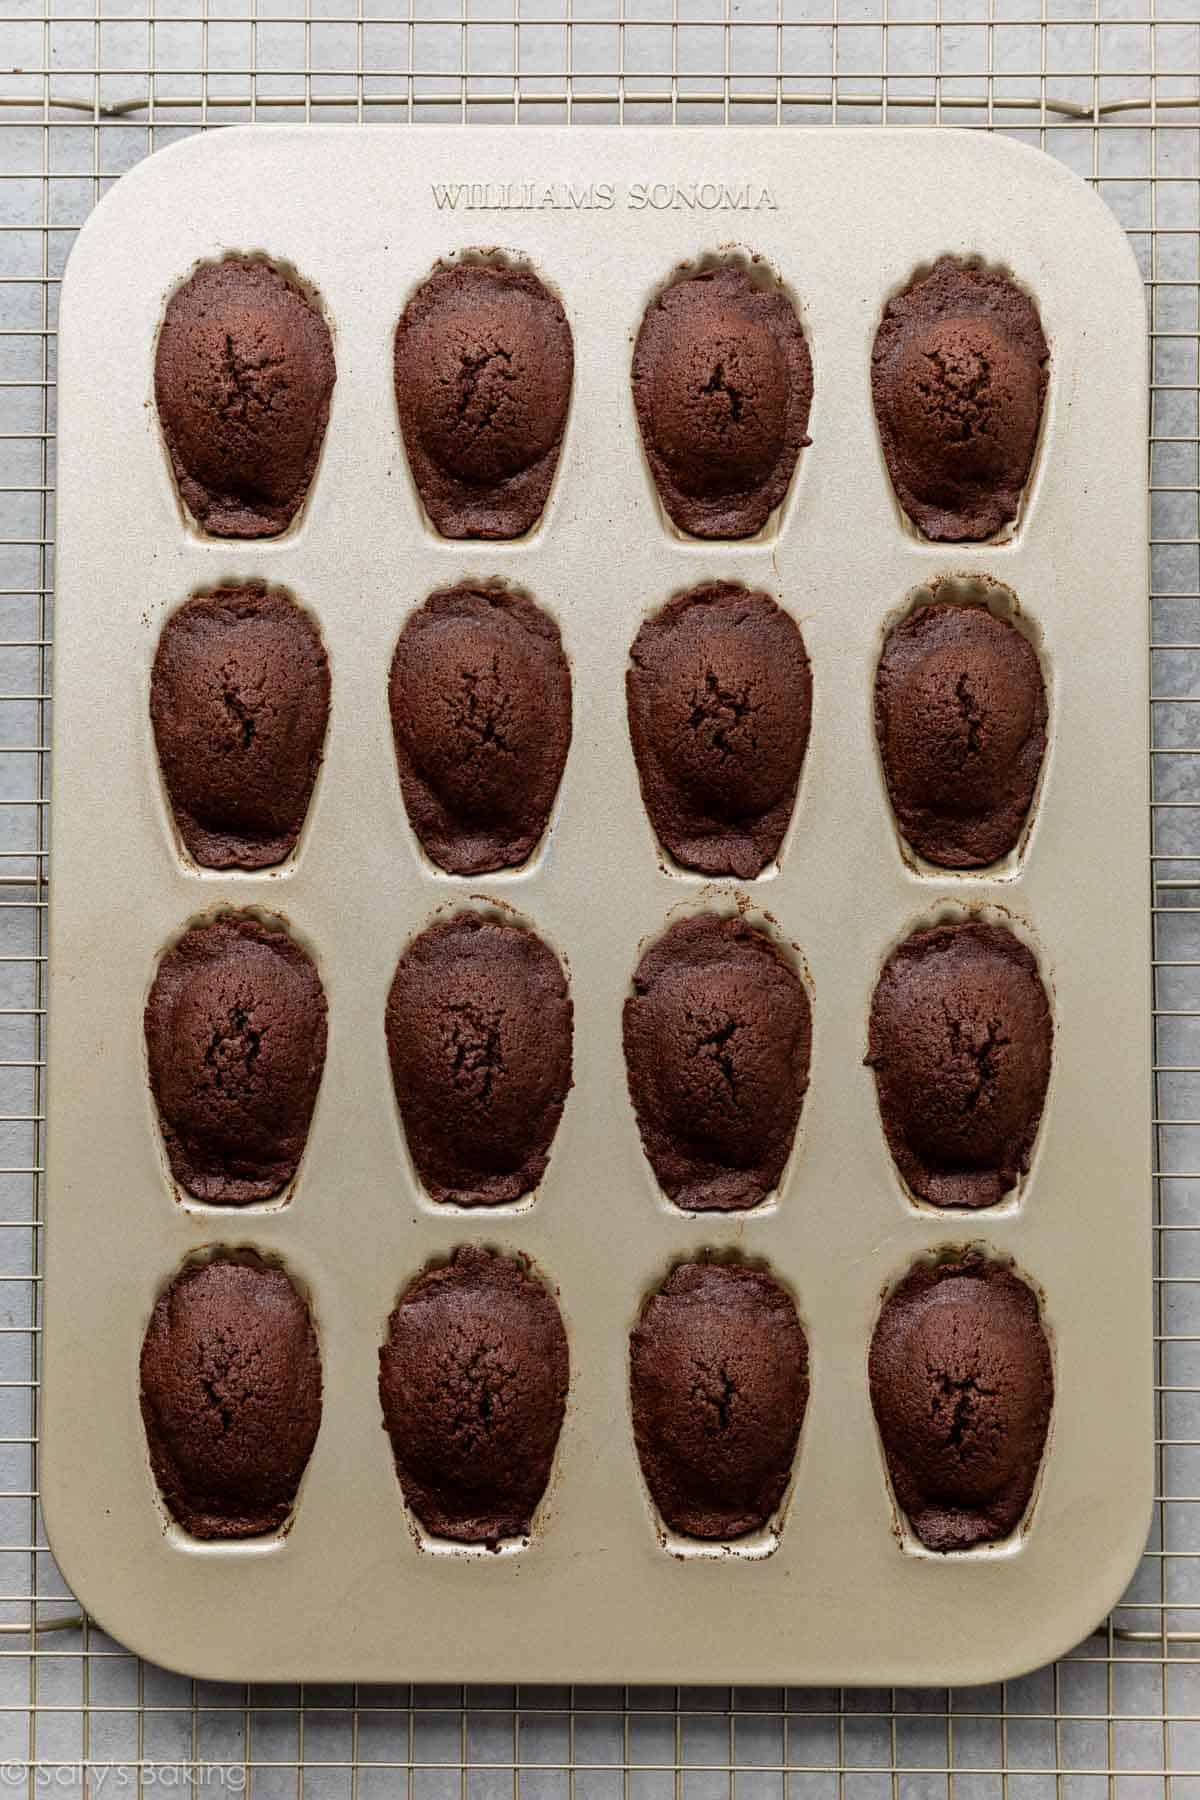
Invert the pan to release the madeleines and let them cool.
Finishing Touches
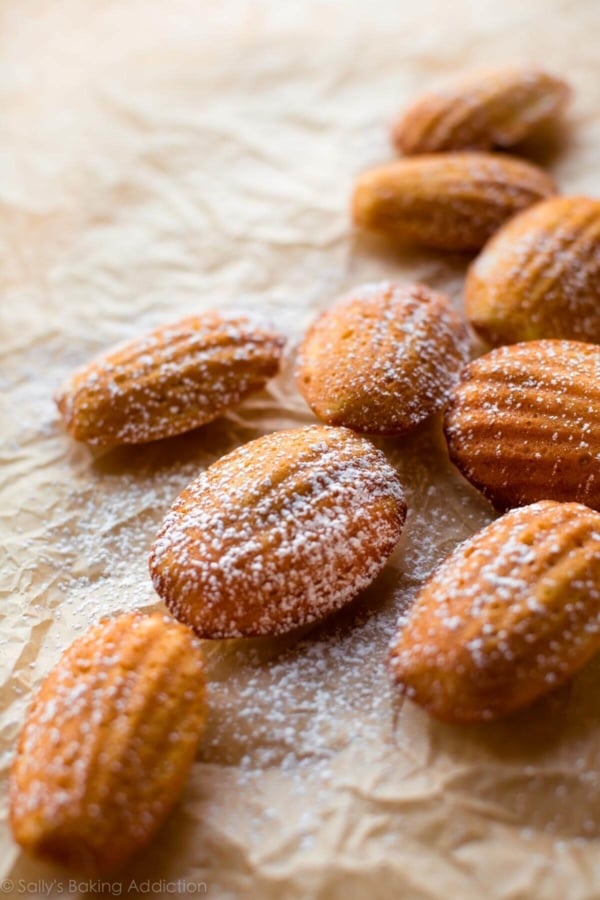
While these are absolutely wonderful with nothing but a dusting of powdered sugar on top, it’s the holiday season, so we are going for glam here.
- Dip in Chocolate: Bittersweet, semi-sweet, or white chocolate all work beautifully.
- Sprinkle With Crushed Candy Canes: The festive finishing touch that adds shine, color, and crunch.
Madeleines have a reputation for being fussy, but once you understand the rhythm… whip, fold, chill, bake hot then low… they’re one of the most rewarding little treats you can make. And unlike many holiday desserts that take an afternoon, these come together quickly. The batter rests for less than an hour, the bake time is about 10 minutes, and decorating is as simple as a dip and sprinkle.
Whether you’re gifting a holiday assortment, hosting a cookie exchange, or craving something a little more sophisticated than your usual December cookie lineup, these chocolate peppermint madeleines bring the perfect mix of technique and festive fun. They look polished and taste like a peppermint hot cocoa!

Not exactly. The pan is essential for achieving the signature shell shape and texture. If you don’t have one, this recipe is a great reason to pick one up! Here is the madeleine pan that I’ve been using.
Madeleines taste best the day or day after they’re made, so freezing isn’t ideal. If needed, freeze them (undipped) in a single layer for up to 1 month. Thaw at room temperature and then decorate. The texture will be a bit denser after freezing.
Absolutely. Simply leave out the peppermint extract, or try adding 1/2 teaspoon almond extract for a chocolate-almond twist. You can also decorate with just chocolate or festive sprinkles.
Usually it’s one of these reasons: (1) the eggs weren’t whipped long enough, (2) the batter wasn’t chilled (very important here!), (3) the oven wasn’t hot enough for the first 3 minutes. These tricks are key to that classic rise.
This recipe is part of my annual cookie countdown called Sally’s Cookie Palooza. It’s the biggest, most delicious event of the year! Browse dozens of cookie recipes over on the Sally’s Cookie Palooza page.


Chocolate Peppermint Madeleines
- Prep Time: 20 minutes
- Cook Time: 10 minutes
- Total Time: 1 hour, 15 minutes
- Yield: 20 cookies
- Category: Dessert
- Method: Baking
- Cuisine: French
Description
Delicately soft and chocolatey, these peppermint-kissed madeleines are an elegant holiday treat that come together quicker than you’d expect. Dip them in chocolate, finish with crushed candy canes, and enjoy their light, sponge-cake texture at its very best: fresh from the oven.
Ingredients
- 1/2 cup (8 Tbsp; 113g) unsalted butter (plus another 2 Tbsp (28g) for the pan)
- 2 large eggs, at room temperature
- 2/3 cup (133g) granulated sugar
- 1 teaspoon pure vanilla extract
- 1/2 teaspoon peppermint extract
- 3/4 cup + 1 Tbsp (100g) all-purpose flour (spooned & leveled)
- 1/3 cup (28g) Dutch-processed cocoa powder*
- 1/2 teaspoon baking powder
- 1/8 teaspoon salt
- optional: 1/2 teaspoon espresso powder*
Topping
- 4 ounces (113g) bittersweet or semi-sweet chocolate, finely chopped
- 1/4 cup (40g) crushed candy canes (about 2–3 large candy canes)
Instructions
- Melt 1/2 cup (8 Tbsp; 113g) butter in a large bowl and set aside to slightly cool as you prepare the rest of the batter.
- Using a handheld or stand mixer fitted with a whisk attachment, beat the eggs and sugar together on high speed for 8–10 minutes. The mixture should be thick, pale, and form ribbons when you lift the beater(s). Beat in the vanilla and peppermint extract just until combined.
- Sift the flour, cocoa powder, baking powder, salt, and espresso powder (if using) together into the bowl with the eggs. Using a silicone spatula, gently fold until just combined.
- Pour in the melted butter and fold with a spatula to combine. It will take a minute of folding to fully incorporate. The batter will be glossy.
- Cover the batter and refrigerate it for at least 45 minutes and up to 2 hours. Any longer and the butter will firm up too much, leaving the batter heavy and the madeleines dense.
- Preheat the oven to 425°F (218°C).
- Melt the remaining 2 Tbsp (28g) of butter. Lightly brush the wells of the madeleine pan with melted butter.
- The batter will be thick, airy, and spongey after resting. Do not stir it—we don’t want to deflate it. Spoon 1 Tablespoon of batter into the center of each scalloped well. No need to spread it to the edges. Just plop it in the center. (Cover and refrigerate remaining batter if you do not have 2 madeleine pans to bake the batter all at once.)
- Bake for 3 minutes at 425°F; then, without opening the oven, reduce the temperature to 350°F (177°C) and bake for 6-7 more minutes. To test for doneness, lightly press on the top of a madeleine. If it springs back, they’re done. If your finger leaves an indent, let them bake for another minute and then test again.
- Cool the madeleines in the pan for 5 minutes, and then invert the pan onto the cooling rack. Let the madeleines cool completely.
- Place the chopped chocolate in a heatproof bowl or 2-cup liquid measuring cup (best for dunking!). Microwave in 20-second increments, stirring after every 20 seconds until completely melted and smooth. (Or you can use a double boiler.) Dip the tops of the cooled madeleines in the melted chocolate and place them on a baking sheet lined with parchment paper. Sprinkle crushed candy canes on top while the chocolate is still wet. Let chocolate set at room temperature, or speed it up by placing the baking sheet in the refrigerator.
- Chocolate madeleines are best the day or day after they’re made. They’ll lose a lot of moisture over time, which noticeably affects the texture, so I suggest baking and enjoying them fresh. For this reason, I don’t recommend freezing them, either.
Notes
- Can I Freeze These? Madeleines taste best the day or day after they’re made, so freezing isn’t ideal. If needed, freeze them (undipped) in a single layer for up to 1 month. Thaw at room temperature and then decorate. The texture will be a bit denser after freezing.
- Special Tools (affiliate links): Glass Mixing Bowl | Electric Mixer (Handheld or Stand) | Fine Mesh Sieve | Silicone Spatula | Pastry Brush | Madeleine Pan | Cooling Rack | 2-cup Liquid Measuring Cup or Double Boiler
- Cocoa Powder: For the best-tasting chocolate madeleines, use cocoa powder that is labeled Dutch-processed. Learn more about Dutch-process vs. natural cocoa powder here.
- Espresso Powder: Espresso powder enhances the flavor of the cocoa, but you can simply omit it if you don’t have any on hand. You could also increase the amount if you’d like more of a peppermint mocha flavor.
- How to Melt Chocolate / Best Chocolate for Topping: Finely chop baking chocolate bars (typically 4 ounces/113g each). I prefer Ghirardelli or Baker’s, in either semi-sweet or bittersweet. Place in a heatproof bowl or glass liquid measuring cup. Microwave in 20-second increments, stirring after each, until smooth. (Or use a double boiler.)
- Can I Make These Without a Madeleine Pan? Not exactly. The pan is essential for achieving the signature shell shape and texture. If you don’t have one, this recipe is a great reason to pick one up!
- Can I Skip The Peppermint? Absolutely. Simply leave out the peppermint extract, or try adding 1/2 teaspoon almond extract for a chocolate-almond twist. You can also decorate with just chocolate or festive sprinkles.


Reader Comments and Reviews
These were so easy and delicious!
Just made these and they’re delicious! But I definitely messed up as they got the hump but no she’ll outline. I’m sure its user error for two reasons. 1. My pan is a dark nonstick 2. I beat the egg mixture with the paddle attachment instead of the whisk for the first 6 minutes by accident. I then switched to the whisk for 8 minutes but I’m sure that mistake cost me. Regardless of looks, they’re very tasty and I’ll be trying this recipe again until I get it right!
4.5 stars. Madeleines looked great but were slightly dry. Instructions were easy to follow. I made these for an event and they were greatly appreciated.
When making these I did not have a madeleine tray. Instead I used a shallow muffin tray, and put 1 tbsp of the batter into a muffin liner, and I folded one end up and tucked it behind, shaping it into the madeleine shell-shape. I put them sideways in the pan holes. When they came out of the oven they had that ribbed, shell look from the edges of the muffin liner. It didn’t have that classic bump, but they still looked like madeleines and tasted great!
Sally, I got the “hump” on these cookies but the front of the madeleines are completely flat…you can’t see the ridges from the pan at all. They also seem almost too dark. I only left them in 6 minutes after turning down the oven but would definitely need to do less next time. Would cooking them too long impact that ridge or what would cause that?
Hi Cally, yes, baking time can definitely impact both the color and how defined those ridges look. Because madeleines are so small and bake very quickly, even an extra minute or two can cause the batter to set too firmly against the pan, which softens or completely blurs the shell pattern. Over-baking will also make them look darker, especially with cocoa in the batter. The fact that you got the classic hump is a great sign because your batter and temperature were spot-on. For next time, I’d recommend shaving off 1–2 minutes of bake time and keeping a close eye on them once the oven temperature is lowered. Using a well-buttered pan, and if possible a lighter-colored madeleine pan, can also help keep the shell details more visible.
These chocolate madeleines are delicious! I used almond extract instead of peppermint, and they still tasted perfect. The chocolate and candy cane gives a moist crunch to the brownie-like dessert.
These were great! My first attempt at madeleines (one of my favorite cookies!) and glad they turned out nicely. Is there an easier technique to drop the batter into the pan? I used a tablespoon and it was messy… the batter is quite sticky so it was a little bit of an effort!
Hi Diana! If you have a small cookie scoop, that would work great here – much less messy!
Which size pan did you use? The mini or the large?
Hi! The pictured pan that we used is labeled as large.
I followed these directions exactly and my madeleines did not spread at all. They’re domed in the center where I plopped the batter down and don’t have the shell shape. Very very disappointing. 🙁
I’m so sorry these were disappointing. Madeleines can be a little finicky, and lack of spreading usually points to the batter being a bit too thick or the pan not being greased quite enough. If the batter sits too long after mixing, or if it’s slightly over-measured on flour/cocoa, it can hold its shape rather than flowing/spreading into the shell design. For your next batch, double-check your flour and cocoa measurements, make sure the buttering of the pan is thorough, and you can also try gently smoothing the batter before baking. I know how frustrating this can be, and I hope you’ll give them another try. They’re worth it when they cooperate!
These cookies are so good! I was not exactly sure what a ribbon of eggs and sugar should look like plus after removing the batter from the refrigerator it was thick but did not appear airy and spongy! I used my heart shaped Madeleine pan and the batter I plopped into the center of the well did not spread to the edges. When I prepared the second pan for baking I pressed the dough into the heart shape. BUT, both the trays were delcious with cookies that had a crisp edge, soft center and a nice “poof” to them. Not all were a nice heart shape but they were yummy and looked pretty with the toppings.
Hi. After whipping my eggs I am finding clear plastic hairs, thicker than an actual hair, in my whipped eggs. I’m not using anything that could be contaminating the eggs. Is this the chalazae? Or am I somehow contaminating my mixture? Please help!
Hi Dhana, it does sound like that may be the chalazae—that’s perfectly fine and shouldn’t impact how the madeleines bake. Hope you enjoy them!
Omg I learned how to make madeleines in Paris. I’m going to try this recepie!,
Made with GF flour (boo!) and the “plop” in the center definitely didn’t spread out appropriately
At least they taste good!
I have molds that are Madeleine shaped but are not together as a sheet, instead are one mold for one cookie. There are passed down from my grandmother and we use them for Czech best paw cookies, so I am not sure what they were designed to be used for and can’t find any other ones online. Would something like that work for this recipe or is it important that they are all connected as a sheet?
Hi Makayla, those sound absolutely lovely. Your individual molds should work just fine for this recipe. The madeleine batter doesn’t require the molds to be connected as a single sheet; what matters most is the shape and that they’re greased well so the cookies release cleanly. The only thing to keep in mind is that baking may be a touch quicker or slower depending on the thickness and material of your vintage molds, so keep an eye on the first batch and adjust as needed. Otherwise, you can use them exactly as you would a standard madeleine pan.
I really want to make these cookies since they are so pretty and sound delicious! But, I have a question which I hope can be answered!
I found my madeleine pan which I bought years ago from Williams and Sonoma but tucked it away and never used it. I found it and it is for heart shaped madeleines.
My question is how much batter would I put into the heart shaped well and I am not sure how to accurately measure the depth of the heart?
I read that for this recipe a tablespoon is spooned into each well. A rough measure of the heart at the largest parts suggests it is about 2.5″ by 2.5″
I look forward to your expert advice!
Hi Patricia, a heart-shaped Madeleine pan sounds absolutely adorable! You can use it for this recipe without any special changes. Even though the shape is different, the wells typically hold a similar amount of batter as standard madeleine molds. I’d start by adding about 1 Tablespoon of batter to each heart, just as written, and then adjust after the first batch if needed. The exact depth doesn’t have to be perfect; you’re mainly aiming for the wells to be about 2/3 full so the batter has room to rise and form that soft hump. Since your molds are slightly wider, they may take a minute more to bake.
Thanks so much for this detailed and helpful information!
I so enjoy Cookie Palooza but I cannot make this one as it isn’t suitable for making ahead for cookie boxes.
Chocolate Peppermint Madeleines? Yes, please! Just ordered my pan!
I’m excited to try these! 20 madeleines will be a lot for my family to finish by the day after they’re made, so is it possible to half this recipe or will that change how the madeleines bake?
Hi Shirley! You can absolutely halve the recipe. Nothing changes except, of course, the amount and also the time it will take the sugar and eggs to reach that pale, thick consistency. It will likely take around 5 minutes.