

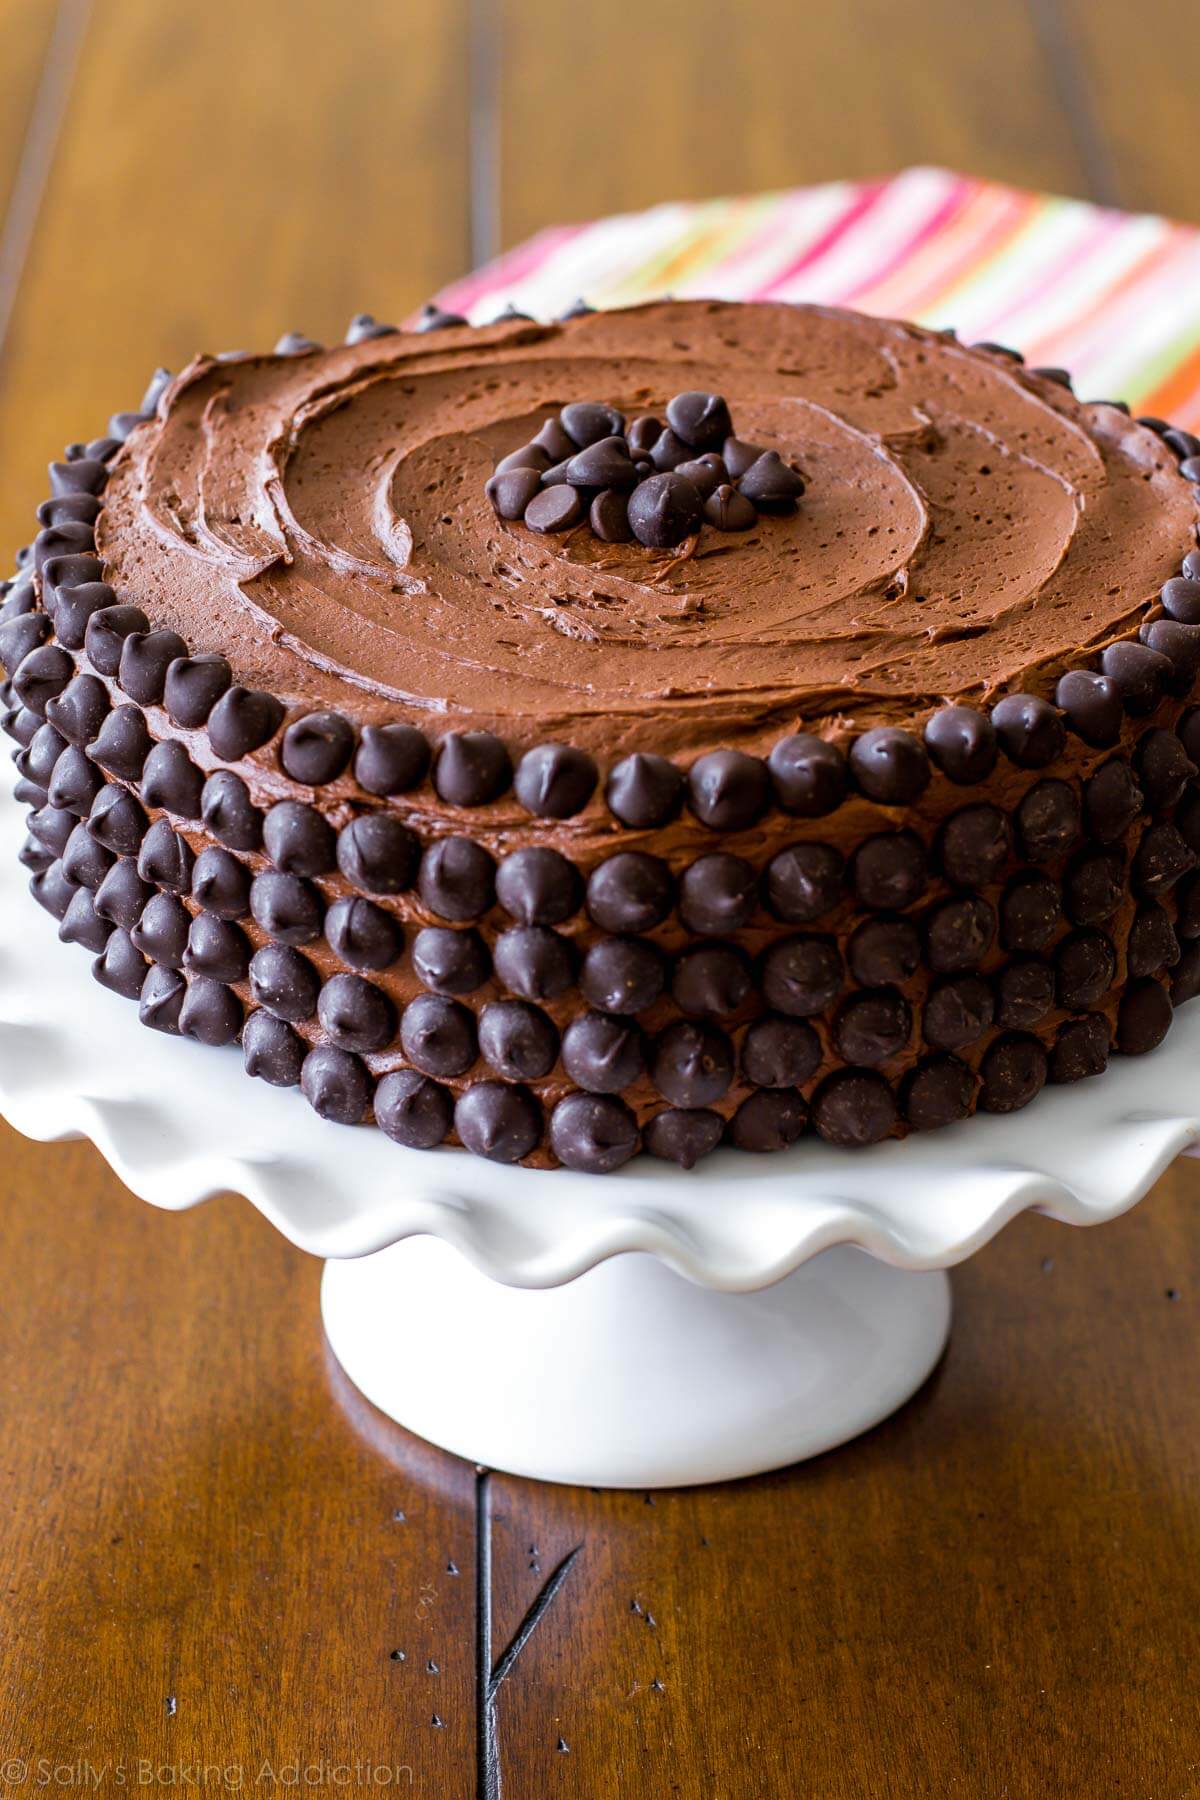
With a super moist crumb and fudgy, yet light texture, this chocolate cake recipe will soon be your favorite too. Top with chocolate buttercream and chocolate chips for 3x the chocolate flavor. You can also prepare this chocolate layer cake as a sheet cake, too. See recipe note.

Originally published in 2013 and now with more in-depth descriptions, a helpful video tutorial, clearer instructions, and different ways to use this classic chocolate cake recipe. I hope you enjoy all the new features in this recipe post!
Devil’s Food Chocolate Cake… But Better
This pictured cake is a combination of chocolate buttercream and mock-devil’s food cake. You know the devil’s food chocolate cake you get at a restaurant or even from a box mix? This is that exact cake, only completely homemade.
This is, without a doubt, the best chocolate cake I’ve ever had. And judging by your feedback in the reviews, I’m confident you’d say the same thing!
This Chocolate Cake Is:
- Extra moist
- 2 layers, but can be made as 3 layers or as a sheet cake
- Soft with a velvety crumb
- Deeply flavorful
- Unapologetically rich, just like my flourless chocolate cake
- Covered with creamy chocolate buttercream
One reader, Greta, commented: “This is, hands down, the best chocolate cake I have ever baked. And I’m not the only one who thinks so… because I have baked and shared this cake with many people… it’s simply the best! Thank you for sharing this recipe with us. ★★★★★“
Another reader, Melanie, commented: “This has become my go-to chocolate cake! My family loves it. The directions are very clear and easy to follow. Before now, I did not consider myself a baker. I had only baked box cakes. Now, this recipe has catapulted me into a from-scratch cake baker. So glad I found this recipe and many others from this site. ★★★★★”
Another reader, Todd, commented: “Outstanding! One of the best cakes I have ever made. Moist, chocolatey, beyond delicious! ★★★★★“
Key Chocolate Cake Ingredients & Why
Each ingredient serves an important role. For best results, do not make substitutions.
- All-Purpose Flour: The structure of the cake. Unlike confetti cake where you can use either, do not use cake flour here—when combined with ultra-light cocoa powder, cake flour is too fine for this cake.
- Unsweetened Natural Cocoa Powder: Do not use Dutch-process cocoa powder. Save it for another recipe, like these homemade brownies. If you’re interested, see Dutch-process vs natural cocoa powder for an in-depth explanation.
- Baking Soda & Baking Powder: Remember the differences in baking soda vs baking powder? We use both here for lift.
- Salt: Salt balances the flavor.
- Espresso Powder: Espresso powder is optional, but I recommend its addition because it enhances the chocolate flavor. The chocolate cake will not taste like coffee, I promise. I use espresso powder in my chocolate zucchini cake, Guinness cake, chocolate raspberry cake, and marble loaf cake too! You can find it in the coffee or baking aisle at the grocery store or online.
- Oil: Don’t use butter in this cake batter. Cocoa powder is a particularly drying ingredient, so this cake needs oil for suitable moisture. Same goes for my chocolate cake roll recipe, too.
- Eggs: Use 2 room-temperature eggs. If your eggs are cold, place them in a bowl of warm water for 10 minutes.
- Buttermilk: This chocolate cake requires the moisture and acidity from buttermilk. Lately I’ve been using a mix of sour cream and buttermilk, as well as reducing the hot liquid. You can read more about this next and see my dark chocolate mousse cake, tuxedo cake, black forest cake, German chocolate cake, and chocolate peanut butter cake recipes.
- Vanilla Extract: Vanilla extract adds flavor.
- Hot Coffee or Hot Water: Hot liquid enhances the cocoa powder’s flavor. It also encourages it to bloom and dissolve appropriately. You’ll notice I don’t use hot liquid in my chocolate cupcakes recipe. That’s because there isn’t the same volume of dry ingredients. With this amount of cake batter, we need a hot liquid to break up the cocoa powder lumps resting in all that flour. If you don’t drink coffee, you can use hot water. For deeper and darker flavor, though, use coffee. (Decaf coffee works!) You use it in this black velvet cupcakes recipe, too.
What an Easy Cake!
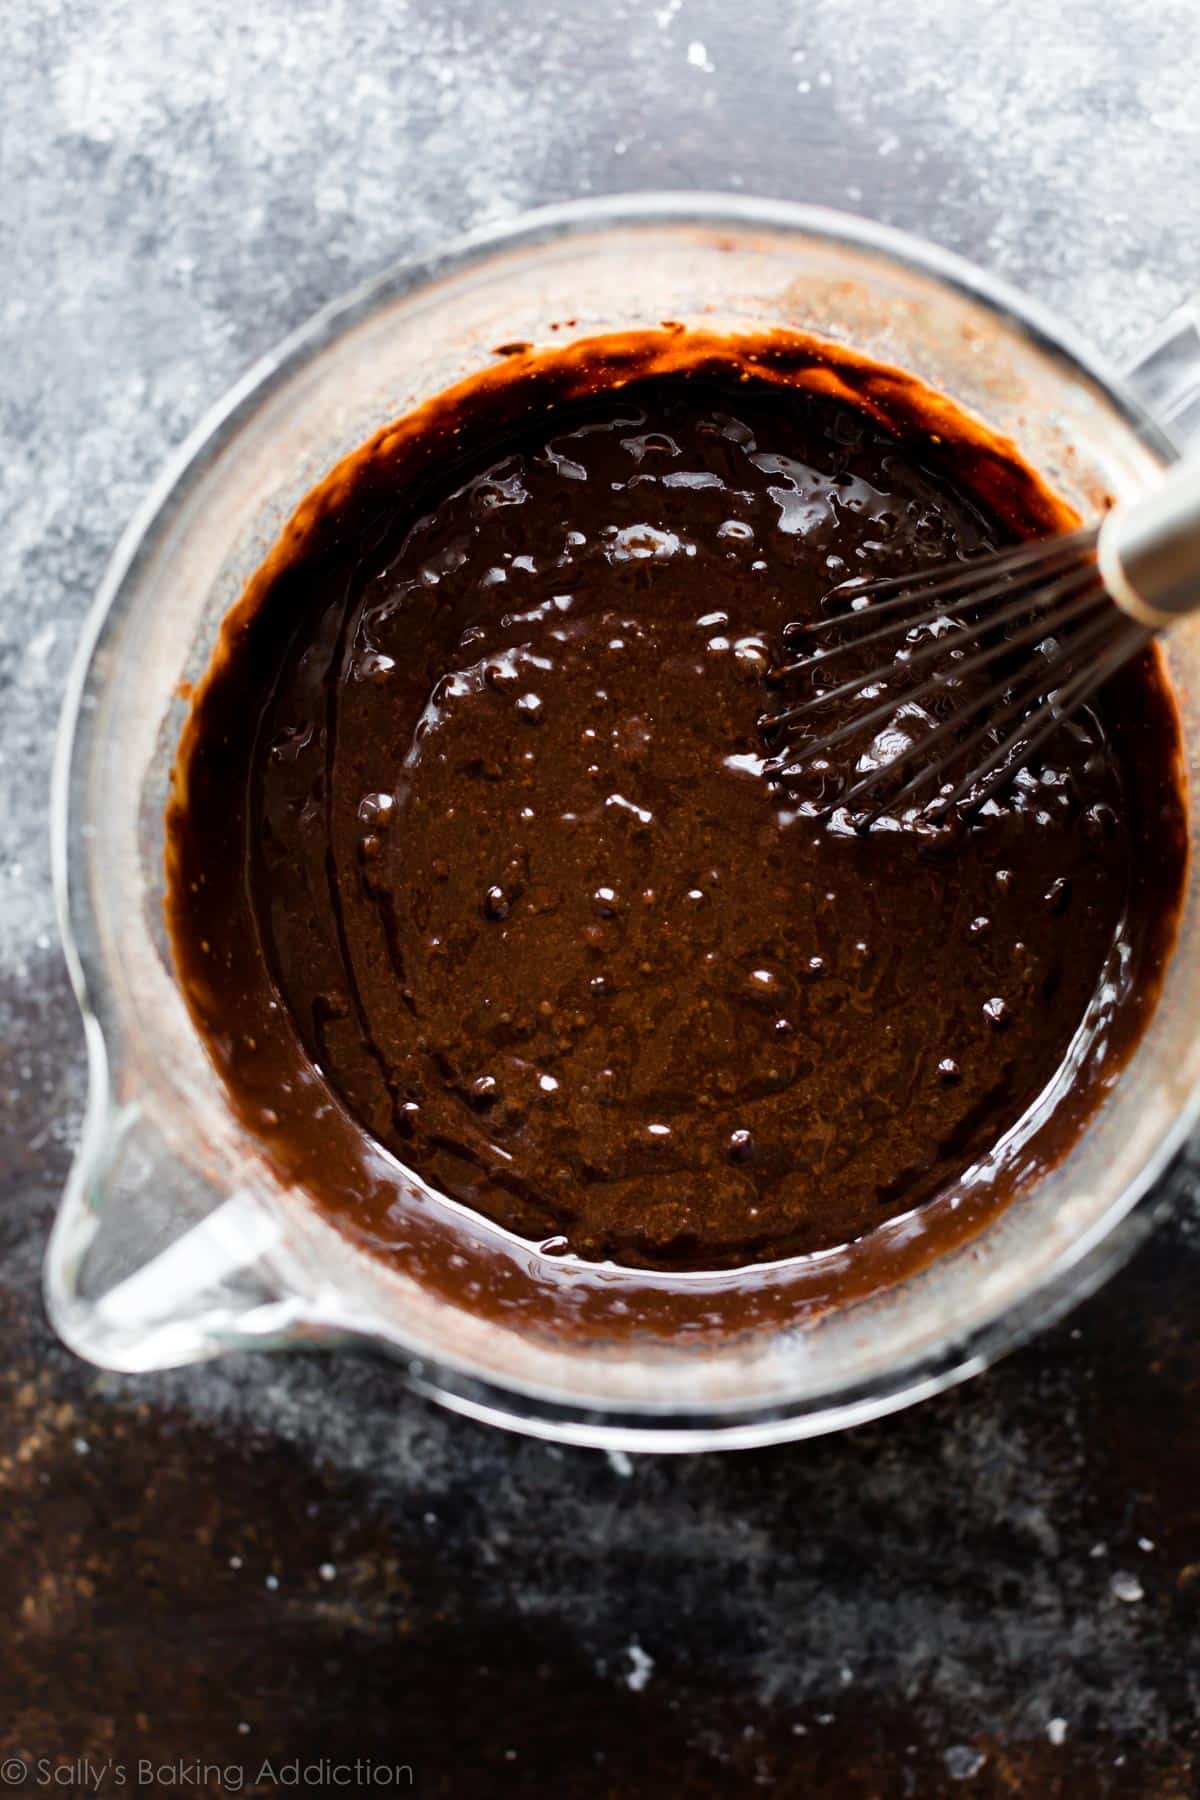
While you can use a mixer, you could also simply use a whisk. Whisk the dry ingredients in one bowl and the wet ingredients in another bowl. Combine them, add the hot coffee, then whisk everything together. The cake batter is thin.
Divide between two 9-inch cake pans. You can easily stretch it to three or four 8-inch cake layers if needed. Or make a quarter sheet cake using a 9×13-inch cake pan. See recipe Notes for details.
Need a one-layer cake? Use this mint chocolate cake recipe for one 9-inch round cake.
Need cupcakes? Try my super moist chocolate cupcakes, classic chocolate cupcakes, or cream-filled chocolate cupcakes recipes.
For a Slightly Sturdier Version of This Cake
As mentioned above, there are two ways to prepare this cake batter and the slight difference involves the wet ingredients. You can follow the recipe as written using buttermilk and hot coffee/water. Or you can add sour cream. Whichever way you make it, the process is the same. (Just reduce the liquids and add sour cream!)
- Original Version (pictured and written below): The original recipe produces a very thin batter. The cake is extra soft with a deliciously spongey texture.
- Sour Cream Version (written in recipe notes and shown in video tutorial): By replacing some of the buttermilk and hot coffee with sour cream, the cake batter is slightly thicker and produces a slightly denser cake with more structure. I love using sour cream in my vanilla cake, too!
Both cakes are equally moist and chocolatey with the same flavor and ease of preparation. It just depends if you want a spongier or sturdier cake. 🙂

Silky Chocolate Buttercream
Like my yellow cake, I use my favorite chocolate buttercream. I slightly increased the amount of each ingredient to produce extra frosting for this chocolate layer cake. You need 6 ingredients total:
- Unsalted Butter
- Confectioners’ Sugar
- Unsweetened Cocoa Powder
- Heavy Cream or Milk
- Vanilla Extract
- Salt
Because there is no leavening occurring, you can use either Dutch-process or natural cocoa powder in the buttercream. Heavy cream provides an extra creamy frosting, but whole milk can be substituted if needed.
While I love chocolate frosting here the most, this cake is also wonderful with vanilla buttercream or peanut butter frosting instead!
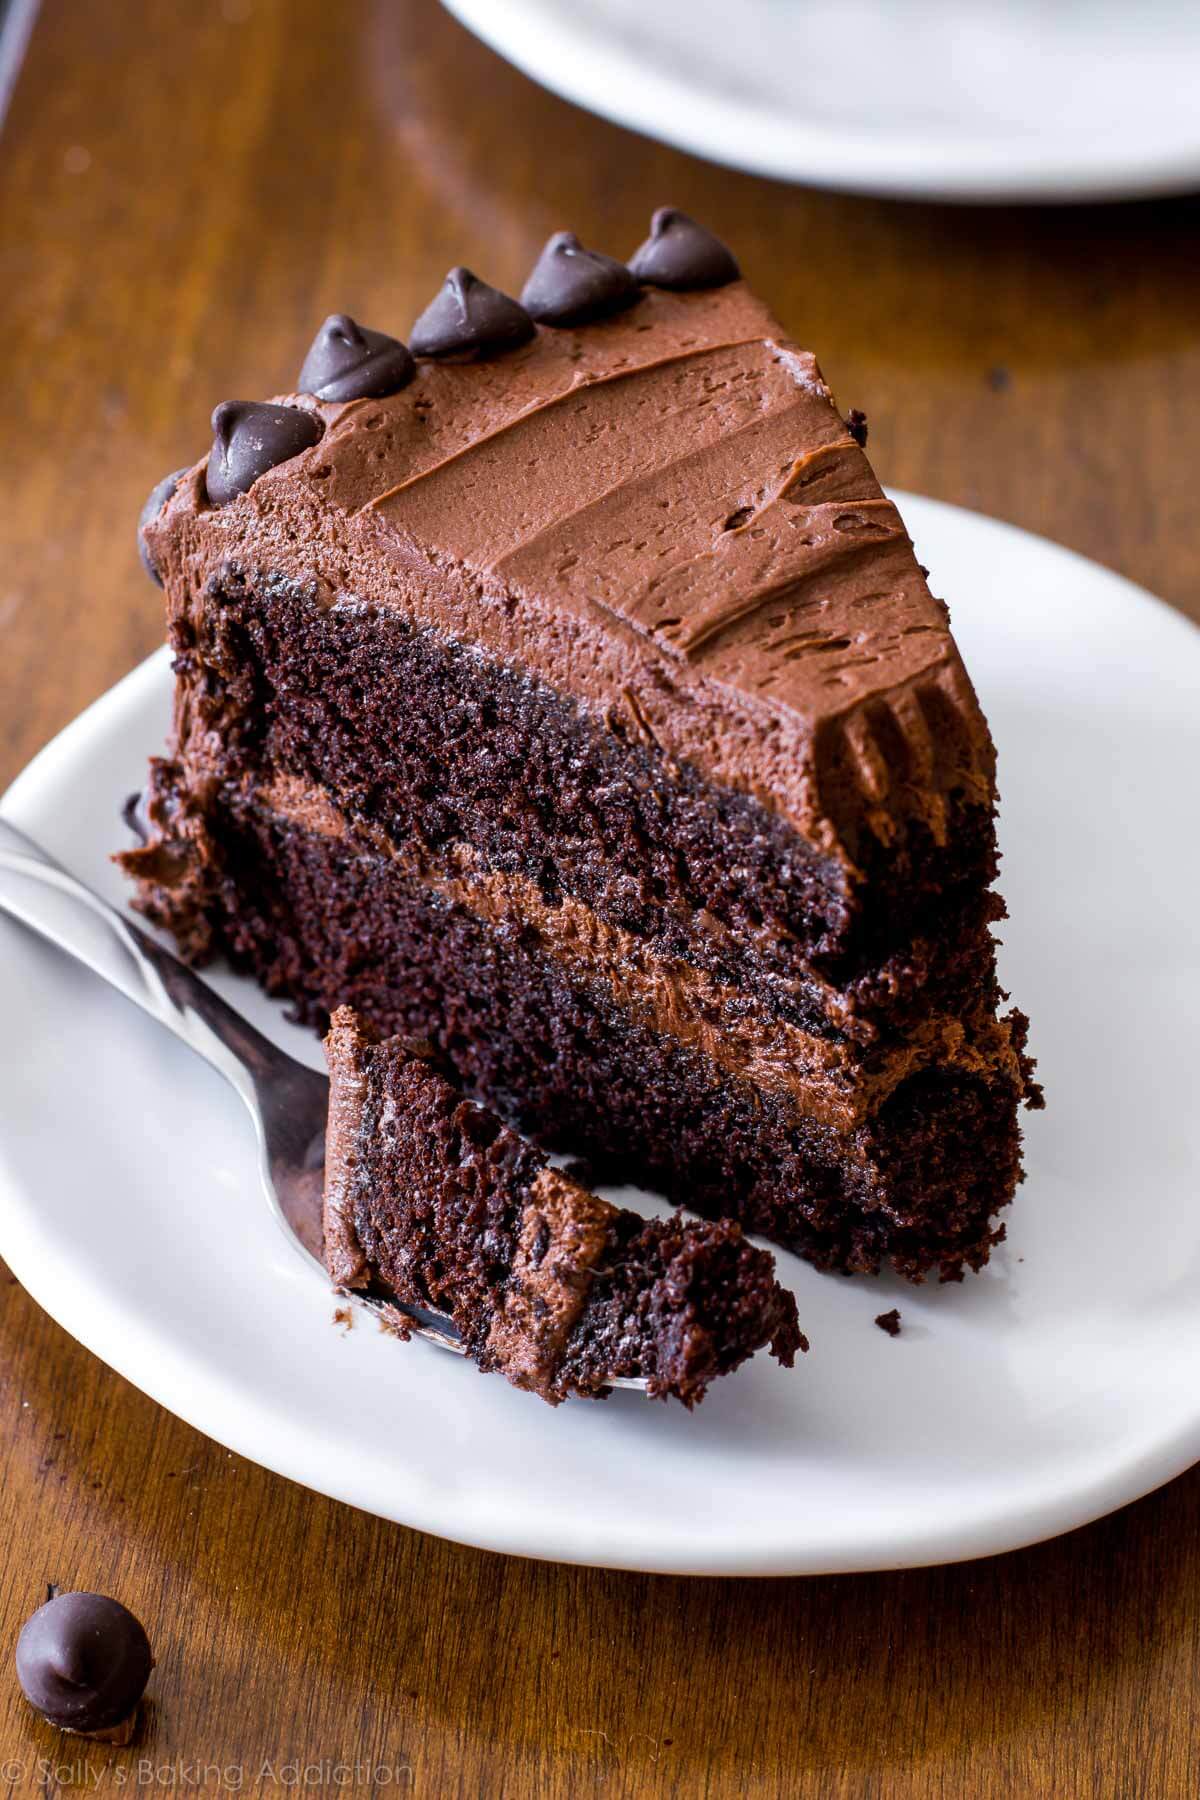
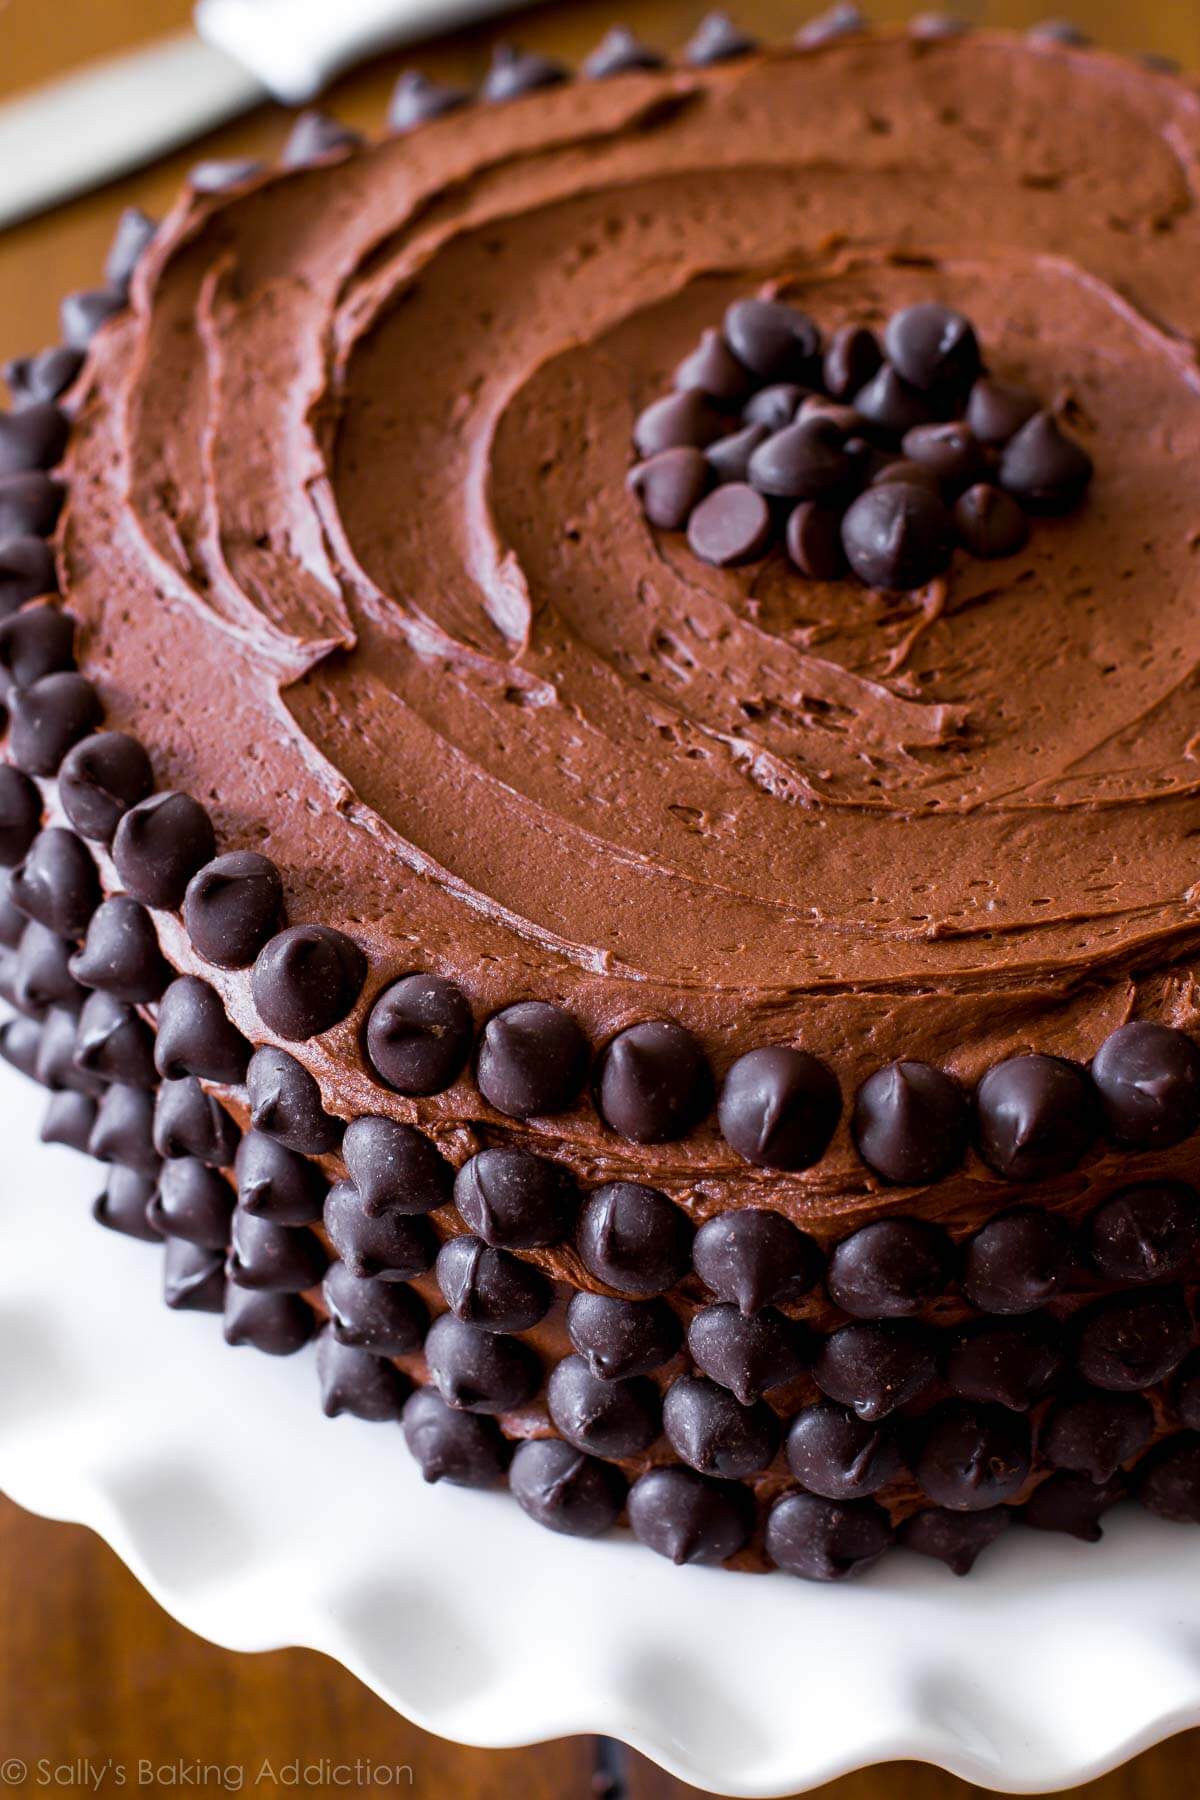
So, why do I call it triple chocolate layer cake when it only has 2 layers? Well, chocolate is used three times: chocolate cake, chocolate frosting, chocolate chips. Press a handful on top like we do with warm chocolate chip cookies, or go with “the more the better” motto like we did. Let’s eat!
Print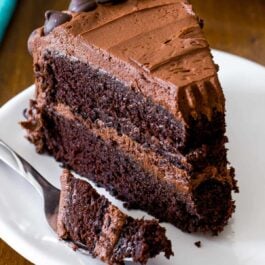
Deliciously Moist Chocolate Layer Cake
- Prep Time: 30 minutes
- Cook Time: 25 minutes
- Total Time: 4 hours
- Yield: serves 12-16
- Category: Dessert
- Method: Baking
- Cuisine: American
Description
This is my favorite homemade chocolate cake recipe. With a super moist crumb and fudgy, yet light texture, this chocolate cake recipe will be your favorite too. Top with chocolate buttercream and chocolate chips for 3x the chocolate flavor. You can also prepare this chocolate layer cake as a sheet cake. See recipe Note.
Ingredients
Cake
- 1 and 3/4 cups (219g) all-purpose flour (spooned & leveled)
- 3/4 cup (64g) unsweetened natural cocoa powder
- 1 and 3/4 cups (350g) granulated sugar
- 2 teaspoons baking soda
- 1 teaspoon baking powder
- 1 teaspoon salt
- 2 teaspoons espresso powder (optional)
- 1/2 cup (113g/120ml) vegetable oil (or canola oil or melted coconut oil)
- 2 large eggs, at room temperature
- 2 teaspoons pure vanilla extract
- 1 cup (240g/ml) buttermilk, at room temperature
- 1 cup (240g/ml) freshly brewed strong hot coffee or hot water
Chocolate Buttercream
- 1 and 1/4 cups (282g) unsalted butter, softened to room temperature
- 3 and 1/2 cups (420g) confectioners’ sugar
- 3/4 cup (64g) unsweetened cocoa powder (natural or Dutch-process)
- 3–5 Tablespoons (45–75g/ml) heavy cream (or half-and-half or milk), at room temperature
- 1 teaspoon pure vanilla extract
- 1/4 teaspoon salt
- optional for decoration: semi-sweet chocolate chips
Instructions
- Preheat the oven to 350°F (177°C). Grease two 9-inch cake pans, line with parchment paper rounds, then grease the parchment paper. Parchment paper helps the cakes seamlessly release from the pans. (If it’s helpful, see this parchment paper rounds for cakes video & post.)
- Make the cake: Whisk the flour, cocoa powder, sugar, baking soda, baking powder, salt, and espresso powder (if using) together in a large bowl. Set aside. Using a handheld or stand mixer fitted with a whisk attachment (or you can use a whisk) mix the oil, eggs, and vanilla together on medium-high speed until combined. Add the buttermilk and mix until combined. Pour the dry ingredients into the wet ingredients, add the hot coffee/water, and whisk or beat on low speed until the batter is completely combined. Batter is thin.
- Divide the batter evenly between the prepared pans. Bake for 23–26 minutes or until a toothpick inserted in the center comes out clean. (Note: Even if they’re completely done, the cooled cakes may *slightly* sink in the center. Cocoa powder is simply not as structurally strong as all-purpose flour and can’t hold up to all the moisture necessary to make a moist-tasting chocolate cake. It’s normal!)
- Cool the cakes in the pans set on a cooling rack for 1 hour. Run a knife around the edges to help loosen the sides, remove the cakes from the pans, peel off the parchment, and place on the cooling rack to finish cooling.
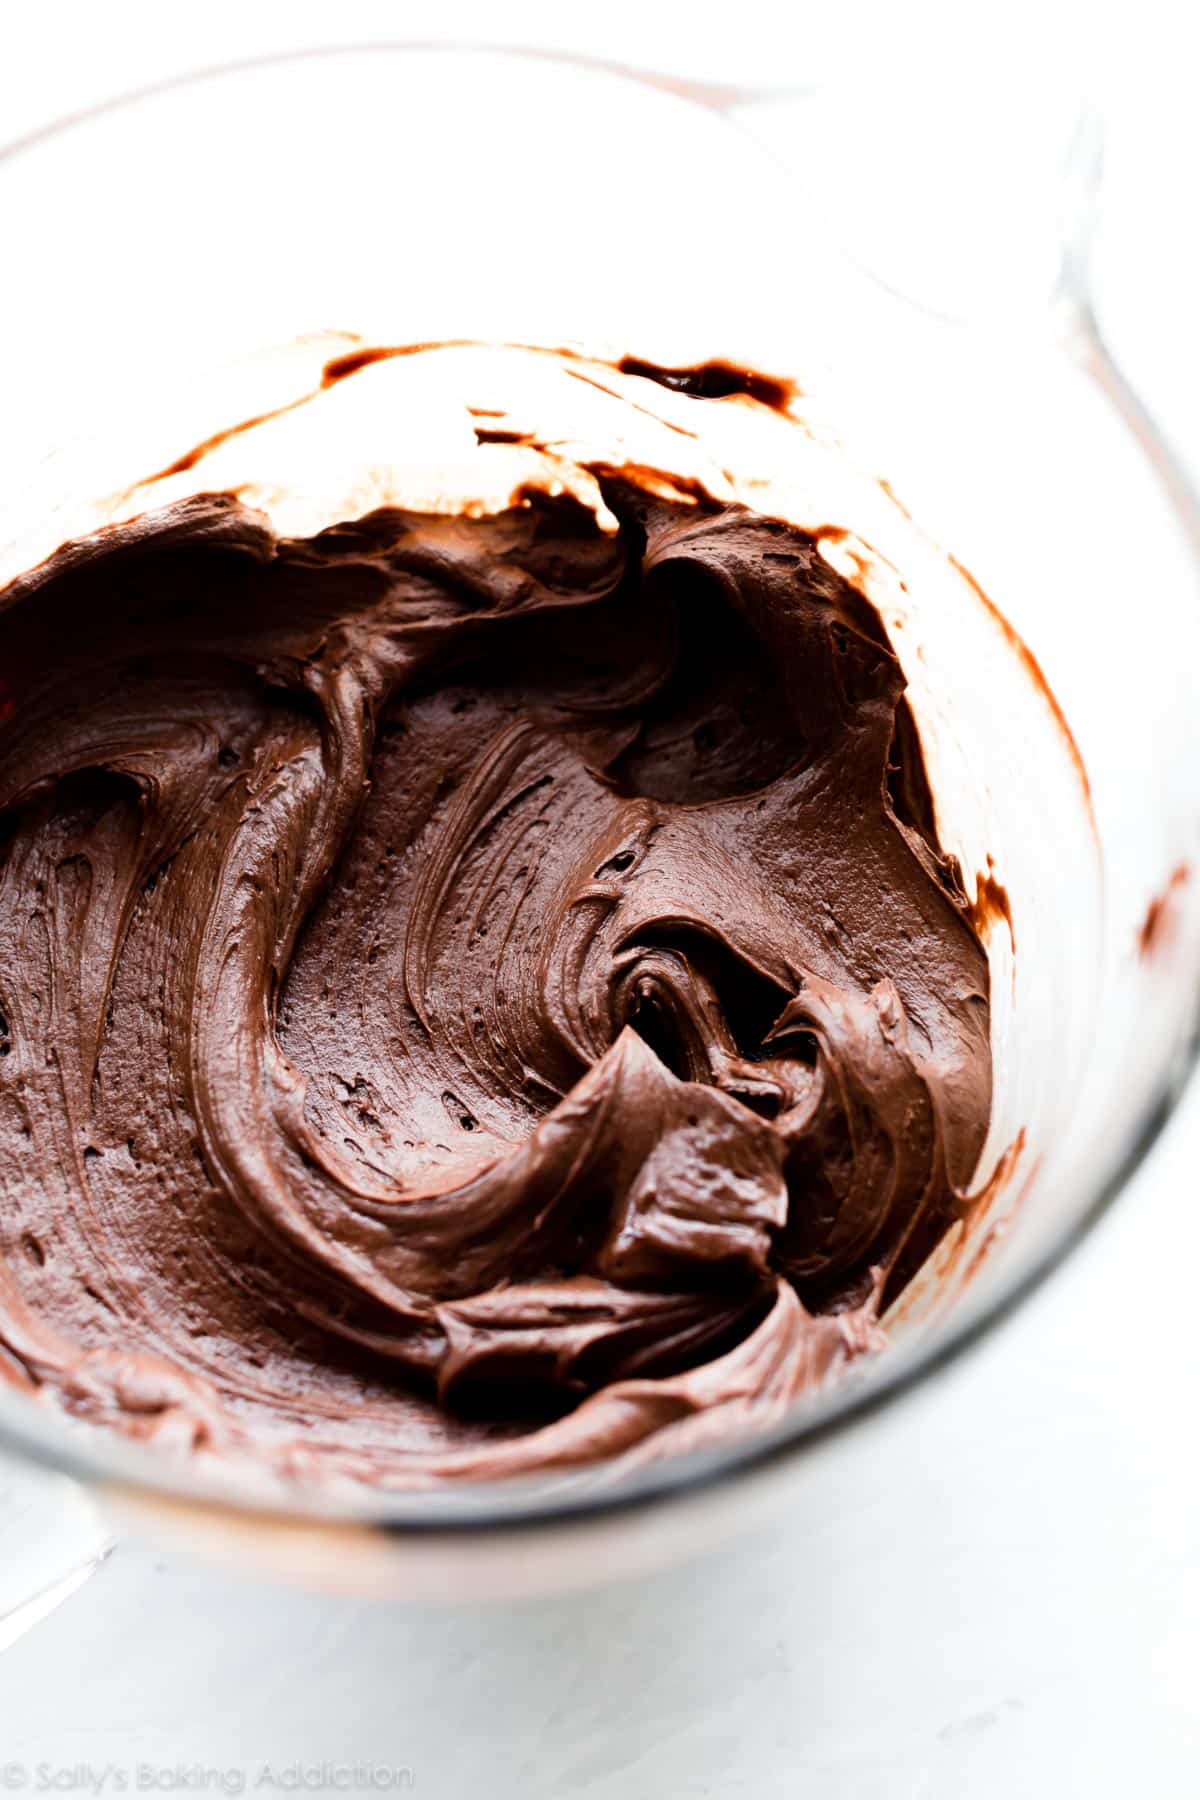
- Make the buttercream: With a handheld or stand mixer fitted with a paddle attachment, beat the butter on medium speed until creamy—about 2 minutes. Add confectioners’ sugar, cocoa powder, 3 Tablespoons heavy cream, vanilla extract, and salt. Beat on low speed for 30 seconds, then increase to high speed and beat for 1 full minute. Do not over-whip. Add 1/4 cup more confectioners’ sugar or cocoa powder if frosting is too thin or 1–2 more Tablespoons of cream if frosting is too thick. Taste. Add another pinch of salt if desired.
- Assemble and frost: If cooled cakes are domed on top, use a large serrated knife to slice a thin layer off the tops to create a flat surface. This is called “leveling” the cakes. Discard or crumble over finished cake. Place 1 cake layer on your cake stand or serving plate. Evenly cover the top with frosting. Top with 2nd layer and spread remaining frosting all over the top and sides. I use an icing spatula and bench scraper for the frosting. Garnish with chocolate chips, if desired.
- Refrigerate uncovered cake for at least 30–60 minutes before slicing to help set the shape. After that, you can serve the cake or continue refrigerating for up to 4–6 hours before serving. Cake can be served at room temperature or chilled.
- Cover leftover cake tightly and store in the refrigerator for up to 5 days. I like using a cake carrier for storing and transporting.
Notes
- Make Ahead & Freezing Instructions: Prepare cake through step 4. Wrap the individual baked and cooled cake layers tightly and refrigerate for up to 2 days or freeze up to 3 months. Bring to room temperature then continue with step 5. You can prepare the chocolate buttercream 2–3 days in advance. Cover and refrigerate, then bring to room temperature before spreading onto/assembling the cake. Frosted cake freezes well, up to 3 months. Thaw overnight in the refrigerator, then bring to room temperature or serve cold.
- Special Tools (affiliate links): 9-inch Round Cake Pans | Electric Mixer (Handheld or Stand Mixer) | Glass Mixing Bowls | Whisk | Cooling Rack | Cake Stand, Serving Plate, or Cake Turntable | Icing Spatula | Bench Scraper | Cake Carrier (for storing)
- 3-Layer Cake: You can also prepare this cake as a 3-layer cake. Divide batter between three 8-inch cake pans in step 1 and bake for 22–25 minutes or until a toothpick inserted in the center comes out clean. This frosting will be enough for 3 layers. If desired, 1.5x the buttercream ingredient amounts or use the frosting recipe from my Piñata Cake if you want extra frosting.
- Cocoa Powder: Use natural cocoa powder in the cake, not Dutch-process. (See Dutch-process vs natural cocoa powder for more information.) Because there is no leavening in the frosting, you can use either natural or Dutch-process in the chocolate buttercream.
- Buttermilk: Buttermilk is required for this recipe. You can make your own DIY buttermilk substitute if needed. Add 2 teaspoons of white vinegar or lemon juice to a liquid measuring cup. Then add enough room-temperature whole milk to the same measuring cup until it reaches 1 cup. (In a pinch, lower-fat or nondairy milks work for this soured milk, but the cake won’t taste as moist or rich.) Stir it around and let sit for 5 minutes. The homemade “buttermilk” will be somewhat curdled and ready to use in the recipe.
- Sour Cream Version: Lately I’ve been using a mix of sour cream and buttermilk, as well as reducing the hot coffee. Reduce the buttermilk and hot coffee to 1/2 cup (120g/ml) each. Add 3/4 cup (180g) of room-temperature full-fat sour cream with the wet ingredients. You can see this described above and in my dark chocolate mousse cake. That cake and this cake are both fantastically moist, but the sour cream version has a slightly sturdier crumb.
- Can I top this cake with fondant? The sour cream version (note above) makes a sturdier cake that should hold up under fondant.
- Amount of Cake Batter: This recipe yields about 6 cups of batter, which is helpful if you need it for different Cake Pan Sizes & Conversions.
- Room-Temperature Ingredients: All refrigerated items should be at room temperature so the batter mixes together easily and evenly. Read more about why room-temperature ingredients are important.
- Espresso Powder/Coffee: Espresso powder and coffee will not make this cake taste like coffee. Instead, they deepen and enhance the chocolate flavor. I highly recommend them both. Decaf coffee is fine. You can find espresso powder in the coffee or baking aisle at the grocery store or online. You can use the same amount of instant coffee (the powder, not coffee grounds) instead of espresso powder if desired. If coffee isn’t your thing, you can leave out the espresso powder and use hot water instead of the hot coffee.
- Bundt Pan: I recommend my chocolate cream cheese Bundt cake but without the cream cheese filling. Reduce buttermilk in that recipe to 1/4 cup and increase sour cream to 1 cup.
- 9×13-inch Pan: You can bake this cake in a 9×13-inch baking pan. Same oven temperature, about 35–40 minutes bake time.
- Chocolate Cupcakes: I have 2 favorite chocolate cupcake recipes: my super moist chocolate cupcakes and this classic chocolate cupcakes recipe. The second one is based off of this chocolate cake recipe and has the same texture and flavor as this cake!
Recipe adapted from Ina Garten and originally from Hershey’s


Reader Comments and Reviews
I love this recipe and the cake is delicious! I’m wanting to make a 6 layer cake for a birthday party. Has anyone tried this? Any tips?
Hi Amber! This is such a light cake, we’re afraid the crumb may compress under the weight of so many layers. We have not tried it ourselves, though!
Would I need to make any modifications to use 9”x1.5” pans instead of 2” depth?
Hi Ellie, just make sure to fill your pans no more than halfway so that they have plenty of room to rise without overflowing. Enjoy!
Can I make this recipe in a 9 inch springform pan?
Hi Claire, We always recommend using regular cake pans instead of springform pans unless a recipe specifically calls for a springform pan – the extra height on the pans can cause cakes to bake unevenly. However, some bakers have reported success baking cakes in springform pans. If you do use a springform pan, be sure to still make 2 separate layers rather than baking it all in 1 pan. We hope you enjoy the cake!
Wow was this recipe spectacular! Not surprised because your recipes always come out fantastic! I made this for my parents’ 60th wedding anniversary – as a 3 layer 8” cake – and I filled both layers with your raspberry cake filling (also amazing!!) and as a result I didn’t need to make extra buttercream. I decorated the top with fresh raspberries. This was a huge hit with my family. The cake was super moist even though the layers were thin, the buttercream was not overly sweet, and it really wowed everyone.
Baked this in a Wilton nonstick metal 9×13 pan and cooked it same temp for 30 minutes exactly and it was perfect! The middle didn’t sink hardly at all! I was worried when I read the note but It wasn’t at all noticeable after icing! And while the batter tasted like coffee the cake did not. It’s so moist and dangerously delicious!
Do I have to use hot brewed coffee if I don’t want the coffee taste?
Hi Natalie, the hot coffee doesn’t give off a coffee taste in the final cake, it just helps deepen the chocolate flavor. You could use the same amount of hot water instead.
Hey there! I have had the frosting sitting out for an hour and it still seems a little hard to spread smoothly. Would it be OK to put it in a bowl of warm water or put it in the microwave, or put it back in the mixer with a little bit more milk?
Hi Denise, we’d add a splash more milk and rewhip the frosting. Hope this helps!
I made this cake for my son’s second birthday party! It’s so deliciously moist. The best cake I have ever eaten and everyone who eats it says the same.
My son has an egg allergy, so I substitute 1/4 cup Greek yogurt for each egg and the recipe still works great!
This is by far the best chocolate cake I have ever had! I will definitely share this recipe with friends!
Tried this for a cake! So good!
How would bake times differ with a loaf pan?
Hello Sally & Team,
I wanted to try baking a small 6″ 3-layer cake – can I use the recipe “as is”? Will I have enough batter? And will the buttercream recipe “as is” be enough to cover the cake and the layers?
Thank you so very much – I love all of your recipes. Your tips have helped me feel more confident as a baker.
Hi Cindy! This would be too much batter. Instead, you can use the batter from these chocolate cupcakes. It yields the perfect amount for a 3 layer, 6 inch cake. You can follow the baking times and directions for 6 inch cake recipes. Let us know how it turns out!
Absolutely lovely cake..I halved the recipe as only needed it for 4 people so disnt need a huge cake. I needed it dairy free so I just swapped out the cream and buttermilk for soy milk and swapped out the oil /butter for margarine. I have small cake tins so still cooked 2 separate cakes and layered them. And just adjusted the cooking time..
10/10. Such a soft and moist cake
Hi Sally,
This cake is my go to chocolate cake. Thank you for this recipe. Everyone raves about it! My only concern is that each time I make it, the batter is not just thin, but like water. I thought it was normal until I just watched your video… any idea why mine is watery? Also, the layers are not all crumb but the bottom 1/4 almost looks a little like a gluey texture. Again, its delicious and moist and the frosting is edible right out of the bowl, so, no complaints here, just wondering if it may be something I’m doing wrong.
I don’t believe it’s underbaked, but not sure. The toothpick is always clean… Thx!
Hi Dee! Happy to help. Are you making any changes (even small ones) to the batter? Do you live somewhere particularly humid? This is definitely a thinner batter. Have you tried the sour cream version (detailed in the recipe Notes)? This yields a slightly thicker batter that may work better for you!
This cake is amazing! I want to make a thicker 1 layer cake using a 9×3 aluminum pan and putting more batter in it. What would you recommend for oven temp and cook time?
Hi Michelle, we don’t recommend putting all of this batter in one 9-inch round, even if it has higher sides. The batter will have difficulty baking through properly. It’s best to bake in separate pans and stack as written in the recipe, or you could try the 9×13-inch version in the recipe Notes. Hope this helps!
This cake was delicious and turned out perfect. I did use alkalized chocolate so, I increased the baking powder to 2 tsp and decreased the baking soda to 1.5 tsp to compensate. The cake also didn’t seem quite set enough at 26 minutes so I increased the bake time to 29 minutes. It turned out absolutely perfect.
Hi Sally…wanted to know if i can substitute chocolate grenache instead of Chocolate buttercream?
Certainly! You can decorate your cake however you would like.
Yes you sure can I do on many of my cakes I bake
My cakes came out lopsided what is the best way to fix them?
Hi Danielle! You can use a sharp knife to level your cakes before assembling (just shave off the top parallel to the counter).