

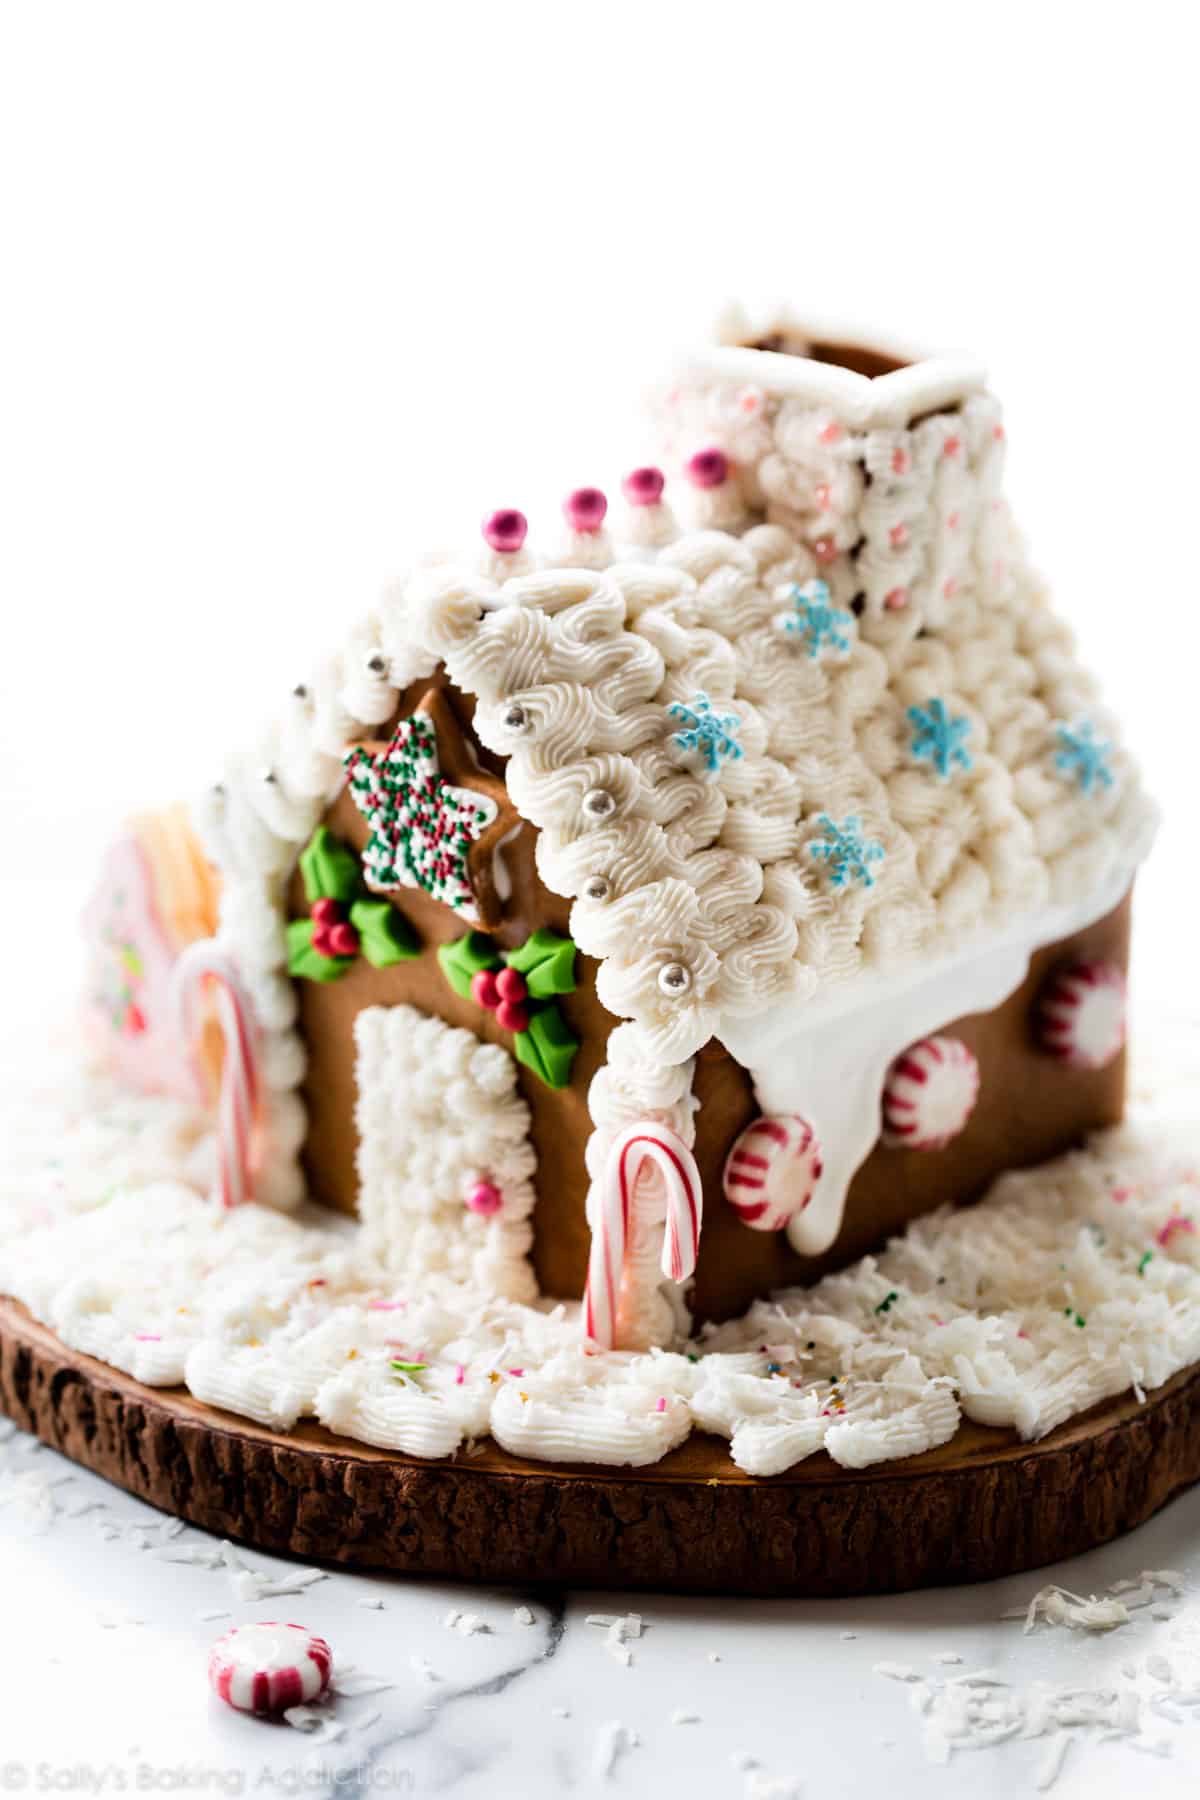
Here’s my completely homemade gingerbread house recipe including how to bake, construct, and decorate with royal icing and buttercream. There are no rules when it comes to decorating gingerbread houses. The ONLY rule is to have fun!

One of the most common recipe questions I receive is how to turn my gingerbread cookies into a house. I’ve never really had a solid answer until now. I have it all for you today including:
- solid gingerbread cookie dough recipe
- a free gingerbread house template with the exact shapes you’ll need
- all my decorating tips and recommendations
- links to the products I use if you want to replicate this
Trust me when I say that I am NOT a crafty person, but I could EASILY decorate this beauty and I’m showing you exactly how I did it. This is perfect for beginners!
Let’s get started. Here’s the video tutorial to guide you along. You can watch me make this gingerbread house from start to finish, including rolling out the dough and decorating the house. Sprinkled throughout are my highly recommended tips and methods to guarantee gingerbread house success.
Gingerbread House Video Tutorial
Starting Your Homemade Gingerbread House
We’re using a cookie dough that’s similar to my gingerbread cookies. The gingerbread cookies are soft in the centers and crisp on the edges, but the gingerbread house shapes are much more sturdy and solid. Let’s compare the house recipe to the cookie recipe:
- small amount of baking soda for less puff
- less butter so the house shapes are harder
- less molasses so the dough isn’t as sticky
- add water to make a smoother dough
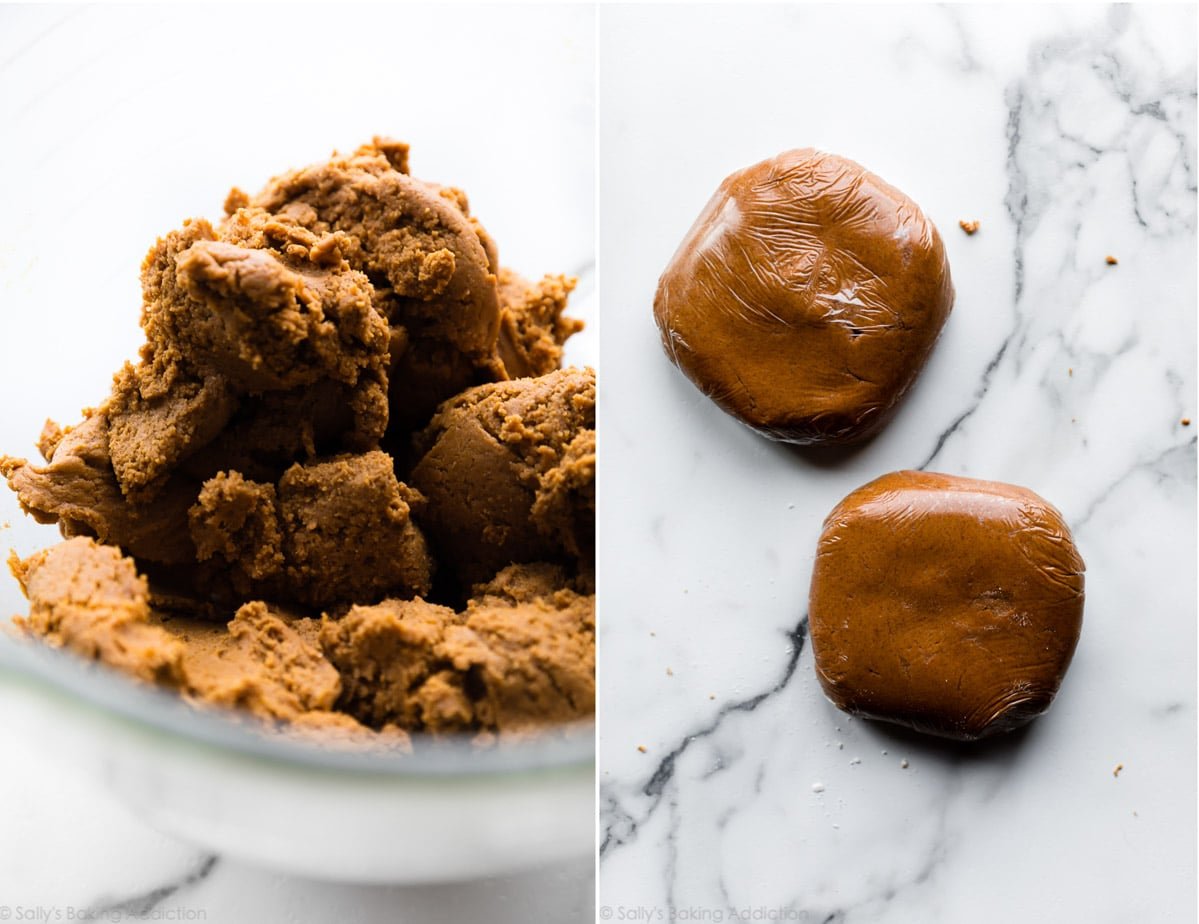
Other than that, the recipes are pretty similar. Chilling the dough is imperative—otherwise the house pieces will lose shape and constructing will be impossible. The dough is a little sticky from the molasses, so I recommend chilling in two discs before rolling out.
Why two discs? It’s easier to roll out smaller portions of cookie dough.
How to Construct a Gingerbread House
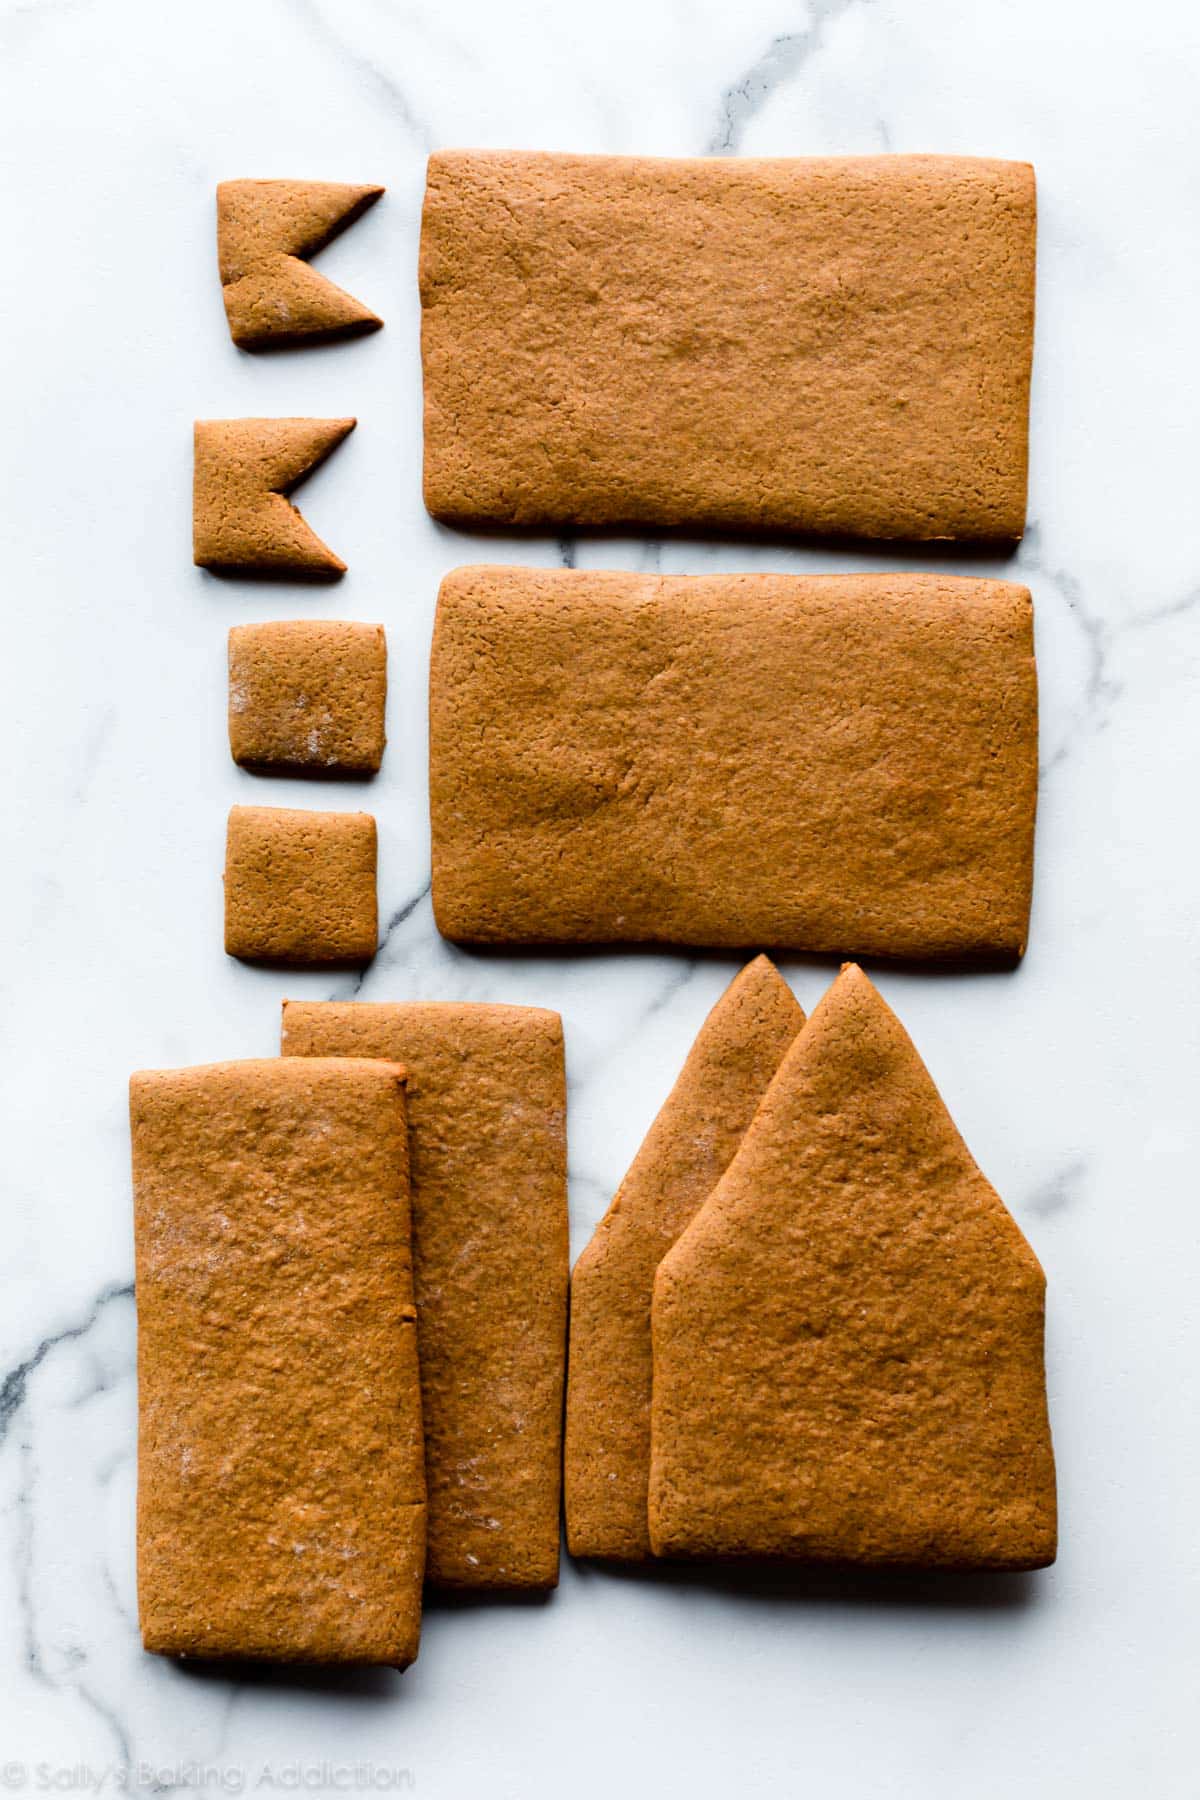
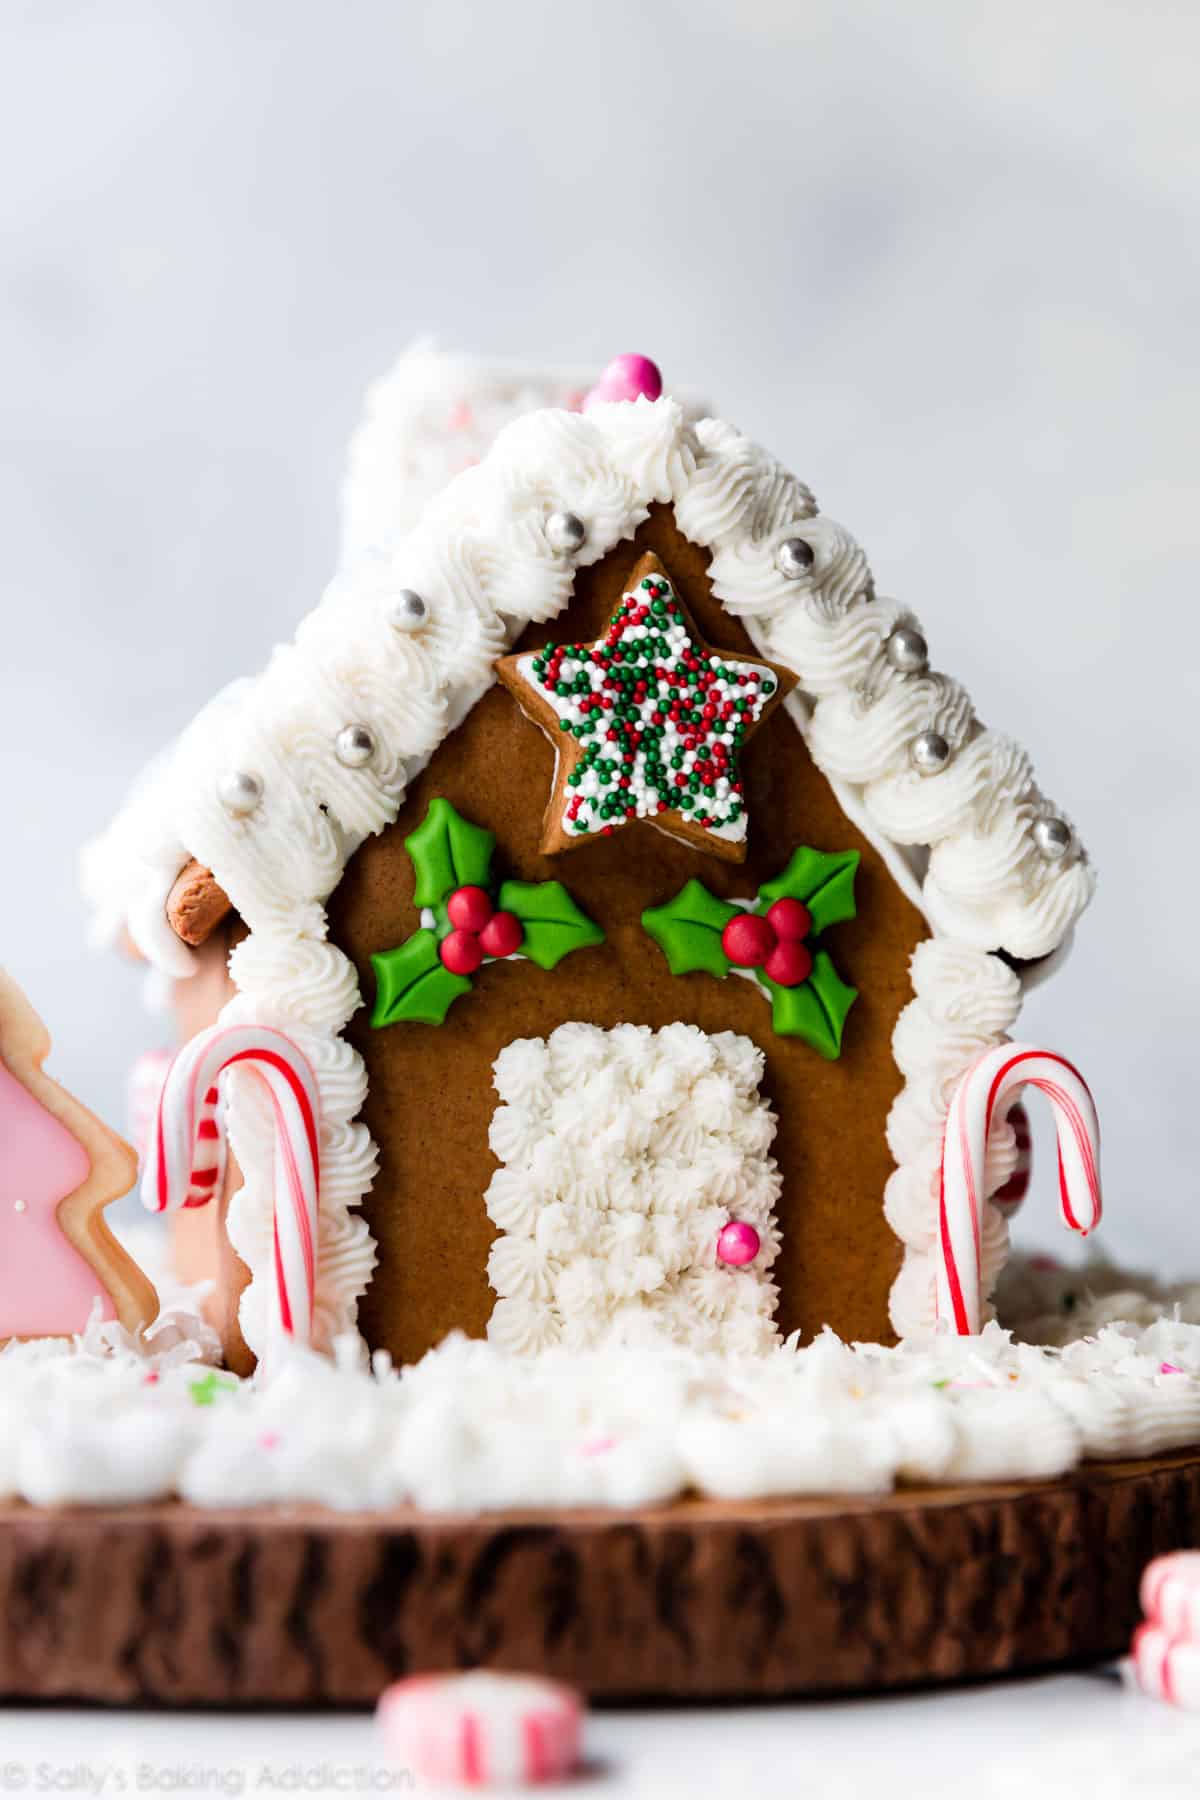
Use my gingerbread house template. This template will give you a small-medium house that’s totally approachable. I find large houses difficult to construct and decorate.
This house is approximately 7 inches tall with the chimney and 6 inches wide.
Click this link for the PDF: Sally’s Baking Gingerbread House Template
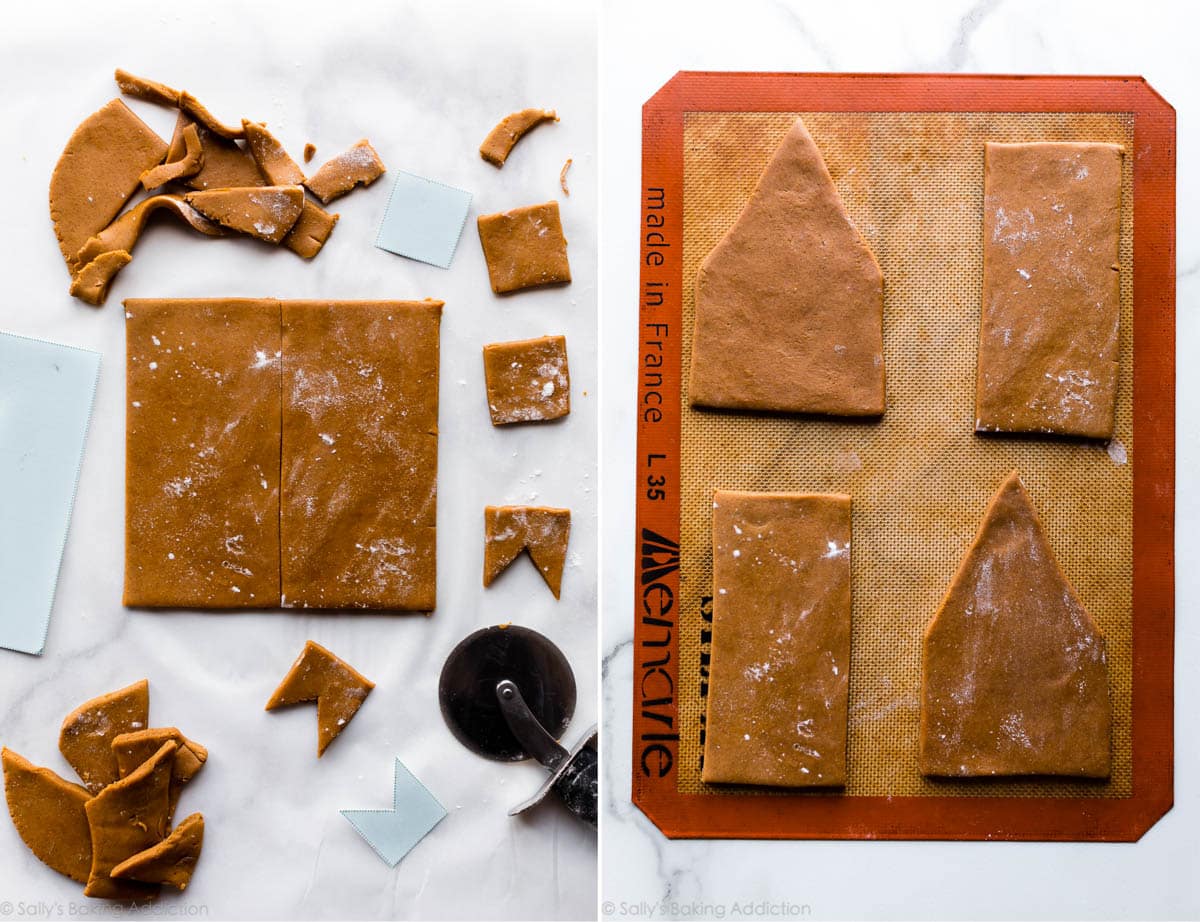
Print out the template and cut out the shapes. Each shape will be used TWICE. For example, two roofs, two sides, etc. Use a pizza cutter or small knife. The chimney is totally optional, but I think it’s a cute addition.
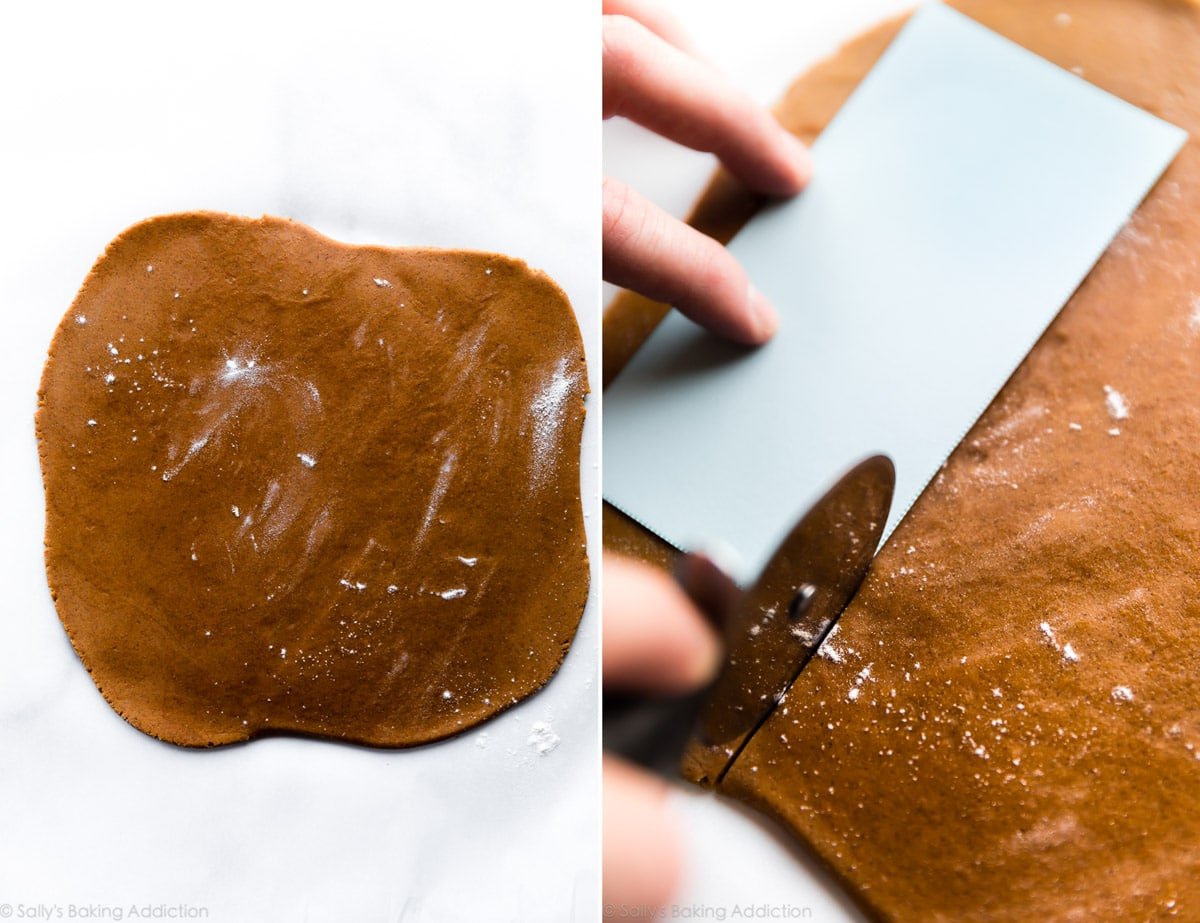
Best Method for Rolling the Dough
The most successful way to roll out this gingerbread cookie dough is between two sheets of parchment paper. It will stick to your counter no matter how much you flour it.
Re-roll the scraps so you have enough dough for the entire house.
Gingerbread House Icing
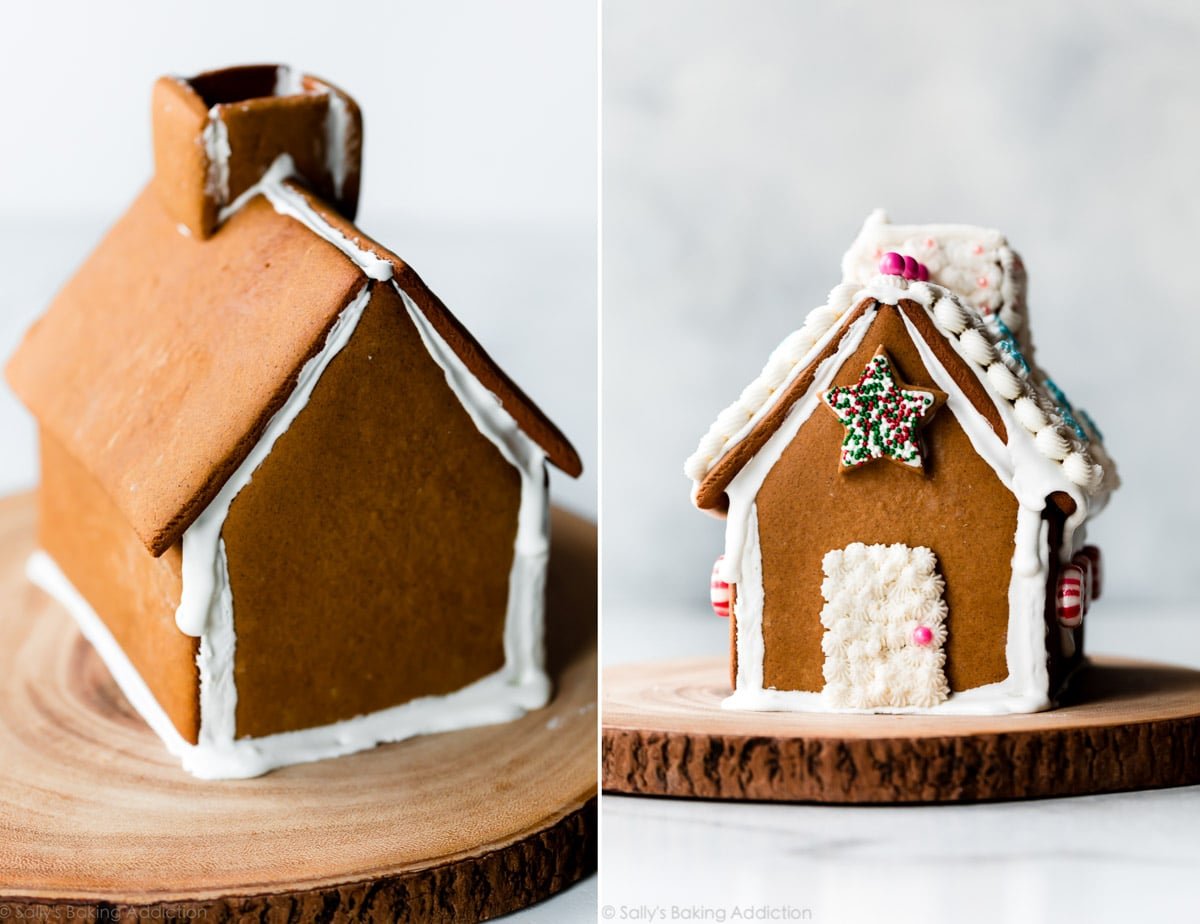
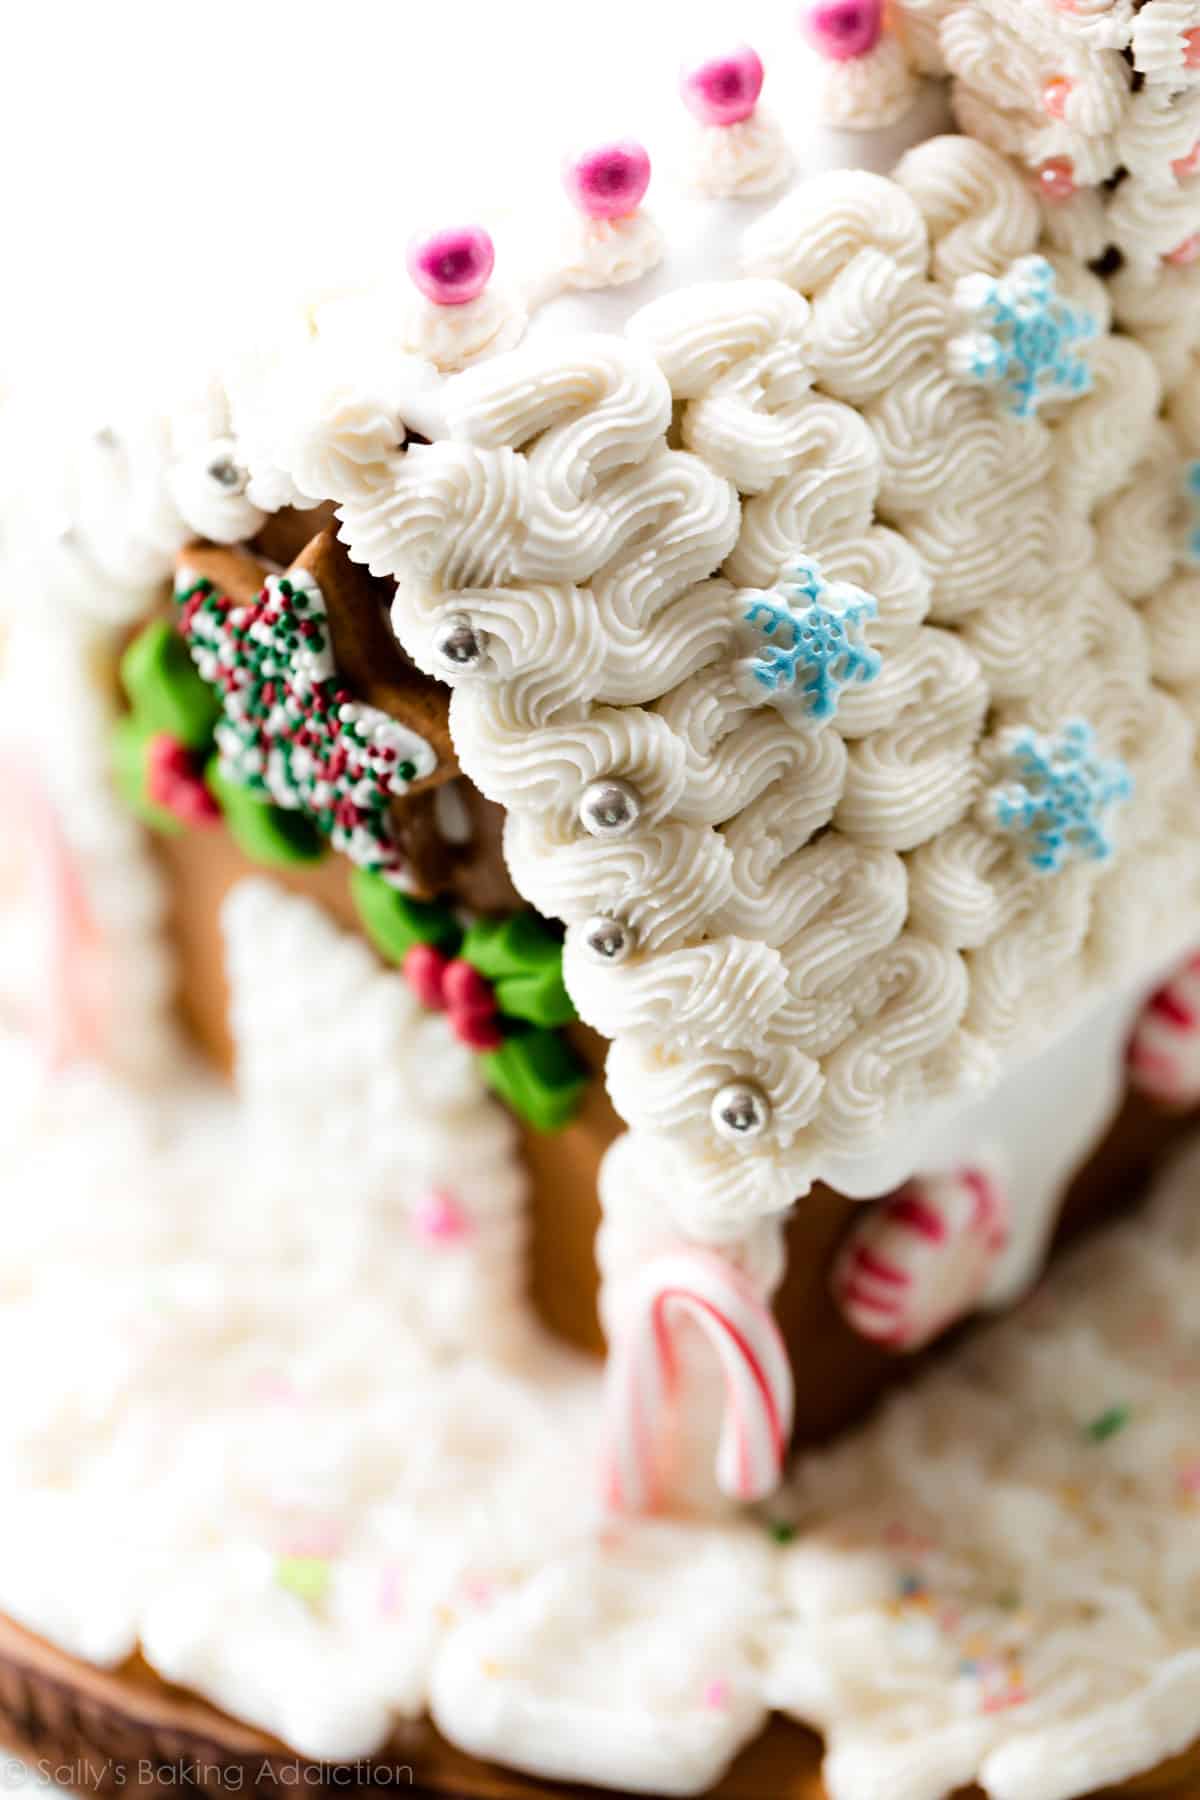
Every house needs sturdy walls, right? Royal icing is the “glue” that holds the house together. It’s also the glue adhering any candies to the walls and roof. As you can see in these photos, I covered the roof with royal icing before piping the buttercream on. As the royal icing dried, it gently dripped off the sides and looked like snow.
TIP: Use as much royal icing as you need to for constructing the house. It dries hard and will look like snow. Plus, you can cover up any messy parts with buttercream or candy.
Crusting Buttercream for Decoration
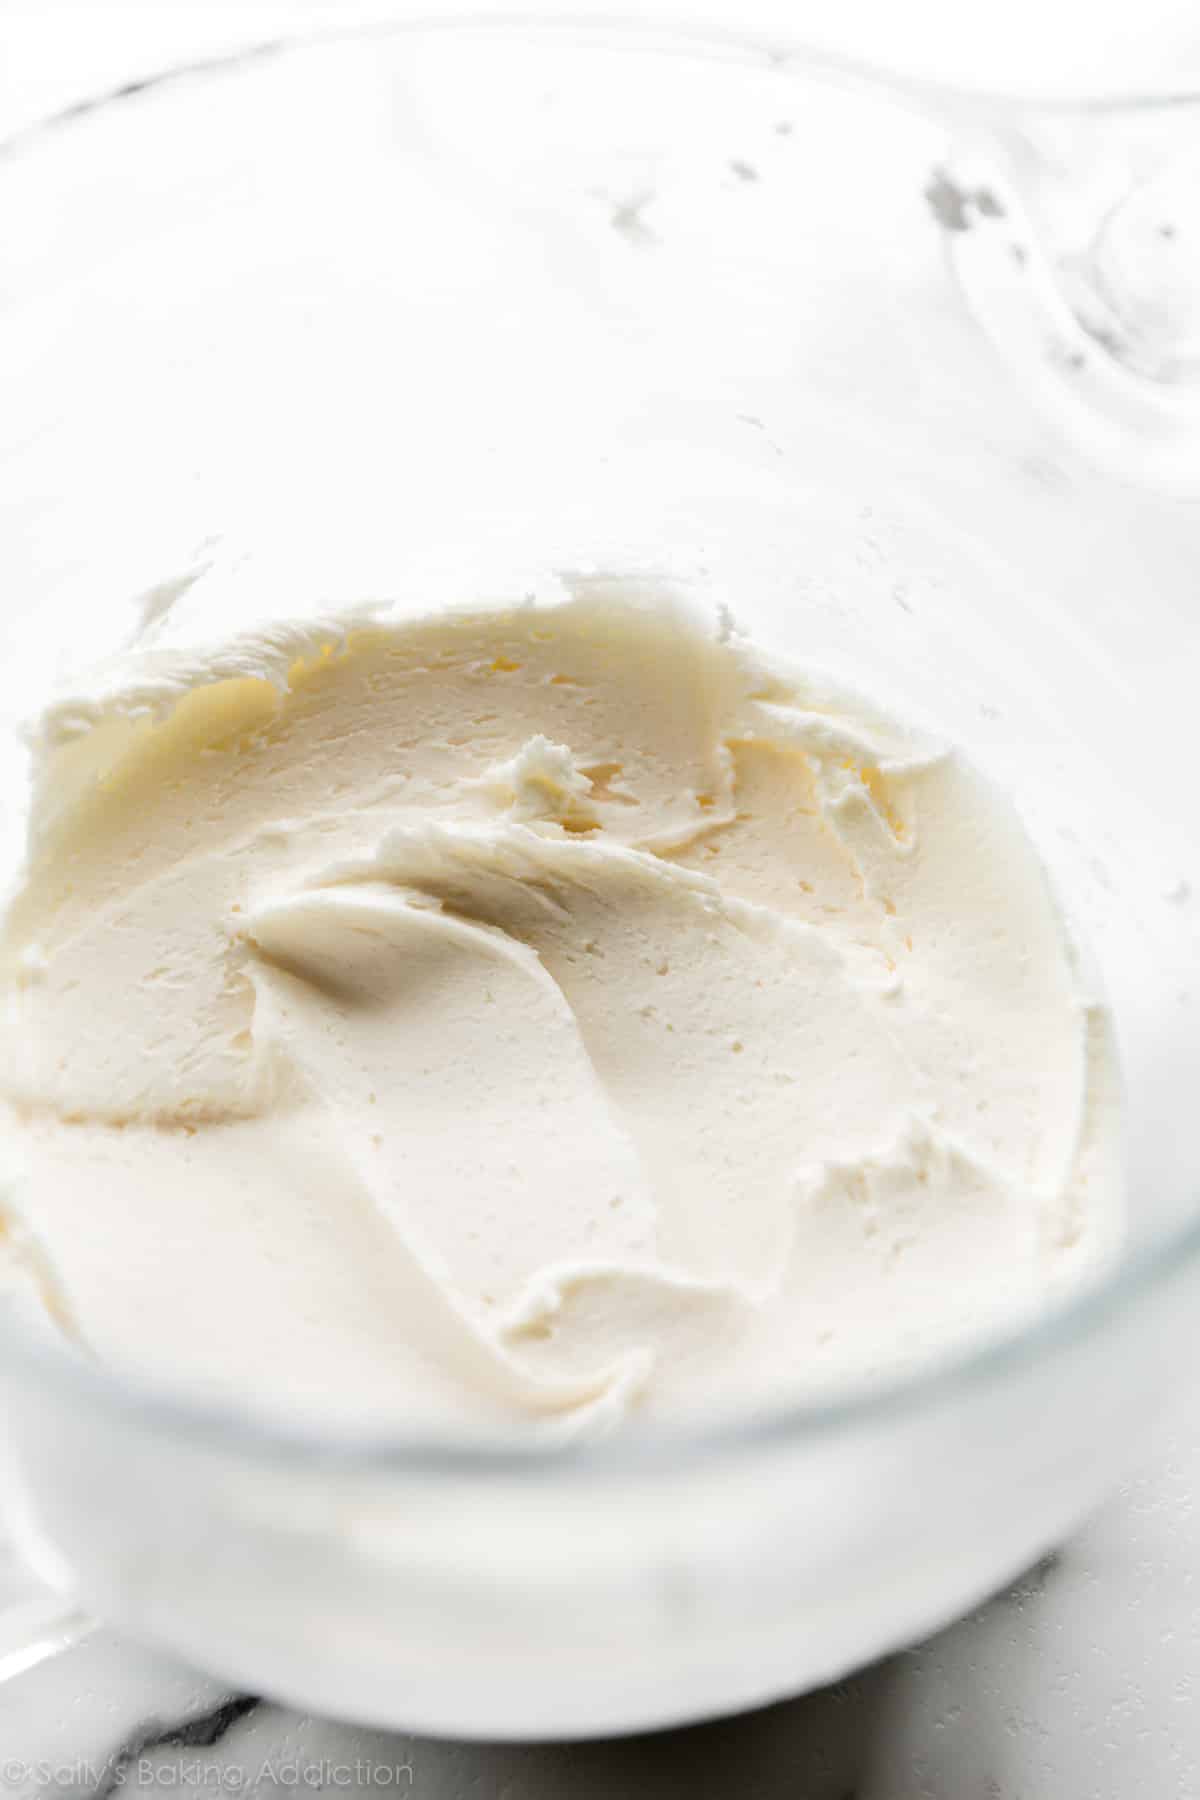
Though I love working with both, I’m much better at decorating desserts with buttercream compared to royal icing. And maybe you’re the same? So let’s use some STURDY and THICK buttercream called Crusting Buttercream. Made with both shortening and butter, crusting buttercream “sets” and doesn’t stay sticky—it’s ideal for decorating gourmet cakes, cookies, and gingerbread houses.
Two tools I highly recommend:
- A squeeze bottle for the royal icing “glue” around the edges of the house.
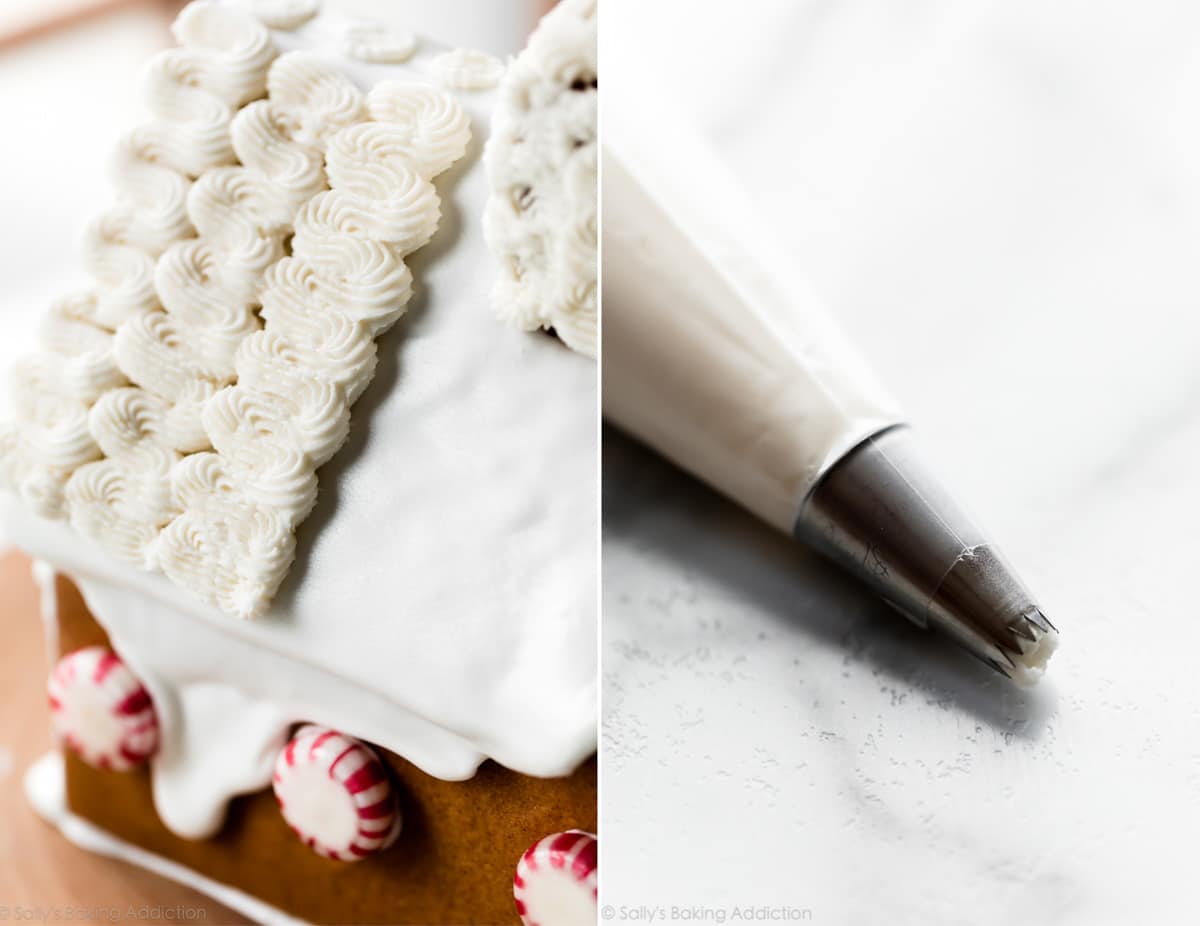
- A piping bag (reusable or disposable) + tip for decorating with buttercream. I only used 1 piping tip for the entire house: Ateco piping tip #32. This is a small open star piping tip and you can watch me use it in the video above. Makes a lovely design.
These baking tools would be great to add to your holiday wish list. And while you’re at it, be sure to check out my complete guide full of Holiday Gifts for Bakers. Lots of fun ideas in there, either for yourself or other baker friends!
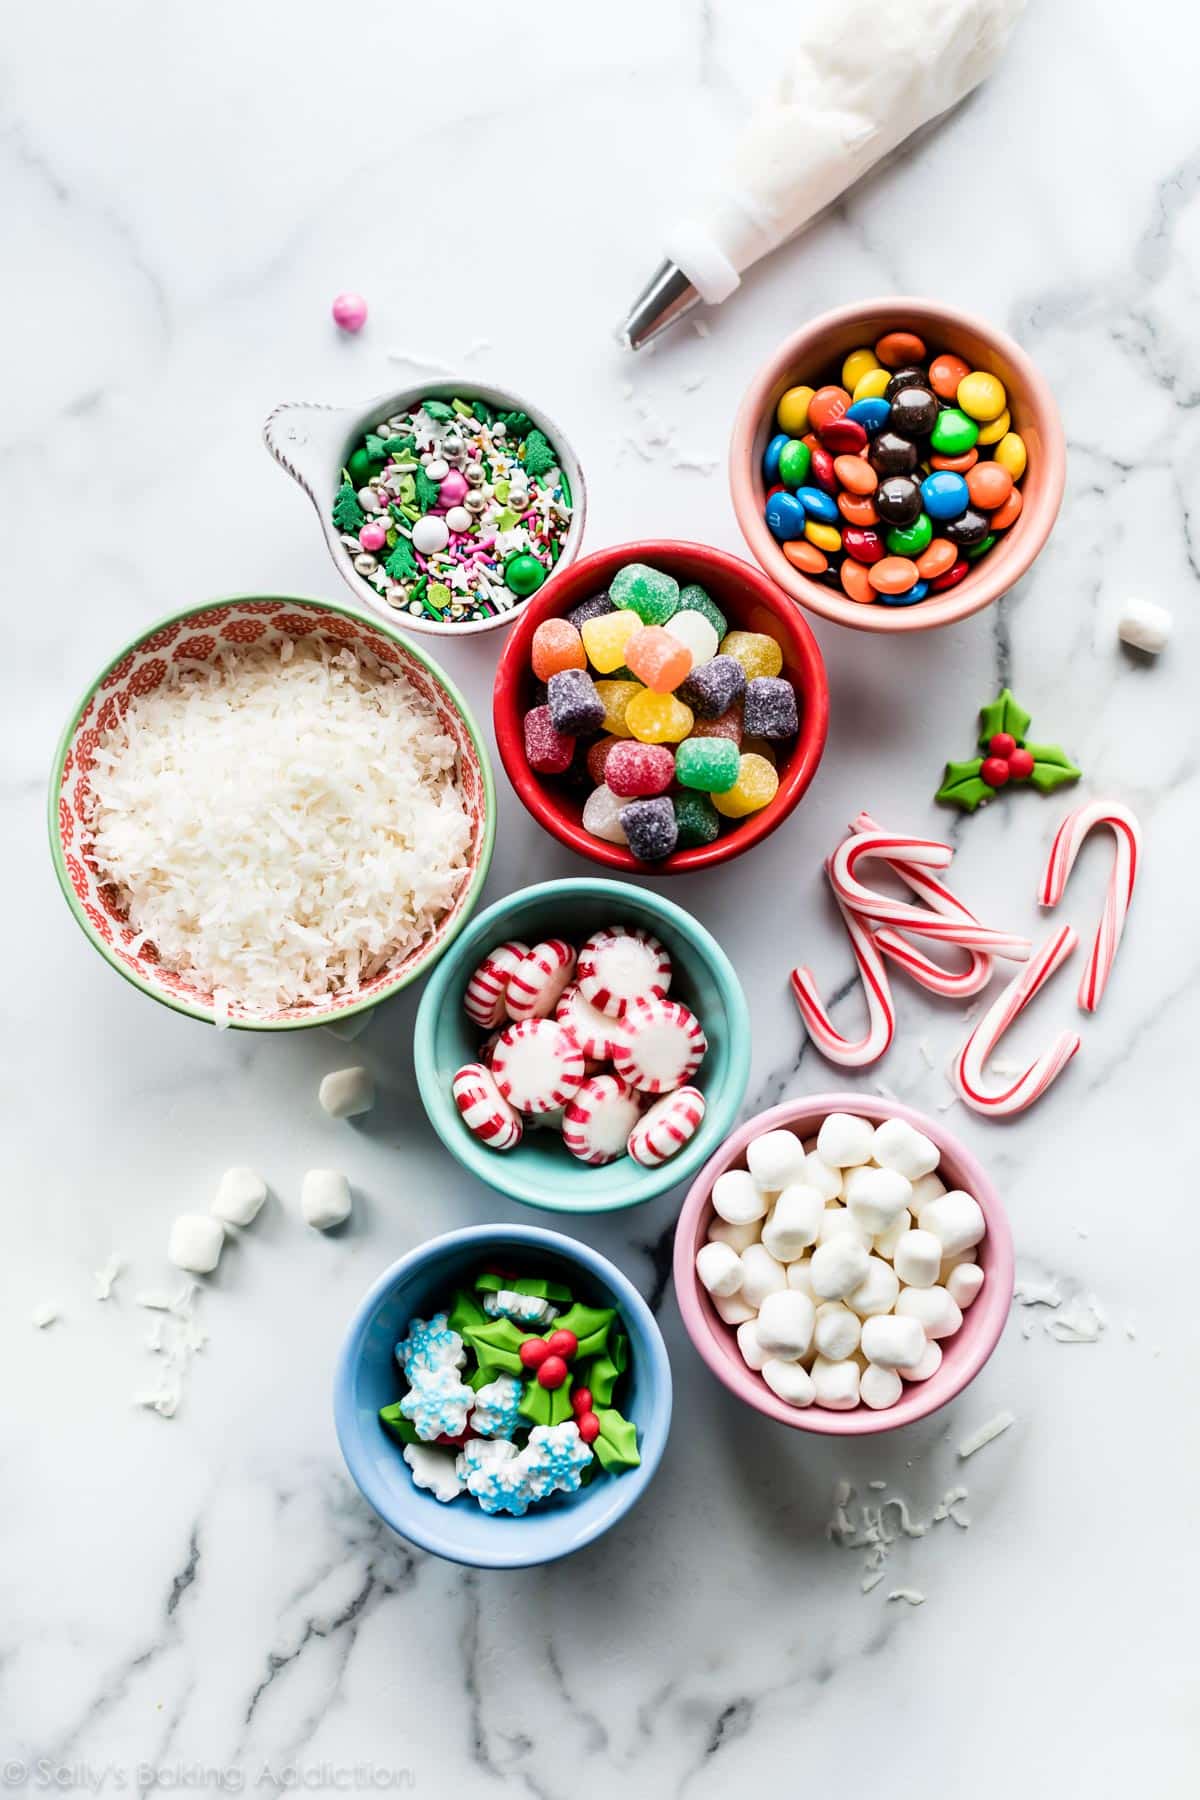
Candies for Decorating a Homemade Gingerbread House
- gumdrops
- M&Ms
- candy canes (mini or regular size)
- peppermint swirl candies
- sprinkles (I used a holiday mix from Sweetapolita)
- edible metallic beads/dragees (also from Sweetapolita)
- marshmallows
- coconut for “snow”
- cinnamon sticks, Hershey’s Kisses, chocolate chips, cereal pieces!
- icing decorations such as these snowflakes
I absolutely love the Wilton brand icing decorations you can find online or at craft stores. I bought them at Michaels craft store, which had a ton of gingerbread house decorating candies in the seasonal section including the pictured holly and these similar snowflake icing decorations. (Not sponsored, genuinely LOVE Wilton and Michaels craft store.)
Gingerbread House Ideas
I gathered a few links for you to use as decorating inspiration. There are so many beautiful (and SIMPLE) decorated gingerbread houses out there.
- picture of fun roof ideas
- slideshow of 40 cute gingerbread houses
- even more adorable gingerbread houses
- log cabin gingerbread house
- you could also cut windows out of the house’s walls before baking and add crushed hard candies, just as we do with stained glass window cookies
Ditch the “pinterest perfection” goal and get messy. The piped crusting buttercream on my pictured gingerbread house hid about 100 mistakes. Remember, there are no rules when it comes to decorating. The ONLY rule is to have fun.
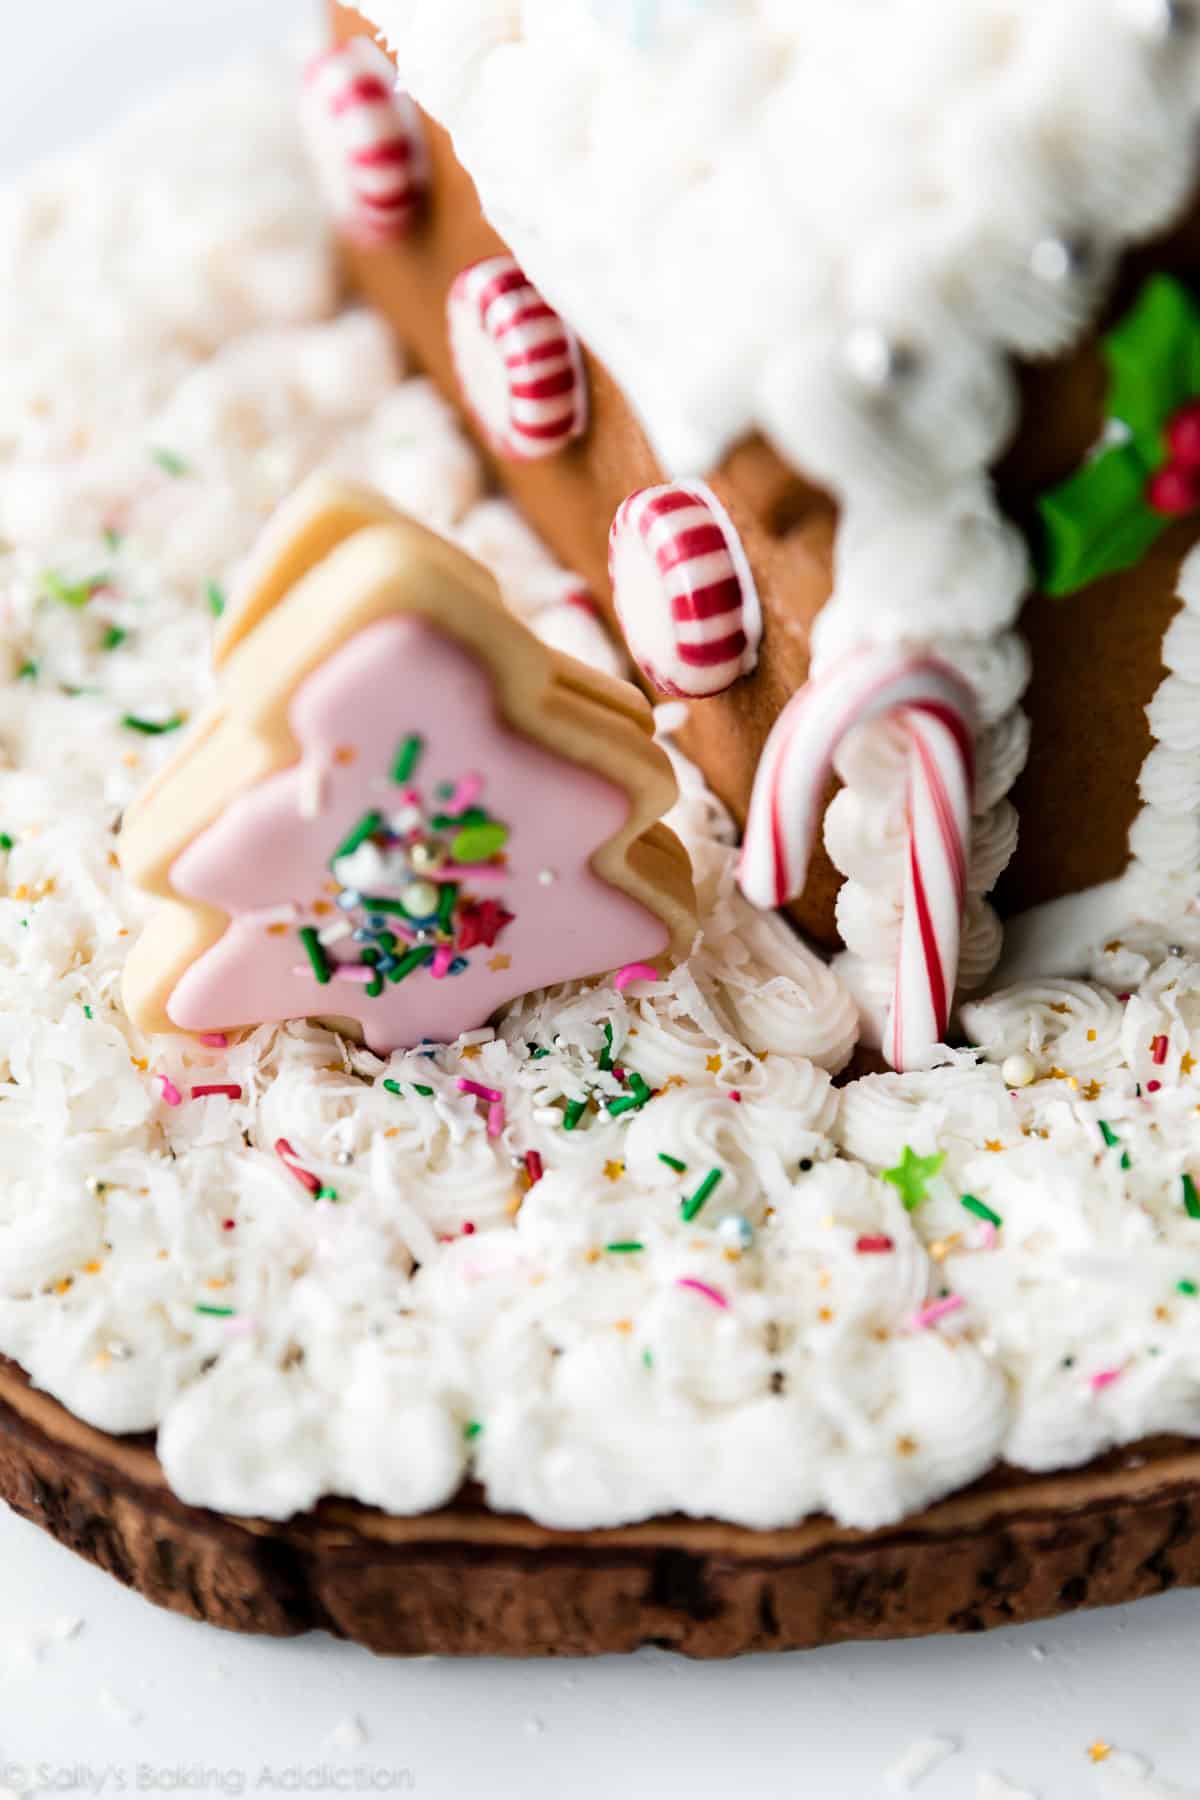
Watch me decorate a gingerbread house in the video above. I added two decorated sugar cookies to the “yard.”
I can’t wait to see your gingerbread house creations! This was truly one of the most fun projects; it was a complete joy testing, decorating, photographing, and filming this recipe. I truly hope it brings exciting memories to your family this holiday season. And even though they make a beautiful Christmas decoration, don’t forget to eat all your hard work!!
Love to create and decorate? You’ll enjoy making this yule log, too! And of course, Christmas sugar cookies.
Sally’s Cookie Palooza


Gingerbread House Recipe (VIDEO)
- Prep Time: 1 day
- Cook Time: 18 minutes
- Total Time: 1 day
- Yield: 1 house
- Category: Dessert
- Method: Baking
- Cuisine: American
Description
Here’s my completely homemade gingerbread house recipe including how to bake, construct, and decorate with royal icing and buttercream. Everything can be prepared in advance, see my make ahead tip after the recipe instructions. House structure must completely set for at least 4-6 hours before decorating.
Ingredients
- 3 cups (375g) all-purpose flour (spooned & leveled)
- 1/4 teaspoon baking soda
- 2 teaspoons ground ginger
- 2 teaspoons ground cinnamon
- 1/2 teaspoon ground allspice
- 1/4 teaspoon salt
- 6 Tablespoons (85g) unsalted butter, softened to room temperature
- 3/4 cup (150g) packed light or dark brown sugar
- 1 large egg, at room temperature
- 1/2 cup (120ml) unsulphured or dark molasses (do not use blackstrap; I prefer Grandma’s brand)
- 1 Tablespoon (15ml) water
- royal icing (the “glue”)
- assorted candies (see post for suggestions)
Crusting Buttercream
- 1/2 cup (95g) shortening, at room temperature
- 1/2 cup (8 Tbsp; 113g) unsalted butter, softened to room temperature
- 4 cups (480g) confectioners’ sugar
- 2 Tablespoons (30ml) milk
- 1/4 teaspoon pure vanilla extract
- 1/8 teaspoon salt
Instructions
- Print out my Sally’s Baking Recipes Gingerbread House Template and cut out the shapes. Set aside for step 6.
- Make the cookie dough: Whisk the flour, baking soda, ginger, cinnamon, allspice, and salt together in a large bowl. Set aside.
- In a large bowl using a handheld mixer or stand mixer fitted with a paddle attachment, beat the butter and brown sugar together on medium speed until completely smooth and creamy, about 2 minutes. Beat in the egg, molasses, and water on high speed. Scrape down the sides and up the bottom of the bowl and beat again as needed to combine. On low speed, slowly mix the dry ingredients into the wet ingredients until combined. Cookie dough will be very thick.
- Divide cookie dough in half, flatten into discs (about 4-5 inches in diameter), and wrap each tightly in plastic wrap. Chill in the refrigerator for 2 hours or up to 3 days.
- Preheat oven to 350°F (177°C). Line 2-3 large baking sheets with parchment paper or silicone baking mats.
- Cut into shapes: Remove each disc from the refrigerator and roll each out in between two pieces of parchment paper. Watch me do this in the video above—gingerbread cookie dough will stick to your counter no matter how much you flour it. Parchment is best. Roll out to about 1/4 inch thick. You want thick pieces for your gingerbread house. Lightly flour the underside of gingerbread house template shapes. (The dough is sticky and the paper may stick to it otherwise.) Using a pizza cutter or small knife, carefully cut the dough into the gingerbread house template shapes. You will need TWO of each shape. Re-roll dough scraps so you have enough dough for the whole house. Use any extra dough to create fun shapes using cookie cutters. I made a few gingerbread stars!
- Carefully arrange gingerbread house shapes onto prepared baking sheets, about 3 inches apart. If they lost some of their shape transferring to the baking sheet, straighten out the edges (see my video above).
- Bake house pieces for about 18-20 minutes or until edges are lightly browned. Bake chimney pieces for about 12-13 minutes or until edges are lightly browned. Remove from the oven and allow shapes to cool completely on the baking sheets or on the counter. A flat surface is KEY for cooling—the gingerbread house edges very slightly curl up otherwise. Cooled gingerbread house pieces can be made up to 1 week in advance, cover tightly and store at room temperature or in the refrigerator. They can also be frozen for up to 3 months, thaw at room temperature before using.
- Construct the base of the house: Select a base for your gingerbread house. I used a wooden cake server. Watch my video above to guide you through constructing the house. Start with two pieces: the front of the house and 1 side. Using a squeeze bottle, run a thick line of royal icing on one long edge and one short edge of the side of the house piece. Stick it to your base. Use whatever you have around the house to help it stand up. You can see in my video that I use snack bag clips. You can also prop it up with soda cans, a tall cup, water bottle, etc. Run a line of royal icing along the bottom of the front of the house piece. Stick it to your base, adhering it to the side of the house piece. Hold the two in place for a few minutes until the icing is partially set, propping them up as necessary. Repeat with the 2nd side of the house piece and back of the house piece. Pipe royal icing inside any seams, inside and outside of the house, to fill any voids. Don’t be afraid to go heavy on the royal icing “glue”—when it dries, it looks like snow! Allow it to set at room temperature for at least 1 hour before adding the roof pieces.
- Add the roof: The roof pieces will be placed on top of the house base. Run a thick line of royal icing on the inside edges of one of the roof pieces and adhere it to the base. Hold in place for a few minutes. Repeat with 2nd roof piece. Run a thick line of royal icing where the two roof pieces meet at the top of the house. Hold in place for a few minutes.
- Optional Chimney: The chimney is optional, but it’s a lot of fun. I recommend putting together the chimney separately, then adhering to the roof. It’s easiest to glue the chimney pieces together upside-down. Use thick lines of royal icing to assemble the chimney in the same way you put together the base of the house. (Except you’re not adhering it to a base because it’s going on the roof!) Allow icing to set by propping it up as necessary. Once set, adhere onto the roof. The chimney may not fit to the exact angle of the roof because both puffed up or lost some shape during baking and cooling, so use as much royal icing as necessary and you can cover any bare spots with buttercream during decoration.
- House must set: Before decorating, the icing on the entire house must completely set. Allow the entire house to set at room temperature for at least 3 hours, preferably 4-6 hours or even overnight before decorating. Cover and store leftover royal icing at room temperature or in the refrigerator during this time. It will be the glue for adhering candies to the house.
- Prepare the buttercream: Buttercream can be prepared up to 1 day in advance—cover tightly and store in the refrigerator overnight. Bring to room temperature before piping/decorating. With a handheld or stand mixer fitted with a paddle attachment, beat the shortening and butter together on medium speed until creamy, about 2 minutes. Add confectioners’ sugar, milk, and vanilla extract. Beat on low speed for 30 seconds, then increase to high speed and beat for 3 full minutes. Frosting will be very thick, which is what you want. If much too thick, add another splash of milk. Add a pinch of salt if frosting is too sweet. (I add 1/8 teaspoon salt.)
- Use buttercream, leftover royal icing, and candies for decorating. See my candy suggestions in the blog post above. I only used 1 piping tip for the entire house: Ateco piping tip #32. This is a small open star piping tip and you can watch me use it in the video above. Makes a lovely design.
- Don’t forget to chow down on your beautiful creation if you’re in the mood for eating it. Use your best judgment here, obviously the food will taste old after a few days!
Notes
- Make Ahead Instructions: Royal icing can be prepared the day before, see recipe note below. Crusting buttercream can also be made the day before, see step 13. Cookie dough can be made up to 3 days in advance, see step 4. Baked and cooled house pieces can be made up to 1 week in advance or frozen for up to 3 months, see step 8. House can be completely constructed up to 1 day in advance, see step 12.
- Special Tools (affiliate links): Glass Mixing Bowl | Whisk | Electric Mixer (Handheld or Stand) | Baking Sheets | Silicone Baking Mats | Parchment Paper | Rolling Pin | Pizza Cutter | Wooden Server (or similar base for gingerbread house) | Squeeze Bottle | Piping Bag (Reusable or Disposable) | Ateco Piping Tip #32 | Christmas Tree Decorations | Snowflake Decorations | Mini Candy Canes | Candy Canes | Gum Drops
- Recipe Yield: One gingerbread house plus 6-8 3-inch cookies. Gingerbread house is about 7 inches tall (with chimney) and 6 inches wide.
- Royal Icing: Decide how much royal icing you want to use. I suggest making the entire royal icing recipe so you have plenty for constructing and decorating. You can make the royal icing the day before—cover and store at room temperature or in the refrigerator overnight. Let it come to room temperature before using. You can freeze leftover royal icing (instructions in that recipe) or use it to decorate Christmas cookies. As you can see in these photos, I covered the roof with royal icing before piping the buttercream on top. (Let the royal icing dry before adding the buttercream on top.) As the royal icing dried, it gently dripped off the sides and looked like snow!
- Shortening: Shortening is what makes this buttercream “crust” or “set” after a couple hours. If you want a sticky buttercream, you can replace the shortening with unsalted butter.


Reader Comments and Reviews
for the buttercream… can i use coconut oil instead of shortening? i made this over the holidays, and just doubled the butter instead of using shortening and it was actually perfect… but this time i dont have that much butter!
i have recommended this recipe to all my friends btw!
Hi Alyson! Coconut oil would yield a greasy buttercream. We would stick with shortening or butter!
I’m not sure what I did wrong, but mine puffed and spread SO much, they practically lost their shape. I had been hoping for a cookie that keeps it shape similar to a cut out sugar cookie, but this was nothing like that. I’m not sure if it’s something I did wrong, or if this recipe just isn’t meant to hold a more detailed cut out?
Hi Lexi, this dough should hold its shape! Did you follow the instructions for chilling the dough? That’s key to prevent spreading.
I am *not* a crafty person, most of my art attempts are, well, only a parent could love, while my baking skews yummy ugly. But I really wanted a gingerbread house for my nieces and kids this holiday. Well, this one turned our perfect!!
It was quite truly one of the most fun kiddies activities I’ve gotten to do. From 3 to 22, all the children had a blast! Older guiding younger in assembly of the pieces that baked up exactly right using the templates.
Even better, the gingerbread and frosting tasted fantastic! I didn’t want that cardboardy tasteless texture the pre-made kits offer, or even the hard rubble quality of some homemade versions designed to be robust. This one was like a dessert everyone wanted to eat anyway. We let it stay a crowning glory for a few days, then dug in!
I am so appreciative of this recipe and the excellent instructions! It will be on repeat every year.
I tried this recipe as a way to prep for a gingerbread house contest I want to enter next year and I was blown away by how perfect the squares came out. Since this year’s batch isn’t actually getting turned into a house, we’re eating it and the flavor is good too, a perfect bite with my morning coffee.
These came out really great- I am NOT a baker, but I didn’t want to spend a fortune on houses for my daughters xmas party / decorating contest. I was nervous about perfect cuts, but once they baked the pieces were very forgiving.
I needed to plan for time and scaffolding for assembly- the icing takes a bit to set- not like a hot glue gun.
I used extra ginger and less cinnamon for a delicious, ginger-snappy cookie.
I made a second batch and downscaled for smaller houses.
I think next time I would just assemble the houses myself and leave the kids just the decorating.
Hey Sally, thank you so much for the recipe! I wanted to ask if it’s possible to freeze the dough if I’m not going to use it in three days? Thank you
Yes, absolutely! Thaw overnight in the refrigerator and continue with the recipe.
I used this recipe to make little gingerbread houses for my kids and their friend for a pre- Christmas sleep over. It was a huge hit! Thanks so much.
Question: why use buttercream AND royal icing for decorating? Is it better to use both and why? Is it because you can get the swirly designs with buttercream and you cannot with Royal icing?
Thank you! It’s a perfect size also!
Hi Stephanie, royal icing is the “glue” that holds the house together. It’s also the glue adhering any candies to the walls and roof. The buttercream is easier to use for decorating. Made with both shortening and butter, crusting buttercream “sets” and doesn’t stay sticky—it’s ideal for decorating gourmet cakes, cookies, and gingerbread houses.
Easy to follow, but my walls were too soft for gingerbread house making. Three batches that I will need to start again.
I made this recipe x4 and after I put the discs in the fridge. I realized I forgot the water. Will this mess with anything?
Hi McKenzey, the dough may be just slightly dry without the addition of the water. If you find it’s starting to crack when rolling, you can use a lightly moistened fingertip to smooth them out. Hope it’s a hit!
This is a good recipe overall. It’s a little bit too sweet. It held up good and the texture was nice. I rolled my dough a little thinner maybe about 1/8 in. It was light and still held up well for construction.
Thanks.
Hi Sally
My grandkids love gingerbread cookies.I would like to try making it.What recipe can I follow?What can I use instead of molasses.Appreciate your suggestions.Thanks Juliet
Hi Juliet, here is our gingerbread cookie recipe instead.
Hello! Can I replace molasses with corn syrup or honey? (1:1) which one would be better? I know the flavor will change, but I’m more worried about the texture and structure, I’ve to bake multiple gingerbread houses and cookies for a party and I can’t find molasses where I live.
Hi Valerie, some have used honey, but we haven’t personally tested it. If you give it a go, let us know how it works!