

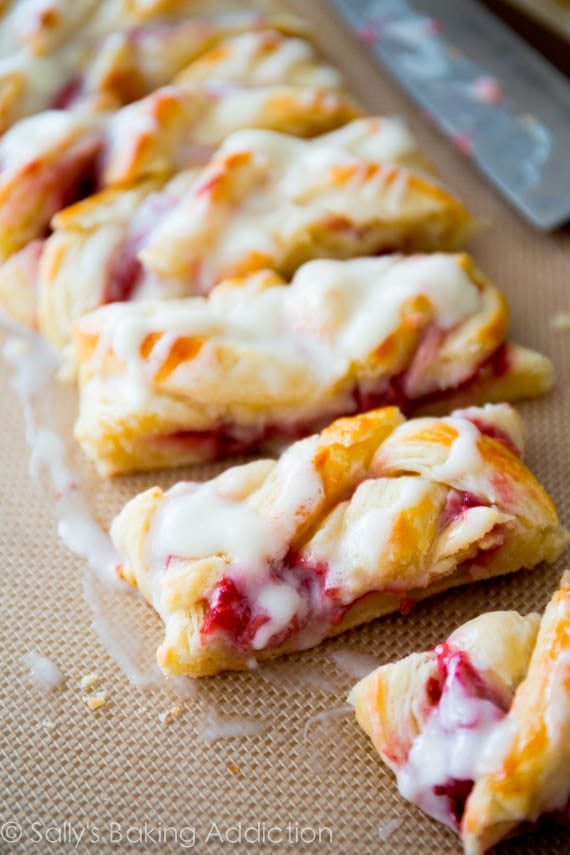
With layers of buttery flaky dough and raspberry filling, this raspberry pastry braid is undoubtedly irresistible. Though it seems intimidating, making breakfast pastries from scratch is completely doable for the home baker. Here we’re using a modified variation of classic Danish pastry dough. Follow these detailed instructions for success.
I’m excited to show you how to make a variation of Danish pastry dough today. It’s a quicker method to real Danish pastry and an adaption of several trusted sources: Cooking Illustrated, Joy of Cooking, and pastry master Beatrice Ojakangas. I combined all of the recipes I studied to produce a shortcut version of the famously flaky buttery dough.
This is a Shortcut Homemade Pastry Dough
This is not the traditional method of making real danish pastry. This dough is usually laminated several times between layers of butter, similar to how we prepare homemade croissants and croissant bread. Here we are working the butter directly into the dough using a food processor. We’re still rolling out and folding the dough, just as you do when you laminate dough with butter, but we’re not folding it up with a separate layer of butter.
I use the term “shortcut” loosely. This dough still takes at least 5-6 hours total with 2 rounds of refrigeration. Pastries made from this dough are just as buttery, tender, and flaky. I usually make individual breakfast pastries from this dough, but another option is a beautiful pastry braid like this blueberry cream cheese pastry braid or today’s raspberry version.
Follow the Pastry Dough Recipe Carefully
Before you begin to make this raspberry pastry braid, review my pastry dough recipe. The recipe takes some planning ahead. Certain ingredients must be at room temperature, certain ingredients must be warm, certain ingredients must be cold. Temperature is imperative to the success of your pastry dough. If you’re new to working with yeast, reference this Baking with Yeast Guide where I include practical answers to common yeast questions.
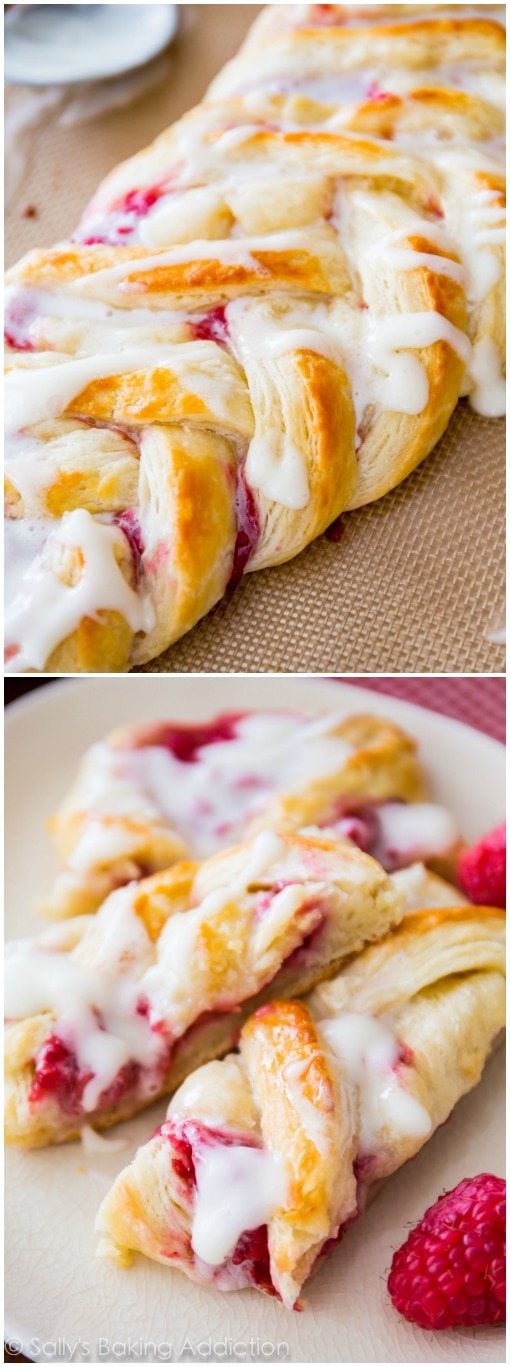
How to Make a Raspberry Pastry Braid
- Make the pastry dough. You can review it in detail in this pastry dough post.
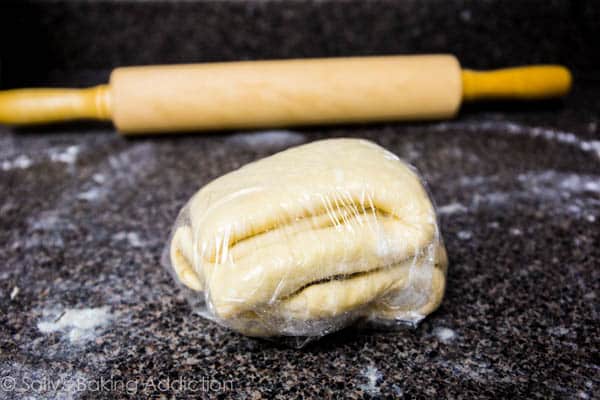
- 1st refrigeration. Wrap the sticky dough up tightly and refrigerate for at least 4 hours and up to 48 hours. This dough is very sticky and should be sufficiently chilled whenever you are working with it.
- Shortcut lamination. Now let’s do a variation of laminating aka rolling and folding dough and butter together. Remember how we make croissants and laminate the dough with a sheet of butter? The butter is IN this homemade pastry dough. So, instead, we’re just rolling and folding the dough itself. Roll it out into a rectangle. Fold it in thirds like a letter, then turn it clockwise. Roll it out into a rectangle again. Repeat the folding. Turn it clockwise again. Repeat rolling and folding 1 more time for a total of 3 times. Have extra flour on hand for this step—I use plenty of it during this whole process!
- 2nd refrigeration. Wrap the laminated dough up tightly and refrigerate for at least 1 hour and up to 24 hours.
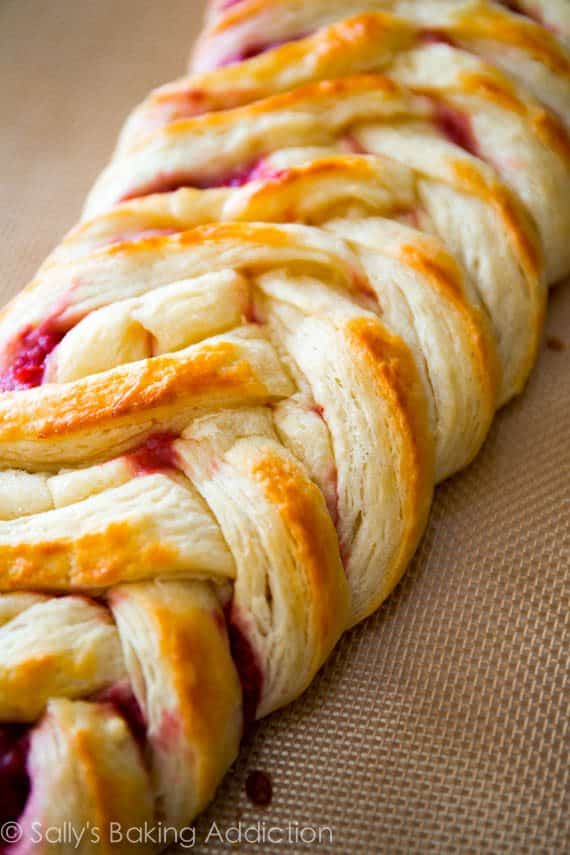
- Shape the pastry braid. This recipe yields 2 braids, so cut the dough in half. Refrigerate any dough you aren’t working with. Roll the half of dough into a 12×8-inch rectangle. Using a sharp knife, cut off two corners of the dough (on one 8-inch side) and then two small triangles 3 inches apart from each other on the other end (the other 8-inch side). Spread 1/2 of the raspberry filling down the center of the strip. Using a sharp knife, pastry wheel, or pizza cutter, cut 10 slanting strips along both sides. Fold strips over dough, alternating each side to resemble a twist or a braid. Fold the bottom end up to seal the filling inside. Repeat with 2nd half of dough and remaining raspberry filling.
- Brush with egg wash. This is a combination of egg and milk and guarantees a shiny and crisp golden crust.
- Chill. To help guarantee the braids hold their shape, chill them in the refrigerator as the oven preheats and even up to 1 hour.
- Bake until golden brown.
Because of all the chilling, this pastry is a wonderful recipe to begin the night before and serve the next morning. Or even prep the dough a few days in advance so your work is cut down the day of serving. I include freezing and make-ahead instructions below.
Raspberry Filling
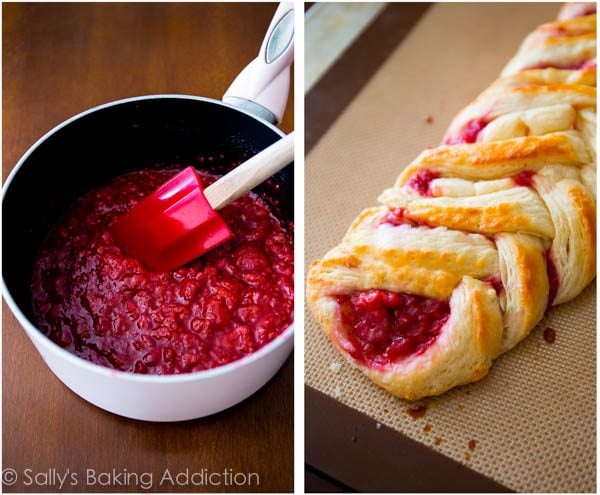
Though you could certainly use store-bought raspberry jam or preserves, I love making the raspberry filling at home. You need fresh or frozen raspberries, sugar, cornstarch, and water. That’s it! The filling must cool down before using, so feel free to get started ahead of time.

Creating danish pastries at home is totally doable. Take some time to read through the instructions before you begin. That will make the whole pastry-making-process much easier for you. You can do this!
Print
Iced Raspberry Danish Braid
- Prep Time: 6 hours (includes chilling)
- Cook Time: 20 minutes
- Total Time: 6 hours, 25 minutes
- Yield: 2 braids, 6 servings each
- Category: Breakfast
- Method: Baking
- Cuisine: Danish
Description
Follow these easy instructions and create flaky, buttery raspberry Danish braids at home. You can be a master in the kitchen too, I promise!
Ingredients
Raspberry Filling
- 2 and 1/2 cups raspberries, fresh (300g) or frozen (340g)
- 3 Tablespoons (40g) granulated sugar
- 1 Tablespoon (15ml) warm water
- 2 teaspoons cornstarch
Dough
- 1 recipe Homemade Pastry Dough
Egg Wash
- 1 large egg
- 2 Tablespoons (30ml) whole milk
Vanilla Icing
- 1/2 cup (60g) confectioners’ sugar
- 1 Tablespoon (15ml) heavy cream or milk
- 1/2 teaspoon pure vanilla extract
Instructions
- Make the raspberry filling: You can start the dough (next step) and prepare this filling during one of the refrigeration times. Whisk together the warm water and cornstarch in a small bowl. Set aside. Combine the raspberries and sugar in a small saucepan over low-medium heat. Stir and allow the raspberries to break down, about 4 minutes. Mix in the cornstarch/water. Gently simmer for 3 minutes until the sauce begins to thicken. Set aside and let it cool to room temperature before using. You can also make it 1-2 days ahead of time. Once cooled down, cover, and store in the refrigerator until ready to use.
- Make the pastry dough through step 11.
- Spread 1/2 of the raspberry filling down the length of the center of the strip, which should be about 3 inches wide. Using a sharp knife, pastry wheel, or pizza cutter, cut 10 slanting strips (3/4 – 1 inch wide each) along both sides. Fold strips over filling, alternating each side to resemble a twist or a braid. Fold the bottom end up to seal the filling inside. Repeat with the second half of the dough and the rest of the filling. The braids may seem very narrow, but they puff up and out as they bake.
- Egg Wash: Whisk the egg wash ingredients together. Brush all over the dough.
- I strongly recommend refrigerating the shaped braids before baking for at least 15 minutes and up to 1 hour before baking. The braids tend to leak more butter and/or lose more shape if they haven’t chilled.
- Preheat oven to 400°F (204°C).
- Bake each braid for 18-22 minutes or until golden brown. Some butter may leak from the dough, that’s completely normal and expected. Feel free to remove the baking sheets from the oven halfway through baking and brush the dough with any of the leaking butter, then place back in the oven to finish baking. (That’s what I do!)
- Remove baked braids from the oven and cool for at least 5 minutes before icing, cutting, and serving.
- Vanilla Icing: Whisk the icing ingredients together. If you want a thicker icing, whisk in more confectioners’ sugar. If you want a thinner icing, whisk in more milk or cream. Drizzle over warm pastries and serve.
- Cover leftover iced or un-iced pastries and store at room temperature for 1 day or in the refrigerator for up to 5 days. Or you can freeze them for up to 3 months. Thaw before serving. Before enjoying, feel free to reheat leftover iced or un-iced pastries in the microwave for a few seconds until warmed.
Notes
- Make-Ahead & Freezing Instructions: Make-ahead and freezing instructions for the dough are included in the thorough pastry dough recipe.
- Special Tools (affiliate links): Glass Mixing Bowl | Whisk | Saucepan | Pastry Wheel or Pizza Cutter | Baking Sheet | Silicone Baking Mat or Parchment Paper | Pastry Brush
- Reference my Baking with Yeast Guide for answers to common yeast FAQs.


Reader Comments and Reviews
OMG!! This was the best recipe in a long while. It was so easy to make and it tasted delicious.
While I was making the dough though, it was a little runny and very sticky but, I added some more flour until it got the right texture.
This I will for sure make again. Thank you 🙂
Just wondering, how much filling does this make? I’m planning on doing both the raspberry and cream cheese, so I was wondering how to split it in half, then half again. I don’t want the sought to get soggy or be overwhelmed by the flavors. Thank you for the help!
This makes about 1-2 cups filling.
This looks so amazing and I can’t wait to try the homemade Danish pastry dough. I Like to bake something I grew up eating called “Danish Twists” which is an egg-rich dough, refrigerated, rolled and filled with fruit like yours. There was no rolling and folding steps though. Would that still be Danish pastry or something else?
I’ve had danish twists with pastry similar to this– though I’m unsure if it is what you are referring to. It sounds like it would be similar.
I just have to tell you that I may have a new passion!I bake cheesecakes, cakes, cookies and even some fake cakes, to make things interesting for co-workers. This is incredible and My neighbor says he wants some for the church bake sale. Thank you for sharing this !!!
WOW!!!!!! This is the best I have ever made… Thank you.
I may have forgotten about my dough in the freezer — can I still use it even if it’s been longer than a month? Is the risk in the dough being bad, or maybe not being as pretty of a braid?
You can still use it– the dough won’t be bad at all. As long as it hasn’t been several months.
Hi Sally! I want to bring this to a Christmas brunch tomorrow, but I don’t have enough time in the morning to cut, fill, braid, and bake the Danish. Do you think I could cut, fill, and braid it today and then pop it into the fridge and bake it tomorrow morning? You said to serve it immediately after baking it and I would hate to have to let it sit for a day and go stale by the time brunch comes around! Thank you!
Leaving it prepped in the fridge overnight should be fine. Merry Christmas!
I made the blueberry danish! ! Omg! It was soo good!! The 1st one didnt look as nice as the 2nd one. This i will be my Christmas morning breakfast. I am going to try it with cranberries! Thanks for Sharing This easy reciepe!
Definitely takes some practice– so happy you made it!
OH.. This is so divine! I too have to learn to make it pretty though . I couldn’t believe how flaky and tasty this was. This is a winner . Thank you for the great recipe.
I think this might be the best thing that has ever come out of my oven! The first braid looked like a crime scene but tasted amazing, the second braid looked as good as it tasted. Nailed it! Thanks for the great recipe!
Sally, Sally, Sally!! Made this today, mine was very messy and badly put together, but was absolutely scrum-diddly-umptious!! Never heard so many mmm’s and ahhh’s from my family as I did today haha. Thanks so much Sally, you are a legend 🙂
You’d possibly have better luck freezing before baking. I’m not sure if you’d want to thaw then bake or just pop it frozen into the oven and adjust the bake time accordingly. Since I have not made this recipe yet, I can’t make any guarantees, but my experience with dough leads me to believe you’d have better luck freezing before baking.
hi! i was wondering if it would be possible to make a twist with it.. i think you mentioned trying but saying it was a total disaster. i would like to know so i can make one half strawberry and another half cream cheese to make one strawberry and cream twist. please let me know as i am aiming to start tomorrow.
I just wanted to let you know that I made this recipe for the county fair last summer with blueberries and lemon glaze, and I got grand champion in the senior division. This is a truly delicious recipe and so easy enough to make! Recently, I went on a diet that is very, very limiting. I made a few adjustments and served this in class as a gluten free, sugar free, and somewhat dairy free, pumpkin danish with maple syrup and crushed pecans on top. Everybody loved it! This recipe is so great it still tastes fantastic without the “typical” essentials and works for my diet. Thank you so much for sharing!
I only have strawberries, could I follow the same raspberry directions, but with strawberries?
Absolutely!
I love your website, thank you so much for the great recipes. I would like to make the Danish this weekend but i can’t find fresh raspberries. Is it possible to use raspberry jam instead?
Raspberry jam would be just fine. Enjoy!
Wow! So incredibly delicious! I need to work on my braiding skills but holy wow so good and so easy! I filled mine with a cream cheese blackberry filling. This is the first of your recipes I have tried and I can’t wait to make more. Thank you for the great recipe and the brownie points with the mother-in-law 🙂
I DID IT! First time Danish Pastry baker. Thanks for the encouragement. It’s not perfect, but pretty darn good and will improve with practice. Today is not Saturday in this time zone, it is Sally-day. Raspberry Danish, Crispy Baked Onion Rings, Chicago Deep Dish Pizza and Caramel Surprise Snickerdoodles describe breakfast, lunch, dinner and dessert. Additionally I baked Apple Bundt Cake and Triple Chocolate Layer Cake for church functions tomorrow and got a jump start on Strawberry Cream Crumb Cake for tomorrow’s breakfast. There’s flour everywhere and my husband says I have been grinning all day. Surprised? Nope.
This pastry does look fantastic. I can imagine with other fruits too, strawberries, blueberries, blackberries, apples, peaches. Sluuuurppp!
I made this for my mom’s birthday brunch, and I just wanted to thank you for such easy and straightforward instructions! This was a breeze to make in advance, and I’m not an experienced baker by any means. It was SO light and airy and the braiding tutorial was super helpful it making it come out beautifully. My mom had a huge smile on her face, so thanks for making it possible. 🙂
Thank you for the foolproof instructions. This danish is excellent! Love It!
I just finished making the homemade dough and danish. I used a cherry filling that my roommate helped me cook/reduce. Oh my goodness, I’ve never tasted anything so good. The bread was light and buttery and melt in your mouth and the tart cherries were a nice set off to the sweet icing. I finally put on my own big girl pants and made an actual dough with yeast. The braiding wasn’t too pretty but for my first time, I think I did okay! Thanks Sally!
It takes practice to make them extra pretty and perfect. Great job Laurie! Yours sounds delicious.
Thank you for the wonderful recipe! I made it this morning, and the two of us had to restrain ourselves from eating the whole thing. My husband, who was very unimpressed that we were having a pastry (he’s definitely a bacon and eggs type of guy), LOVED it! This recipe is definitely going into our keeper pile. I’m looking forward to making it again and perfecting my presentation (because mine isn’t nearly as pretty as yours!).
For anyone who is interested, I made my dough in the bread machine. I was nervous, but it turned out great. I was intimidated by the wetness at first and thought I’d made a mistake in doing this (because it’s definitely wetter than bread dough), but the end result was fantastic. I suppose it could probably be made in a food processor, too.
Wow!! Made this today and it was perfect (just like all the other recipes of yours I have tried) I read your instructions 5-6 times and it was so easy! I Definitely feel like I earned my big girl pants today. Just wish I could upload my photos as proof!
Congrats on the danish success, Julia! And feel free to send me a picture at sallysbakingaddiction (at) gmail.com 🙂
Sally,
Can I just say, thank you! I’m so excited to make this wonderful desert! I don’t think I have ever read such perfect instructions, that honestly made baking so fun! 🙂
Okay, I’ve been wanting to try something a little more difficult than cookies/cupcakes so I think I’m going to go for this recipe this weekend. I’m a little scared but all your instructions are so great and thorough I’m hoping I can do it.
Quick question – I was going to bake this on Sunday and bring to work Monday morning (I don’t think I’d have time to wake up super early & bake it before work). If I do that, should I store in the fridge Sunday night?
Yep, just keep in the refrigerator on Sunday night. Just take your time with the recipe and read the instructions a few times before you begin. That always helps!
Just wanted to thank you for this perfect dough. It was so buttery and delicious. Recipe is written so clear, no way to mess up))) Although first braid was crooked,next one was almost perfect. Next time I will try other fillings, maybe strawberry.
Also wanted to tell you that I ate first right away and froze second one, it was as delicious as freshly baked.
Huge thanks and hugs
Thanks Victoria – so happy you enjoy this dough! Practice makes perfect with the braiding. It’s hard at first!
Hey Sally! Just made this and it certainly was easy but boy did I make some goofs. Good thing it was a test drive for an auction at our church next Sunday. I plan to learn from my errors and give it a go again next weekend with less goofs. One of which is not using freezer jam. Really bad idea. Sure smells and looks good, just ran all over. :). Saw another poster talking about and Almond filling, sounds amazing!!! Thanks for your recipe.
Try this homemade raspberry filling, Erin! Hope it’s a hit at the auction next weekend. This was good practice. I’m glad you found it easy!
If only I liked raspberries! Next week I may just try it. I did use some canned raspberry jam which worked out well… my husband will be so happy…. once he gets done with his never ending plumbing project today. 🙂 I’m putting your book on my wish list!
Hey Sally!
Would it be ok to cut the butter in with a pastry blender if I worked quickly and didn’t cut it in too finely? I’m a pharmacy school student and don’t have a powerful enough food processor or blender yet (I tried with the ones I have- it did not turn out well!!!) I really want to make this recipe though! I’ve made a lot of your recipes and can’t wait to get my cookbook in!
Thanks!
Cutting the butter in would be just fine, Jamie. Enjoy the pastry and my cookbook!
Hi Sally! Just wanted to drop by and say I made danish the past weekend, and it turned out to be SO fabulous! I made a makeshift jam and cheese filling to go inside. Can’t believe how easy the pastry was. Definitely one of my favorites!! Thanks for such a great tutorial! 🙂