

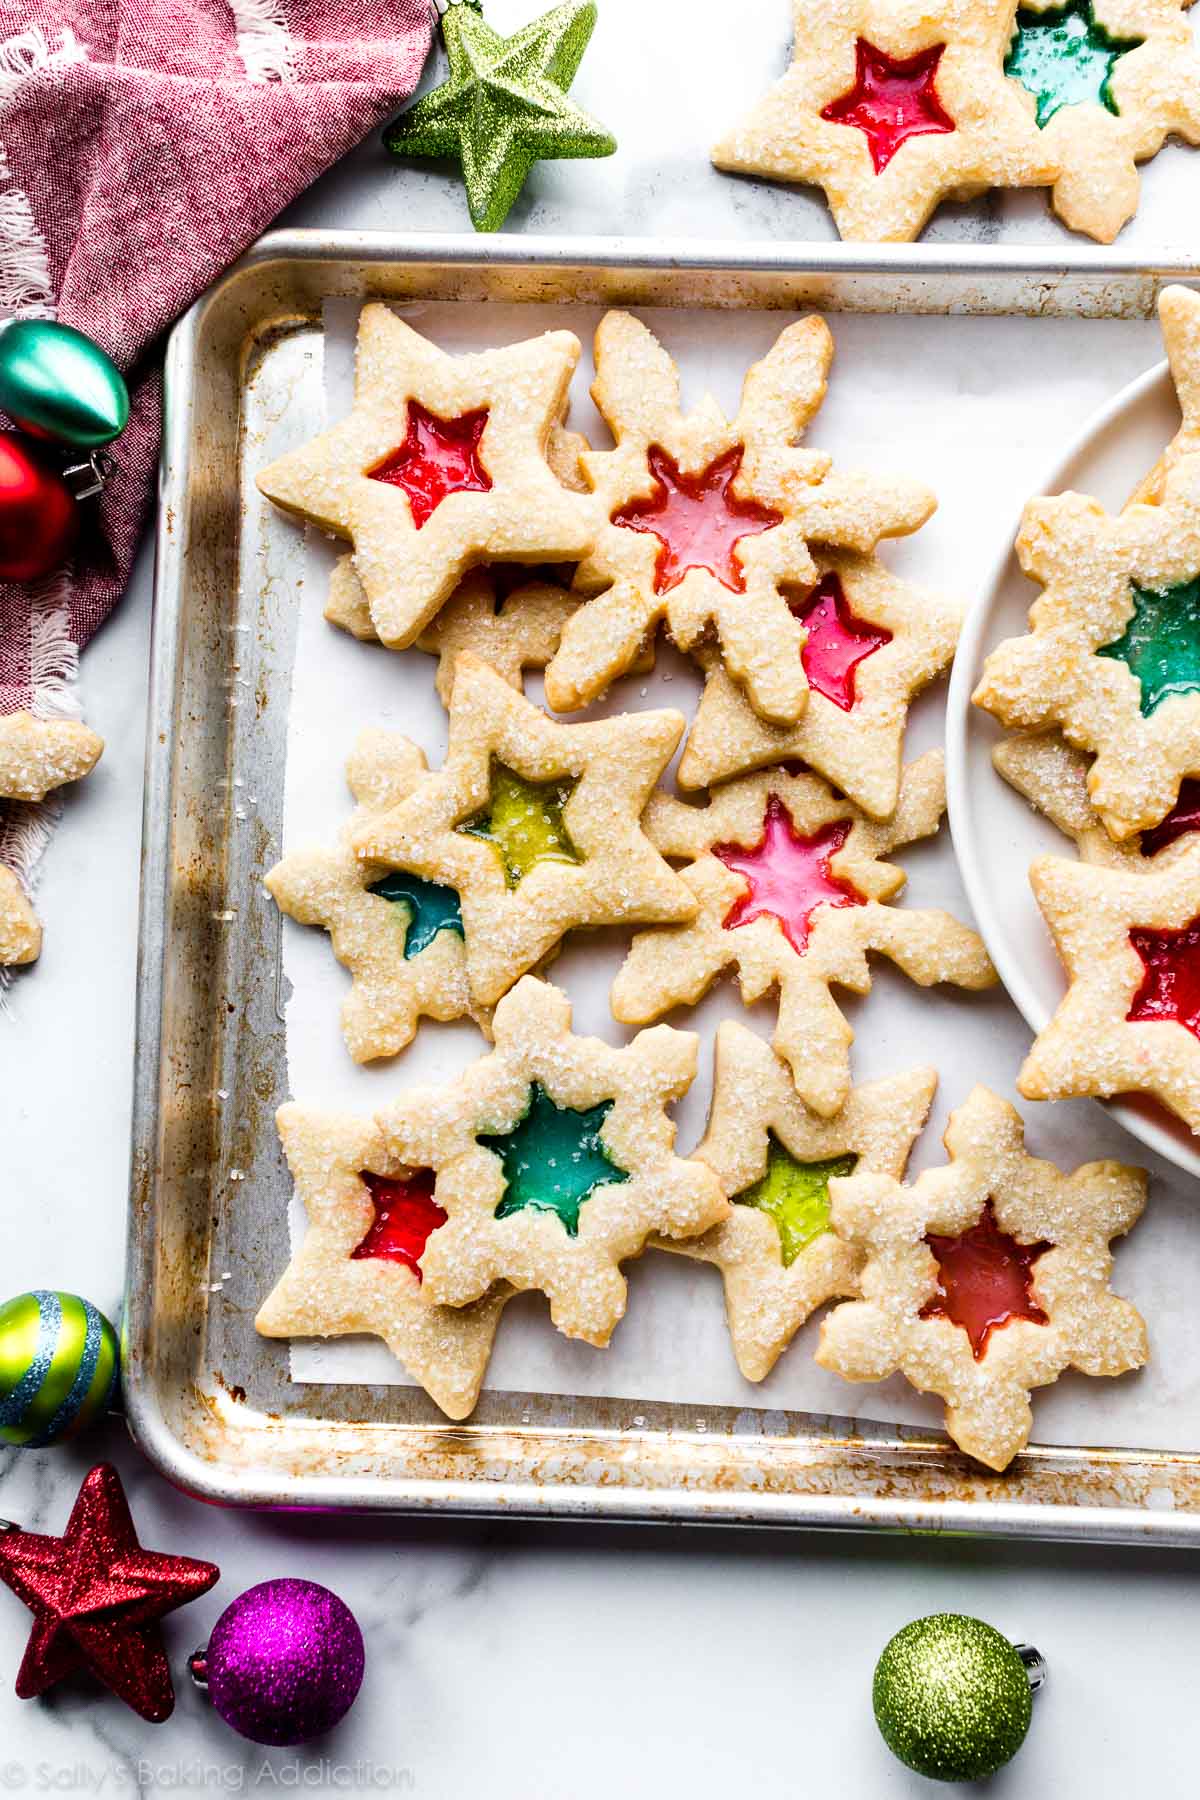
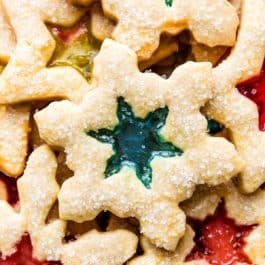
These stained glass window cookies are made with my favorite sugar cookies. Cut out the center of each and fill with crushed hard candies before baking. The candy melts as the cookies bake, creating a gorgeous windowpane effect. There’s no extra decorating or icing required! This is a fun and wildly impressive cookie you can add to your holiday baking.
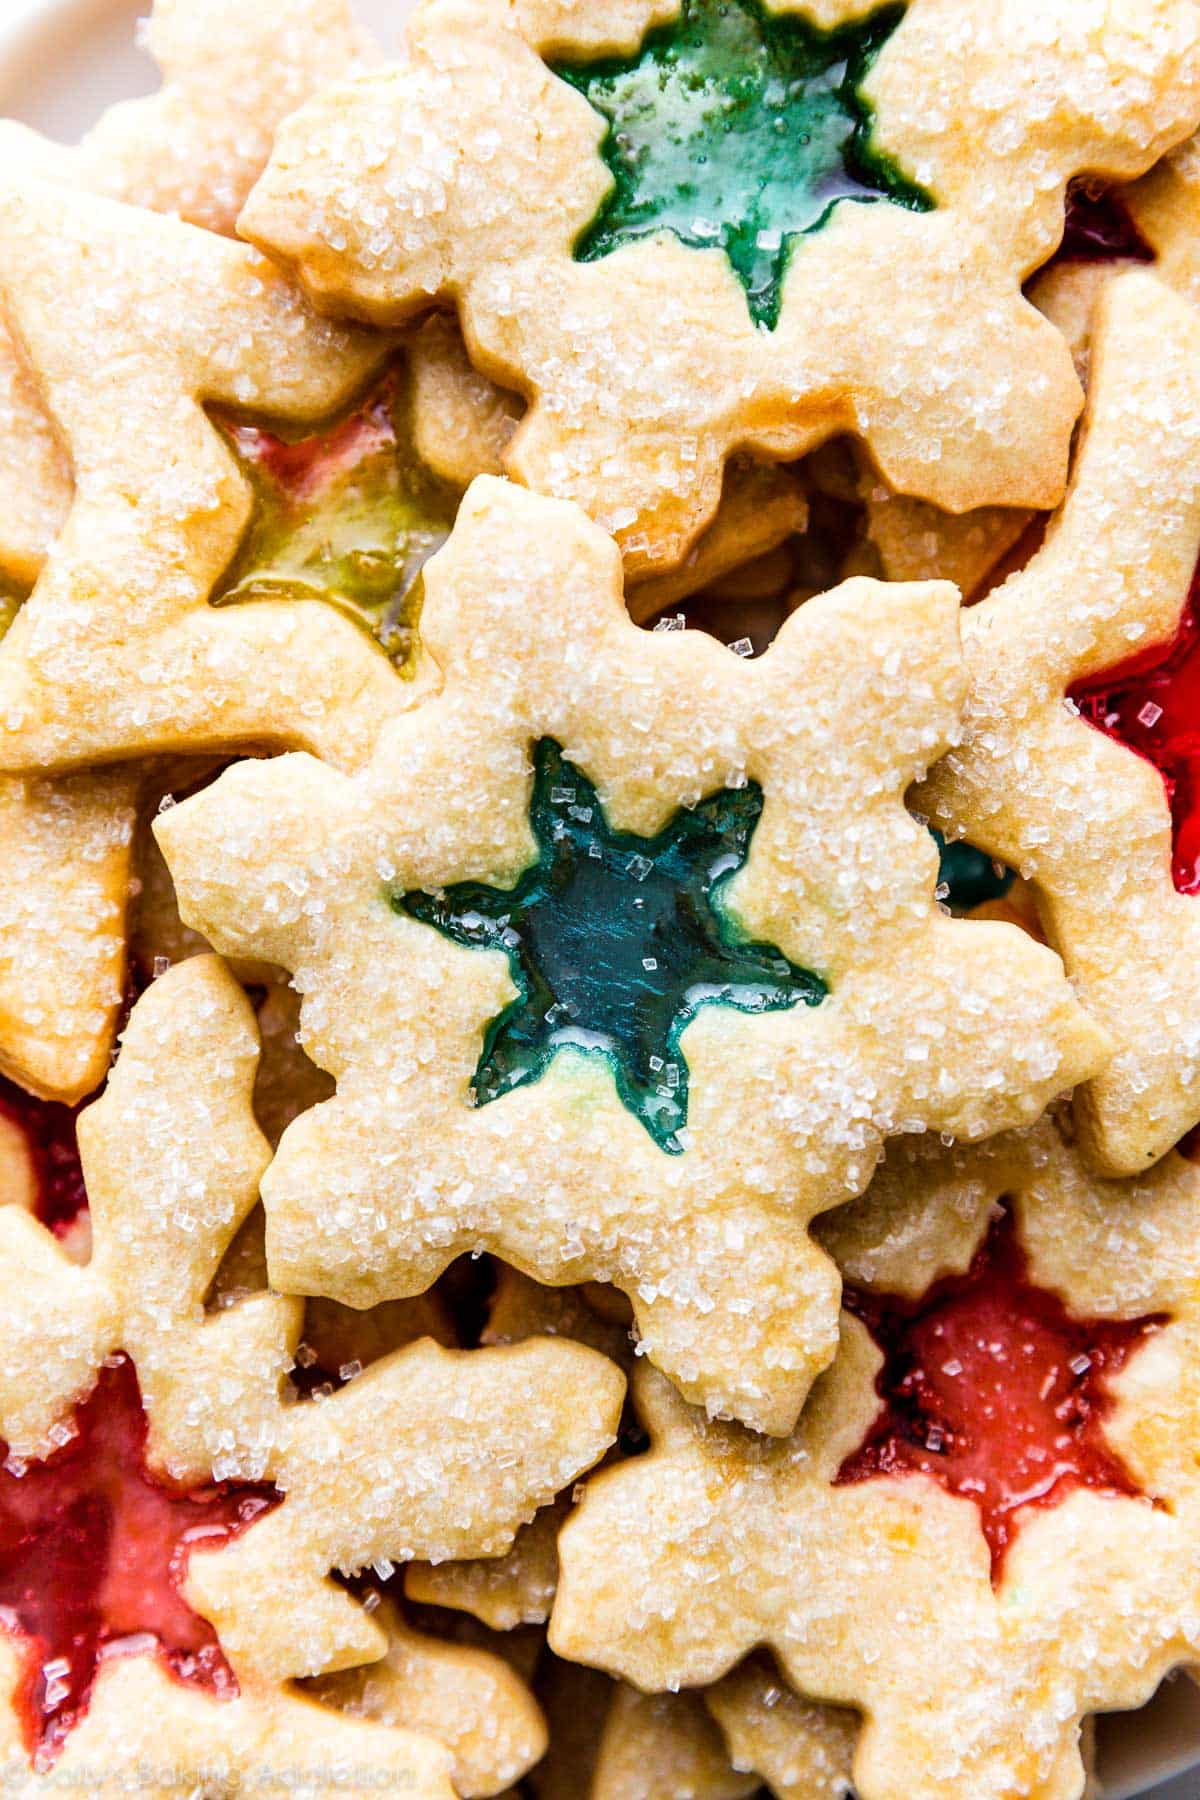
I’ve always wanted to make this style of cookie. I saw stained glass window cookies, also known as windowpane cookies, featured on the cover of Food Network’s holiday magazine and decided it was fate. I used my own sugar cookie recipe, topped them with crisp sparkling sugar, and was delighted with how beautiful they turned out. My daughter was in awe!
Today I’m showing you exactly how I did it plus some success tips that I found helpful.
Tell Me About These Stained Glass Window Cookies
- Texture: Underneath all this glitz and glamour, we have a classic buttery sugar cookie, one of the most loved recipes on my site, in fact. It’s a foundation recipe that I’ve used time and time again to create new recipes, just l’ve done with chocolate chip cookies, peanut butter cookies, and even these vanilla cupcakes. If you avoid over-baking, they’re relatively soft with slightly crisp edges. The sparkling sugar on top adds a pleasant crunch. After the melted candy center cools, it becomes hard candy again. I found it easiest to eat the sugar cookie edges and save the hard candy center for last. The candy center is a thin layer, so it’s much easier to bite into/suck on than a full-size Jolly Rancher or other candy.
- Flavor: The sugar cookies have a sweet vanilla flavor. I was going to prepare them with vanilla sugar, but felt the fragrant vanilla bean would get lost under the fruity candy.
- Ease: Not too tricky! If you’re comfortable making cut-out sugar cookies, you’ll do just fine with these. I appreciate that there’s no finicky icing or decorating required—the cookies are decorated right out of the oven.
- Time: The cookie dough comes together in minutes. Roll it out, then chill it in the refrigerator for at least 1-2 hours. Without chilling, the cookies will completely lose their shape. (It’s a crucial step.) After that, cut the dough into shapes, re-roll the scraps, then fill with crushed candies and bake. Set aside a few hours to complete this recipe.
One reader, Trisha, commented: “These cookies were beautiful and tasted delicious! The candy center adds such a nice fruit flavor surprise! These were a beautiful addition to my Christmas cookie box this year. Thanks for another great recipe, Sally! ★★★★★”
Overview: How to Make Stained Glass Window Cookies
The full printable recipe is below.
- Make sugar cookie dough. You only need 7 basic ingredients for this cookie dough.
- Divide in two pieces. Smaller sections of dough are easier to roll out.
- Roll out cookie dough. Roll it out to 1/4 inch thick or just under 1/4 inch thick.
- Chill rolled out dough. Without chilling, the cookies won’t hold their shape. Chill the rolled out dough in the refrigerator for at least 1-2 hours and up to 2 days.
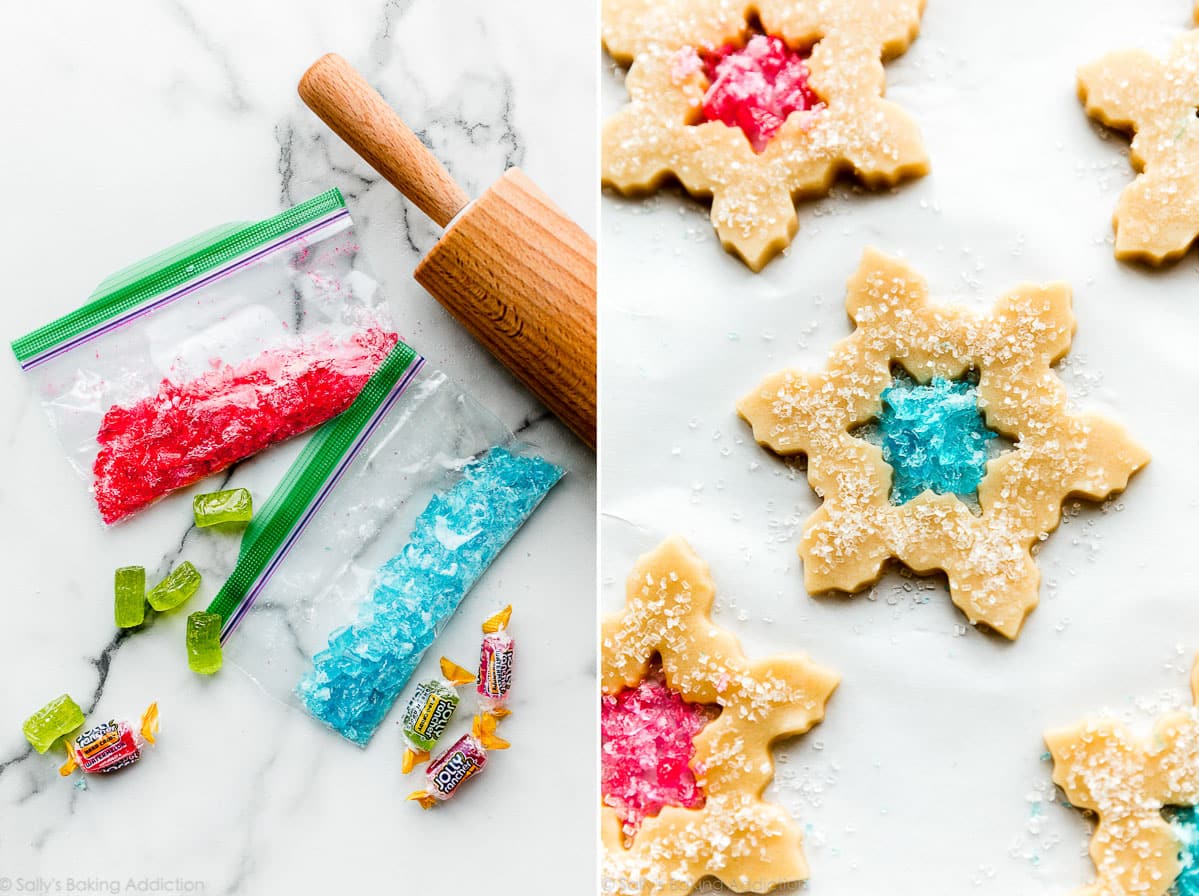
- Crush your candies. Unwrap the hard candies, separate the colors, then crush them into smaller pieces. More on this step below. Warning: it gets messy!
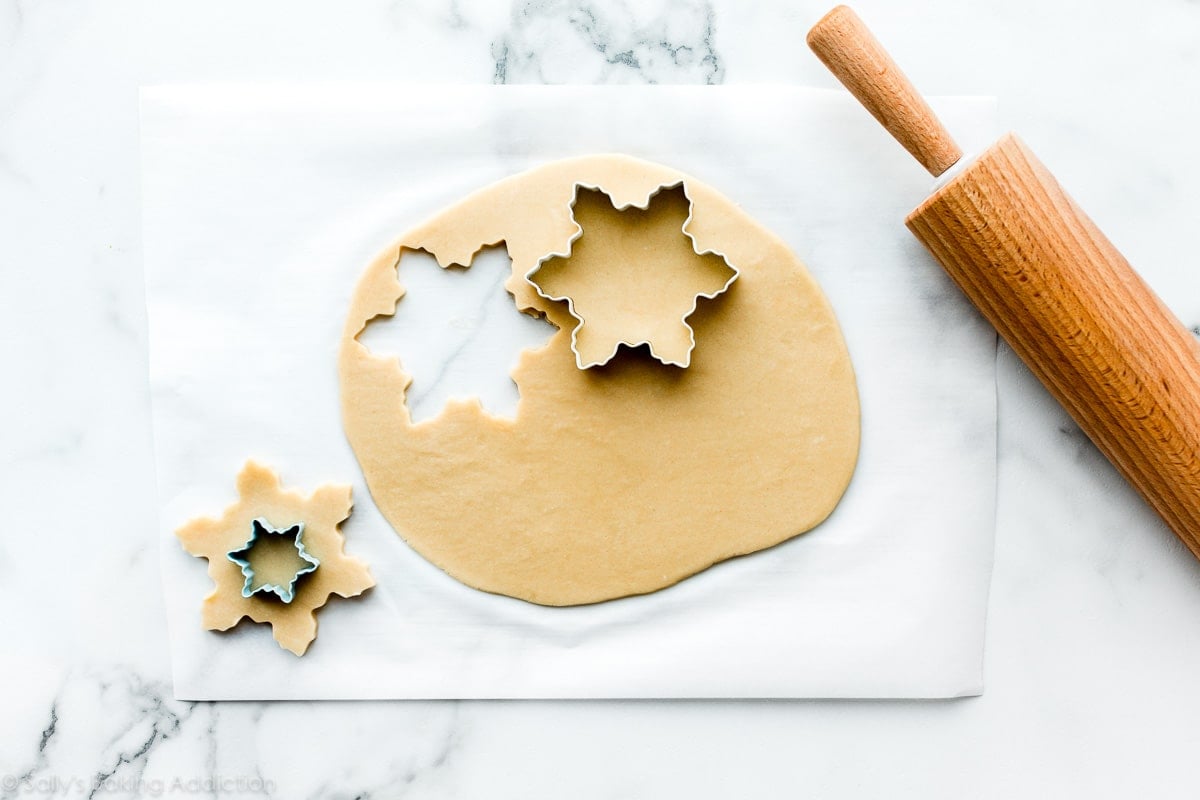
- Cut into shapes. You need 2 cookie cutter sizes for this recipe—1 large and 1 small. If you don’t have a small cookie cutter, use a knife to cut out a circle, diamond, or other easy shape. Have a little flour nearby when you’re rolling out the cookie dough. Keep your work surface, hands, and rolling pin lightly floured. Re-roll all your scraps—you’ll be surprised how many cookies you get from this amount of dough. Work quickly during this step because you don’t want the dough to become too soft.
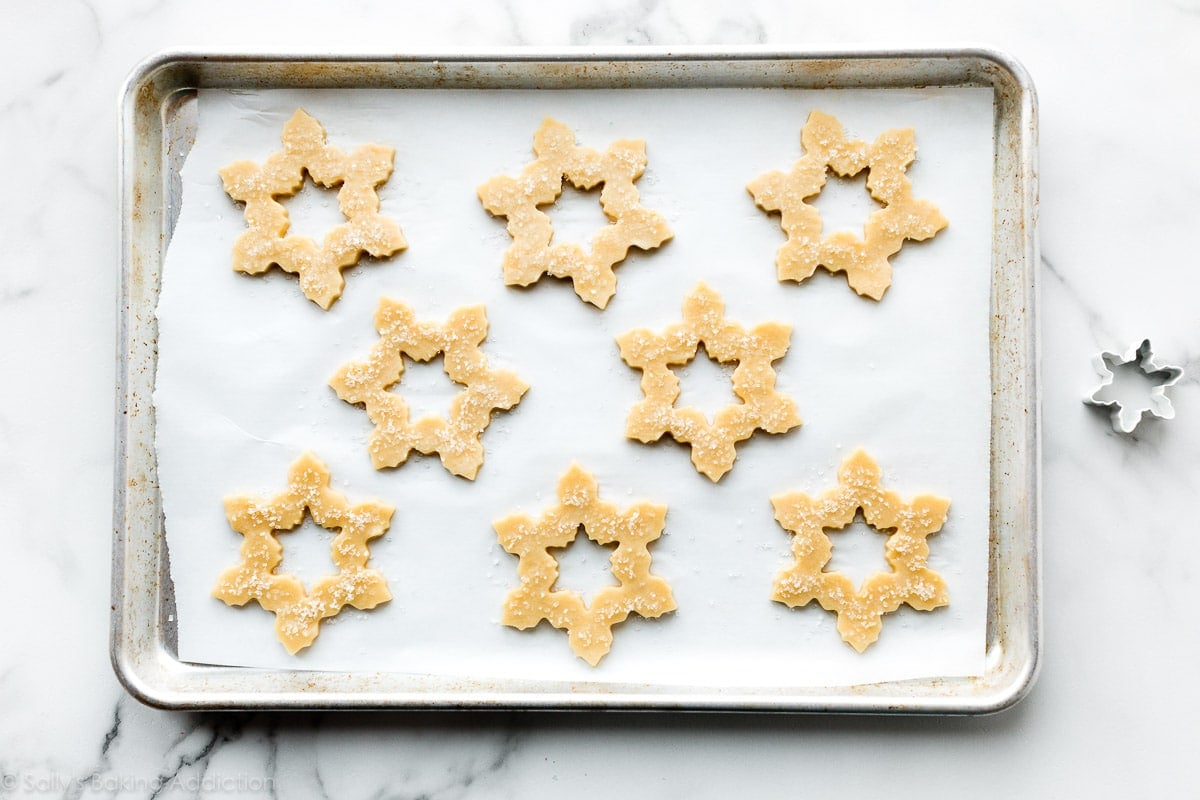
- Top with coarse sugar or sprinkles. The topping is optional, but adds a beautiful sparkle. Brush the cookies with a beaten egg white or water to help the coarse sugar stick.
- Fill the centers with crushed candies.
- Bake & cool. Depending on their exact size, the cookies take about 12-13 minutes. Cool the cookies on the baking sheets until the melted candy center solidifies. Cooling usually takes about 15 minutes.
The Trick is the Order of Steps
Notice how I roll out the dough BEFORE chilling it in the refrigerator? If you’re curious, let me explain why I do this. To prevent the cookies from over-spreading, the cookie dough must chill in the refrigerator. Roll out the dough right after you prepare it, then chill the rolled-out dough. (At this point the dough is too soft to cut into shapes.) Don’t chill the cookie dough and then try to roll it out because it will be too cold and difficult to work with. I divide the dough in half before rolling it out and highly recommend you do the same. Smaller sections of dough are simply more manageable.
Best Candies to Use
Any semi-translucent hard candy works. Some examples include Jolly Ranchers, Life Savers, or clear-ish lollipops. (For lack of better words!) Candy canes work too—you just won’t have the same stained glass window look. If you don’t have candy like this where you live, you can make hard candy from scratch. Here’s a homemade hard candy recipe I’ve used and loved.
Tools You Need
- Rolling Pin: This is my favorite rolling pin. If you have difficulty evenly rolling out dough, try this adjustable rolling pin. It’s really helpful!
- Cookie Cutters: As I mention above, you need 2 cookie cutter sizes—1 large for the cookie’s shape and 1 for the center cut-out. I recommend a 3.5 or 4 inch cookie cutter for the cookie, then a 1.5 inch cookie cutter for the center. If you don’t have a tiny cookie cutter for the center, don’t worry about it. You can cut out a circle or any other shape using a sharp knife. If you want to purchase a large and mini cookie cutter set, though, I recommend this snowflake cookie cutter set (used in the photos and video) and this star set (used in the photos, great for kids). Or use a 3.5-4 inch circle cookie cutter and any shape mini cookie cutter. Here is a mini Christmas cookie cutter set. Or how fun would these be with hearts for Valentine’s Day cookies?!
- Plastic/Paper Bags: The best way to crush the hard candies is to place them in a plastic bag and crush them with a rolling pin, which is a convenient tool because you need one for the dough. A meat mallet works too! Don’t crush the candies into a fine powder—we don’t want it to caramelize and burn. Instead, crush them into fine pebble-sized bits. The crushed candies will pierce the bag no matter how careful you are. Some candy dust will escape, so just know that this step is messy. If you don’t want to use plastic, use a paper bag or paper plate.
- Cookie/Baking Sheets: If you need a brand recommendation, I use and love USA Pan and Nordic Ware 12×17-inch half sheet pans.
- Parchment Paper or Silicone Baking Mats: I recommend baking the stained glass window cookies on lined baking sheets because the melted candy center will harden and stick to a bare pan. Using parchment paper or silicone mats is crucial if you want to remove the cookies in 1 piece. I actually use parchment paper and/or silicone baking mats for rolling out the cookie dough too. This is my little trick because you can easily transfer the rolled out dough to the refrigerator this way. Lift the paper/mat with the rolled out dough on top, put it on a baking sheet, and place it in the refrigerator. If you don’t have enough room for 2 baking sheets in your refrigerator, stack the rolled out dough on top of each other. (You can watch me do all this in the video tutorial above.)
- Pastry Brush: If you decide to top the cookies with coarse sugar or sprinkles before baking, you need to brush the surface of the cookie with a beaten egg white or a little water. This helps the coarse sugar/sprinkles stick. A pastry brush is handy.
Any of these baking tools would be great to add to your holiday wish list. And while you’re at it, be sure to check out my complete guide of Holiday Gifts for Bakers. Lots of fun ideas in there, either for yourself or other baker friends!

FAQ: Can I Do This With Other Cookie Dough?
Absolutely! Instead of sugar cookie dough, try this process with chocolate sugar cookies, cream cheese cut-out cookies with Nutella glaze, or gingerbread cookies. Or you could even cut windows in gingerbread house dough to make actual stained glass windows. I need to try that next.


Stained Glass Window Sugar Cookies
- Prep Time: 2 hours, 30 minutes (includes chilling)
- Cook Time: 13 minutes
- Total Time: 3 hours (includes cooling)
- Yield: 24
- Category: Dessert
- Method: Baking
- Cuisine: American
Description
Sugar cookies turn into colorful windows when you fill their centers with crushed hard candies. Before starting, review the helpful video tutorial below and the success tips above.
Ingredients
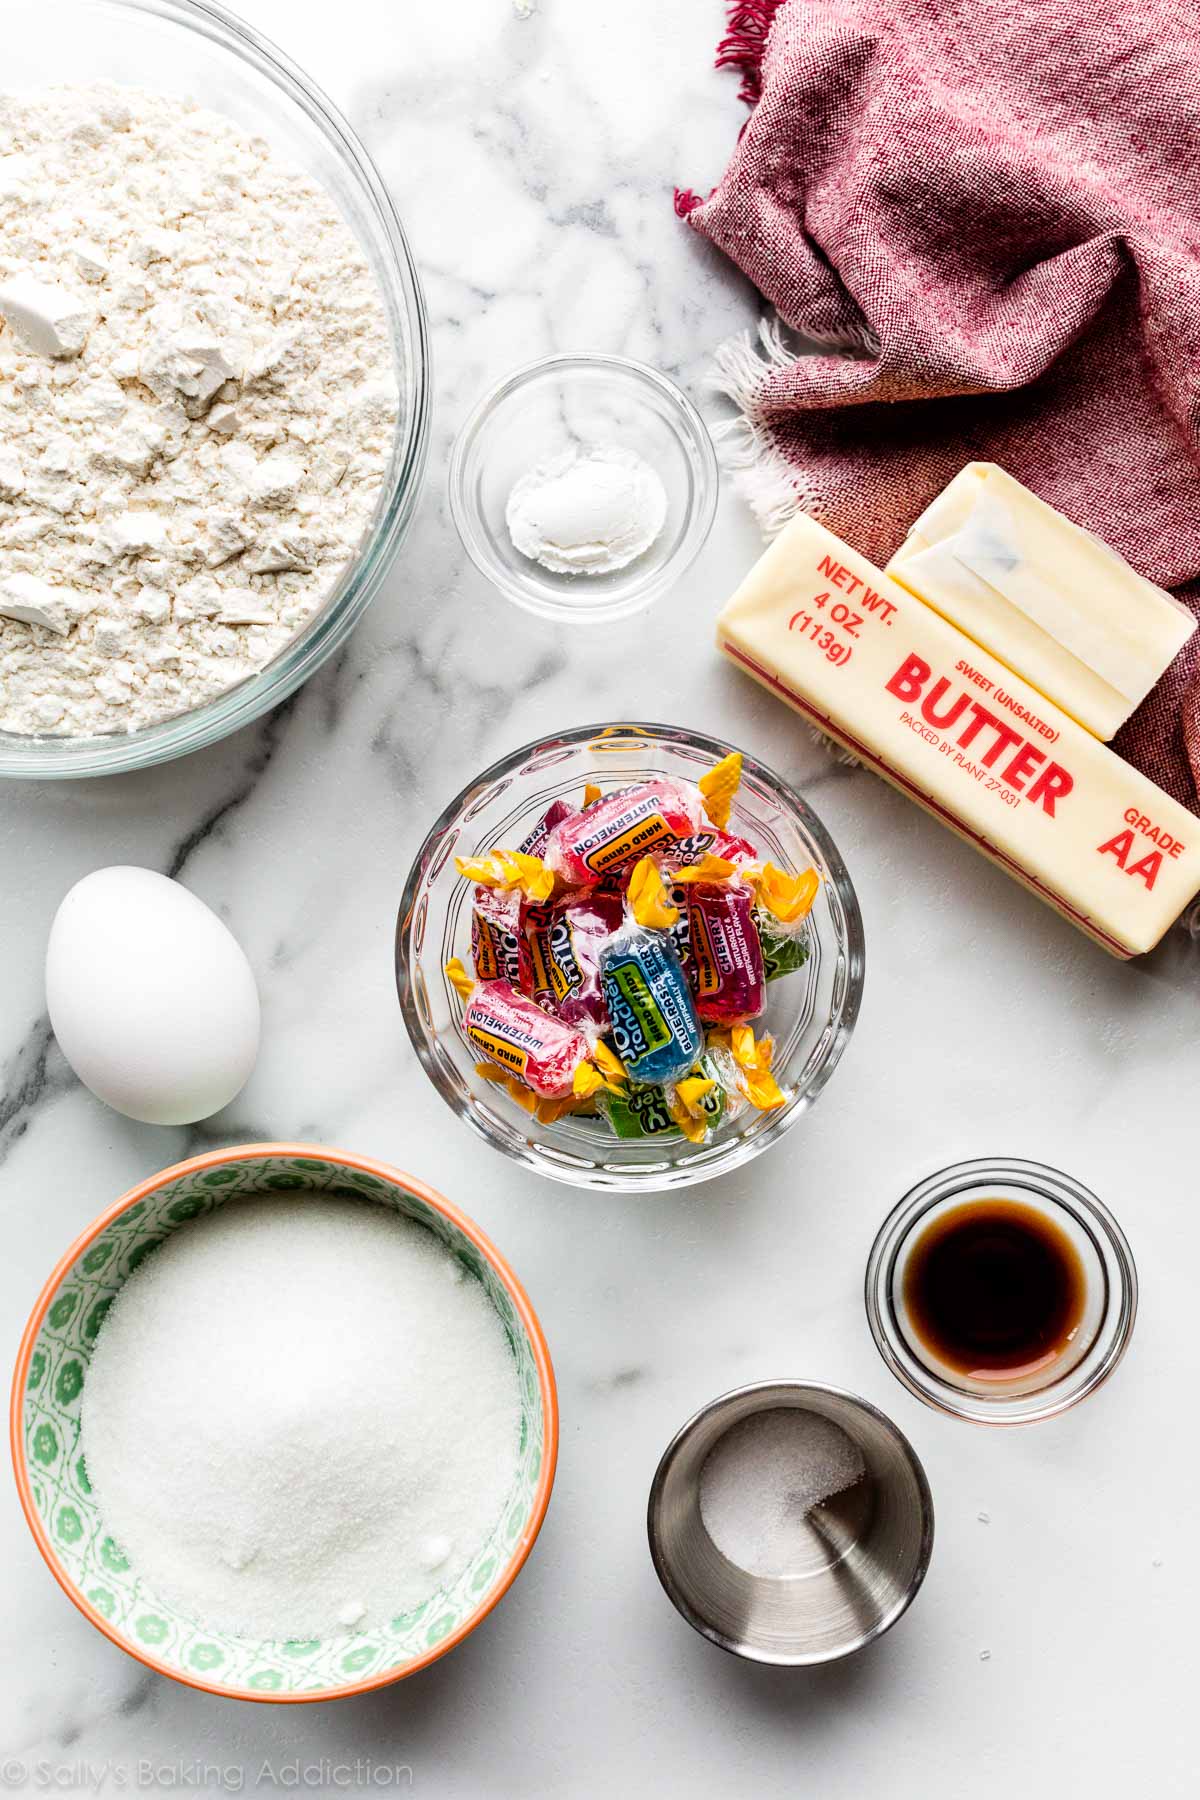
- 2 and 1/4 cups (281g) all-purpose flour (spooned & leveled), plus more as needed for rolling and work surface
- 1/2 teaspoon baking powder
- 1/4 teaspoon salt
- 3/4 cup (12 Tbsp; 170g) unsalted butter, softened to room temperature
- 3/4 cup (150g) granulated sugar
- 1 large egg, at room temperature
- 2 teaspoons pure vanilla extract
- 15–20 unwrapped hard candies, such as Jolly Ranchers or Life Savers
Optional Topping Before Baking
- 1 large egg white OR 2 Tablespoons (30ml) water
- 1/3 cup (65g) coarse sugar or sprinkles
Instructions
- Whisk the flour, baking powder, and salt together in a medium bowl. Set aside.
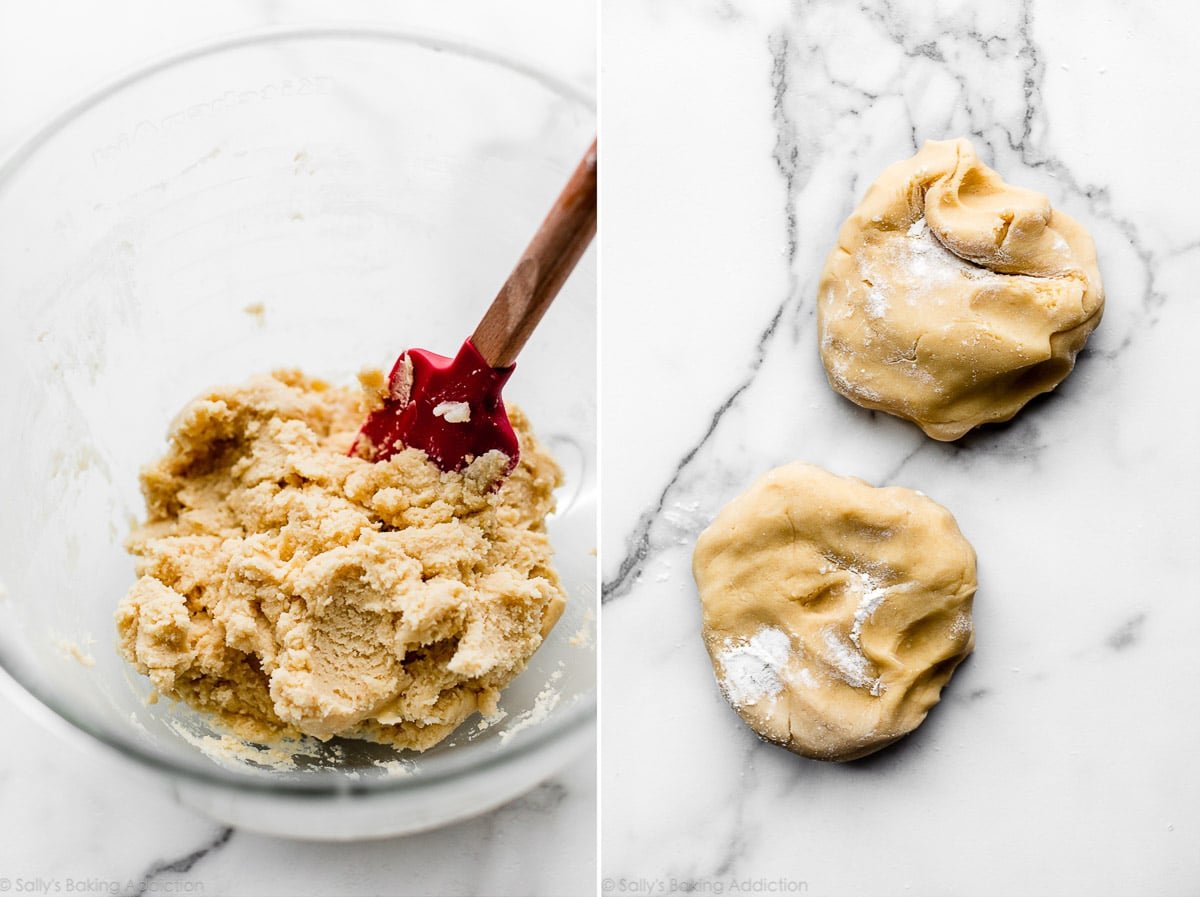
- In a large bowl using a handheld or a stand mixer fitted with a paddle attachment, beat the butter and sugar together on high speed until completely smooth and creamy, about 3 minutes. (Here’s a helpful tutorial if you need guidance on how to cream butter and sugar.) Add the egg and vanilla and beat on high speed until combined, about 1 minute. Scrape down the sides and up the bottom of the bowl and beat again as needed to combine.
- Add the dry ingredients to the wet ingredients and mix on low until combined. Dough will be a bit soft. If the dough seems too soft and sticky for rolling, add 1 more Tablespoon of flour.
- Divide the dough into 2 equal parts. Place each portion onto a piece of lightly floured parchment paper or a lightly floured silicone baking mat. With a lightly floured rolling pin, roll the dough out to about 1/4-inch thickness or slightly thinner (anywhere between 1/8 – 1/4 inch is fine). Use more flour if the dough seems too sticky. The rolled-out dough can be any shape, as long as it is evenly thick.
- Lightly dust one of the rolled-out doughs with flour. Place a piece of parchment on top. (This prevents sticking.) Place the 2nd rolled-out dough on top. Cover with plastic wrap or aluminum foil, then refrigerate for at least 1-2 hours and up to 2 days.
- As the cookie dough chills, begin crushing the candies. The best way to crush the hard candies is to separate them by color, place each color in plastic bags, and crush them with a rolling pin or meat mallet. Don’t crush the candies into a fine powder—crush them into fine pebble-sized bits. The crushed candies will pierce the bag no matter how careful you are. Some candy dust will escape, so just know that this step is messy. If you don’t want to use plastic, use a paper bag or paper plate. (A bag is preferred so candy doesn’t go flying everywhere.) Set crushed candy aside.
- Once cookie dough has chilled, preheat oven to 350°F (177°C). Line 2-3 large baking sheets with parchment paper or silicone baking mats. Carefully remove the top dough piece from the refrigerator. If it’s sticking to the bottom, run your hand under it to help remove it—see me do this in the video above. Using your large cookie cutter, cut the dough into shapes. Using your small cookie cutter, cut out the center shape. (You don’t need the center piece—re-roll it!) Re-roll all the remaining dough and continue cutting until all is used. Repeat with 2nd piece of dough. Note: It doesn’t seem like a lot of dough, but you get a lot of cookies from the dough scraps you re-roll.
- Carefully arrange cookies on baking sheets 3 inches apart. If your cookies are intricately shaped, use two hands to transfer them to the lined baking sheet.
- Optional Topping: If using an egg white, beat it lightly with a fork or small whisk for 10 seconds. It’s easier to brush onto tops of cookies if it’s beaten first. Brush tops of shaped cookies with egg white or water. Sprinkle coarse sugar/sprinkles on top.
- Fill Cookie Centers: Fill the cut-out centers about 3/4 full with crushed candies. The candy pieces melt and expand, so you don’t need to over-fill. I use and recommend 1 color per cookie, but feel free to mix for a spotty multicolor look. The candies are sticky, so wipe off your fingers as needed.
- Bake for 12-13 minutes or until candies have melted and the cookies are lightly browned around the edges. If your oven has hot spots, rotate the baking sheet halfway through bake time. Allow cookies to cool on the baking sheet until the melted candy center sets, about 15 minutes. Once melted candy center has set, transfer to a wire rack to cool completely.
- Cover and store cookies at room temperature for up to 1 week. For longer storage, cover and refrigerate for up to 10 days.
Notes
- Freezing Instructions: Sugar cookies freeze well up to 3 months. After candy center cools and sets, layer the cookies between sheets of parchment paper in a freezer-friendly container. To thaw, thaw in the refrigerator or at room temperature. You can also freeze the cookie dough for up to 3 months before rolling it out. Prepare the dough through step 3, divide in half, flatten both halves into a disk as we do with pie crust, wrap each in plastic wrap, then freeze. To thaw, thaw the disks in the refrigerator, then bring to room temperature for about 1 hour. Roll out the dough as directed in step 4, then chill rolled out dough in the refrigerator for 45 minutes – 1 hour before cutting into shapes and baking.
- Optional Topping: In the pictured cookies, I used an egg white and white sparkling sugar sprinkles, something you can usually find in the baking aisle at the grocery store. (I like Wilton brand.) The egg white created a lovely golden sheen. If you use water, the cookies may look a little pale in comparison.
- Special Tools (affiliate links): Electric Mixer (Handheld or Stand Mixer) | Baking Sheets | Silicone Baking Mat or Parchment Paper | Rolling Pin or Adjustable Rolling Pin | Snowflake Cookie Cutters, Star Cookie Cutters and Mini Christmas Cookie Cutters | Pastry Brush | Cooling Rack
- Room Temperature: Room temperature butter is essential. If the dough is too sticky, your butter may have been too soft. Room temperature butter is actually cool to the touch. Room temperature egg is preferred so it’s quickly and evenly mixed into the cookie dough.
- Be sure to check out my top 5 cookie baking tips AND these are my 10 must-have cookie baking tools.
Adapted from Food Network


Reader Comments and Reviews
Can these cookies be frozen after they are baked?
Yes, absolutely! See Notes after the recipe for details.
Thank you!!
Hi! I want to make stars for my daughter’s space themed birthday party—can I add a yellow food coloring (I like the dye free natural coloring from the brand Supernatural) and use yellow hard candy in the middle? My main concern is the texture changing too much if I use yellow food coloring in the batter.
Hi Kira, Yes, you can absolutely add coloring to the cookie dough. We always recommend using gel food coloring for vibrant colors that won’t change the texture of the dough.
Thank you for a fun baking recipe I made with my 5-year-old daughter today! Mine are definitely not as pretty (I think I need better cookie cutters with smaller cutouts next time), but they taste good and we had a lot of laughs along the way smashing candy.
Tried these for the first time this year and they were the hit Christmas cookie this year. Both my adult kids, grandkids and husband loved them. They are some work but will be added to my yearly rotation of Christmas cookies
Any reason I couldn’t make a version of these with your chocolate sugar cookie dough?
Hi Alison, these will work nicely with the chocolate sugar cookie dough. Enjoy!
Reporting back to say that it does work, but for some reason the Jolly Ranchers seemed to dissolve some of the chocolate cookie dough right around the cutouts, and I ended up with yucky looking centers with brown bits mixed in. I was able to fix it though by baking the cookies 5 minutes to set without the candies, and then filling in the candies and baking the rest of the way. In case anyone else tries it I figure this may save you a pan of uglier cookies.
Thanks! I don’t like sugar cookies, so I was wondering the same thing about a chocolate version. If I ever try this recipe with the cocoa, I’ll be sure to use your tip. 🙂
Hi Sally, I was wondering if you could use peppermint hard candies for this?
Hi Bonnie, sure can!
I’ve experimented with life saver, kerrs suckers , gummies , and jujubes! At 5 minutes in the oven all were completely melted and burnt bubbly! The jujube hardly melted or spread! The candy would cookie would not survive for the cookie timing ! Help I sincerely want to make these!
Hi Dorothy, results can vary depending on the exact type of candy you use. Stick with hard candies—gummies will not melt and then resoldify the same way. If the candy is becoming too bubbly, it could be that the centers are overfilled. Try a little less crush candy next time, and that should help since the candy will have extra room to melt and expand.
Made these today. They are lovely! I subbed ground flax for the egg and the texture was still perfect.
I remembered similar from the 60s.. but it was judt stacked cookies with nasty food coloring.
YOUR recipe is fabulous! One shot. No icing and beautiful!
And tbe sugar cookies are very good by themselves too.
I just made these cookies and they taste great! I was wondering, though, if they’re supposed to be crispy? I rolled the dough out to 1/4″ and baked for 12 mins as instructed. The cookies had a light brown bottom.
Hi Gigi! They should have slightly crisp edges, and softer middles.
I loved it yes but Shaker cookies is what I was looking for- I’m sure make them too
Can this recipe be used for regular sugar cookies cut
Can this recipe be used for regular cut out sugar cookies?
Hi Sheri, the dough is the same as our regular cut-out sugar cookies recipe, so yes!
Love the recipe, but the candy bubbled up while cooking , so the candy centers were bubbly, not clear . How can I avoid that for next time ?
Hi Annie, the candy may bubble a bit as it melts but should “clear up” as they cool. Were you using Jolly Ranchers or another type of hard candy?
Loved this recipe but is the candy hard to eat ??
Hi Maya, the candy centers will harden again, so it will be like eating a hard candy. Best way to eat them like we mention– eat the cookie first and save the hard candy for last. Hard to eat it all together!
This cookie was delicious! I just had a problem with my candy color seeping into the edges of the cookie (in the center). Any suggestions?
Hi Tiffany, we’re so glad you enjoyed them! Did you use Jolly Ranchers or another type of candy? It could be the candy you used or how much they were filled. Hope this helps for next time!
I used Jolly Ranchers. I thought maybe the egg wash seeped into the candies, which is maybe why it spread. The crystallized sugars made them look fantastic! Thanks so much!!
Cookies tasted great. Unfortunately the candy stuck to the parchment paper, so although they were cooled, there tore apart. I was so looking forward to using these for a baby shower. All that hard work and waste. Oh well, won’t try that again.
Hi ES, as a suggestion try baking them on a silicone baking mat. It works really well.
It looked like stained glass. So cool Sally
I only have a hand mixer that has beaters, dough hooks and whisks. Which one of these should I use to make these cookies?
Hi Carol, the beaters will be great. Happy baking!
This was so much fun! We have always wanted to make them. The cookie turned out great but the candy in the middle was bubbly and opaque. Should we use Jolly Ranchers and not Life Savers?
Jolly ranchers do give a nice clear “window”!
I was surprised by how easy these cookies were! And they looked great! Rolling out the dough before going into the fridge was definitely key. Easiest dough I’ve ever worked with when using cookie cutters. We re-rolled the holes and put them in the fridge, and they were ready to be used again 15ish min later. We used Jolly Ranchers and I would suggest filling the holes up 100% vs 3/4th, as the 3/4ths had very thin ‘glass’, whereas the 100%+ were filling up the middle quite well. Our blue jolly Ranchers did come out light green however & green JR came out light yellow. Would be interested in a way to keep the original colors… Highly recommend buying coarse sugar for this, as we didn’t have any, so they didn’t look quite as elegant.
This is my third year making these cookies for my Christmas boxes and the last two years I have had an issue with the centres not seeming to set. They stay sticky/tacky so they are hard to store and many centres break when I am trying to unstick from parchment. I always use Jolly Ranchers. Any ideas/tips?
Hi Hollie, I would try baking them for an extra minute, and keep them uncovered for a day or so to really let that center set and dry. After that, keep them lightly covered instead of fully covered. That could help.
I just made a batch of these cookies. First off, Sally’s Baking Addiction is my #1 place to go when I need a recipe. I love her recipes and i rely on her hints because they work.
The taste of these cookies were delicious, and I followed the directions about having the dough properly chilled so that they would not spread. I purchased and used the recommended cookie cutters and they were beautiful. I baked them on parchment. They did not spread which was wonderful. Regarding the candy, I would not do that again. While I understand the candy was sticky it was difficult getting it into the middle correctly. Youhave to be really careful to get it right. The candy melted but it overpowered the hole, kind of like coloring outside of the lines, if you will. It melted and actually looked like glass, but didn’t look good, and I felt it just didn’t go with the delicate flavor of the cookie. I’m glad I tried these but I won’t make them again. This is just my experience
The recipe and taste of these cookies were awesome.
Thank you, I thought it was just me. While I liked the cookie flavor and didn’t have any problems with getting “just the right amount” of broken candy in the center, the parchment paper was a disaster. The cookies cool on the paper to set and then getting them off is likened to removing a price sticker and leaving behind the stuck paper on the back of the product. Silicone liners is the only way to go with this kind of ingredient. And use a thin cookie spatula to make sure the entire cookie can be lifted off the silicone. These cookies are lovely, but they’re a lot of work. But they are lovely if you like a lot of work.
These look absolutely gorgeous, Sally!
Could I use just colored sugar instead of hard candy? I don’t necessarily want the cookie to taste like a jolly rancher (or any flavored hard candy).
Hi AS, colored sprinkling sugar should eventually melt in the centers, but you will want to use a lot and we’re unsure of how long it will take. For best results, we recommend using hard candies.
would the same method work with gingerbread cookies and some kind of caramel sweet
Hi Hannah, you can definitely use gingerbread cookies, and while we haven’t tested a caramel center, many readers have reported using hard caramel candies with success. Let us know what you try!
Great recipe! My friend and I made these with Jolly Ranchers. We used heart shapes and kept the cutout as smaller cookies. Great recipe.
Looked complicated, but it’s not. Really pretty and pretty simple if you follow instructions. Didn’t have the coarse sugar for the top but they were still pretty cool. Next time I will add the sugar on top. Thank you Sally!
I’ve not made it yet, but I plan to make chocolate sugar cookies and candy cane windows. I don’t think they’ll look as pretty, but they will definitely taste festive! Thanks for the fun idea!