1 Giant Snickerdoodle Cookie.

1 Giant Snickerdoodle Cookie.

Ever have a giant craving for a cookie?  Like a craving of epic proportions?  Well, I've been craving the sweet, ...

snickerdoodle white chocolate chip blondies.

snickerdoodle white chocolate chip blondies.

  A favorite classic cookie of mine are snickerdoodles.  Plain and simple. Coming from a gal who LOVES big chunks and whole ...

Strawberry Shortcake Cupcakes.

Strawberry Shortcake Cupcakes.

100% homemade Strawberry Shortcake. In cupcake form. ;) I recently partnered with The Bozzuto Group, a real estate company that develops and ...

Chocolate Fudge Cupcakes with Salted Caramel Frosting.

Chocolate Fudge Cupcakes with Salted Caramel Frosting.

Devil's food chocolate fudge cupcakes with a salted caramel-infused buttercream frosting topped with caramel drizzle and a pretzel twist.  I ...

Brown Butter Milky Way Oatmeal Cookies.

Brown Butter Milky Way Oatmeal Cookies.

This is what happens when anything and everything candy related goes on sale in the weeks preceding Halloween. Candy bars beckon ...

It’s a Sprinkle Party!

It's a Sprinkle Party!

Care to join? While Mondays are most certainly mundane, I find that Wedsnesdays are particularly drab. You see, you're totally in the ...

S’more Peanut Butter Cookies.

S'more Peanut Butter Cookies.

 Do you remember when I made S'more Chocolate Chip Cookies? Probably not; that was back when no one read my blog ...

Bites for Growing Your Blog: Food Photography Basics.

by Sally on January 20, 2013 · 175 comments

*Disclaimer: All of my thoughts and advice are merely things I have learned in the past year of blogging and strategies that I’ve used to get to this point.  

How to Improve Your Food Photography

Welcome to the 4th segment of my Bites for Growing Your Blog Series!  It’s taken me some time to compile this post, so that’s the reason for the month-long hiatus from the series.  It’s a lengthy post, but I hope you can find some aspects and topics helpful.  I’m learning along the way – I love hearing feedback and tips as well.

New around these parts? Check out the other posts about how to grow your food blog here.

Orange Sweet Rolls

 {orange sweet rolls}

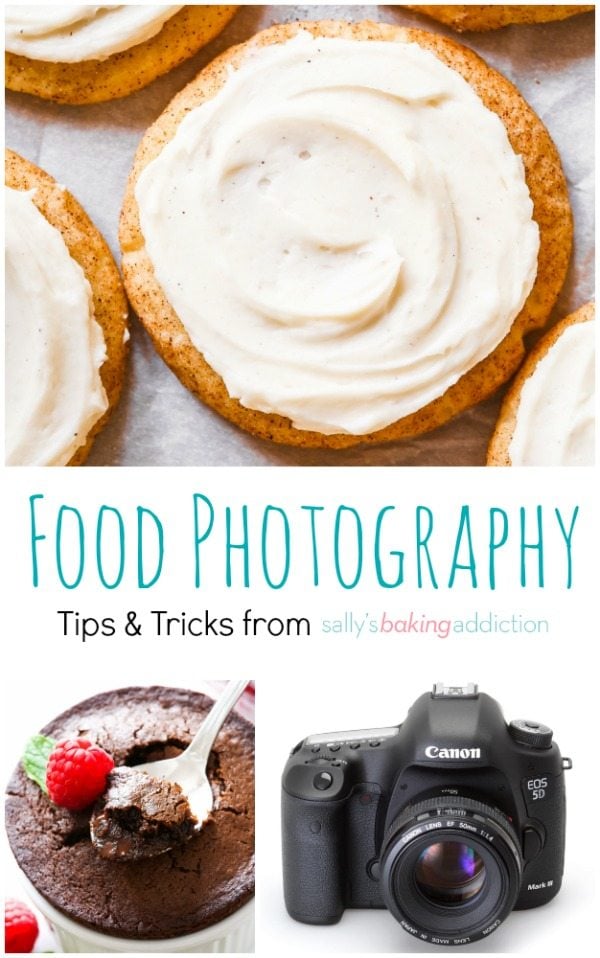
Food Photography Introduction


*Please note that I have no professional background in photography.  The photography you see on my blog has been a journey. Photography is the hardest part of this job for me.  Hours of practice, self-study, research, and help from a couple professional photographer friends.

There are hundreds of thousands of resources for learning how to improve your food photography.  I will just cover the things I’ve learned in this post today.

Photos are the bread and butter of my blog.  I like to think of them as the strategic “selling point” to my recipes.  I can only say so much about a brownie being fudgy.  I want to SHOW you how fudgy it is. And to be honest, not many readers read the text of the blog. They are there for the photos and the recipe.

Aside from posting quality content (over quantity) and being present/available to readers on my blog, I have learned that the photography is what draws in my crowd.  And makes them stay.  Bad food photos are a turn off.  And I write this knowing I have some poor shots on my website – I cringe when I look at old photos. Heck, I even cringe looking at photos from a couple months ago.  I learn and try to improve with every single photoshoot. Sometimes I reshoot old recipes for fun if I make the goodie again, but I like to leave a few old photos up to remind myself that food photography is a learning journey.

Food Photography Improvements

{Photo 1 taken with my iPhone 4 & no editing in December 2011. Photo 2 taken in RAW format, shot in manual mode with my Rebel T2i, tripod, 3pm sunshine in December 2012, ISO 100, f/3.5, shutter speed 1/1.3 s, Lightroom edits to exposure, clarity, saturation, white balance, shadows, and highlights.}

Photography Improvements

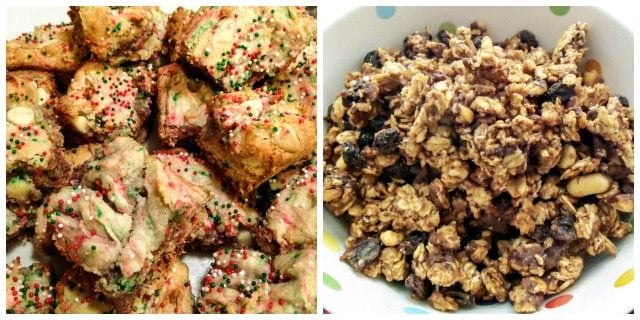
{Photo 1 taken with my iPhone 4 & basic editing in iPhoto to brighten the shot. Photo 2 taken in RAW format, shot in manual mode with my Rebel T2i, tripod, 11am in October 2012, ISO 100, f/4.5, shutter speed 1/1.3 s, Lightroom edits to exposure, sharpening, contrast, shadows, saturation, and white balance.}

After some practice, I have learned that big, bright, CRISP, make-you-want-to-reach-through-the-screen photographs create the most visual appeal for my readers.  I also like to shoot my photographs vertically.  More on that below.

We eat with our eyes, so my blog’s photography is an important aspect.

Sparkling Jumbo Blueberry Muffins-8

{Sparkling Jumbo Blueberry Muffins}

You may certainly have a successful blog without a professional DSLR, editing software, and a pricey lens. However, for me, I didn’t notice my blog taking off until I learned how to use my DSLR.  From April 2012 – March 2013, I used my Canon EOS Rebel T2i.  I am currently shooting with a Canon EOS 5D Mark iii and a 50mm f/1.4 lens.

After I began to learn how to use a DSLR. My photos started to be accepted onto photo sites like FoodGawker and Tastespotting, and pinned more on Pinterest (the source for over half of my referral traffic).  I saw a spike in traffic and companies were reaching out to me because my food photography was improving.

That is why I’m sharing with you a few of the things I’ve learned with my DSLR today.

When I first began blogging, I asked myself what I love most about the food blogs I read.  It’s the photography.  When I was a lurker, I would gaze at big, bold photos with faded backgrounds and natural style.  Nothing forced. I like lots of color, bokeh (the background blur), and pleasant composition.   I never took a photography class when I first picked up my DSLR, so it was time to learn.

*** My #1 piece of advice: PRACTICE MAKES PERFECT.  Take hundreds of photos.  Tons. Keep working at it. ***


My Current Food Photography Tools


canon-5d-mark-III-review

{Updated April 2013} – 
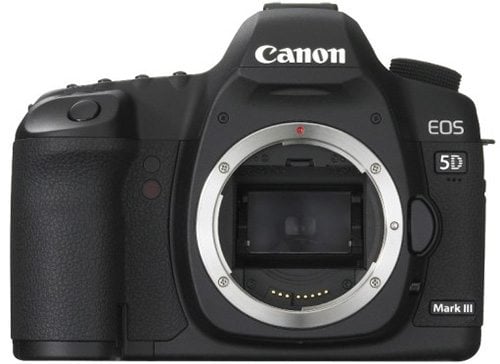
I shoot with a Canon 5D Mark iii and have since April 2013.  My current lens is a Canon EF 50mm f/1.4.

Before my current camera, I shot with a Canon Rebel t2i from April 2012 to March 2013.  I have used Adobe Lightroom 4 to edit my photos since April 2012. I think of my editing software as putting life back into my photos.  Lightroom is extremely user friendly – much more so than Photoshop (I had to use Photoshop in my college design class – did not “get” it).  Needless to say, Lightroom has been my saving grace and I HIGHLY recommend buying it, even if you do not own a DSLR. Use this killer Adobe Lightroom Tutorial.

I shoot in manual mode (M) and have since July 2012. I shoot all of my photos in natural light.  Light is everything in food photography.  In fact, lighting deserves its own post.  If you’d like to read more about lighting right now, I highly suggest looking into buying Tasty Food Photography eBook by Lindsay, the author of popular food blog Pinch of Yum.  It is only $19 and it pays for itself.  I bought this eBook last May and learned SO much useful information.  I reference back to it often when I am shooting.

tasty-food-photography

I do not currently use my camera flash to take food photography.  However, I’ve never tried my hand at an in-home artificial light set-up before; I am currently researching options (recommendations welcome!) since I am at the sun’s mercy on Saturdays and Sundays.  I currently do not use any diffusers or reflectors.

I shoot in RAW format as of November 2012 (more on RAW format below).  I shot with the kit lens (the lens that comes with the camera) from May – July 2012.  In July 2012, I bought a Canon EF 50mm f/1.8 lens.  This is a very affordable and lightweight lens for its functionality.  They range between $100-$120 or even cheaper if you find a good deal.

In April 2013, I bought a Canon EF 50mm f/1.4 lens. 50mm means that this lens has a fixed focal length and does not zoom. It delivers tack-sharp images when adequately combined with 3 other very important features that I will explain below: aperture, shutter speed, and ISO. I plan to invest in a pricier lens when I’ve save up a bit more, but the 50mm f/1.8 is a fantastic starting point.

As of July 2012, I use the Sunpak PlatinumPlus 6000PG 61 Tripod for all of my photos.  It was $51 at Best Buy.  My apartment has very dark and dull lighting So when I shoot at 12pm on a sunny day – it isn’t harsh light whatsoever.  There is no direct sunlight into my apartment.  Because of these darker conditions, buying a tripod has been one of the best investments I have ever made besides Lightroom.  I highly suggest a tripod (that shoots both vertically and horizontally) if you are having trouble with lighting or having your photos stay in focus.  Also, food photography is all about the details.  Because I use a tripod on a self 2 second timer, it is nice to have both of my hands to quickly move a crumb or cookie to another spot.

Tripod


Let’s go over the three major controls you use with your DSLR.

Three Major DSLR Controls


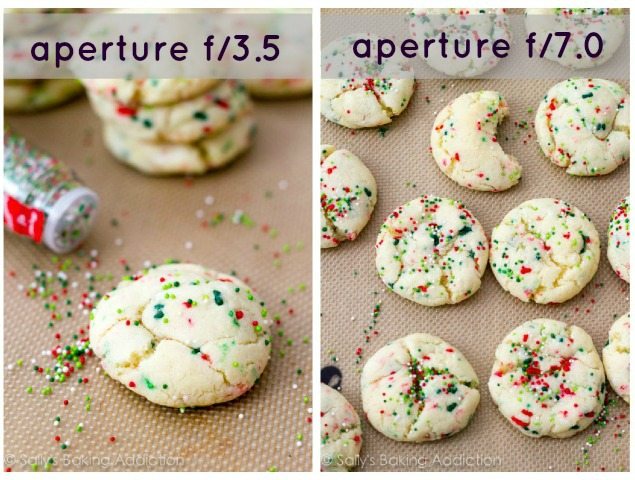
1) Aperture.  Aperture is measured in F stops (“f/2.8″ is the aperture).  It controls how light will hit the sensor.  It is the size of the hole that the light goes through when it passes through the lens.  Photos taken with a low aperture will let in more light (f/3.5 lets in more light than f/8.0).

A lower aperture will also give you a more shallow depth of field.  This is when one small object (or part of an object) is in focus when the rest of the photo is blurred.  A blurred background is known as bokeh. For my food photography, I like to use a low aperture.  Depending on the subject, I do not go lower than f/3.5 and in most cases (practically ALL cases), I shoot at f/4.5.  

The two photos below show my Confetti Cake Batter Cookies.  I shot these on a very sunny day in December at 12pm.  The photo on the left has an aperture of f/3.5.  I wanted just the one small cookie in the front (most of the cookie) to be in focus and the sprinkles around it to be slightly blurred.  This meant that I had to lower my aperture.

The photo on the right is shot at f/7.0.  For this overhead shot, I wanted most of the cookies in focus.  I probably could have increased the aperture more, but I’m pleased with how it turned out.

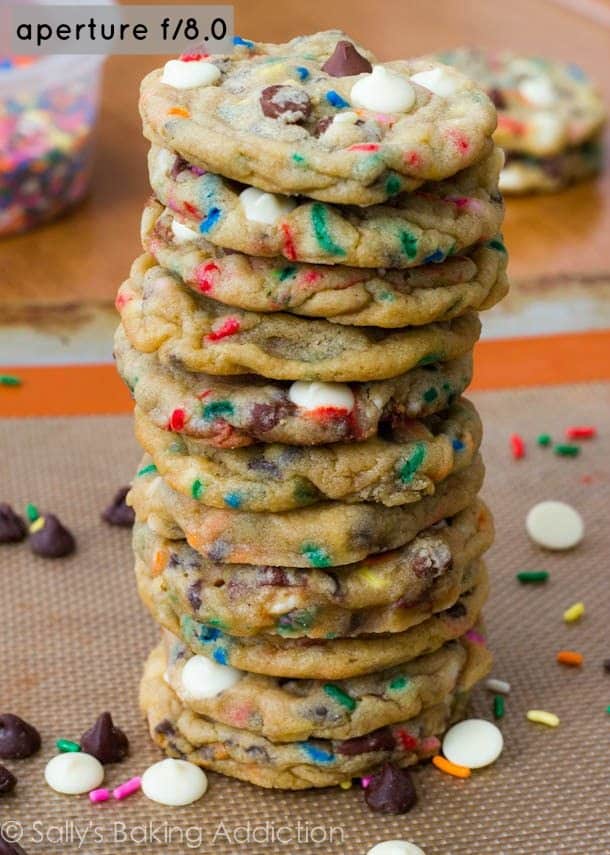
When you take photos with a high aperture (meaning more of your photo is in focus), you need a lot of light because the “hole” that the light goes through when it passes through the lens is smaller. 

Aperture Differences

Below is a photo of my Cake Batter Chocolate Chip Cookies that I took in December 2012.  I wanted the entire tower of cookies to be in focus (remember: higher aperture = more of the photo is in focus). This meant that I had to step back considerably from the subject and bump up my aperture to f/8.0. It was a hard shot to take and probably took me about 9 tries.

Because I set the aperture higher to get more of the cookie tower in focus, I had to slow down my shutter speed to compensate for the loss of light.  More on shutter speed next.

Aperture

For fun, below is a photo taken of the same cookies 1 year ago.  Taken with my iPhone 4 in natural light, no editing, poor composition, too tight, and no styling.  Try to step away from your subject, Sally!

dsc015891

2) Shutter Speed.  Shutter speed is the amount of time the shutter is open.  Shutter speed and aperture are buddies.  When you adjust one, you (most of the time) must adjust the other to compensate.

While aperture depicts the size of the hole in which the lens allows light, the camera’s shutter is for exposing the sensor to light for a specified amount of time. Shutter speed is represented by seconds or fractions of a second. For example, if your shutter speed is “1/125 s″ that means your shutter is open for one one-hundred and twenty fifths of a second.  A shutter speed of “1″ is one full second.

The bigger the denominator in the fraction, the faster the speed ( 1/500 is much faster than 1/30).

To get a decent or perfect exposure, your aperture and shutter speed must be aligned.  Even when aligned, I usually still have to brighten or darken the photo in my editing software.

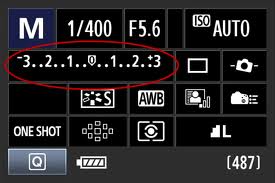
How do I change the aperture and the shutter speed in manual mode?  Take a look at your camera’s manual.  On most DSLR cameras, you may change the aperture or shutter speed by turning the dial on top of the camera.  Below you’ll see this user shooting in M mode (manual), 1/400 s shutter speed, and f/5.6 aperture.  Do you see that dial in the red circle, in between the two 1s? That means the shutter speed and/or aperture have been adjusted to perfectly align for a decent exposure.  I say decent because, for me, I still notice my photos too bright or too dark when the dial is in the center.  Sometimes I move the dial to the left or to the right to get the exposure I am looking for.  Amanda explains this well here.

images

{source}

Because my apartment is so dark, I need to use a slower shutter speed most of the time.  Because of the longer shutter speed, I have to use a tripod to take my photos.  Bare hands cannot stay steady for long shutter speeds, which results in blurry photos.  The photo below of my Orange Sweet Rolls was taken with my tripod in the middle of the day in RAW format, manual mode, aperture f/4.5, 1/1.3 s shutter speed. “1/1.3 s” shutter speed means 1 divided by 1.3 = 7/10 of a second.

This photo was lightened in Lightroom, with additional adjustments to saturation, shadows, white balance, and sharpening.

Orange Sweet Rolls

3) ISO.  ISO is an indication of how sensitive your camera is to light. 100 is low, 3200 is high. The lower the number the less sensitive your camera is to light and the finer the grain of your photo.  A higher ISO setting is used in dark settings to get quicker shutter speeds – but this means a noisier/grainy photo.  White on Rice Couple explains ISO in detail here.

I remember when I first began using my DSLR.  I had it set to 2400 (!!!) in the afternoon to take a photo of a cupcake in my dark apartment.  This was when I was shooting with the kit lens and before I had a tripod.  Kevin picked up the camera the next day, saw the 2400 ISO, and asked me if I was shooting in the dark.  I had to bump up my ISO very high to get a lighter photo.  I could have just adjusted my shutter speed and aperture, but I had no idea what I was doing.  The resulting photo (below) is very noisy with a lot of grain in the background.

The ISO is 2400. See how grainy the background is?

brownie cookie dough cupcakes-6


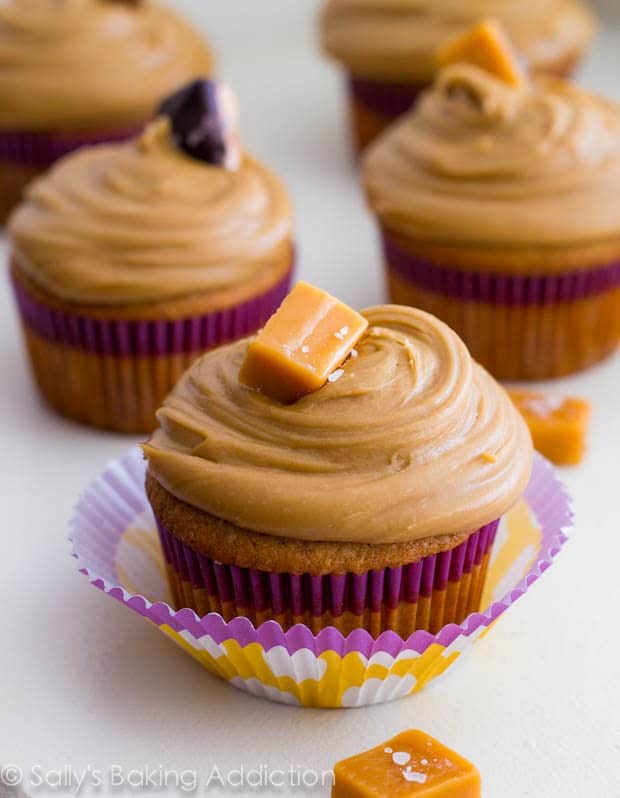
Currently, I try hard not to go above ISO 100.  This produces a clean, crisp photo with hardly any noise.  I am able to go this low because I shoot in bright sunlight and use a tripod.  However, I recently fell victim to the weather.  It was snowing when I shot my Salted Triple Caramel Cupcakes 3 weeks ago.  The lighting was very soft (too soft) – gray and dull and the subject was monotone light brown.  My camera lens would NOT focus at 100 ISO, no matter where I put the shutter speed.  I had to increase the ISO to 400.  Still much less grain (if any) than the photo above.

Triple Salted Caramel Cupcakes-11


So that briefly covers your DSLR three basic features.  Here are a few more things I like to bundle up into the whole food photography package. These are things that can be implemented even without a DSLR.

5 Things to Keep in Mind


1. Styling and Compostion. These subjects deserves their own post.  Every photographer has their own style. A wedding photographer with soft-lit, glowing photos. A food photographer with moody, crisp, sultry photos.  It really just depends what you like and are comfortable shooting.  It took me some time to find a style, but like I mentioned before, I am constantly learning and improving and my style may be different down the line.

For food styling, I suggest checking out my #1 resource on the subject:  Plate to Pixel: Digital Food Photography & Styling by Helene Dujardin. I highly recommend this book – it covers the ins and outs of everything I’m going over today.

I like my photos close up, but not too close up that you don’t even know what you’re looking at.

What is this stuff? Too tight composition!

old photography

See those photos above?  Below are the same foods with a styled composition. You can actually make out what is inside the frame and I use plates, napkins, and crumbs to gently style the shot.

Food photography improvements

Create movement in your photos.  Make the reader’s eyes move from one corner of the photo to another.  The entire frame should be interesting – avoid white, blank space.  Avoid being cluttered. I’m still working on my food styling. :)

Take a step back from your object and style your frame aesthetically.  A few sprinkles here, a few granola pieces there.  Natural crumbs on the plate – nothing forced.  A spoon, a patterned linen – all of these create dimension and a sense of place.  Try to always use the rule of thirds.
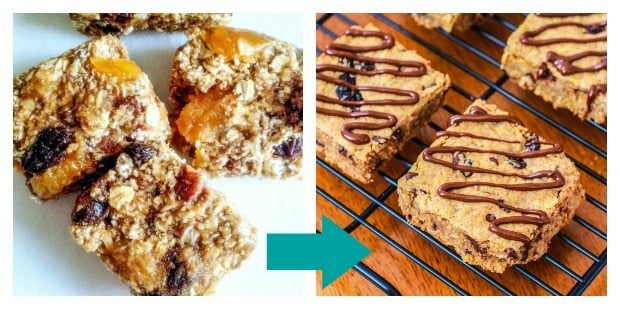
 

2. Formatting. The two photos above of my Cake Batter Blondies and Oatmeal Raisin Cookie Granola – notice how they have a warm, yellow look to them?  I took these photos in the summer, which is a large part to do with the warm yellowish lighting.  But I also took these photos in JPEG format before I began to shoot in RAW format.  These are the two main image formats cameras shoot in: JPEG and RAW.  When you shoot in JPEG, your camera automatically adjusts the photo and removes some of the color data, sharpness, and resolution.  This loss of information means that the photo can be saved in a smaller format on your memory card.  JPEG is a lower quality photo and gives you less control in post production (editing).

I switched to shooting in RAW format in November 2012 after speaking with friends (thank you Megan and Erin!) and bloggers (thank you Averie!).

I love shooting in RAW. RAW photos are VERY large files because they retain all of the data from plate to camera to computer.  Get ready to use up a ton of space (or all) on your memory card. For me, RAW photos take a lot longer to edit but it is well worth the extra time spent because the images are clear as ever and no color data or resolution was compressed.  Using Lightroom 4, I am able to upload the photos in JPEG format to use on my blog. I do not have any other experience switching RAW to JPEG.


3. Angles. Most of my photos are taken at three-quarters view.  This means they are slightly above eye level, but not overhead.  I throw more of the food into the background when shooting in this view – I do not need to worry about my couch, my window, or a chair being in the background. This angle is perfect for me because my apartment is so small and I have limited space.

Easy Homemade Funfetti Cupcakes with Vanilla Buttercream-8

{Shot at three-quarters view at 2pm in December, RAW format, manual mode, tripod, ISO 100, f/4.5, shutter speed 1/1.4 s}

However, I do like to mix it up in a photoshoot to give each post a little pizazz.  The photos in my posts are mostly three-quarters, with a few eye level and overhead shots thrown in.

I prefer taking vertical shots opposed to horizontal shots.  Practice both ways and see which you are most comfortable with. I like vertical shots for a couple of reasons:  (1) Vertical photos are larger on my website – again, I like big and bold photos. (2) Vertical photos are larger on Pinterest, which grabs the attention of users. (3) Vertical photos are much easier to crop down if needed – sometimes my shots aren’t perfectly framed or appear lopsided when I upload them to my computer.  I swear, my floors are crooked. :)   Cropping down a vertical shot is much easier than horizontal because you have more photo to work with.  This is perfect for submitting to food photo sites like FoodGawker and Tastespotting, since images must be cropped down for submission. (4) Vertical photos allow you to create movement easily in your frame, which works better for my favorite way of shooting – three-quarters view.

Easy Homemade Funfetti Cupcakes with Vanilla Buttercream-7

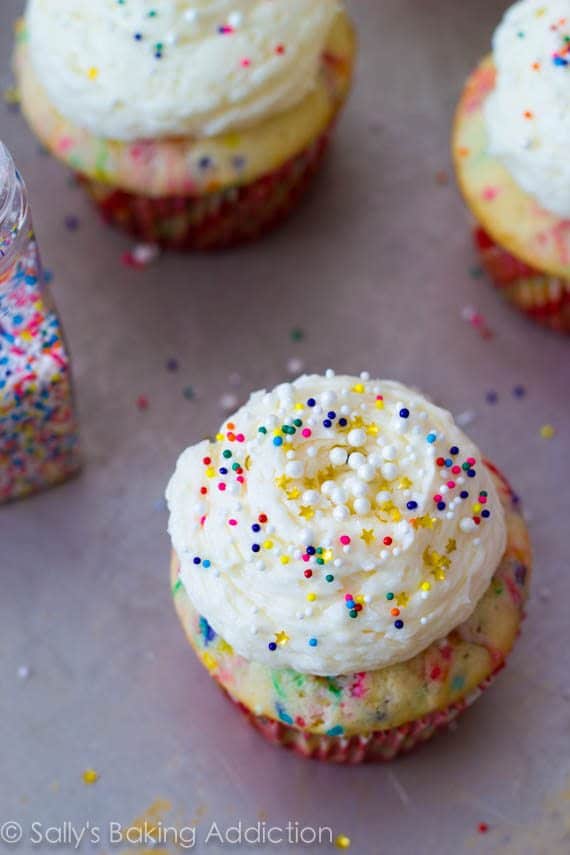
{Shot overhead, looking down on the subject at 2pm in December, RAW format, manual mode, tripod, ISO 100, f/4.5, shutter speed 1/1.4 s}

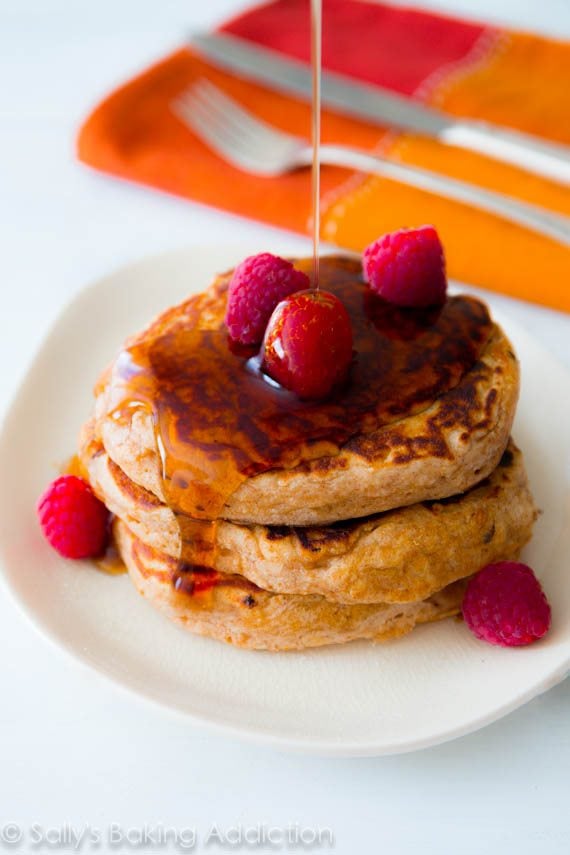
4. Action shots. Actions shots are fun and well, only possible if you have a friend to help you or a tripod. It kind of makes the reader feel like he/she is right there with you.  It makes for a very interesting photo.
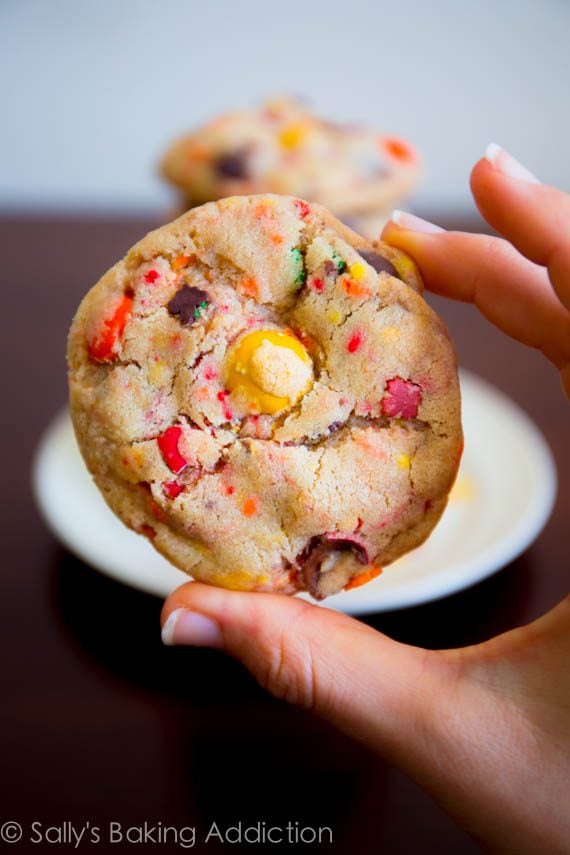
 I’ve done action shots with some recent posts:

Raspberry Swirl Sweet Rolls-16

{Raspberry Swirl Sweet Rolls. ISO 100, RAW, f/4.0, shutter speed 1/13}

5. Props! Also making for an interesting shot are your props and accessories. The fun little extras make food styling so much fun.

Pretty dishes, colorful textiles, or vintage silverware.  Distressed wood pieces, white plates and bowls, or granite counter tops.  I have an extensive and growing collection of unique dishware that I find at Goodwill (or fancy stuff I splurge on at Anthropology!).

Food can also be a prop in your photo.  What is in your recipe? Chocolate chips? Herbs? Lemon? Peanut Butter?  Add some extras to your frame for very little cost by using relevant food.  But make sure that the finished product is always the star.

You can even use your hands.  To me, the photo below is more interesting than simply showing you the apple with dip on top.

Cinnamon Cheesecake Toffee Dip

{Cinnamon Toffee Cheesecake Dip. ISO 100, JPEG format, f/3.2, shutter speed 1/8. I think this photo is too bright and lacks clarity.}


There are so many other topics to touch on in terms of food photography.  I could go on and on, but my fingers are about to fall off and I’m sure I’ve lost you by this point.  I hope this leaves you with a few extra pieces of knowledge in the food photography world.  Food photography can be a lot more fun and a lot less scary if you just keep practicing.  I still have so much to learn and improve; it’s a journey.

I’m going to direct you to a few resources that are extremely helpful.  Also, a list of products that I use.

Highly Recommended


Helpful Food Photography Resources


 Questions? Comments? Tips? Again, I am no professional and I am still learning, so I will answer as best as I can.


{ 175 comments… read them below or add one }

Avery @ Southern Belle Living Well January 21, 2013 at 7:27 pm

I don’t have access to some of the tips mentioned, but a few certainly apply to me! I need to work on using more light, thats for sure. Thanks girl!

Reply

Sally January 21, 2013 at 9:29 pm

Hey Avery! It’s just a reflective post of things I’ve learned with my DSLR camera, I knew it wouldn’t apply to all bloggers. :) Light is key, yes!

Reply

Meg @ Sweet Twist January 21, 2013 at 7:28 pm

Lots of great advice. I love my 50 mm and almost never take it off.

I think of my favorite things is buying dishes and props for photos…. I have a lot of cake stands and pedestals…
Meg @ Sweet Twist recently posted..Pecan Cherry Butter Tarts and a Giveaway!My Profile

Reply

Sally January 21, 2013 at 9:30 pm

i adore my lens! I love buying new dishware as well – I just bought 4 new bowls yesterday. It’s so fun to accessorize! Thanks Meg.

Reply

Jennifer @ Peanut Butter and Peppers January 21, 2013 at 7:39 pm

Great post! I’m keeping this one! I need so much help! I’m horrible, I take photos on automatic because I have such a hard time with manual. I have to practice more. Thank you again for this!!
Jennifer @ Peanut Butter and Peppers recently posted..Birthday Cake Cashew ButterMy Profile

Reply

Sally January 21, 2013 at 9:32 pm

Practice makes perfect. and I’m still practicing every day. :) You can do it Jennifer – make the switch to Manual. You’ll never look back after you get the hang of it.

Reply

Averie @ Averie Cooks January 21, 2013 at 7:43 pm

Can’t even imagine how long this took you to write – Sally – wow!! So comprehensive and thorough and yes, Ive always said, it doesnt matter how amazing the recipe tastes, but if the photography isn’t good and doesn’t sell it, the recipe dies forever. I even have recent recipes that for whatever reason, the photo shoot just didnt go well no matter what and I posted them anyway, and those recipes never take off. No matter how good they were – in fact, better than just ‘average’ recipes that randomly had great photo shoots. It’s all about the photography!

I have enjoyed watching your transformation, post by post. And to see how far you’ve come! You have done it the right way; and when you do go to upgrade to bigger and better equipment one day as your journey continues, you will truly appreciate it and be able to use it for all it can do. Rather than just buying something from the get-go and thinking that will give you the images you want. No, hard work and practice is the only thing for that :)
Averie @ Averie Cooks recently posted..Chewy Sugar Sprinkles CookiesMy Profile

Reply

Sally January 21, 2013 at 9:35 pm

thank you for everything Averie! I was thinking that last week too. I ate a bowl of this amazing clam chowder at work and thought about how it would look in camera – murky with gray-looking clams. Ok that sounds gross, but it really was good. Even though it’s incredible, if you can’t shoot it looking glamorous, it just won’t take off and be as popular as others. I can’t wait to upgrade my lens!

Reply

Madison January 21, 2013 at 7:56 pm

Thank you for these tips, Sally. I just started my blog and these are truly going to help me out!!! I cannot thank you enough.
Madison recently posted..Monday FundayMy Profile

Reply

angela @ anotherbiteplease January 21, 2013 at 7:56 pm

sally this is such an informative post…all the details and TIPS are so much appreciated…I will say I love blogs with pretty pictures – when you just want to grab the food right off the screen…i hope with these tips I will get better and better…but I do do most my photos at night with what I made for dinner so I should look into the artifical lighning…it would be a set in the right direction :-)
angela @ anotherbiteplease recently posted..{meatfree monday} spinach artichoke grilled cheeseMy Profile

Reply

Sally January 21, 2013 at 9:36 pm

thanks Angela! I still have a ton to learn, but I’m glad this is helpful for you!

Reply

Karly January 21, 2013 at 8:04 pm

I think this is SO interesting. You shoot COMPLETELY different from me, but we both manage to produce well exposed, bright shots. (I mean, I hope I do? ;) ) Very fun to read how you shoot! And, wow, girl! So comprehensie. How long did this take you to write?!
Karly recently posted..Carnitas PizzaMy Profile

Reply

Sally January 21, 2013 at 9:38 pm

oh gosh Karly. YOU’RE the professional photographer and we shoot so differently lol. I still have so much to learn. But yes, I think it’s fascinating that all of my favorite food/photography blogs have such different styles. I admire yours so much! Ohhhh and this post? 21 working hours to write over about 3 or 4 weeks and I could’ve gone into more detail on some things. I was glad to press publish today. :)

Reply

Ikhlas January 21, 2013 at 8:06 pm

Wow, lots of helpful information here, Sally! I found the photography terminology a bit hard to follow, since I don’t have a DSLR, but the section about lighting, props, angles, etc. was very useful! I’m eager to put some of these tips into practice with my own food photography soon :)

This post definitely makes me appreciate all the work it takes to produce such beautiful pictures! They look so effortless, but now I can appreciate all the hard work and preparation that goes into it. Thanks for sharing!
Ikhlas recently posted..Recipe: Hot CocoaMy Profile

Reply

Sally January 21, 2013 at 9:39 pm

I am so glad you found the other items informative and helpful Ikhlas! Photography is the hardest part for me – not baking like most would imagine, but getting the photos just right.

Reply

Liz (Little Bitty Bakes) January 21, 2013 at 8:09 pm

Sally, I need posts like this to wake me up — I’m the worst DSLR camera user out there, I’m pretty sure! I always keep my camera set to ‘auto’ and just let it do what it does. Time to play around with my apertures, etc. :)
Liz (Little Bitty Bakes) recently posted..Vanilla Greek Yogurt Cupcakes and FrostingMy Profile

Reply

Sally January 21, 2013 at 9:40 pm

switch to manual Liz, I know you can do it! It’s challenging for sure but I know you can handle it. You’re a smart cookie!

Reply

Cassie | Bake Your Day January 21, 2013 at 8:10 pm

Sally, I can’t imagine the time that it took for you to put this post together. You have come such a long way in such a short period of time and you are a gem for passing the knowledge forward. For me, too, photography is a never-ending learning process…I feel like I get better with each shot and am always learning from others. Great post!
Cassie | Bake Your Day recently posted..Cheeseburger MeatballsMy Profile

Reply

Sally January 21, 2013 at 9:41 pm

Oh Cassie thank you so much! It took me weeks to draft this post – I wanted it to be informative but not come off as a know-it-all because I am FAR from it. I learn with every single photoshoot as well. In fact, I have photos I took only a few weeks ago that haven’t been on my blog yet and I am cringing! It’s such a journey! I’m glad you’re with me on that.

Reply

Hayley @ The Domestic Rebel January 21, 2013 at 8:18 pm

Oh my. Sally, your photos are what I hope mine will look like one day! They’re so crisp and clear and bright–I love them! You’re so spot-on about natural light: nothing beats it and I just could never use flash for my food pictures. I need one of those tilting tripods ASAP .. and to use some of these tips tomorrow when I’m on my shoot ;)
Hayley @ The Domestic Rebel recently posted..Lofthouse Sugar Cookie Stuffed BrowniesMy Profile

Reply

Eva @ Eva Bakes January 21, 2013 at 8:18 pm

Thank you for the wonderful tips! Food photography will always be a journey for me, but tips like these will only help me get better quicker.

Reply

June g. January 21, 2013 at 8:32 pm

Another fabulous post! I really do not know anything about my camera *sigh*…Did you take any classes or just self taught? I think a tripod may be in my future;)

Reply

Sally January 21, 2013 at 9:42 pm

Hi June! I mentioned a few times that I have not had any formal training. Just research and practice. :) I love my Sunpak tripod – it’s so convenient!

Reply

June g. January 21, 2013 at 10:23 pm

Haha, sorry, I didn’t mean professionally;) thanks for the tips and I’ll check out the tasty food photography:) practice makes perfect!

Reply

Sally January 22, 2013 at 5:57 am

I hear ya! Practice does make perfect you are right! Thanks June, you will love Tasty Food Photography.

Reply

Georgie Morley January 21, 2013 at 8:36 pm

This is such an excellent and clearly written comprehensive tutorial! I am just starting to get into DSLR photography and I love it. I know the basics but it’s great to have them explained in such a clear useful way and you also have great tips about composition.

I love your blog! You have such a great style of writing and obviously your treats are some of my favorite to recreate.

XxGeorgie
Georgie Morley recently posted..High buns & high hopes @instafran6 #speakeasyMy Profile

Reply

Sally January 21, 2013 at 9:44 pm

Thanks Georgie! I’m glad you love the treats. I wanted to go more into composition but the post is so long already. Maybe a future post! :)

Reply

Elizabeth @ Confessions of a Baking Queen January 22, 2013 at 12:03 am

Yes go into composition…in your spare time ;) Pretty please!!
Elizabeth @ Confessions of a Baking Queen recently posted..Brown Butter Chocolate Chip CookiesMy Profile

Reply

Sally January 22, 2013 at 6:16 am

I will try, Elizabeth – this post took me several weeks! Maybe down the road this year. Depending on how much other data you have on your macbook (i use a macbook at times too), using RAW shouldn’t be a problem – however once you convert them to JPEG, you may delete the RAW version. I do not have any other experience with converting besides in Lightroom though.

Reply

Reeni January 21, 2013 at 8:54 pm

What a great post Sally! This makes me realize I need to learn how to work my camera! It’s out of pure laziness that I haven’t. I have a Rebel T1i and really don’t know what I’m doing. I love that you shoot in RAW! That scares me to death. Your pictures are so gorgeous Sally! Thanks for sharing all your knowledge with us. You rock! I will definitely come back and reference this and check out your links when I have more time.
Reeni recently posted..Chocolate Peanut Butter Magic in the MiddlesMy Profile

Reply

Sally January 21, 2013 at 9:45 pm

RAW is not scary Reeni!! Not at all. It just takes a bit longer to edit. I know you could easily begin shooting in RAW format, no problem. I’m glad you will come back and find this to be a helpful resource. I know I will too. It’s hard to remember everything!

Reply

Erin @ Dinners, Dishes and Desserts January 21, 2013 at 9:22 pm

Can’t even imagine how long it took you to write this! Great job. You have come so far in such a short amount of time. Photography is a never ending journey!
Erin @ Dinners, Dishes and Desserts recently posted..Crispy Baked Shrimp #WeekdaySupperMy Profile

Reply

Sally January 21, 2013 at 9:47 pm

Thanks so much Erin! I have always admired your food styling. :) I agree, there is always something new to learn!

Reply

Natasha @ The Cake Merchant January 21, 2013 at 9:35 pm

So much great info in this post, Sally! Your photos are always beautiful. I also noticed a big improvement after purchasing Tasty Food Photography.
Natasha @ The Cake Merchant recently posted..Vegan Whole Wheat Chocolate Chunk Raspberry Drop SconesMy Profile

Reply

Nancy P. January 21, 2013 at 9:36 pm

Thanks so much for this very informational and detailed post. This will be very helpful!

Reply

Sally January 21, 2013 at 9:50 pm

I’m glad, Nancy! Thank you so much!

Reply

Ashley @ Kitchen Meets Girl January 21, 2013 at 9:45 pm

What a fabulous post, Sally! I still have SO much to learn with my DSLR. I’m so scared to shoot in full manual mode, which is why I leave it on AV mode most of the time. I know I’ll get better shots if I make the switch, but I’ve been dragging my heels. I bought Lindsay’s Tasty Food Photography ebook a few weeks ago–hopefully between that and your awesome post, I’ll be on my way. :-)

Thanks so much for sharing all of this wonderful information! Seriously, posts like this are a huge help to people like me (read: the camera illiterate).
Ashley @ Kitchen Meets Girl recently posted..Quick Cinnamon BunsMy Profile

Reply

Sally January 21, 2013 at 9:50 pm

Baby steps Ashley! It took me a couple months to switch from one thing to another. You can handle Manual mode, I promise. I love Lindsay’s eBook SO much. It’s my little secret weapon. So much helpful information in there. :)

Reply

Liz January 21, 2013 at 9:51 pm

Great post Sally! I still have a point & shoot and I have always used it in manual mode but it’s still not as good as a DSLR. I am learning a lot with this camera and it will definitely help me when I do purchase my first DSLR. Thanks for the awesome tips! :)
Liz recently posted..Shortbread Rocky Road BarsMy Profile

Reply

Sally January 22, 2013 at 5:55 am

P&S are amazing cameras. I just had no luck with them and wish I had more pointers about them! Thank you Liz!!

Reply

Teresa Young January 21, 2013 at 9:55 pm

Thank you so much for posting this! I’m going to pin it for future reference for when I get my DSLR, but I think that some of these tips can apply to anyone with any camera! Thank you, Sally! Keep up the awesome-ness that is this blog!! (:
Teresa Young recently posted..Adventures in Driving Manual & Other RamblingsMy Profile

Reply

Sally January 22, 2013 at 5:55 am

I agree – I tried to make the last set of things to keep in mind universal. But other than that, I just have personal experience with a DSLR. I’m glad this can be helpful Teresa!

Reply

Dorothy @ Crazy for Crust January 21, 2013 at 10:02 pm

I’ve always been afraid of RAW but I want to try it. Also, thank you for the ISO and the brown discussion. I have so much trouble with that! Now I can adjust if necessary. Also, I need to get on M instead of A. :)
Dorothy @ Crazy for Crust recently posted..White Chocolate Macadamia Magic PizzaMy Profile

Reply

Sally January 22, 2013 at 5:57 am

Yes monotone food is very hard to shoot in poor lighting and on a low ISO. But yes, I would give M and RAW a try Dorothy, you’ll be amazed at the difference! It’s such a journey and I’m working on learning more about food styling. Photography is hard – the hardest part for me – but I also think it is the most fun. :)

Reply

Luv What You Do January 21, 2013 at 10:03 pm

Your photos are always beautiful! This explains why. I love how much effort you put into making your foods so colorful. And that camera…is a dream!

Reply

Lindsay@Life, Love and Sugar January 21, 2013 at 10:35 pm

Such a great post! This is definitely something I’m always working on. Need to build up my props collection! I understand aperture and shutter speed (took 1 photography class in college), but I need to have a nice camera like yours to control those things. One of these days I’ll have the money! :) Thanks for the tips!
Lindsay@Life, Love and Sugar recently posted..Valentine’s Day Strawberries and Cream Puppy ChowMy Profile

Reply

Sally January 22, 2013 at 6:01 am

Thanks Lindsay! It takes awhile to save up for one but it is very worth it. I wish I had more experience with point & shoot cameras to give sound advice, but I don’t. I’m glad this could be helpful though!

Reply

Jenn January 21, 2013 at 10:37 pm

Sally, seriously, you might just be the most amazing person ever! It is obvious that you care a lot about your readers and fellow bloggers and want them to succeed. This is the most helpful food photography post I have ever read. For real. It is actually in “English” and I understood everything you were saying. I now feel like I can remember what I just read thanks to all of your examples. Thank you so much for sharing all of your hard work and research with us. Just one question. How do you keep track of what settings you used on each picture? Do you write them down? Or is that what you mean when you say RAW files retain all the data?

Reply

Sally January 22, 2013 at 6:03 am

Thanks Jenn – that means a lot to me. This post took awhile to write but I do find the subject SO interesting and I remember being desperate to learn every possible detail I could last year. I’m glad I could break it down and make it simple for readers – b/c truthfully, i t is simple once you understand a few basic features. Whether JPEG or RAW, the memory card will hold onto the camera settings data – when I pull it up in lightroom I can see on the sidebar the aperture, shutter speed, ISO etc. I don’t write it all down. That would waste a lot of paper!

Reply

Lisa January 21, 2013 at 10:42 pm

There is SO MUCH good information here Sally. Thank you. Pinning this so I can come back to it again and again and again. And I’m not sure if you intended it to read this, but thank you for making this seem doable. There are so many amazing bloggers out there who take amazing photos, and you make it seem like it really is possible for your photography skills to improve. Thanks!
Lisa recently posted..Obsessed with Fonts {Part 1}My Profile

Reply

Sally January 22, 2013 at 6:04 am

Hi Lisa! I’m glad this can be helpful. It IS possible for photography to improve drastically as long as you are familiar with a few features. I’m still learning too! It’s a journey and practice makes perfect.

Reply

michelle January 21, 2013 at 10:49 pm

this is great! Sadly i dont have a fancy camera (some day!) but its good to know for the future plus i need to work on my styling and editing and be more patient to work with better lighting!
michelle recently posted..Jumping on the tofu trainMy Profile

Reply

Sally January 22, 2013 at 6:06 am

Hi Michelle! Yes, lighting is everything. Photography is light. Light in a picture. I find lighting to be the most daunting b/c my photoshoots depend on the sun, but truthfully lighting is the most crucial part to photoshoots if you are looking to improve your photography. DSLRs do take some time to save up for – I wish I had more advice and experience with point and shoots, but I don’t! Glad this can be helpful though in some aspect. Thanks Michelle!

Reply

Ari @ Ari's Menu January 21, 2013 at 11:43 pm

Sally, you should have been a teacher! Usually a few paragraphs into photography posts, my brain starts to blur. I’ve been learning from my super talented husband, and I finally can fly solo now, but sometimes I still need him to save me, haha. But when you talk about the technical aspects, it just flows, and it makes sense to me in a way that no other post has been able to do! Photography is definitely the toughest part for me too, and some days the stars align, and I’m so happy with the way things look, and then some days I just can’t seem to find the magic. I’ve always thought your photography was beautiful and drool-worthy. The colors always look so bright and vibrant! Great post–thank you soso much for all the great info! :)
Ari @ Ari’s Menu recently posted..Peanut Butter Chip Brownie CookiesMy Profile

Reply

Sally January 22, 2013 at 6:08 am

Kevin helped me a TON in the beginning because he has a lot of photography experience but once I was on my own during the day to shoot – I really had to become familiar and KNOW my camera. It’s so hard in the beginning for sure but once you get the hang of a few basic features, you will be golden. Shooting in Manual mode has been a life changer. Thank you for your support Ari and I love your photos – I see them on foodgawker all the time. you go girl. :)

Reply

Elizabeth @ Confessions of a Baking Queen January 21, 2013 at 11:51 pm

Once again you have created a FABULOUS post. Seriously I thank you for the time and effort into these blog posts. They are so full of information and an easy read.

I purchased the canon rebel eos t4i and the canon ef 50mm f/1.8 II lens both in December and am just playing around a lot with them. I find I have trouble with lighting- the other day I was shooting and I thought does my kitchen really have this horrible lighting? Definitely going to try out some of this information tomorrow I made an oat flour banana bread tonight for the first time! I was told by a friend who is a professional photographer to always stick to an iso of 100 but that’s about all I know for now anyways! ;) Thanks for ALL the info :)
Elizabeth @ Confessions of a Baking Queen recently posted..Brown Butter Chocolate Chip CookiesMy Profile

Reply

Elizabeth @ Confessions of a Baking Queen January 22, 2013 at 12:05 am

Forgot to ask I have never shot in RAW and I think I will tomorrow but you say the files are much larger. I do everything on my mac book- I wonder if it’s too much for a laptop? Any thoughts? Please and thank you :)
Elizabeth @ Confessions of a Baking Queen recently posted..Brown Butter Chocolate Chip CookiesMy Profile

Reply

Denise January 22, 2013 at 12:20 am

I am going to get myself a tripod ASAP. It is sooo dark here (the sun sets at 4:30 these days), so I have to pretty much photograph everything on week-nights with artificial lights. They are no match to natural light though :( I am going to try out some of your tips next shoot!
Denise recently posted..Meal-Sized Moroccan SaladMy Profile

Reply

Sally January 22, 2013 at 6:17 am

Hi Denise! Yes I suggest a tripod! It saved my photos and my life! :)

Reply

Regina @ SpecialtyCakeCreations January 22, 2013 at 1:52 am

Wonderful post, Sally!
I am always eager to read and learn from other’s learning experiences. For the time being I have to work with a point&shoot camera but even with that one there is soo much room for improvement.
I agree, Lindsay’s (Pinch of Yum) ebook is awesome. It made me learn to use the manual settings on my point&shoot, and all the important stuff about lighting, styling etc. Still soo much to learn though :)
But this hat makes life interesting. Life-long learning keeps us young ;)
Regina @ SpecialtyCakeCreations recently posted..Mandarin-Orange Cranberry MuffinsMy Profile

Reply

Sally January 22, 2013 at 8:45 am

Hi Regina! I wish I had more experience with a Point & Shoot for my readers, but I switched to a DSLR from my iPhone. I love Tasty Food Photography, amazing resource. Thanks so much for appreciating this post and I’m glad it can be helpful!

Reply

Erin @ Texanerin Baking January 22, 2013 at 3:43 am

Manual mode? Aww. I’m so content with aperture priority mode. :( I know I need to try it at some point but it sounds so… I don’t know. Not as cozy as AV mode!

And I can’t believe the difference in your photos from half a year ago. That is CRAZY. Good job! :)

And you’re the second person in a week to tell me to shoot in RAW mode. For this I have no excuse, other than having only 600 MB free on my computer. I’m going to get started on deleting junk so I can give that a try!

Thanks for all your hard work on this post! We all appreciate it! :)
Erin @ Texanerin Baking recently posted..Homemade Hamburger Helper Cheeseburger MacaroniMy Profile

Reply

Sally January 22, 2013 at 6:18 am

Erin, you can totally do it – Manual mode is a little hump to get over but once you do – you will be SO SO happy. I highly suggest RAW and M mode, Erin. The photo quality of the two combined is wonderful. I loved shooting in AV mode and did so for a month, but M mode gives you so much more room to experiment. PS: I love your photos!!

Reply

Erin @ Texanerin Baking February 1, 2013 at 7:32 am

Aww, thanks. I don’t really love them but I’m happy you do. :)

And I still haven’t had any photoshoots since this post. But I’ll give M and RAW a try when I do!
Erin @ Texanerin Baking recently posted..Whole Wheat Stuffed Cheese BunsMy Profile

Reply

Joy @ Baking-Joy January 22, 2013 at 5:27 am

This such great information Sally, thank you! I know it sounds silly, but I almost always totally forget that I can shoot portrait :-) I currently use aperture priority mode mostly, but am going to be brave and switch to manual :-) I totally agree about the lighting, my house is very dark with small windows, so I’m going to get my tripod out more and use a slower shutter and look at the difference it makes!
Joy @ Baking-Joy recently posted..Blueberry jamMy Profile

Reply

Sally January 22, 2013 at 6:19 am

I loved shooting in AV mode before I switched to Manual Joy – it’s a great mode but M mode gives you so much more room to experiment! I would bust out your tripod when you can – it has been my saving grace!

Reply

Lindsay @ Pinch of Yum January 22, 2013 at 6:17 am

Hey Sally! You rock. That’s all. Keep doing what you do!
Lindsay @ Pinch of Yum recently posted..Healthy Sweet and Sour FishMy Profile

Reply

Sally January 22, 2013 at 6:20 am

YOU rock Lindsay. I really, really appreciate you stopping by. :)

Reply

Annie @ Annie's Noms January 22, 2013 at 6:25 am

Thank you so much for this post! I’m still trying to figure out photography, I’m trying to put a lot more time and effort into it as I know that I click on pictures which look fabulous. I’m so envious of your photographs, they are absolutely beautiful so thank you for giving us your advice. I’ve got the kit, I just need to learn how to use it properly! I also have a very dark house, I’m constantly fighting with the light and often have to use an external flash and then edit the white balance on Lightroom as it’s just ridiculous gloomy in my house! I know I still have a long way to go, but I think my photographs have improved since I first started my blog, I used to use my phone with no editing and now I use my DSLR. I also need to learn to be more creative! The sprinkles around a cookie or granola around the bowl is such a good idea, simple, but effective :) I hope I can one day have photos as good as yours! :)

Reply

Sally January 22, 2013 at 8:37 am

Hi Annie! I am jsut like you. I went from iPhone to DSLR. I didn’t know the first thing about my DSLR when I got it. I just knew it was the right choice for me for where I wanted to go with my photographs. You are going in the right direction though! Lightroom is my savior. It puts the life back into my photos. The kit lens is wonderful and in time you can get a new, more precise lens that works well for food photography. Have you considered a tripod to use in natural light? I could not take a majority of my photos without it in my dull apartment – I have no direct sunlight at all. It just takes practice! LOTS of practice and research. It’s a journey!

Reply

Annie @ Annie's Noms January 22, 2013 at 11:20 am

A tripod is the only thing I don’t have, would you say it really makes that much difference? I may ask for one for my birthday! I have a variety of lenses as my boyfriend had them all already, so I’m lucky in the sense I don’t have to buy them! I didn’t really understand aperture and shutter speed as whenever I ask my boyfriend he doesn’t explain it very well, but I understand it much better having read your post! I’ve bought a book on food photography as well so will be sitting down to read that soon, just have to find time to practice more! :)
Annie @ Annie’s Noms recently posted..Apple PieMy Profile

Reply

Sally January 22, 2013 at 12:07 pm

Hi Annie! With my dark lit atmosphere and small frame of time to shoot, a tripod is necessary for me. My hands are also shaky, so that is why the $51 tripod has saved my photos. I highly suggest the one I linked above. It’s very easy to use and has made my photography life SO much easier. I’m glad this was helpful for you!!

Reply

Colleen @ What's Baking in the Barbershop?! January 22, 2013 at 7:10 am

You are amazing to put all of this “onto paper” for others, Sally! My dream some day is to have a DSLR… Someday. For now, I will just drool at your gorgeous photos. ;)
Colleen @ What’s Baking in the Barbershop?! recently posted..Butterfly Cupcakes: Banana Chocolate Chip Cupcakes with Cream Cheese FrostingMy Profile

Reply

Sally January 22, 2013 at 8:38 am

Thanks Colleen!

Reply

megan @ whatmegansmaking January 22, 2013 at 7:21 am

GREAT!! Seriously, love this post Sally. I do not push myself nearly enough in food photography. I love seeing what other people use, especially for aperture – is that strange? I need to get out my tripod again – I’ve gotten lazy :/ Also – you’ve almost convinced me to invest in lightroom – I keep putting it off! I currently edit using picasa haha
megan @ whatmegansmaking recently posted..Extraordinary Grilled CheeseMy Profile

Reply

Sally January 22, 2013 at 8:39 am

Megan I can’t believe that you only use Picasa for your beautiful photos! wow! Lightroom is worth its weight in gold Megan. Seriously. It is SO SO SO user friendly (ha! I didn’t even read the manual – I just threw myself in!) and it will pay for itself over time.

Reply

Caley January 22, 2013 at 7:46 am

Awesome post! I’m sure it will help a lot of bloggers and general photography enthusiasts. I always think your pictures are great, and it’s amazing to me how much work you put into them. :D

Reply

Dana F January 22, 2013 at 9:10 am

I don’t have a food blog or a DSLR, and neither is likely to happen in the near future, but this was very interesting to read. Thanks for all the work you put into this post!

Reply

Sally January 22, 2013 at 9:34 am

Thanks Dana! I appreciate that you read it even though it doesn’t pertain to you.

Reply

Krista January 22, 2013 at 9:13 am

Sally! I cannot thank you enough for writing this post. I just purchased a Nikon D3100 and have been so lost as where to even start. I have always wanted to start my own food blog, but didn’t want to post poor pictures. As a long time food blog reader, I too value the importance of good, crisp photos. I am so excited to try out some of your tips and start producing yummy pictures. Thanks again!!

Reply

Sally January 22, 2013 at 9:35 am

I am SO glad to hear that Krista! It sounds like you have enough determination to get started. Let me know if I can help. Good luck!

Reply

Ali | Gimme Some Oven January 22, 2013 at 9:37 am

Amazing, Sally! Totally bookmarking this to send to people with photography questions.

Your photography is so beautiful!
Ali | Gimme Some Oven recently posted..skinny buffalo chicken dipMy Profile

Reply

Sally January 22, 2013 at 10:46 am

That means a lot to me coming from you Ali, thank you so much.

Reply

Laura Dembowski January 22, 2013 at 11:32 am

I am still trying to improve my photography – but I’m getting there! I also have found a tripod to be my saving grace. I had no idea such a small adjustment would make such a huge difference. I have to take pictures using artificial light. I am set up in my dining room where the light has a dimmer. If I dim it a little and then use photoshop to remove the color cast, I am amazed at the results. I can’t even tell the difference between sunlight and artificial light. And sometimes neither can Foodgawker! Your pics are really great, Sally! I wish I had a professional photographer friend to help me raise my game more.
Laura Dembowski recently posted..Honeybell CupcakesMy Profile

Reply

Sally January 22, 2013 at 12:08 pm

Thanks Laura! Shooting in artificial light would give me a world of options as I am only limited to shooting on saturday and sunday afternoons with my full time office job. Something I need to look into at some point. Congrats on the foodgawker features! I am always so excited when my photos are on there. :)

Reply

Meagan @ Scarletta Bakes January 22, 2013 at 11:50 am

What a thoughtful, thoughtful post, Sally! You really cover all the bases and do so exceptionally well. Thank you so much for such a wonderful tutorial!
Meagan @ Scarletta Bakes recently posted..Pomegranate Crumble BarsMy Profile

Reply

Haley January 22, 2013 at 12:11 pm

Hi Sally, thanks for the tips. My site is all up and running. Let me know what you think! :)
Haley recently posted..Seven-Layer BarsMy Profile

Reply

Herbivore Triathlete January 22, 2013 at 12:38 pm

Extremely comprehensive post Sally! I think you covered everything, lol. I’m comfortable with the ‘exposure triangle’ and shoot in mostly manual mode. Where I get stuck is the composition and food styling. Plus, I never take enough photos. I take like 20-30 and that’s it. I really need to practice the styling and taking MORE photos.

I agree with the Tasty Food photography ebook recommendation. I bought it and have read it numerous times, very helpful!

I appreciate you linking the lens too, I never realized it was so inexpensive! It’s my birthday tomorrow, so, a gift to myself perhaps? :)

Thanks again for the post, very helpful indeed.
Herbivore Triathlete recently posted..Polar Bear Series~10KMy Profile

Reply

Sally January 22, 2013 at 1:19 pm

HAPPY EARLY BIRTHDAY!!!! :) I always take a TON of photos for every shoot. You need to buy that lens! It’s so affordable for its performance! amazing clear shots!

Reply

Herbivore Triathlete January 22, 2013 at 5:01 pm

I really think I’m going to buy the lens, it seems so many bloggers use it and have great results. I am still shocked at the price!

I think/know one of the reasons I don’t take as many photos as I should is because I then get overwhelmed with the sheer volume. How do you choose which ones you are going to use? Then the post-processing, I always over think it and then feel like I over process the photo.

How much time would you say you spend on just the photo shoot–>post processing?
Herbivore Triathlete recently posted..Polar Bear Series~10KMy Profile

Reply

Sally January 22, 2013 at 8:17 pm

This lens is amazing. I love it so much for its price vs functionality. Can’t be beat. I get overwhelmed by my selection, for sure. I just look at the food blogs andfood photos I admire and choose the ones from my collection that stand out to me the most, without making every photo in the post look the same. I’m working hard on mixing things up in each photoshoot. Photoshoots are about 1-2 hours. Then, I upload them to my computer and if a few crucial scenes/set-ups didn’t work out, I go back and shoot again. I’m a perfectionist. Editing photos for 1 post takes 1-2 hours more. I spread it out ver a few days. I edit some, come back to it and redo something, brighten another thing. Again, I’m a perfectionist and quite meticulous. so up to 4 hours for some recipe posts, just on the photography.

Reply

Herbivore Triathlete January 23, 2013 at 10:55 am

Thanks Sally. I appreciate all your insight.
Herbivore Triathlete recently posted..Homemade Veggie WashMy Profile

Julianne @ Beyond Frosting January 22, 2013 at 1:37 pm

Hi Sally, thank you SO much for sharing your tips. The first time I came across your blog a couple months ago, I have been hooked ever since! It is hard to believe you have only been doing this for a year, and as a relatively new blogger, I can only hope to achieve what you have by the time October comes around! I also wanted to tell you that I received a lighting kit for Christmas this year, it is the Imagemaker plus. It comes with a pop up light box, and two lights. I also got a larger pop up light tent for shooting wider shots. I have been pretty happy with it so far, and it has reduced my stress level for shooting in the day light hours! Here is a link to the specs! Keep up the awesome work!

http://www.smithvictor.com/products/detail.asp?prodid=406&id=48&pid=37&s1=Light+Tents+%26amp%3B+Kits&s2=Light+Tent+Kits&nm=IMAGEMAKER%99+LIGHT+TENT+KIT
Julianne @ Beyond Frosting recently posted..Ghirardelli Chocolate and Strawberries CupcakesMy Profile

Reply

Sally January 22, 2013 at 4:06 pm

Hi Julianne! I have to look into that lighting kit, thank you! It’s terrible being at the mercy of sunlight only two days of the week. I’m so glad to have you as a reader, I really appreciate all of your kind words and this lighting suggestion!

Reply

Nicole January 22, 2013 at 1:52 pm

nice post, few things to mention:
“The photo on the right is shot at f/7.0. For this overhead shot, I wanted most of the cookies in focus. I probably could have increased the aperture more, but I’m pleased with how it turned out.” – they are all on the same plane since you shot overhead, so the increased aperture doesn’t really matter here. You could have shot at f/3.5 and they would have all been in focus.

100 ISO is usually too low for inside shots. The better the camera, the higher you are able to raise the ISO without experiencing noticeable noise. I will bump up my ISO before I would take my ss below 60 (even with a tripod)

RAW is great, but not really necessary for blog photos unless you plan to sell or print.

lots of great info here.

Reply

Sally January 22, 2013 at 2:57 pm

Hi again Nicole. Thanks for your input and I’m glad you think most of it is great information. I know you read this series and usually have critiques. Thanks for the info about the aperture for my Confetti Cake Batter Cookies. You are most certainly correct that RAW is not necessary for blog photography, however I do quite a bit of editing in Lightroom and I do not want the automatic adjustments my camera makes to the JPEG format. For me, the purpose of shooting in RAW isn’t about being appropriate for uploading to my blog but more about my editing process. I determine the ISO based on how much light I have to work with. ISO 100 is perfect for my inside shots since I shoot exclusively when large amounts of natural light are coming into my apartment.

Reply

PhotoBob January 22, 2013 at 8:38 pm

“– they are all on the same plane since you shot overhead, so the increased aperture doesn’t really matter here. You could have shot at f/3.5 and they would have all been in focus.”

Nicole, aperture has to do with depth of field. Even if they are on the same plane they aren’t the same distance to the camera. Imagine looking straight down at the floor, it might be five feet from your eyes to the ground, however the floor across the room(which is on the same plane) could be ten feet from your eyes. That’s just a little basic Pythagorean Theorem for you. So if Sally would have used a 3.5 aperture looking straight down it would have brought the outsides of the picture out of focus.

This was a great beginners article on food photography. One correction is a large aperture is 1.4 and a small aperture is 22 even though the numbers contradict that. However, it is easier to talk about and less confusing for beginners when referred to the the way you did. Keep up the great work Sally. More peanut butter treats!!!

Reply

Sally January 22, 2013 at 9:02 pm

Thank you PhotoBob! I like your name. :) I’m still learning myself and the reason for this post was to show readers the basics and how I do my own photography, since I get many emails and comments asking about how I learned, etc. Despite what the viewer sees, my camera was quite far away shooting that overhead cookie shot, so I didn’t get the same shot at f/3.5 vs the f/7.0 like the reader mentioned above. I like to refer to aperture by “low” or “high” because the large vs small always will have me confused, for the reason you mentioned. I really appreciate the positive feedback and you better believe more peanut butter treats are on the way!

Reply

Caroline @ Pass the Cocoa January 22, 2013 at 2:13 pm

Wow, some of the camera technology are a little out of my depth, but thanks so much for such detailed tips! Your photos are stunning. A HUGE congratulations for growing your blog so fast, Sally!
Caroline @ Pass the Cocoa recently posted..Pâte à Choux Swans (aka Cream Puffs!)My Profile

Reply

Sally January 22, 2013 at 4:08 pm

THANK YOU Caroline! :)

Reply

Desi January 22, 2013 at 2:50 pm

I’m definitely bookmarking this post to refer to at all times! Love your recommendations for the ebook and lightroom, and for quality dslr cameras. You said that you shoot most of your photos in natural light… any advice for those who can’t shoot in natural light? I work until 5 PM daily and as we all know, during the winter times it gets dark early so I can never photograph my dinner meals, and I want to! Thanks so much for this post :)

Reply

Sally January 22, 2013 at 4:11 pm

Hi Desi! I do not have any experience with artificial lighting at this time. Just natural lighting – although I am looking into some options. It’s really hard for me as well since I have a full time job and only a short window of time on Saturdays and Sundays.

Reply

Ashley @ Wishes and Dishes January 22, 2013 at 3:04 pm

Hey, Sally! I am one of those that read this entire post – it’s so very helpful! Thank you! I use artificial lights and I love them! I bought them when I lived in an apartment with no natural light at all. I still use them even though I have a house now with natural light…this way I can take pictures at night if I need to. They are Lowel Ego brand and I bought them on ebay. They are awesome!
Ashley @ Wishes and Dishes recently posted..Almond Chicken and Rice CasseroleMy Profile

Reply

Sally January 22, 2013 at 4:12 pm

thank you so much for the suggestion Ashley! I’m going to look into them. :)

Reply

Chung-Ah | Damn Delicious January 22, 2013 at 3:58 pm

What a great post! I use the rebel T2i too! :)

Oh and your photos are always so dang gorgeous!
Chung-Ah | Damn Delicious recently posted..Raspberry Balsamic Glaze Pork Sliders with Coleslaw and a Giveaway!My Profile

Reply

Stephanie @ Eat. Drink. Love. January 22, 2013 at 4:59 pm

I have the same camera and lens. I can’t wait to get a new lens, but they are so darn expensive and I just have too many bills! UGH! This is such a great post with lots of helpful info! I finally got a tripod last month. So much better.
Stephanie @ Eat. Drink. Love. recently posted..Purple Monster SmoothieMy Profile

Reply

Yammie @ Yammie's Noshery January 22, 2013 at 5:42 pm

Sally! Nice post! Crazy thing: I just posted a post on photography basics today on my blog! Great minds think alike! :)
Yammie @ Yammie’s Noshery recently posted..Photography 101My Profile

Reply

Sally January 22, 2013 at 6:27 pm

Too funny Yammie!! I can’t wait to check yours out!

Reply

Jolene (www.everydayfoodie.ca) January 22, 2013 at 5:56 pm

This was very helpful – thank you!! I’d like to shoot in RAW, but I don’t think I have room on my computer for the files!

Reply

Meaghan January 22, 2013 at 6:49 pm

I left an FB comment last night, but just wanted to leave a real comment thanking you for this awesome write-up! I just printed it out and am going to start studying it tonight. I cannot get through a camera manual for the life of me, so it really helps when someone lays it out like this. Much appreciated!!!

-Meaghan
Meaghan recently posted..Menu Plan {Tuesday}My Profile

Reply

Sally January 22, 2013 at 8:21 pm

Hi Meaghan! Thank you so much again. That means a lot to me because (1) you came back to let me know again you appreciate this photography 101 post and (2) because you don’t understand that pesky camera manual either! It’s like gibberish to me sometimes.

Reply

Elise @ elisebakes January 22, 2013 at 7:34 pm

Wow, Sally, this is so great! I’m a beginning blogger and have found the photography to be one of the trickiest parts! I’m still using a point-and-shoot (for the time being anyway), but all of your information was still super helpful! Thanks for your insight!
Elise @ elisebakes recently posted..Cake Batter Truffle Cupcake PopsMy Profile

Reply

Sally January 22, 2013 at 8:22 pm

Photography IS the hardest part! For me too, at least. Such a challenge with each photoshoot for sure. I’m glad this is helpful!

Reply

Reg January 22, 2013 at 9:20 pm

Sally,
Wow, what a great and informative post. Your pictures definitely set you apart. Loved looking at the before and after shots! Thanks for the info and keep up the awesome job!
Reg

Reply

Sally January 22, 2013 at 9:57 pm

Thank you so much Reg, for always being so supportive! You AND Josh as so wonderful. I need to give you more treats for all the kind words!!

Reply

Megan @ The Pink Flour January 22, 2013 at 11:09 pm

Thanks for this awesome post, Sally! I’ve always admired your photos and I strive to produce the quality you do one day. I totally hear you on the difficulty of natural light during winter – makes it tough when you’re working during the week! Thanks again for such a great resource!
Megan @ The Pink Flour recently posted..Almond Cupcakes with Strawberry Cream FrostingMy Profile

Reply

Sally January 23, 2013 at 8:34 am

Megan, i’m glad you can relate to me about shooting in natural light – and only being able to do so on the weekends. It is SO hard in the winter. I don’t have weekends anymore because all I do know are bake and shoot photographs! I love it though. Just wish I had more time to do it.

Reply

Natalie D. January 23, 2013 at 12:20 am

Thank you, thank you! Oh my gosh. I ate up every word. I just got a Canon Rebel a few months ago and my pictures have improved immensely but I have so, so, so much more to learn and was very overwhelmed. This is just what I needed. Simple steps. Thanks again!!
Natalie D. recently posted..Food Review: "Cookie Mix In A Jar" Gifts (★ ★ ☆ ☆ ☆)My Profile

Reply

Sally January 23, 2013 at 8:35 am

I love my canon rebel. :) I’m still so overwhelmed but take it in baby steps. One new thing at a time Natalie. You’ll get the hang of it, I promise.

Reply

Loretta E January 23, 2013 at 12:30 am

What a great tutorial, Sally! I got Plate to Pixel for Christmas and have been devouring it! I’ve been wanting to switch over to shooting in RAW, but don’t have the software to convert them, so that’s first on the list…I also really want the Pinch of Yum book….And I want to start shooting tethered, but that requires a functional computer, right :)
Loretta E recently posted..Raspberry MousseMy Profile

Reply

Sally January 23, 2013 at 8:36 am

Hi Loretta! I highly suggest Tasty Food Photography. It is AMAZING. A life saver for sure – Lindsay is a genius. I love Plate to Pixel. Another life saver!!

Reply

Kristy @Sweet Treats & More January 23, 2013 at 1:54 am

I love shooting in Raw. You’ve convinced me to get a tripod!! And read my Plate to Pixel book I’ve had for a while now:)

I love this post…you can tell how much work you’ve put into your blog and your photos, just by this post. You really do rock! THANK YOU!
Kristy @Sweet Treats & More recently posted..15 Food Bloggers You Should Follow on PinterestMy Profile

Reply

Sally January 23, 2013 at 8:37 am

YOU rock Kristy!!! So glad we’ve become blogging buddies and can chat about running too. :)

Reply

Jess @ On Sugar Mountain January 23, 2013 at 2:10 pm

Sally! This post is AWESOME! I just pinned it to my blogging tips since I’m at work and can’t mess around with aperture currently but I will soon! Thanks so much for all the tips :D
Jess @ On Sugar Mountain recently posted..Oreo Cookies and Cream Cake DoughnutsMy Profile

Reply

Sally January 23, 2013 at 2:44 pm

I’m so glad, Jess! and thank you for the pin!

Reply

Jennie @themessybakerblog January 23, 2013 at 3:23 pm

This is such a great post, Sally. Thanks for taking the time to write it. I never thought about using the timer so I could move food around.
Jennie @themessybakerblog recently posted..Sponsor Spotlight ~ Chocolate Chip Cookie Dough Balls from The Cooking ActressMy Profile

Reply

Ala January 23, 2013 at 7:10 pm

Sally. Let’s stop. Breathe. Rewind. You, my girl, are a *godsend.* I don’t know how long I’ve been looking for this precise tutorial from a friendly, accessible source–and finally stumbled across it!! I received my DSLR less than a month ago and have only gotten to use it for three posts (since I’ve been in bed with a terrible flu for two of those weeks), but I can already see the results and astounding difference it really does make in traffic and presentation. I absolutely cannot say enough how much this tutorial means to me, as I’m sure it does to so many other readers. We know you put so much, so much, so absolute much effort into your writing, and it pays. You need to give yourself even more credit for not only drawing readers in with your photos, but keeping them with your wonderful personality! Keep it up!
Ala recently posted..Insanely Fudgy Deconstructed Twix BrowniesMy Profile

Reply

Sally January 24, 2013 at 4:42 am

Hi Ala!! You are so sweet. I’m so glad that you find this tutorial to be helpful. I’m still learning myself, but I wanted to share a few things that I’ve learned so far in a way that people could understand. I know how frustrating it is to read the manual or some online sources and not have a clue what anything means! And what you said about the end means the world to me. I’m glad my personality comes through in each post. THANK YOU so much for that!

Reply

leah aaron January 23, 2013 at 10:55 pm

I don’t know what I like better. Your new photos or your baking. All looks delicious…..Thanks for the hints. I’m still looking for the camera ment for me.:)

Reply

Sally January 24, 2013 at 4:49 am

Thank you Leah! Hope you find the perfect one for you. :)

Reply

Julie@A Little Sugar January 24, 2013 at 10:05 am

Thank you Sally! A treasure of good info ;-)

Reply

Sally January 24, 2013 at 10:05 am

Thanks Julie! I’m glad.

Reply

jen January 24, 2013 at 3:09 pm

Thanks for all the info. Can’t wait to try it out some of your tips!
jen recently posted..Child’s PlayMy Profile

Reply

Cecilia January 24, 2013 at 4:10 pm

Thank you for taking the time to write this post. It feels like you are talking to me and that was exactly what I needed. When I have read posts in this topic before I just see bla bla bla bla, but you explain it so well. I will read this post over and over again with my DSLR in my hand. I live in Sweden and I don’t think I have taken a decent photo since October because of my inability to use my camera ;)
Thank you thank you thank you.

Reply

Sally January 25, 2013 at 5:52 am

Hey Cecilia! I am so glad to hear that. When I read my camera manual or even how-to’s online, I can never comprehend it. Only picking up my DSLR for the first time last year, I still need things to be broken down into simple terms. And I know many readers are like me! Let me know how it all goes with your camera! Thanks Cecilia!

Reply

Denise Nichols January 25, 2013 at 10:11 pm

Hi Sally,
I’m a professional photographer and I just stumbled across your blog. Wow…what a comprehensive post! In your post, you said, “I have learned that the photography is what draws in my crowd. And makes them stay. Bad food photos are a turn off.” And, that is so true. I’ve always been drawn to cookbooks with lots of photos and blogs are no different. A written description of food just can’t compete with a well exposed & styled photo. Btw, the Strawberry chocolate chip cookies look fabulous! Kudos to you for constantly improving your craft.

Reply

Sally January 26, 2013 at 3:00 pm

Denise, that really, really means a lot to me. I am not a professional by any means. I just picked up my DSLR only 10 months ago. It is very hard work and requires so so so much practice. Coming from a professional like you – is so nice to hear. I really appreciate it! And I agree, I could make something fabulous and if my lighting, compostion, styling, and focus isn’t right – the recipe will be a flop on my blog. Thank you again SO much for this and taking the time to comment.

Reply

Jane N. January 28, 2013 at 12:14 am

Your photos are AMAZING! And this post was so helpful. Thank you! You would never know that you are shooting all these in a dark apartment. I have the same issue. Thanks again for the tips.

Reply

Jaren (Diary of a Recipe Collector) January 31, 2013 at 3:26 pm

This was so helpful! DSLR cameras are like a science for me and are so overwhelming! Thank you so much! Your photos are gorgeous!!!!

Reply

Sally January 31, 2013 at 8:14 pm

I’m so glad to hear that Jaren! And thank you for the compliment :)

Reply

Karen Cox February 4, 2013 at 4:04 pm

Thanks so much for the detailed blog series. I decided last month to start my own food blog and your information is extremely helpful! Thank you, Sally. :)

Reply

Sally February 4, 2013 at 4:53 pm

That is so great to hear, Karen! I’m so glad this has been helpful to you so far. Truly, you will just learn as you go. Everything I’ve learned has been learned along the way by trying new things and making mistakes! It’s a journey. Good luck Karen!

Reply

Monika February 12, 2013 at 9:33 am

Hello Sally, I discovered your blog recently and I have to say I find it really inspiring, your recipes looks delicious, not even to mention the pictures! So good! That’s why I was very glad I found this article about food photography basics, I want to start adding some recipes on my blog and this is so so helpful! So well explained and touches every detail I should know to start!! Thanks so much! xx Monika

Reply

Sally February 12, 2013 at 10:31 am

Hi Monika! Thank you so much! I’m glad this is helpful for you. thank you for reading all about my photography!

Reply

Jessie February 15, 2013 at 12:43 pm

Hi Sally! A friend of mine made your awesome peanut butter swirled brownies for a meeting the other night and she gave me the link to your site so I could get the recipe (feeling way less guilty for eating three now…). Anyways, I just started into the food blogging world myself and I really enjoyed your tips and tricks posts – I definitely learned a few new things! Thanks!

Reply

Sally February 15, 2013 at 2:36 pm

That’s wonderful Jessie! I’m so glad you got to try my brownies. They are so easy to make and I love that they aren’t very sinful to eat. :) Glad these tips and tricks are helpful!

Reply

S. @ The Captivating Life February 17, 2013 at 4:37 pm

Thank you so much for this amazing and detailed post! I was looking over my older posts last night and cringing at some of my early (and even some not-so-early) photographs. It’s all a learning process, though, and it’s information like this that inspires me to keep working at my photography to make it better. Thanks again and have a great weekend!
S. @ The Captivating Life recently posted..Tomato and Chickpea Quinoa SaladMy Profile

Reply

Sally February 17, 2013 at 5:02 pm

I agree with you! Even photos from 1 month ago, I wish I could have shot them differently. But yet, it’s a learning process and a journey. We can only get better. So glad you enjoyed this post!

Reply

fabíola February 20, 2013 at 5:32 pm

Hi, greetings from brazil. Thank you for sharing your knowlegde, it´s very helpful.
I guess i should start investing in new dishware and cool napkins to improve my food photography. Special thanks for the styling and composition part of the tutorial, that´s where i´m lacking. Also, yummy food you cook. lol

Reply

Mandie March 4, 2013 at 7:39 pm

Sally, could you tell me how you made your watermark ? I have used Photoshop before and made watermarks, but since I d not have it (and it is so expensive) I was wondering if there is a good way to make watermarks without Photoshop.
Thanks!
Mandie recently posted..Adonai, I’m still Waiting…My Profile

Reply

Sally March 5, 2013 at 9:37 am

Hey again Mandie! I use my photo editing software – Adobe Lightroom – for watermarking my photos. I upload them with a watermark. I have also used Picmonkey.com (free) to add text watermarking to photos too. You have to upload the photos to picmonkey and then again to your blog. It takes extra time.

Reply

Mandie March 5, 2013 at 7:55 pm

Awesome! Thanks =D
Mandie recently posted..Adonai, I’m still Waiting…My Profile

Reply

Camille March 14, 2013 at 2:14 am

You are amazing. And inspirational. And amazing. Oops, I already said that. I’ve had a blog for a couple of years now and it is in nowhere near shape as yours is. I appreciate you taking the time, (even though you didn’t have to), to help amateurs like me understand what is missing with their blog and how they can improve. Mostly me, everyone has got it made. :) ha, anyways, You amazing…again.

Reply

Sally March 14, 2013 at 8:47 am

Hi Camille! What a VERY sweet comment and I was so happy and thankful to read it this morning. That you for taking the time to write to me! Blogs take a lot of work and I can tell you have passion for it. Thank you SO much again Camille! This comment meant a lot to me.

Reply

Beatrix March 18, 2013 at 2:21 pm

Hello Sally,
one of my friends shared your cookie receipt on the Facebook and I ended up reading your blogging recommendations. I love it! :) I am planning to start a food blog so your entries were very useful. Thank you for sharing it! I just started play with the camera – which I never used before because it was sooo scary! :D
Of course I will try one of your recipe too! :) They look delicious!
You are a great woman!
Greetings from Vienna

Reply

Sally March 18, 2013 at 3:42 pm

I’m happy to be a help Beatrix! I’m glad you commented to let me know, too. Let me know any recipes you try. Good luck with the camera – it’s not so scary!

Reply

Kat March 18, 2013 at 4:09 pm

Thanks Sally! It’s very inspiring and I like the way you nicely explained it, with real examples. It helps me to better understand! Keep on doing, please! ;-)

Reply

Sally March 18, 2013 at 4:40 pm

Glad to hear it Kat!

Reply

Nann April 15, 2013 at 11:44 pm

THANKYOU, THANKYOU, THANKYOU for sharing all this FABULOUS and informative information. You can know I am going to try doing all you have suggested. I’ve learned so much just by reading it already. Hopefully I can get a great camera like yours. I am SO impressed. Thankyou again. N.

Reply

Sally April 16, 2013 at 5:11 am

Nann, so happy this has been helpful for you!!

Reply

Kate April 18, 2013 at 11:52 pm

This is the first time I’ve understood any camera lingo. Thank you for the clear information!

Reply

Sally April 19, 2013 at 6:22 am

Glad to help :)

Reply

Kim @ KC Bakes April 23, 2013 at 8:13 am

This has been SO helpful!!! I really like your reminders after you’ve explained something… “(remember: higher aperture = more of the photo is in focus)” — this made your tips so much easier to process b/c I didn’t have to scroll back up to the original explanation. I will definitely be trying these tips soon! ps: love the tower of confetti cookies, it was worth the 9 tries ;-)

Reply

Sally April 23, 2013 at 8:34 am

Hi Kim! I’m so glad this was helpful for you. I tried to make it as simple as possible. Even I am still confused sometimes! Glad you like the tower of cookies. :)

Reply

Cheyanne Smart @ Touristathomeblog April 25, 2013 at 12:11 pm

Hi Sally!

Thanks so much for this post! I desperately needed it. I am currently getting things up and running, and the photography aspect has not been priority number one! Oops!

I have read manuals galore and visited endless websites, but I just could not grasp their concepts. I thought this post was extremely well written, and alas something I can understand! Bravo!

Thank you SO much for the tips, and resources! I think it is time to splurge a little on photography :P

I cannot thank you enough!
Cheyanne Smart @ Touristathomeblog recently posted..Healthier Carrot Cake (Garrett’s Carrot Cake Masterpiece)My Profile

Reply

Sally April 25, 2013 at 12:18 pm

So glad you find this helpful! The photography aspect is so important, but it is also the most challenging for me and for most. Think of splurging on your photography as an investment. I saw my numbers go up dramatically once I started to put money into my photography. :)

Reply

Leon May 7, 2013 at 8:15 pm

Thank you for this article! I referenced it on a blog that I wrote about starting food photography. http://www.leonbailey.me/blog/personal/starting-food-photography

Haven’t started yet, but I will be this weekend. :)
Leon recently posted..Reasons To Hire A Wedding VideographerMy Profile

Reply

Sally May 7, 2013 at 8:38 pm

Thanks Leon!

Reply

Renee May 20, 2013 at 8:36 am

Wonderful article and lots of great information. I’ve been shooting in “P” mode and need to take the step to go to full manual. Thanks for the nudge with explaining the benefits. I very much agree on how Lightroom can do worlds of good to food photos.
Renee recently posted..Sauerbraten for #SundaySupperMy Profile

Reply

Sally May 20, 2013 at 10:07 am

You will be very thankful when you switch to Manual. So much more control! Just takes some practice.

Reply

Veronika May 20, 2013 at 8:37 am

What an awesome post!! So so soooo comprehensive and very very very helpful. I don’t ‘work’ in food, but I think I can implement so much of what you so kindly shared in my business of making and selling my dolls. (for some reason the link doesn’t work above: http://www.veronikalaveydesign.com ;)
Thanks Sally!

ps: I’m making cinnamon rolls for the kids today!

pss: You should make an ipad app!!

Reply

Sally May 20, 2013 at 10:06 am

how perfect, Veronika. I’m glad this was helpful! Enjoy those cinnamon rolls!

Reply

Victoria May 20, 2013 at 1:27 pm

Thanks Sally! Great tips! I’m still learning so all this information is a little overwhelming. I don’t use my flash either, it’s all about the natural light!
Victoria recently posted..Chinese Chicken BunsMy Profile

Reply

kara May 21, 2013 at 2:58 am

Sally, Your pictures are always so natural and effortless looking. They make every recipe worth trying!! Thanks for sharing some great tips!

Reply

Sally May 21, 2013 at 6:19 am

Thank you very much Kara! And you are welcome.

Reply

Leave a Comment

CommentLuv badge

Previous post:

Next post: