

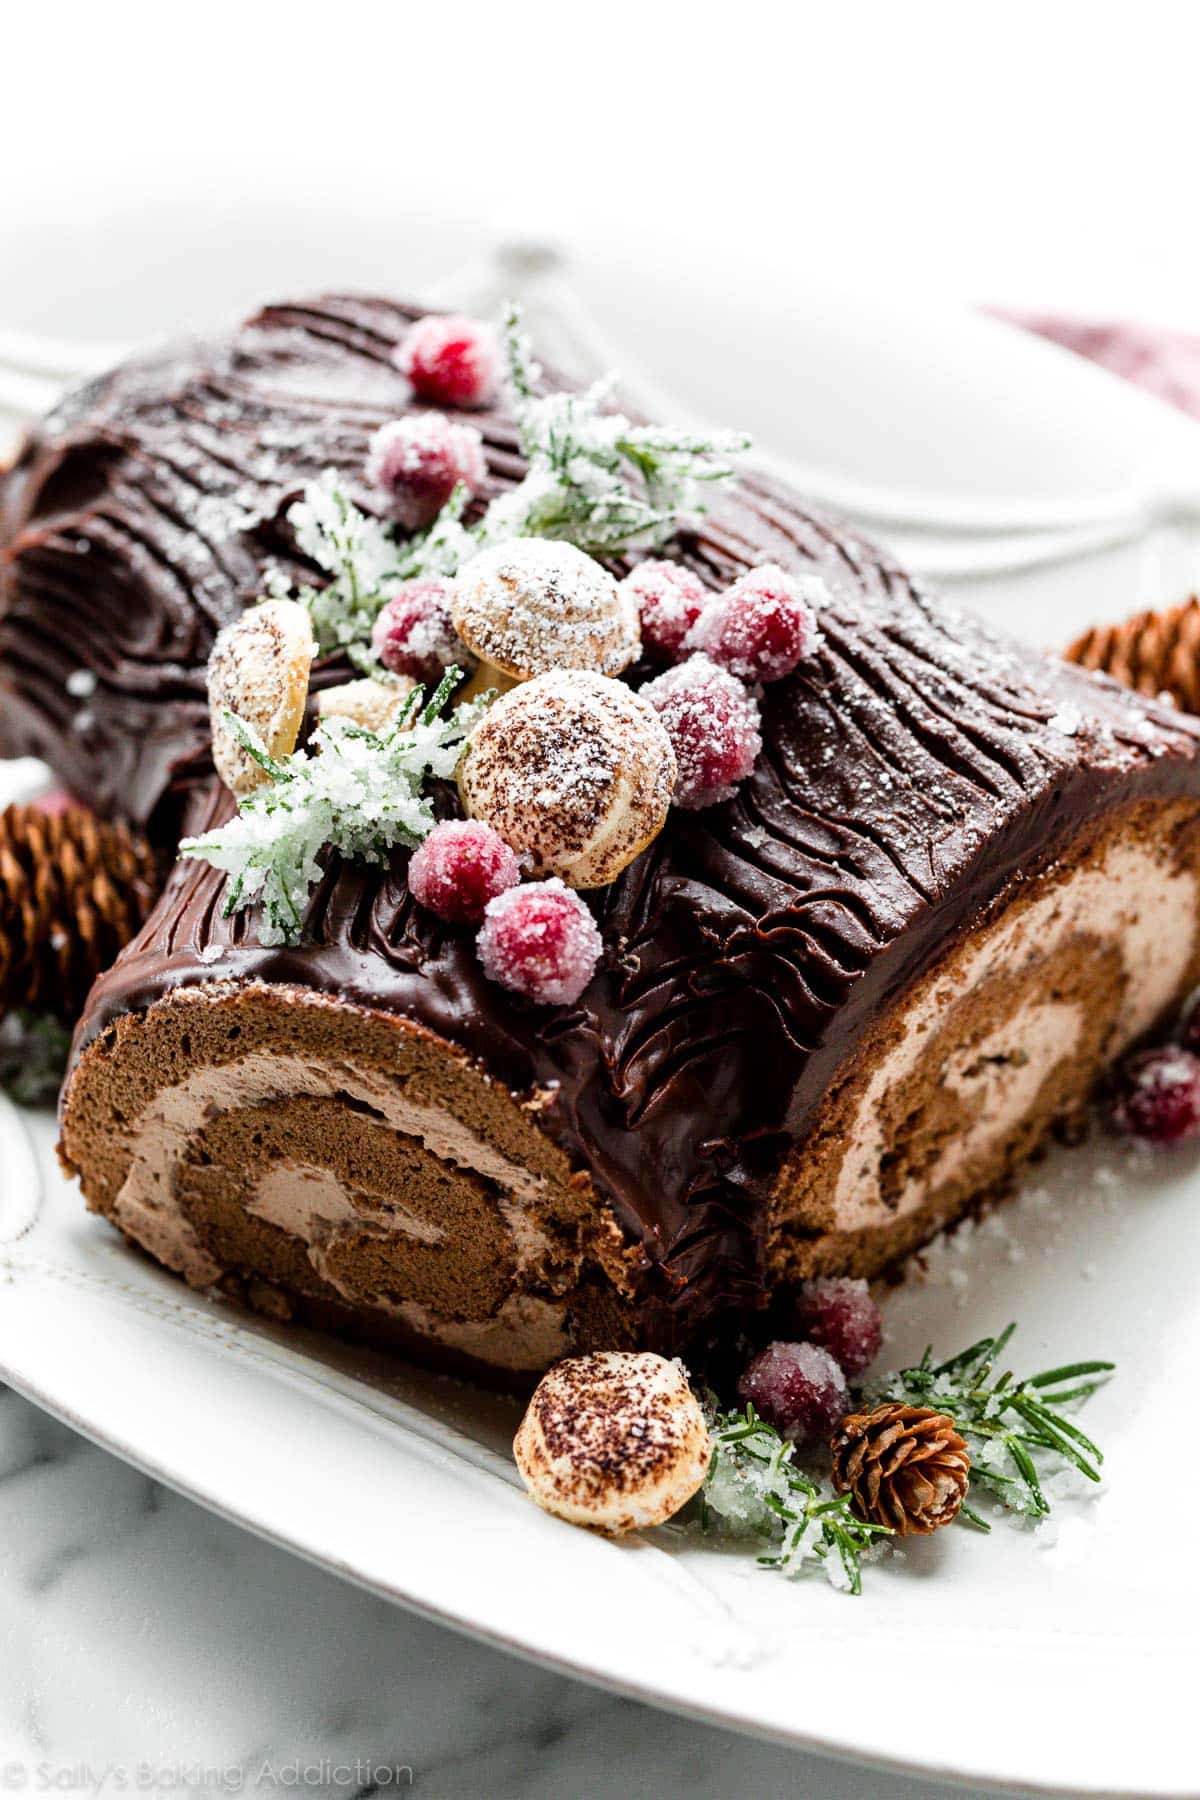
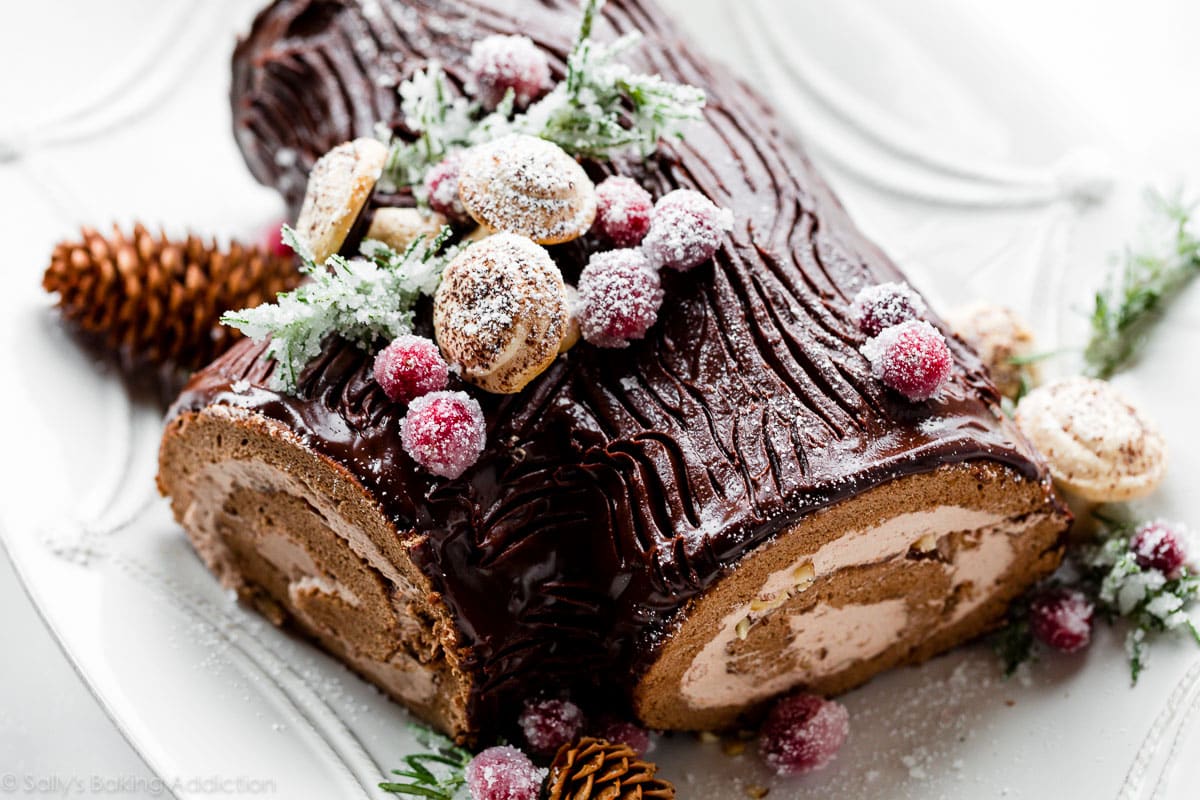
Using a detailed recipe, step-by-step photos, and a complete video tutorial, let me show you how to make a lovely from-scratch yule log, also known as a Bûche De Noël in French. This traditional Christmas cake is decorated to resemble a log. My recipe starts with a cocoa flavored sponge cake that we’ll fill with cocoa hazelnut whipped cream. We’ll top it with chocolate ganache and a variety of fun optional garnishes including mushroom shaped meringues plus sugared cranberries and rosemary for a shimmery finishing touch. It’s show-stopping and elaborate dessert, yet completely doable in your home kitchen!
Christmas is a time rich with tradition. Christmas cookies for Santa, ornaments and decorations, jingle bells and hot cocoa by the fire. For some and in European regions, it’s making a yule log cake, also known as a Bûche De Noël in French. I’ve tasted plenty during the holiday seasons, but hadn’t attempted a from-scratch recipe until this year. Initially overwhelmed by the process, I learned that it’s just like other at-home baking projects: fun quality time in the kitchen. Made even better with an extra dose of chocolate!
One reader, Karen, commented: “Made this for Christmas Eve. Always wanted to make one but thought it would be difficult. Thank you, Sally, for the step-by-step directions. My yule log turned out AMAZING—beautiful and very delicious. It looked so professionally done. Couldn’t have done it without Sally’s help. ★★★★★”
One reader, Amanda, commented: “My third year in a row making this recipe. I think that’s enough to consider it a tradition. I love how easy it is to execute, and it’s always fun to share with my family. ★★★★★”
One reader, Blaire, commented: “This is the second year that my daughter has made this cake for the family Christmas party. It looks fabulous and the taste is fantastic. So many neat flavors blending into each perfect bite. We plan to continue using this recipe each year—thanks! ★★★★★”
By the way, here’s another at-home baking project: a homemade gingerbread house with a free printable template for constructing it.
Tell Me About This Yule Log Cake
- Texture: Underneath all this festive decor, we have a soft and airy sponge cake. If you’ve tasted angel food cake before, you’ve had sponge cake. What’s interesting about sponge cake is that, unlike most cake recipes, it’s (usually) made without butter or oil. All of the magic happens with the eggs, a crucial ingredient in any sponge cake recipe. Note: I include a touch of oil in this cake for added moisture.
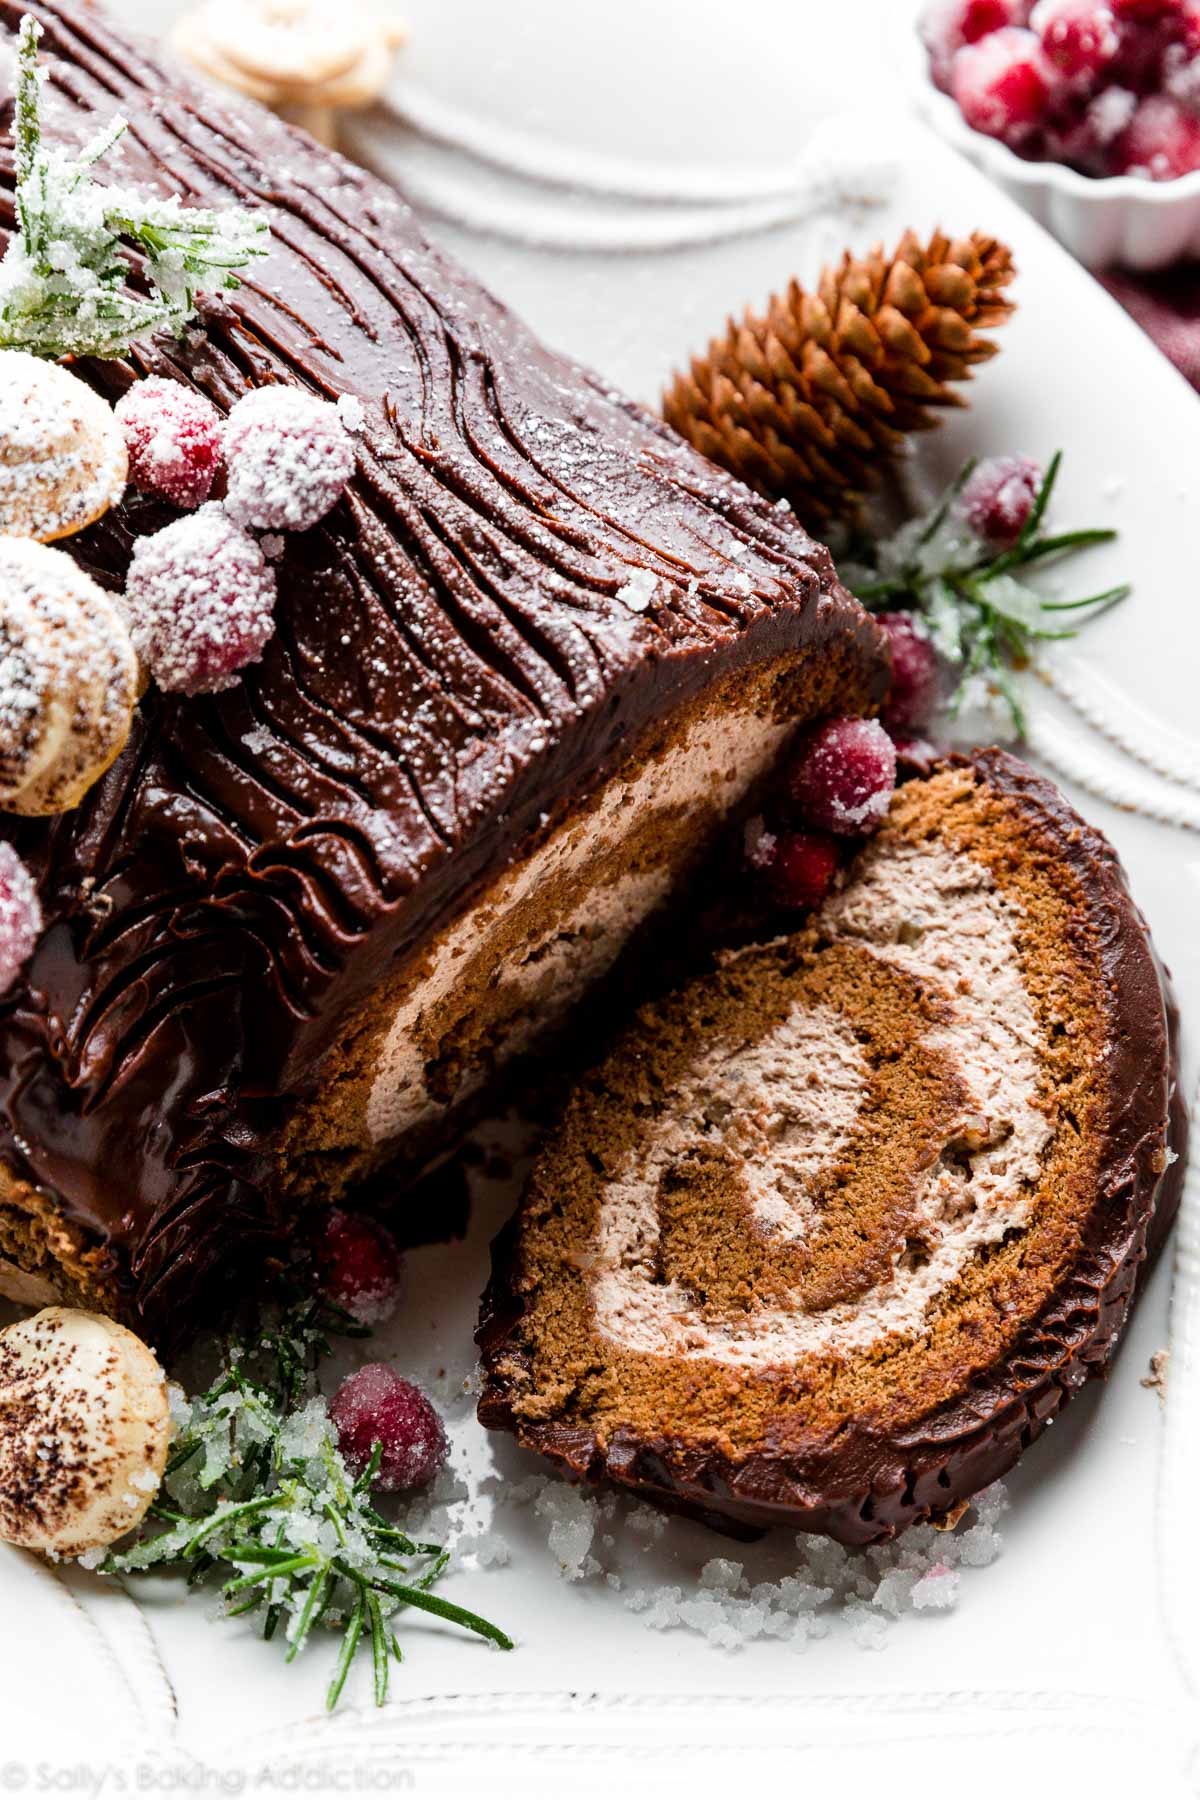
- Flavor: My Bûche De Noël includes a light cocoa cake, cocoa hazelnut whipped cream spiked with Frangelico (can definitely skip the booze if you want), and is topped with smooth chocolate ganache. Since ganache is incredibly rich, the other elements have lighter cocoa flavors. In fact, the cake tastes like a mug of hot cocoa.
- Ease: Advanced, but it’s a fun project to do by yourself or with your family. If you watch the video tutorial and read through the very detailed recipe prior to beginning, you’ll be set up for success.
- Assembly: If you’ve ever made pumpkin roll, chocolate cake roll, or any other jelly roll cake before, you’re familiar with this assembly. If you haven’t, it’s nothing to be nervous about as long as you have a solid recipe and the right equipment. (Tools list below.) Have fun with the garnishes and watch my video tutorial before beginning.
- Time: Yule log cakes aren’t anything you can rush; this recipe will take you all day. My advice is to concentrate on one element/step at a time. Make sure you’re following the cooling and chilling times closely. I don’t want you to ruin all your efforts by not letting portions of this recipe cool/thicken/set up properly.
Yule Log Christmas Cake Video Tutorial
4 Parts to This Yule Log Cake:
- Cocoa Sponge Cake
- Cocoa Hazelnut Whipped Cream
- Chocolate Ganache
- Decorations
Let’s review each part with step-by-step photos to guide us along.
Cocoa Sponge Cake
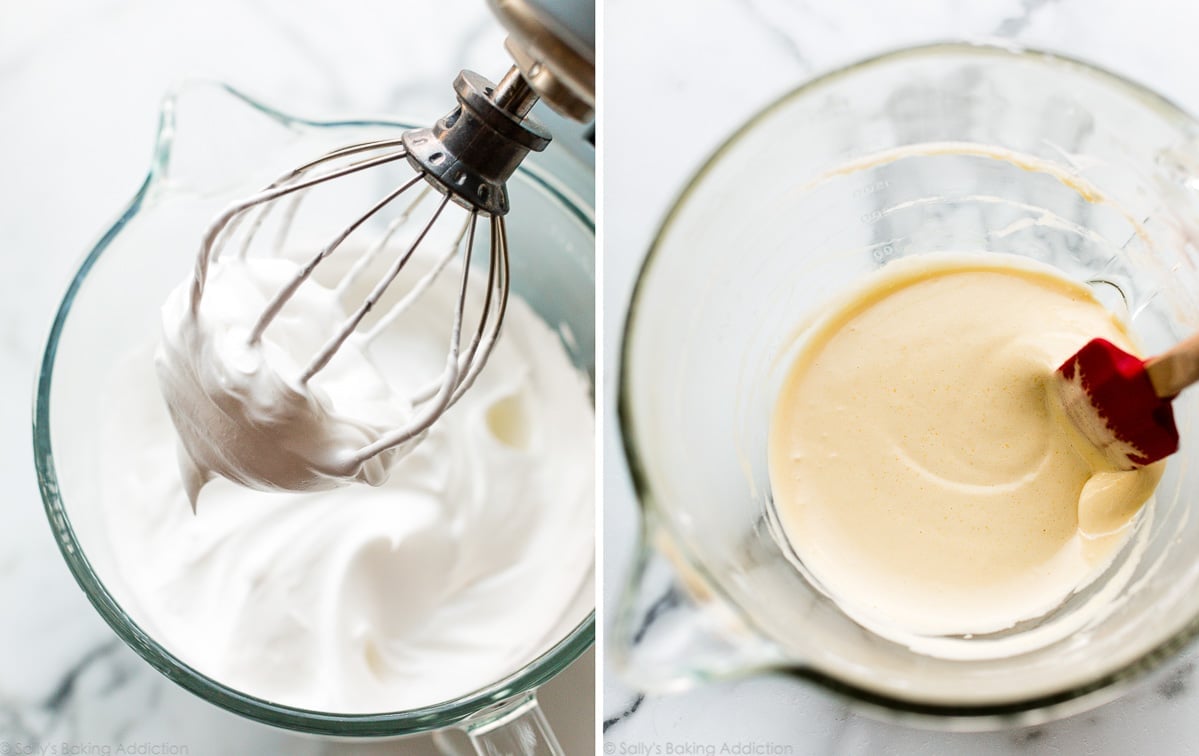
Start by whisking a few of the ingredients together. In terms of volume, there isn’t much: cake flour, cocoa powder, baking powder for added lift, and a little salt. Eggs are the cake’s main ingredients. Separate the eggs, then whip the egg whites with sugar into stiff peaks. Set those aside. Then whip the egg yolks with the remaining sugar, a little oil for moisture, and vanilla extract until thickened. You get more volume with room temperature eggs than cold eggs. Before beginning, set the eggs in a cup of warm water for 10 minutes to warm them up.
Below left: whipped egg whites + sugar. And below right: thickened egg yolk mixture.
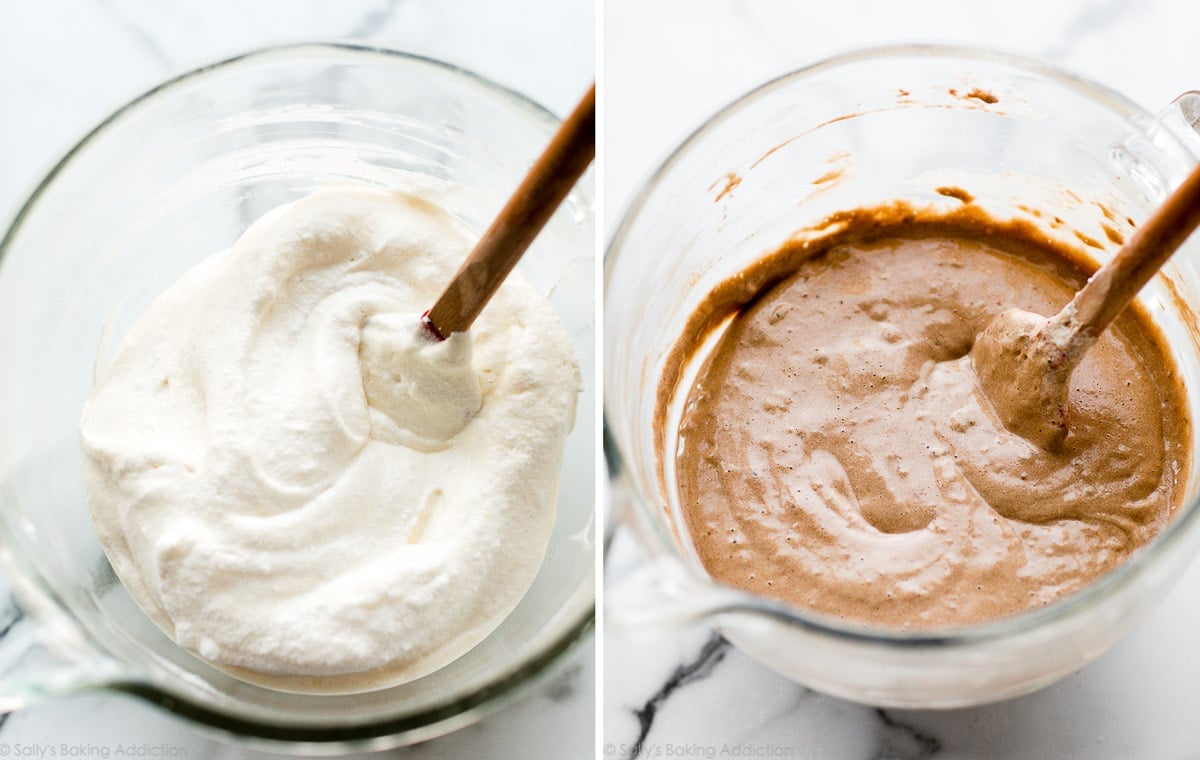
Below left: In 2 additions, fold the fluffy egg whites into the egg yolk mixture. And below right: In 2 additions, fold in the dry ingredients. Like the finished cake, the cake batter is very light and airy.
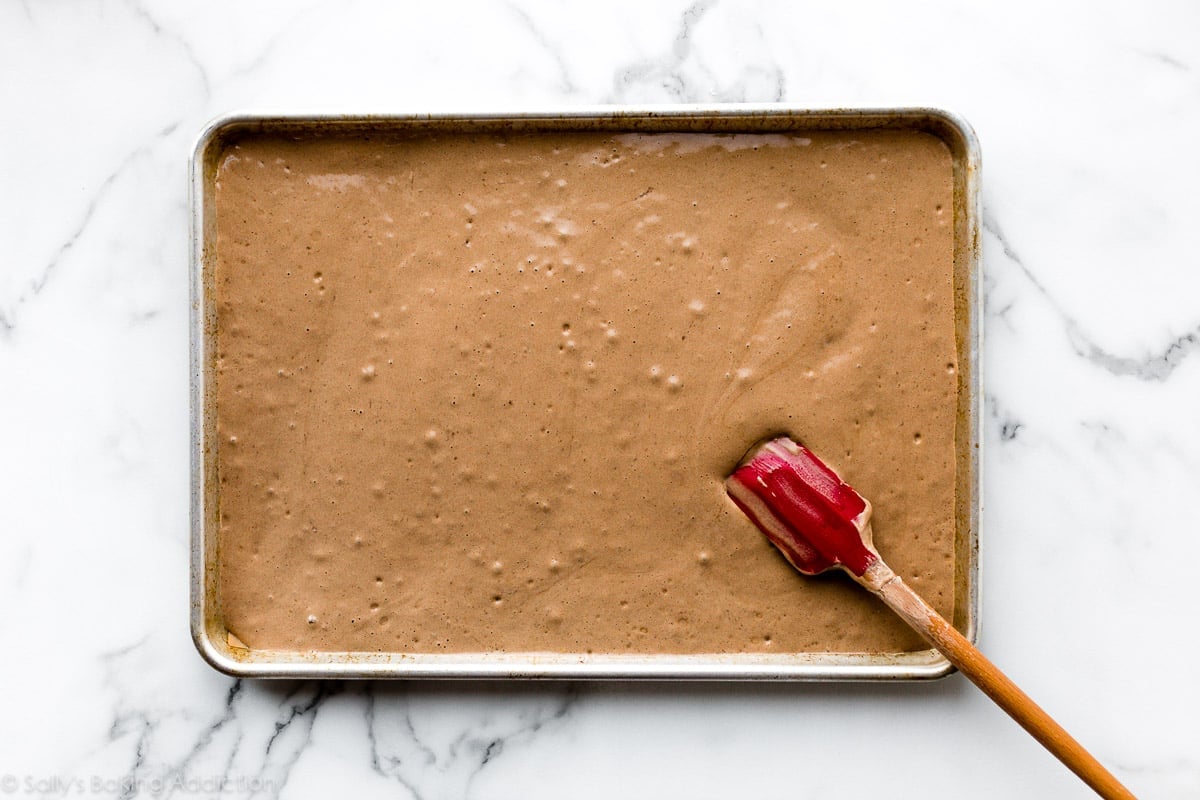
Bake the cake roll in a 12×17-inch pan. So there’s plenty of cake for sectioning off and decorating, this a larger roll cake than my champagne cake roll and red velvet cake roll, both of which are baked in a 10×15-inch pan. Feel free to use any of my roll cake recipes as the base of your bûche de Noël, but know that if they’re baked in a smaller pan, you’ll have a smaller cake.
How to Shape a Yule Log
Shaping a cake roll is easier than it looks. There are two tricks:
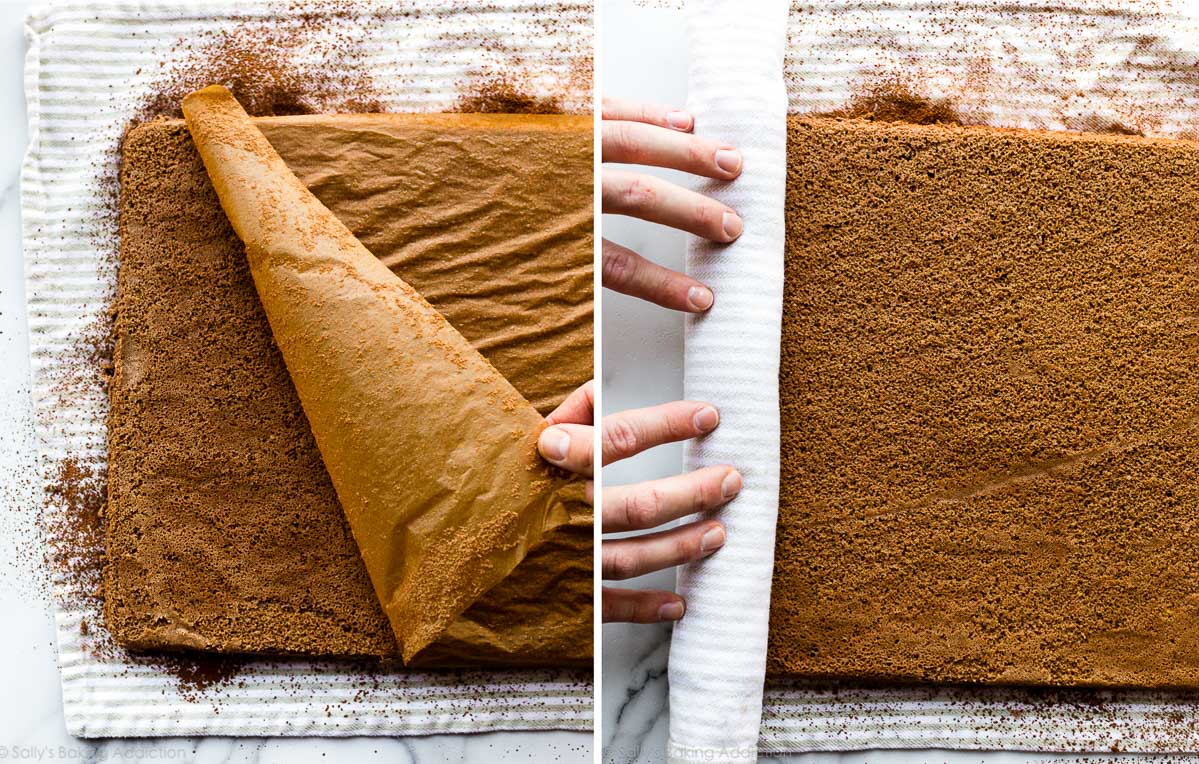
- The 1st trick is to roll the cake up, without filling, while it’s still hot. Why? If the cake cools in the rolled shape, it will make rolling the cake with the filling inside EASIER.
- The 2nd trick is to roll the cake up with a clean kitchen towel or piece of parchment paper. Why? The warm cake will be sticky and stick to itself otherwise. Dust the towel or parchment paper with cocoa powder to prevent any chance of sticking!
These two tricks help guarantee no rips, no cracks, and no sticking.
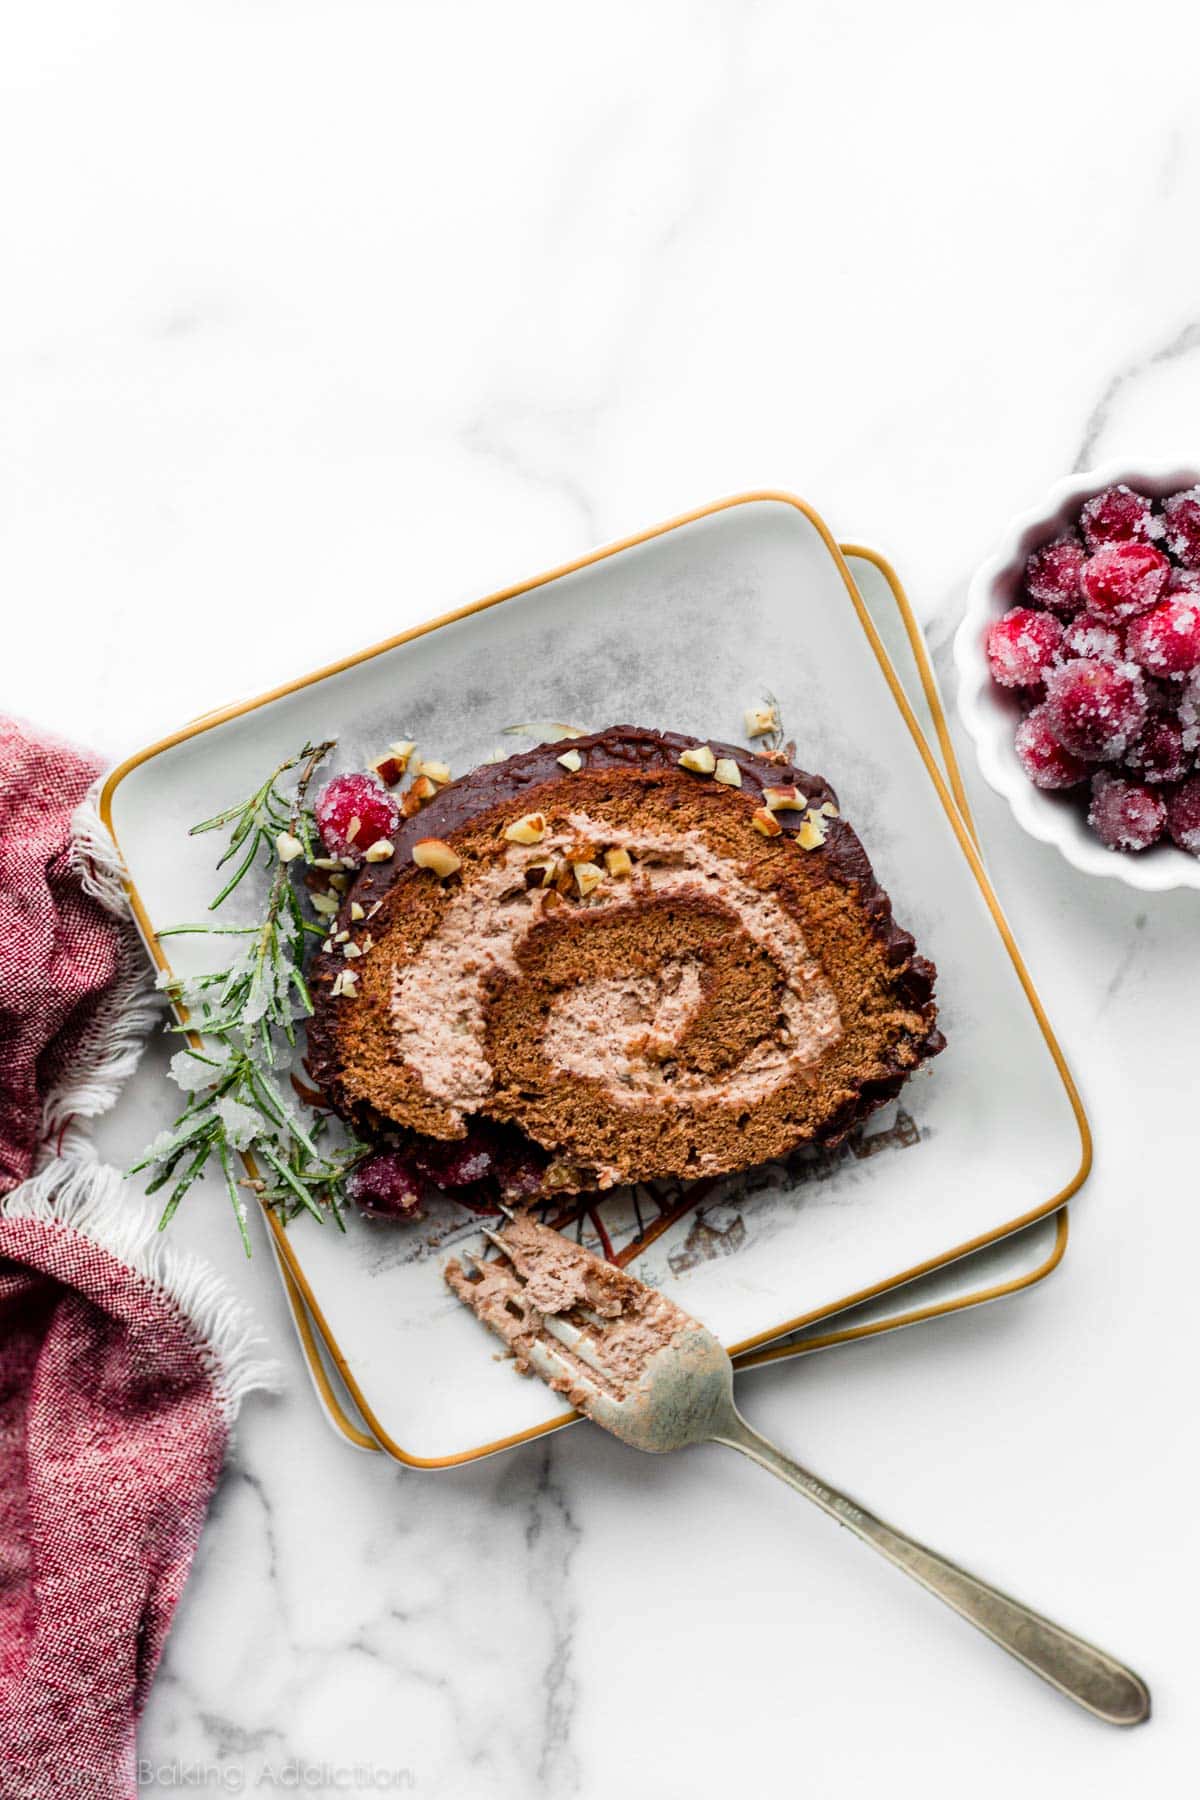
Cocoa Hazelnut Whipped Cream
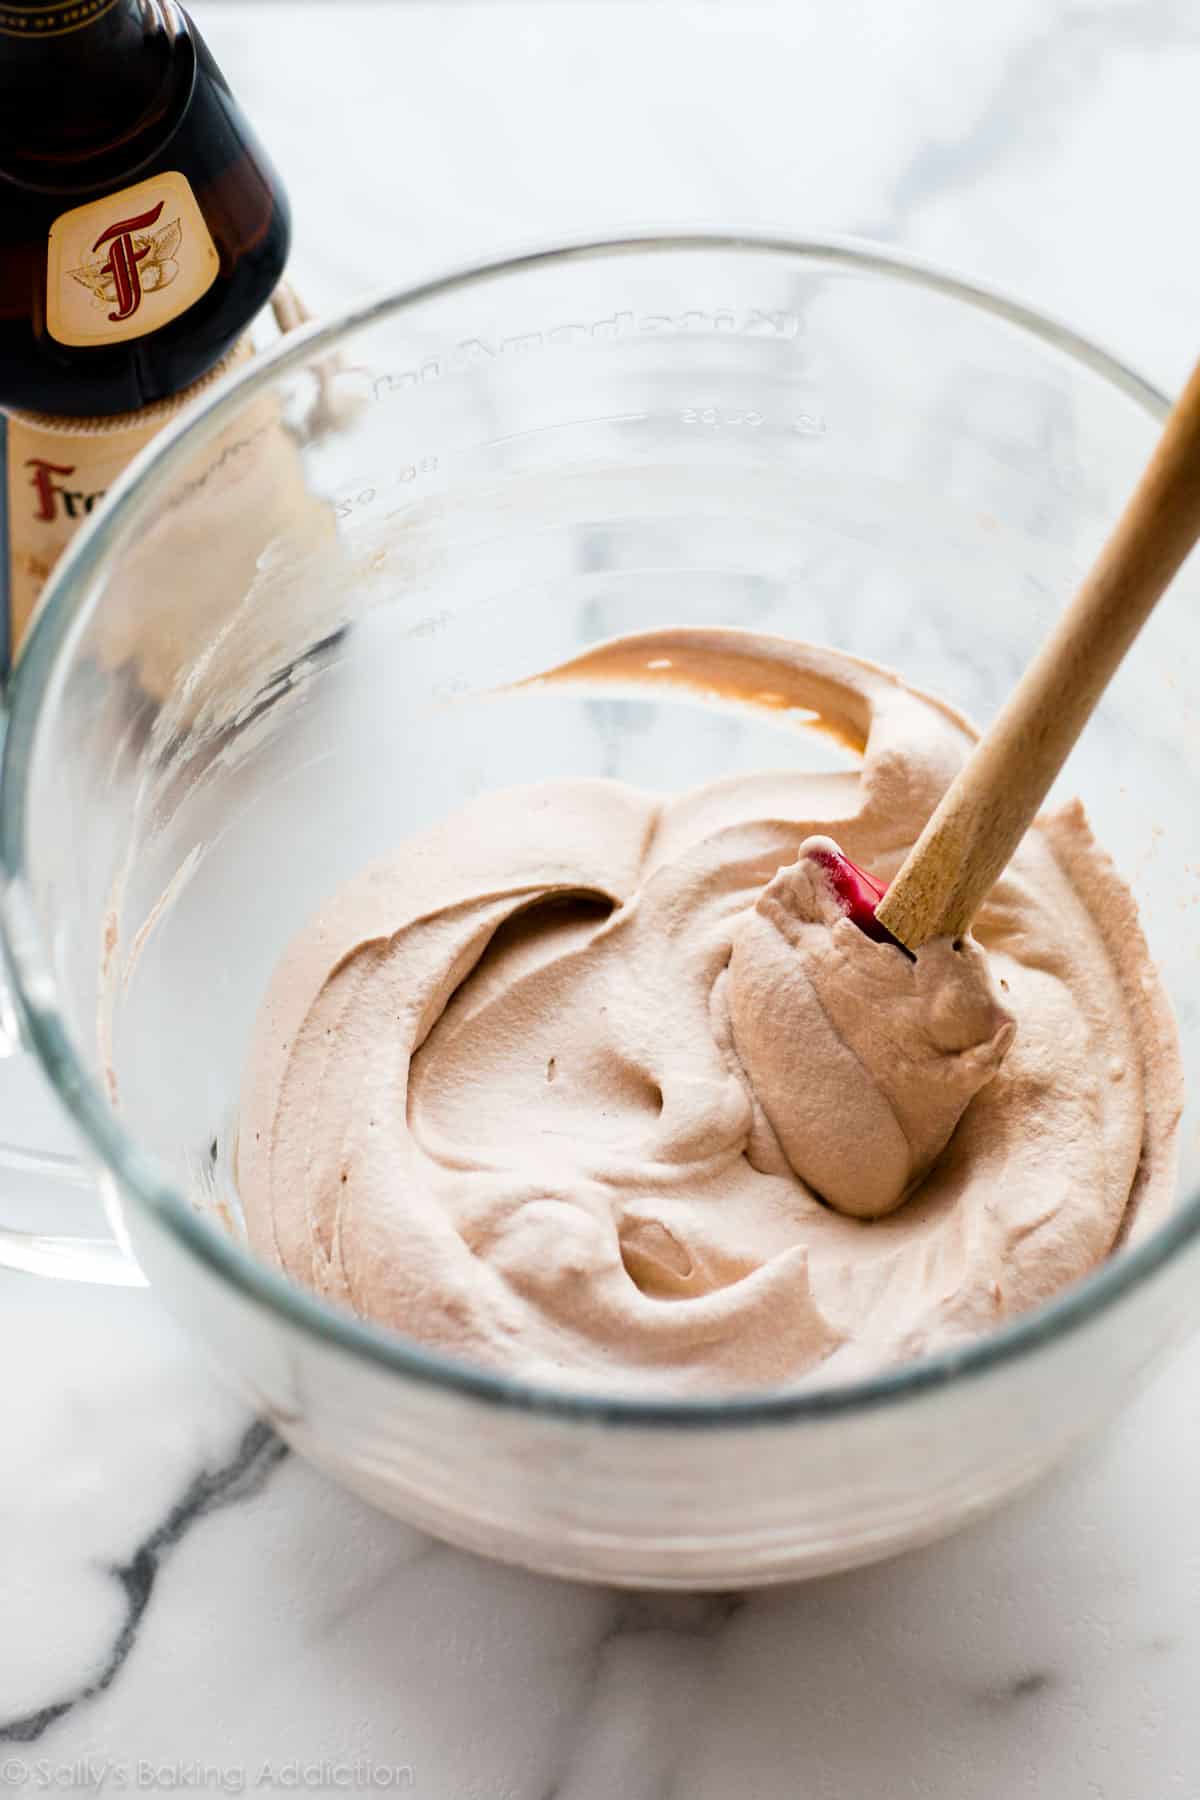
As the warm rolled cake cools down, make your whipped filling. Heavy cream is the base and we’ll sweeten it with a little confectioners’ sugar and flavor it with cocoa powder and hazelnut liqueur. Feel free to swap with the same amount of another flavored liqueur such as amaretto, Baileys Irish Cream, Kahlua, Grand Marnier, or other. You can also replace the alcohol with strong (cold or room temperature) coffee or 1 teaspoon of vanilla extract.
Or if you want to skip the cocoa and liqueur in the filling completely, make this whipped frosting instead.
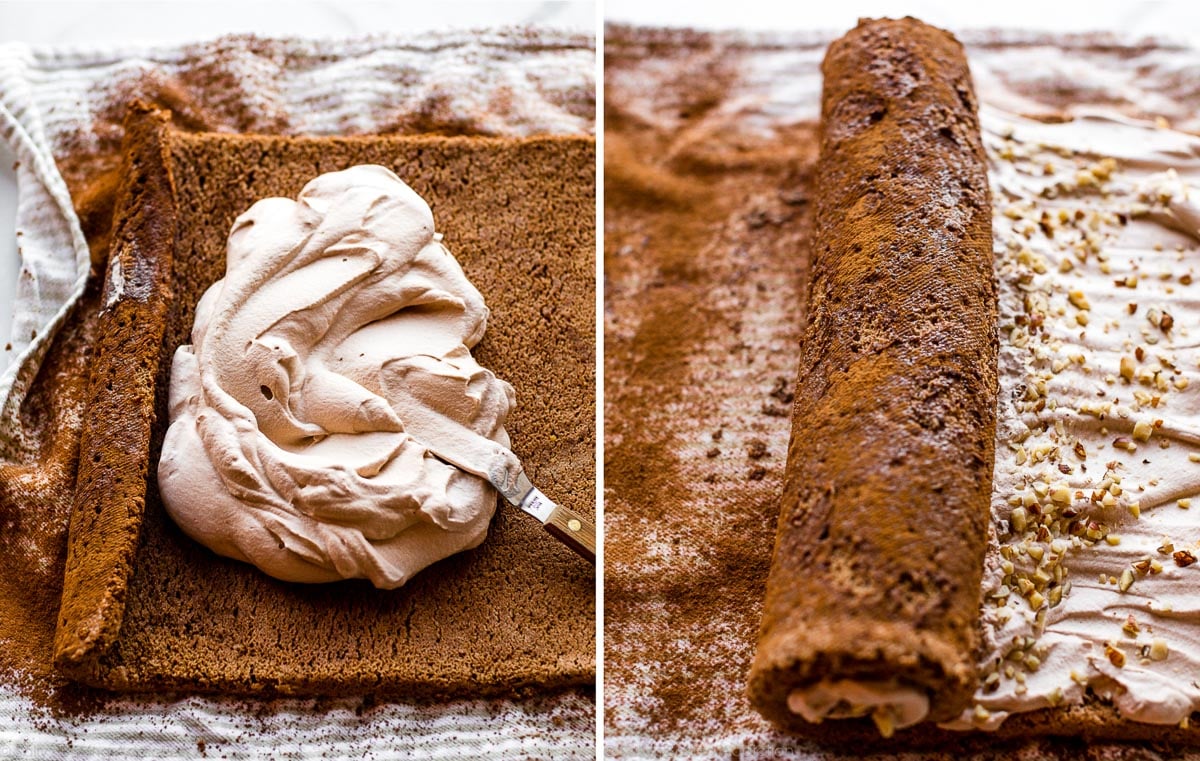
Feel free to add finely chopped hazelnuts on top of the whipped filling. As you roll the cake, if it appears sticky and moist, dust with more cocoa powder.
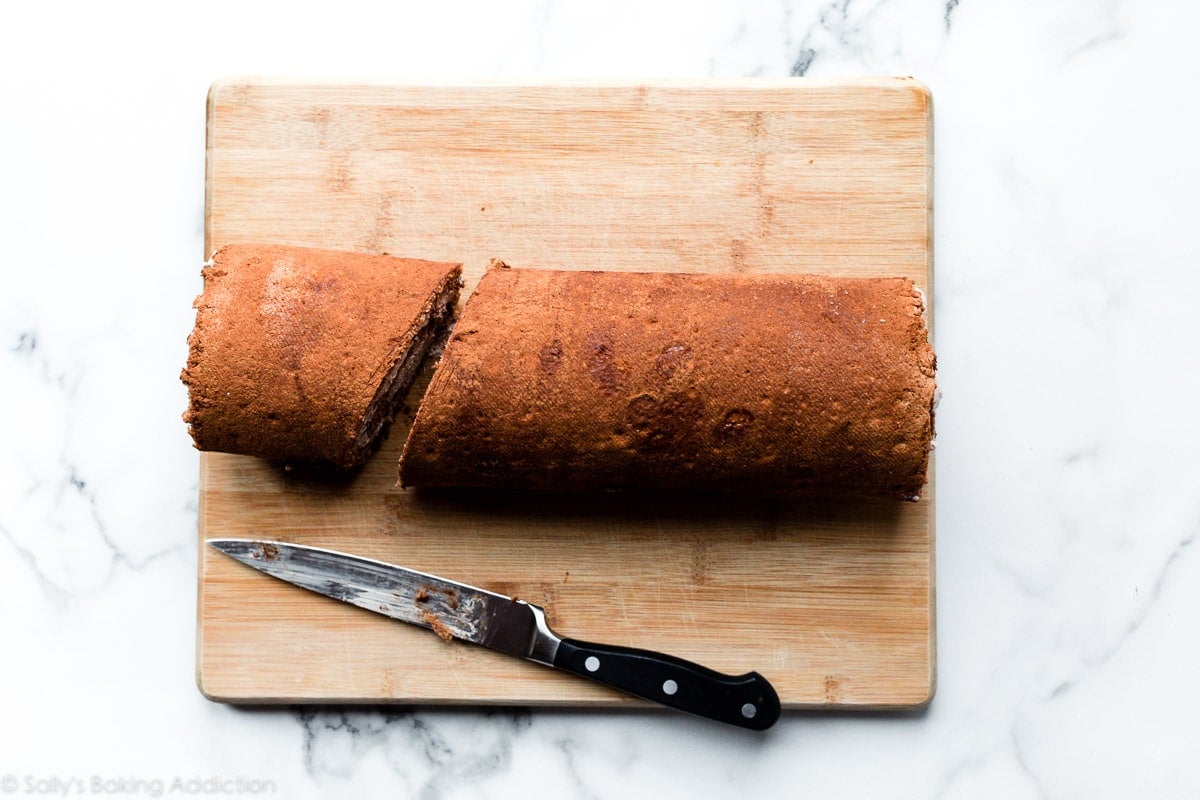
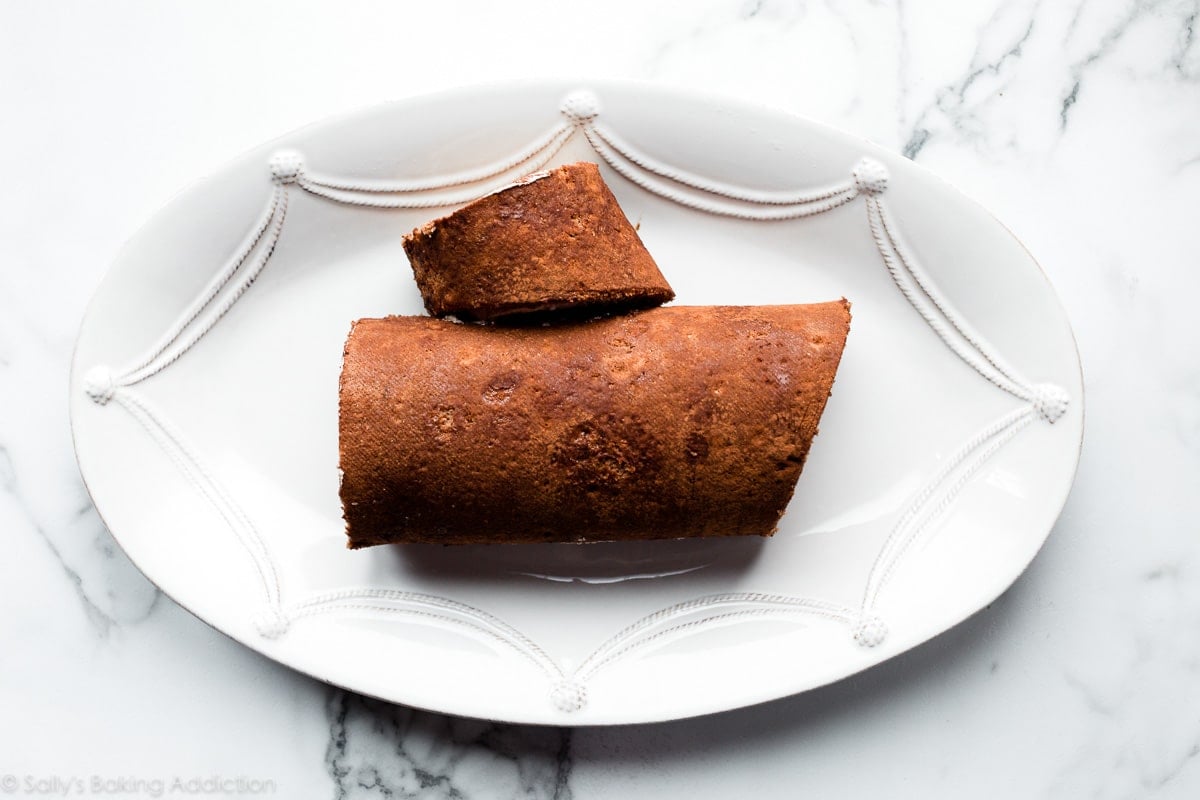
Assembling the Yule Log
One end of the yule log cake is traditionally cut off and placed on the side or on top of the roll to resemble a branch. You can cut it at a diagonal angle as pictured below:
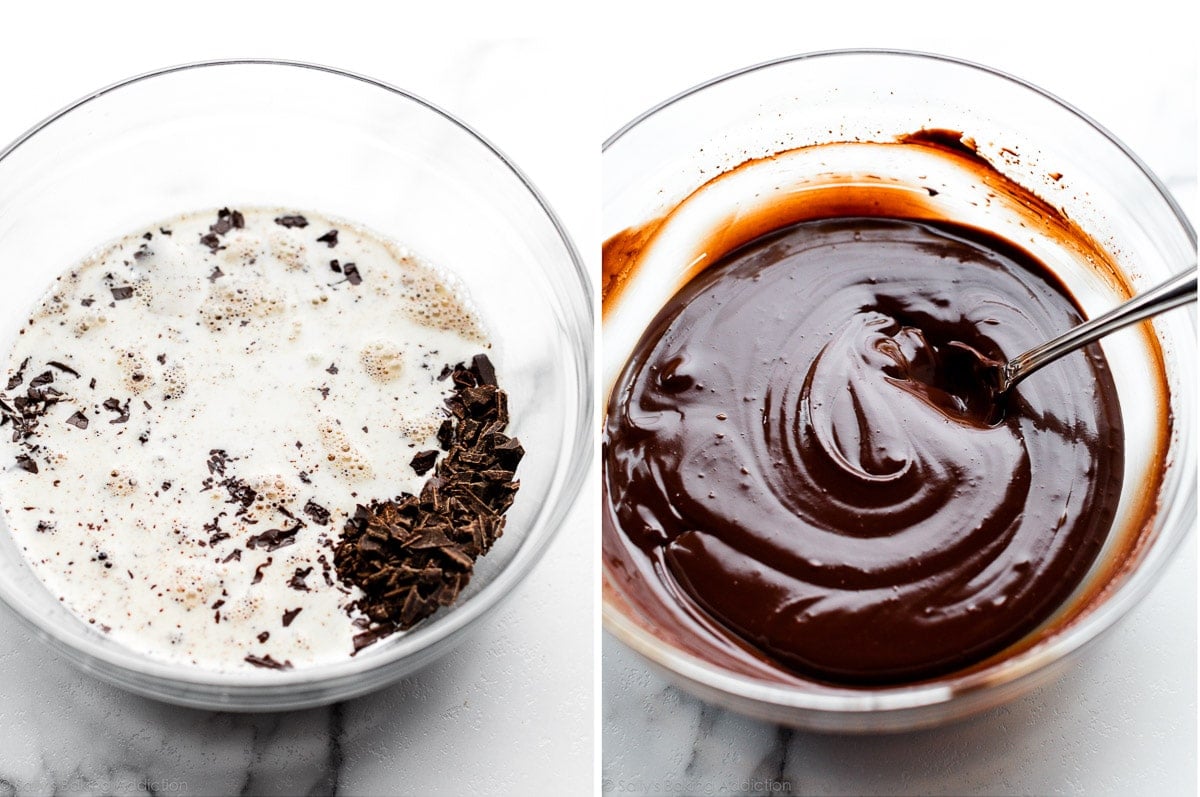
Chocolate Ganache
I have a separate and very detailed post showing you how to make chocolate ganache. Feel free to review it if you’re a beginner. You need 2 ingredients: pure chocolate and warmed heavy cream. The ganache is very thin right after you make it, so it’s imperative you let it cool down before using. Ganache thickens as it cools.
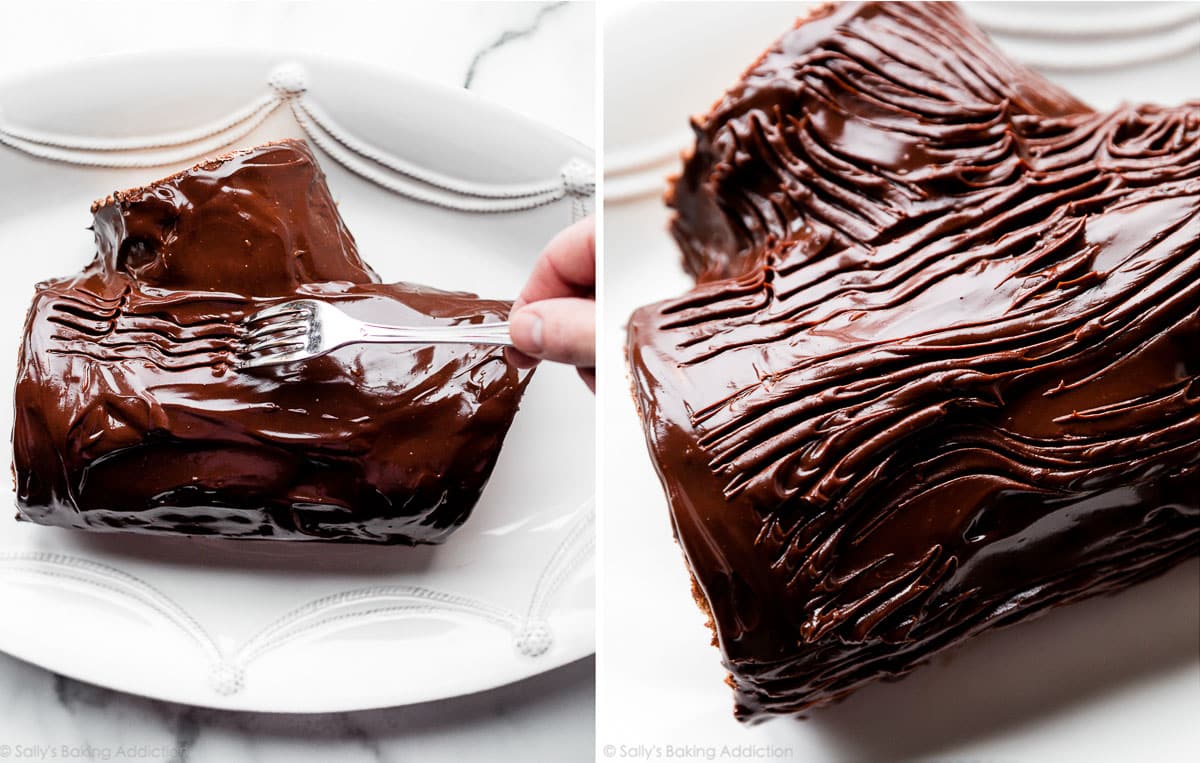
Spread the thickened ganache all over your shaped cake. This next part is easy—lightly drag a fork through the ganache so that it resembles tree bark.
Decorating Your Bûche De Noël/Yule Log
Your cake is nearly complete! Some garnish suggestions include:
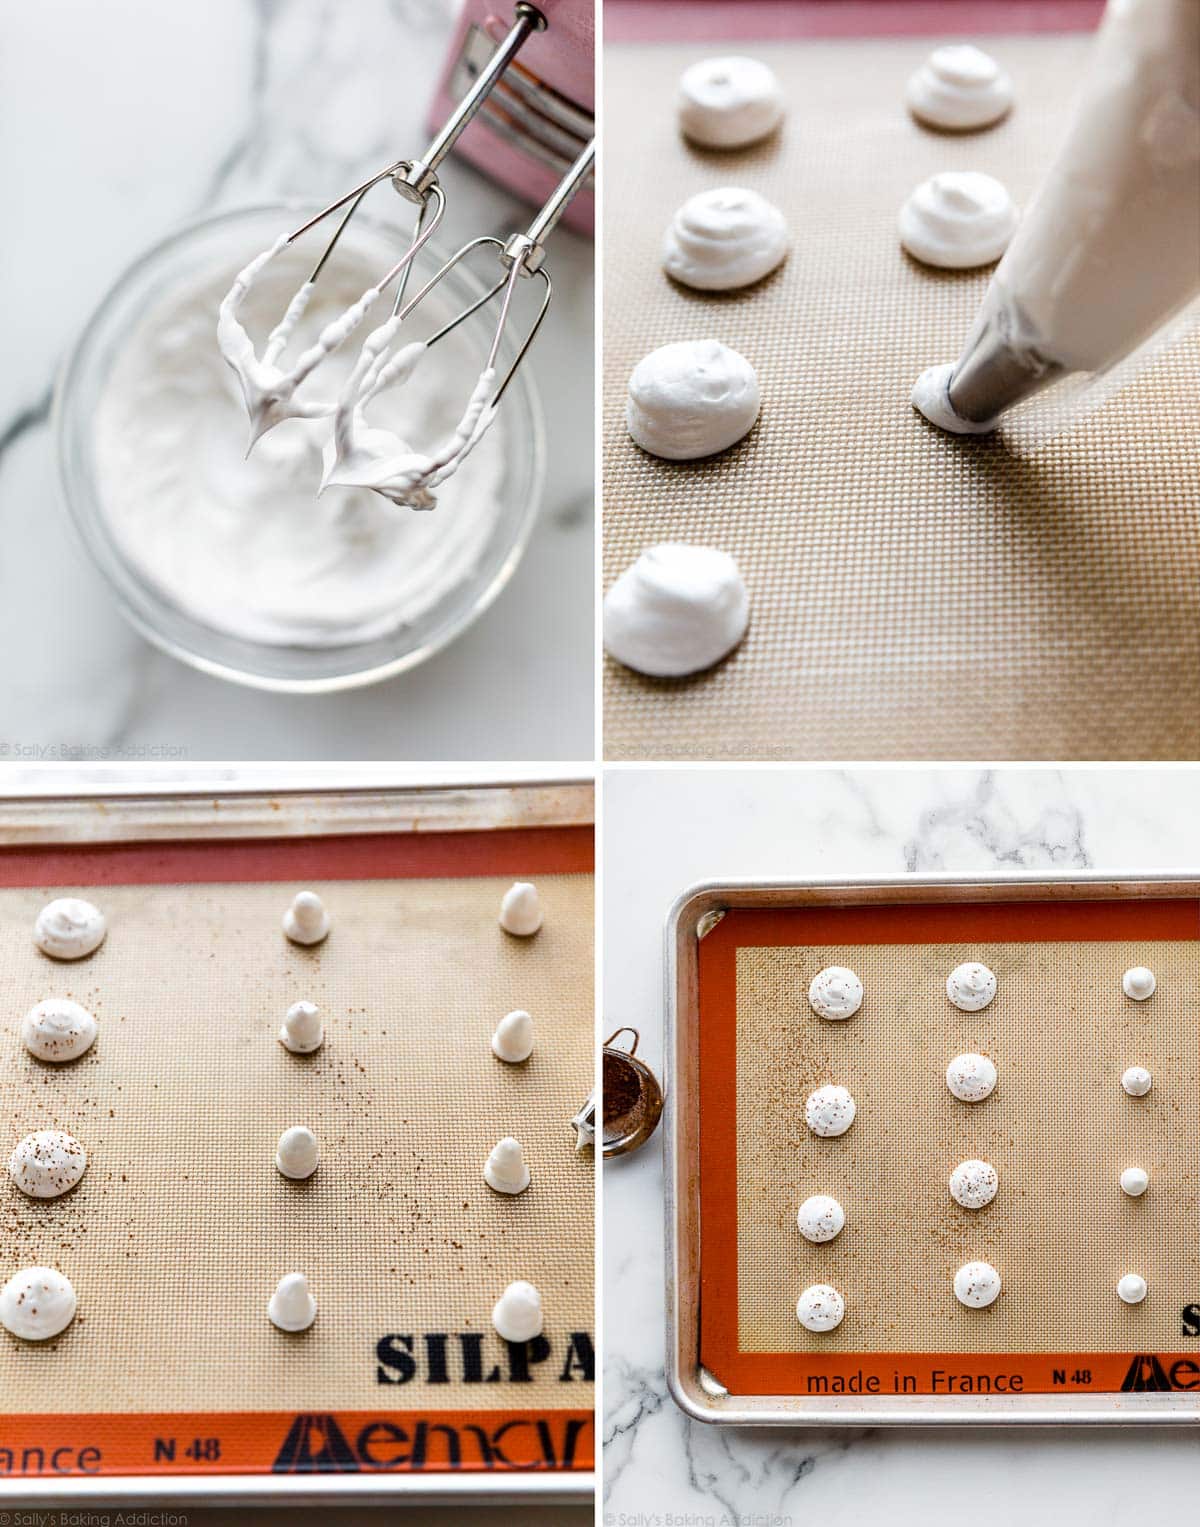
- meringue mushrooms (recipe below)
- sugared cranberries & rosemary (recipe below)
- pinecones set on your platter
- herbs & edible flowers
- shaped marzipan
- chocolate shavings
- a dusting of confectioners’ sugar to resemble snow
I’m extremely detailed in these recipe directions, so don’t be overwhelmed. If I can do this, you can do this. See my make ahead instructions if you want to get prepared—there’s plenty of ways you can prep this yule log cake in advance. Take your time and enjoy the festive process. Wishing you a season of good cheer. We all need it!
Tools You Need:
- Electric Mixer (handheld or stand) for cake batter, meringues, and filling.
- An egg separator is very helpful for the eggs.
- 12×17-inch baking pan for the cake.
- Parchment paper for lining the pan. I love these sheets.
- Offset spatula for spreading the whipped cream filling and ganache.
- Fine mesh strainer for dusting cocoa powder and confectioners’ sugar.
- Wilton 2A piping tip or any tip with around a 1/2 inch opening (plus a disposable or reusable piping bag) for meringue mushrooms.
- Thin kitchen/tea towel or parchment paper. You need either for rolling the cake, but I strongly recommend a towel because it’s better at helping to prevent cake cracks. It will get pretty dirty from the cocoa powder and cake, but stains should come right out in the wash especially if you rinse it with warm water first.
- Plus the usuals: mixing bowls, whisk, silicone spatula, cutting board, saucepan, etc.
- Pictured: large white platter from Juliska’s Whitewash Berry & Thread line and square appetizer Christmas plates from Pottery Barn
These baking tools would be great to add to your holiday wish list. And while you’re at it, be sure to check out my Holiday Gifts for Bakers guide. Lots of fun ideas in there, either for yourself or other baker friends!
Print
Bûche De Noël (Yule Log)
- Prep Time: 8 hours (includes cranberries)
- Cook Time: 2 hours, 20 minutes (includes meringues)
- Total Time: 10 hours
- Yield: 10-12 slices
- Category: Dessert
- Method: Baking
- Cuisine: French
Description
The meringue mushrooms and sugared cranberries & rosemary are completely optional garnishes. The recipe below includes both. For all make-ahead instructions, see recipe notes. I recommend watching the video tutorial above and reading the full recipe below before beginning. There’s a lot of cooling down, chilling, and other moving parts here!
Ingredients
Sugared Cranberries & Rosemary
- 1 cup (100g) fresh cranberries (do not use frozen)
- 4–5 rosemary sprigs
- 3/4 cup (180ml) water
- 1 and 1/4 cups (250g) granulated sugar, divided
Cake
- 1 and 1/3 cups (157g) cake flour
- 2 Tablespoons (10g) unsweetened natural or dutch-process cocoa powder
- 1 teaspoon baking powder
- 1/2 teaspoon salt
- 6 large eggs, separated and at room temperature
- 1 cup (200g) granulated sugar, divided
- 2 Tablespoons (30ml) vegetable oil, canola oil, or melted coconut oil
- 1 and 1/2 teaspoons pure vanilla extract
For Rolling
- 3 Tablespoons (15g) unsweetened natural or dutch-process cocoa powder
Meringue Mushrooms
- 1 large egg white, at room temperature
- less than 1/8 teaspoon cream of tartar (about 1/16 teaspoon)
- pinch salt
- 2 Tablespoons (25g) granulated sugar
- 1/2 teaspoon unsweetened natural or dutch-process cocoa powder (optional for dusting)
- 1 ounces (28g) semi-sweet chocolate, finely chopped
Cocoa Hazelnut Whipped Cream
- 1 and 1/2 cups (360ml) cold heavy cream
- 2 Tablespoons (30ml) Frangelico liqueur
- 1/4 cup (30g) confectioners’ sugar
- 1 Tablespoon (5g) unsweetened natural or dutch-process cocoa powder
- 1/2 cup (60g) finely chopped hazelnuts (optional)
Ganache Topping
- 6 ounces (170g) semi-sweet chocolate, finely chopped
- 3/4 cup (180ml) heavy cream
Instructions
- Make the sugared cranberries and rosemary: If you want to decorate the cake with sugared cranberries and rosemary, start them the night before because they need to sit for several hours. Place cranberries and rosemary in a large heatproof bowl. Set aside. In a medium saucepan set over medium heat, bring the water and 3/4 cup (150g) of sugar to a simmer, whisking until the sugar has dissolved. Remove the pan from heat and allow to cool for 5 minutes. Pour the sugar syrup over the cranberries and rosemary and stir. Cover the bowl and set aside for 15 minutes. Line a baking sheet with parchment paper or a silicone baking mat. Using a slotted spoon, transfer the cranberries and rosemary from the sugar syrup and place them on the prepared baking sheet. Allow to dry, uncovered, for 1 hour. Pour remaining 1/2 cup (100g) sugar into a large bowl. Toss the cranberries and rosemary in the sugar, coating them all the way around. Place on a parchment paper—or silicone baking mat-lined baking sheet and let them dry uncovered for at least 1 hour at room temperature or in the refrigerator. Cover tightly and store in the refrigerator for up to 3 days. For more uses, see how to make sugared cranberries.
- Preheat oven to 350°F (177°C). Spray a 12×17-inch baking pan with nonstick spray or grease with butter, so the parchment paper sticks. Then line it with parchment paper so the cake seamlessly releases. Spray or grease the parchment paper too. We want an extremely nonstick surface for this cake roll.
- Make the cake: Whisk the cake flour, cocoa powder, baking powder, and salt together in a medium bowl. Set aside until the next step. Using a hand mixer or a stand mixer fitted with whisk attachment, beat the egg whites and 1/2 cup (100g) sugar together on high speed for 4-5 minutes or until stiff peaks form. Transfer to another bowl. Using the same mixing bowl you just had the egg whites in (no need to clean it), add the egg yolks, remaining sugar, oil, and vanilla extract. Beat together on high speed for 3-4 minutes or until thickened and light in color.
- Add half of the whipped egg whites into the egg yolk mixture. Beat on low speed for 10 seconds. Repeat with remaining egg whites and beat on low for 10 seconds. Add half of the flour mixture and beat on low or fold with a silicone spatula until combined. Repeat with remaining flour mixture. Avoid over-mixing and deflating those egg whites. Batter will be very light.
- Spread batter evenly into prepared pan. Gently bang the pan on the counter a couple times to pop any air bubbles. Bake for 15-16 minutes or until the cake springs back when lightly poked with your finger. Cake will look a little bubbly on top when it’s done. That’s ok. Avoid over-baking cake because it will crack if over-baked. As the cake bakes, get started on the next step.
- Prepare to roll: As the cake bakes, place a piece of parchment paper (larger than the cake) or a thin kitchen/tea towel flat on the counter. (Note: I find a kitchen towel is better to help prevent cracking.) Using a fine mesh sieve, dust parchment/towel with 3 Tablespoons (15g) of cocoa powder. Once the cake comes out of the oven, quickly run a knife around the edges to loosen it. Immediately invert it onto the parchment/towel. Peel off the parchment paper that was on the bottom of the cake as it baked. Starting with the narrow end, begin tightly rolling the hot cake up with the parchment/towel. Do this slowly and gently. The cake will be warm. Allow the cake to cool completely rolled up in the parchment/towel. Feel free to place it in the refrigerator to speed it up, about 3 hours and up to 1 day.
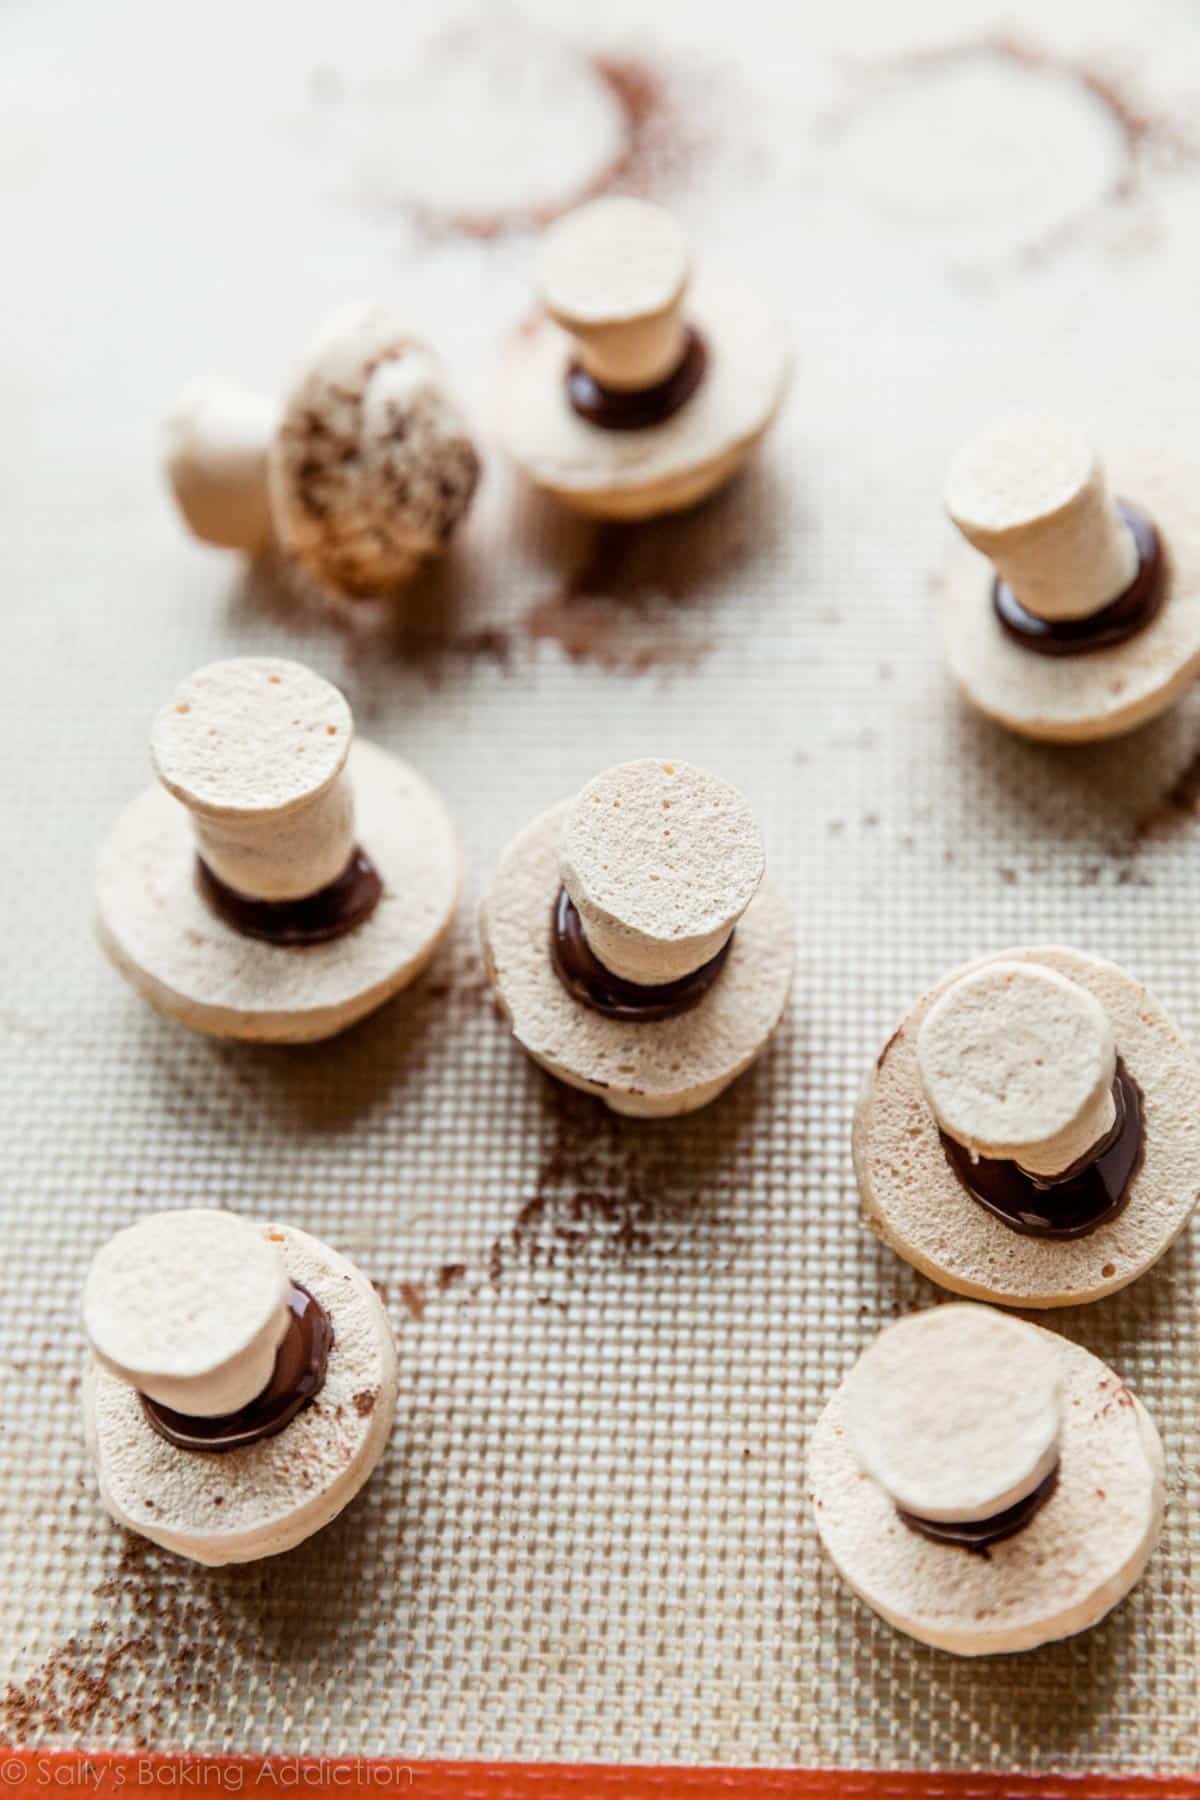
- During this time, make the meringue mushrooms: Preheat oven to 200°F (93°C). Line a large baking sheet with parchment paper or a silicone baking mat. In a completely clean residue-free large glass or metal mixing bowl, using a handheld mixer or stand mixer fitted with a whisk attachment, beat the egg white, cream of tartar, and salt together on high speed until foamy, about 2 minutes—this is a small amount and the whisk on a stand mixer might not reach it, so whisk by hand until foamy if needed. With the mixer running on high speed, slowly add the sugar and beat until stiff glossy peaks form, about 2 more minutes. Snip off the end of a plastic bag or fit a round piping tip in a piping bag. I use and recommend Wilton 2A piping tip or any tip with around a 1/2 inch opening. Pipe quarter-sized circles (these will be the round mushroom tops) and 1-inch tall cones (these will be the stems). You will have enough meringue batter for about 16 mushrooms. I usually only make 8-12 and discard leftovers, but feel free to make all 16. Using a moistened finger (just a dab of water is fine), smooth down any peaks. If desired, lightly dust mushroom tops with cocoa powder using a fine mesh sieve. Bake for 2 hours. Do not open the oven as the meringues bake. Turn off the oven after 2 hours and let the meringues sit inside the cooling oven for 20 minutes. Remove meringues from the oven and cool completely. When they’re just about cool, melt the 1 ounce of chocolate in a double boiler or use the microwave. If using the microwave, melt in 15 second increments, stopping and stirring between each until melted and smooth. Cool for 5-10 minutes. (Easier to adhere mushrooms if the melted chocolate is a bit cool.) Once meringues have cooled, use a flat spatula to remove them from the baking sheets. Dot a bit of chocolate onto the center of the bottom of a mushroom top. Adhere a mushroom stem to it. Place back on the baking sheet to set. If stems or tops still have a little peak, scrape off with a knife or your spatula, as you see me do in the video above. Leaning them against the rim is helpful if they keep toppling over. Repeat with remaining tops and stems to form mushrooms. Let chocolate cool and harden, about 1 hour.
- Remove the cake roll from the refrigerator and allow to sit on the counter for a few minutes to warm up as you prepare the whipped cream.
- Make the whipped cream: Using a hand mixer or a stand mixer fitted with a whisk attachment, whip the heavy cream, Frangelico, confectioners’ sugar, and cocoa powder on medium-high speed until medium to stiff peaks form, about 2-3 minutes.
- Gently and very slowly unroll the cake. Spread whipped cream evenly on top, leaving about a 1/2 inch border around the cake. I like using a large or small offset spatula to spread. Sprinkle chopped hazelnuts on top. Gently roll the cake back up, without the parchment/towel this time. Roll it slowly. This part is messy. Carefully place on a cutting board. If the exterior of the cake looks moist, dust with a little cocoa powder. Cover with plastic wrap and refrigerate for at least 30 minutes and up to 2 days before shaping and topping with ganache.
- Make the ganache topping: Place chopped chocolate in a medium bowl. Heat the cream in a small saucepan until it begins to simmer. (Do not let it come to a rapid boil—that’s too hot.) Pour over chocolate, then let it sit for 2-3 minutes to gently soften the chocolate. Slowly stir until completely combined and chocolate has melted. Ganache will be thin, so it has to thicken before using. Refrigerate, uncovered, for at least 30 minutes and up to 1 hour to thicken.
- Remove rolled cake from the refrigerator. Diagonally slice a 3-4 inch section off one end. At this point, I usually place the cake on a serving platter. Place the angled side against a side of the roll, forming a branch. Slowly pour and spread thickened ganache all over the top and sides of cake. Feel free to leave the cut ends exposed (as you see in these photos) or spread ganache over the ends—there should be plenty of ganache to use. Use a fork to make textured lines resembling tree bark. Feel free to wipe the serving plate if ganache dripped all over.
- Decorate with meringue mushrooms, sugared cranberries and rosemary, and a dusting of confectioners’ sugar just before serving.
- Cover leftover cake and store in the refrigerator for up to 3 days.
Notes
- Make Ahead Instructions: You can get started on the sugared cranberries and rosemary ahead of time. See step 1. You can make the meringue mushrooms in advance (step 7) as long as the weather is dry. (Humidity will ruin them.) Store at room temperature for up to 2-3 days before using. You can make the roll cake in advance (steps 2-6) because it must cool/chill completely before filling. Refrigerate for at least 3 hours and up to 1 day. You can also refrigerate the filled cake roll (steps 9-10) for up to 2 days. You can make the whipped cream (step 9) 1 day in advance too. Cover and refrigerate until ready to use. You can make the chocolate ganache topping (step 11) 1 day in advance, but if you let it sit for longer than 1 hour, it will thicken too much. If refrigerating for longer than 1 hour, cover it. To thin it out when ready to use, stir and warm it in a heat-proof bowl over a pan of simmering water for about 1 minute. Do not microwave it. Entire cake can be made 1-2 days in advance too. (Steps 1-12.) Cover and refrigerate until ready to decorate and serve. You can also freeze the assembled cake before or after adding the ganache. (Steps 1-11 or 12.) Cover and freeze for up to 3 months. Thaw in the refrigerator before continuing with the recipe. It’s best to decorate with sugared cranberries, meringues, and a dusting of confectioners’ sugar (step 13) closest to serving.
- Special Tools – Cake, Whipped Cream, and Ganache (affiliate links): 12×17-inch Baking Pan | Parchment Paper | Glass Mixing Bowls | Whisk | Electric Mixer (Handheld or Stand) | Silicone Spatula | Thin Kitchen/Tea Towel | Fine Mesh Sieve | Egg Separator | Small Offset Spatula | Saucepan
- Special Tools – Optional Sugared Cranberries & Rosemary (affiliate links): Glass Mixing Bowls | Saucepan | Whisk | Baking Sheet | Parchment Paper Sheets or Silicone Baking Mat | Slotted Spoon or Sieve
- Special Tools – Optional Meringue Mushrooms (affiliate links): Baking Sheet | Parchment Paper Sheets or Silicone Baking Mat | Electric Mixer (Handheld or Stand) | Egg Separator | Piping Bag (Disposable or Reusable) | Wilton 2A Piping Tip (or any tip with a 1/2-inch opening) | Fine Mesh Sieve | Double Boiler (optional for melting chocolate)
- Cranberries: Use fresh cranberries, not frozen. The sugar syrup doesn’t coat evenly on the frozen berries, leaving you with plain shriveled cranberries.
- Frangelico Liqueur: This is a hazelnut liqueur. If desired, feel free to swap with the same amount of another flavored liqueur such as amaretto (almond), Baileys Irish Cream, Kahlua, Grand Marnier, or other. You can also replace the alcohol with strong (cold or room temperature) coffee or 1 teaspoon of vanilla extract or other flavor extract.
- Chocolate: You need 6 ounces of pure chocolate for the ganache topping and 1 ounce for the mushrooms. Pure baking chocolate is sold in 4 ounce bars, so 2 bars will be a little more than enough. I recommend Baker’s or Ghirardelli brands, both sold in 4 ounce bars in the baking aisle. You can use semi-sweet or bittersweet. If using white chocolate, reduce the amount of heavy cream in the ganache to 1/2 cup (120ml).
Have you made it down this far? Let me show you how to make the optional garnishes.
Meringue Mushrooms
I taught you how to make chocolate swirled meringue cookies before. Meringues require precision, so feel free to visit that post if you need a little refresher. As instructed in step 7 above, pipe mushroom tops and stems using a round piping tip. Moisten your finger with water to smooth down any peaks. Bake in a relatively cool oven, then adhere the cooled pieces with melted chocolate.
These mushrooms look adorable on top of homemade dirt pudding too!
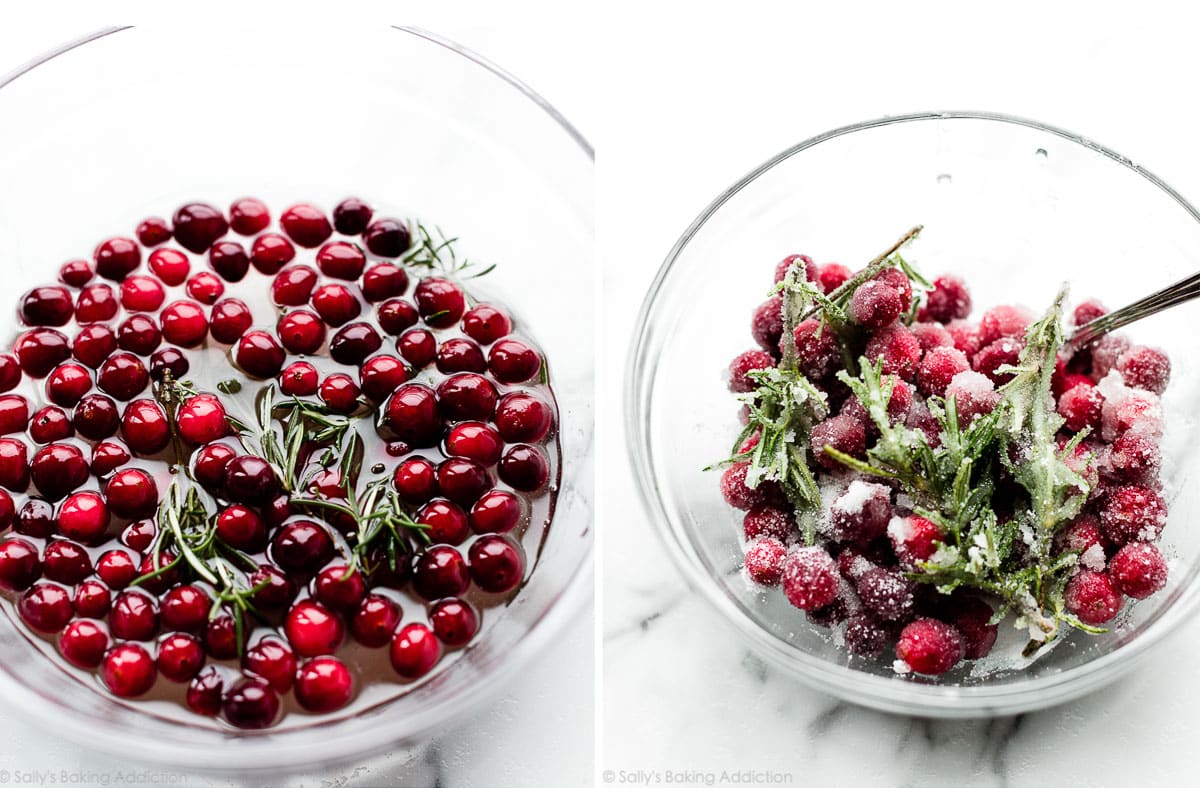
Sugared Cranberries & Rosemary
You need sugar, water, fresh cranberries, and rosemary. Frozen cranberries are not recommended here (although they’ll work for cranberry sauce, if you have a bag that needs using!) and feel free to skip the rosemary if you’d like. As instructed in step 1 above, make your sugar syrup on the stove. Pour over cranberries and rosemary and let it all soak for several hours. (Great to make these in advance.) Drain, then toss in sugar. Let it all dry out for about 2 hours before using as decor. You can also use this glitzy garnish on pumpkin pie, gingerbread cake, and cranberry orange Bundt cake, too. I love the pop of color that cranberries


Reader Comments and Reviews
I was wondering, is it possible to make the mushrooms in this recipe chocolate swirled mushrooms? I thought maybe there was a way to combine the recipe for the mushrooms with the recipe for Chocolate Swirled Meringue Cookies that you shared a link for when talking about the mushrooms. Thank you!
Hi Ruthie, we can’t see why you couldn’t use that same method of adding chocolate to the piping bag to pipe these mushrooms. Let us know if you try!
I have made this every year at x-mas for since 2020. Each year, the rolled cake comes out too thick. The cake improves after a few days of absorbing the filling, but the filling to cake distribution is off. I’ve tried everything – rolling tighter, trying to add or reduce the air in the batter before baking, using the recommended sized pan, and even ensuring the oven is level. Mine looks just like the first hero image on the post, so I don’t think I’m doing anything drastically wrong. Any other options? Or should I look to another cake recipe?
Hi! I was wondering if I could leave out the liquor in the hazelnut crème filling.
Hi Emma, yes! See Notes for details: You can also replace the alcohol with strong (cold or room temperature) coffee or 1 teaspoon of vanilla extract or other flavor extract.
Trying this for a woodland themed shower. If I roll the cake long ways, how many will it serve?
As written, this recipe yields 10-12 slices. Enjoy!
My husband’s birthday is in December, so I opted for this recipe instead of a traditional birthday cake this year. I followed the recipe exactly, and it came out perfectly. It looked quite impressive and tasted great. I felt quite pleased with myself when I was finished 🙂
Hi Sally, I made this cake for a family Christmas Eve dinner, this turned out stunning. Is it better to serve it almost room temperature? This because, I kept it in the fridge until serving and it turned a bit dry. When I tried it when the icing is softer, it was great.
Hi J, while it’s best to store the cake in the refrigerator, you can certainly let it come to room temperature for a while before serving. We’re glad it was a hit!