

This is a variation of classic Danish pastry dough. Instead of laminating the dough with separate layers of butter like we do with homemade croissants, we’re working the butter directly into the yeasted dough. We still get a wonderfully flaky and buttery layered pastry! From this dough you can create a blueberry cream cheese pastry braid or individual breakfast pastries.
I’ve studied, tested, and retested plenty of homemade pastry dough the past month. (And I’ve gone through a few pounds of butter in the process!) The resulting dough is a quick-method to real Danish pastry. It’s an adaption of several trusted sources: Cooking Illustrated, Joy of Cooking, and pastry master Beatrice Ojakangas. I mish-mashed all of the recipes I studied and made my own version of this flaky, buttery dough.
What is Danish Pastry?
Danish pastry is made from flour, yeast, milk, eggs, and copious amounts of butter. The texture is similar to croissant dough, but tastes sweeter (and has the addition of egg in the dough). Like croissants, typical Danish pastry dough is rolled out thinly, then folded with a layer of butter to form multiple layers.
This is a Shortcut Homemade Pastry Dough
This is a shortcut version—it’s not the traditional method of making real danish pastry. Here we are working the butter directly into the dough using a food processor. We’re still rolling it out and folding the dough, just as you do when you laminate dough with butter, but we’re not folding it up with a separate layer of butter. Does that make sense?
I use the term “shortcut” loosely. This dough still takes at least 5-6 hours total with 2 rounds of refrigeration. Pastries made from this dough are just as buttery, tender, and flaky. You could compare this to store-bought puff pastry, but it’s worlds better. Crispier, more buttery, flakier, and—of course—homemade.
What Can I Make With This Dough?
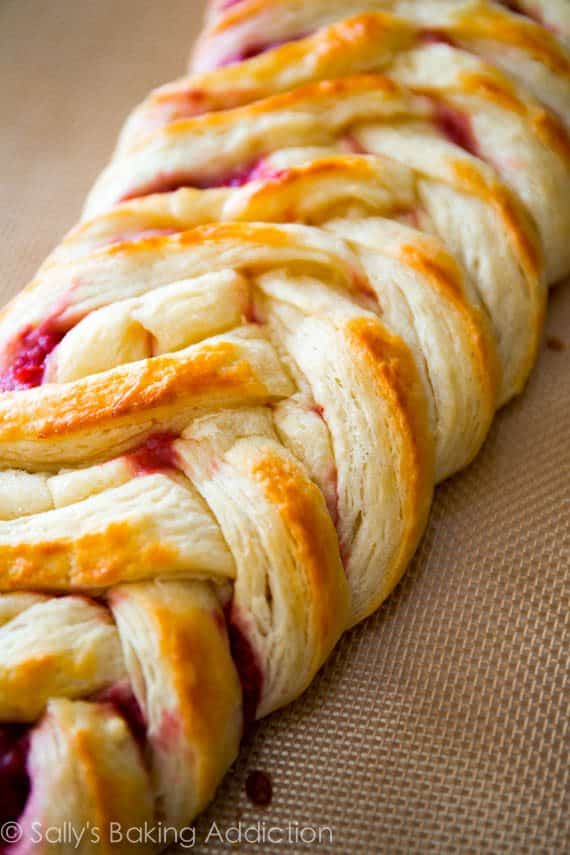
I stick to breakfast pastries like pastry braids and individual breakfast pastries. You’ll love my raspberry pastry braid (pictured above) and blueberry cream cheese pastry braid (pictured below).

You’ll also love these breakfast pastries (pictured below).

Overview: Homemade Pastry Dough Ingredients
This yeasted pastry dough comes together with 8 basic ingredients.
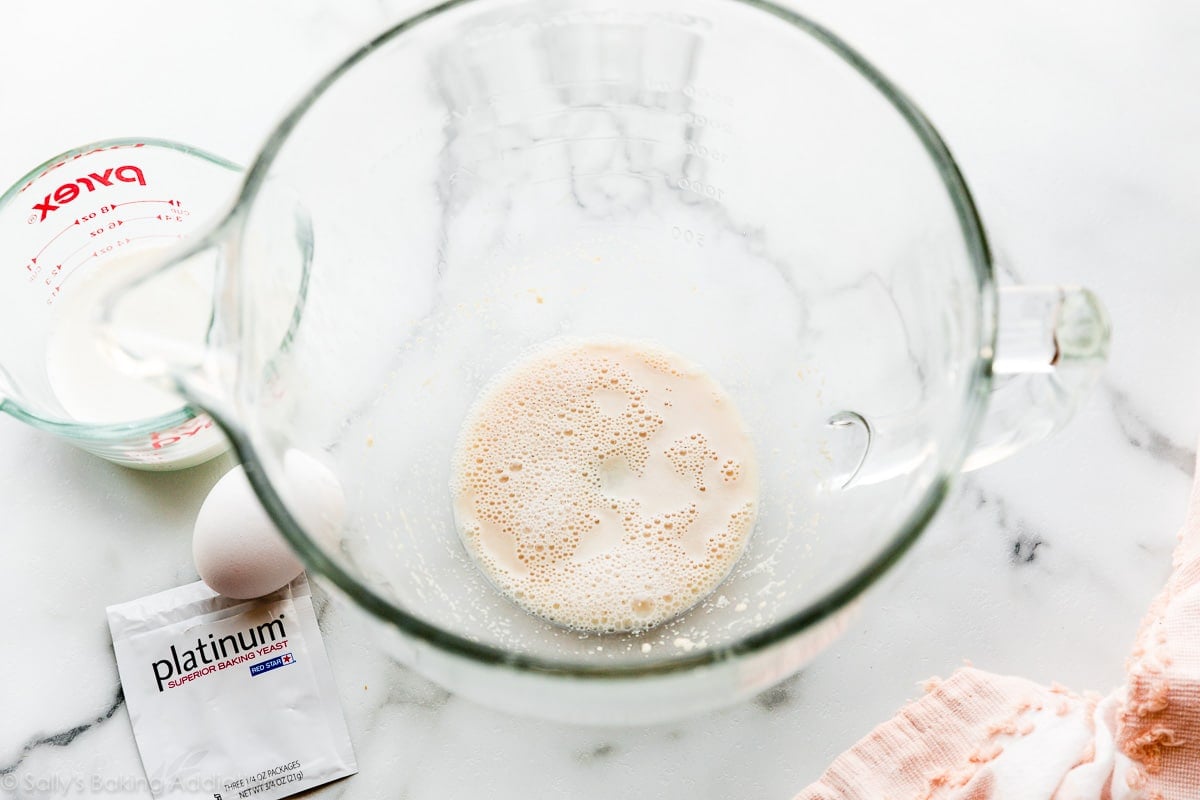
- Water: You need 2 liquids in this dough recipe: warm water and room temperature milk. Don’t use all water or all milk; this careful balance is key. Mix the warm water with yeast and some granulated sugar. Cover and wait until the top is a little foamy, as pictured below. (You will do this step no matter if you are using instant yeast or active-dry yeast.)
- Yeast: You can use active-dry or instant yeast. The instructions, amount, and recipe do not change—you will still do each of these exact steps regardless of which type you use.
- Granulated Sugar: Sugar sweetens this dough and feeds the yeast. Use 1 Tablespoon at first, then add the rest of the sugar when you whisk in the milk, egg, and salt.
- Whole Milk: Use room temperature milk, not warm milk. For best taste and texture, I strongly recommend whole milk.
- Egg: 1 egg tenderizes the dough. Don’t skip it!
- Salt: Adds flavor.
- All-Purpose Flour: You need flour in the dough, plus a generous amount for the rolling, folding, and shaping steps. It’s helpful to have plenty of extra flour on hand. I use A LOT of it when I’m rolling the dough and shaping the pastries.
- Cold Butter: Butter is the main ingredient in this dough recipe—you will work it directly into the flour, forming pea-sized crumbles. Just like when we make pie crust or biscuits, make sure the butter is extra cold. If the butter isn’t cold, the butter will melt, the dough will turn to semi-liquid, and you won’t have any layers or flakes in your pastry. The colder the butter (and dough), the better results.
Homemade Pastry Dough Success Tips
- Use cold butter. If the butter isn’t cold, the dough will melt before it even hits the oven.
- Expect some butter to leak as the pastries bake. That’s completely normal!
- The dough must be sufficiently chilled whenever you are working with it. Because of all the refrigeration, this dough is a wonderful recipe to get started ahead of time. You can easily make this dough in 1 morning or over the course of 3 days.
- The temperature of your ingredients is imperative to this pastry’s success. Make sure you take the time to warm the water and bring the milk to room temperature.
- I do not recommend any substitutions in this carefully formulated dough, though a lower fat or nondairy milk works in a pinch.
- Use a food processor for the butter/flour in step 3. If needed, a pastry cutter works in a pinch. (Affiliate links—any processor or pastry cutter works, but both linked options are what I own and love)
- Read through the recipe, recipe notes, and see the visuals below. Take your time!
Video Tutorial
Do NOT be overwhelmed by all these steps. I break everything down into detail. Be sure to use the photos below this recipe as a visual guide.
Step-by-step photos below!
Print
Homemade Pastry Dough (Quick Method)
- Prep Time: 6 hours (includes chilling)
- Cook Time: 20 minutes
- Total Time: 6 hours, 25 minutes
- Yield: 2 lbs dough (2 braids, 6 servings each)
- Category: Breakfast
- Method: Baking
- Cuisine: American
Description
This recipe yields 2 lbs of dough, which equals 2 pastry braids. 1 braid serves 5-6 people. If you don’t need that many tempting pastries around, freeze the second half of the dough for a later time. Make-ahead and freezing instructions included below.
Ingredients
Pastry Dough
- 1/4 cup (60ml) warm water (between 100-110°F, 38-43°C)
- 2 and 1/4 teaspoons active dry or instant yeast (1 standard packet)*
- 1/2 cup (120ml) whole milk, at room temperature (between 68–72°F, 20-22°C)
- 1 large egg, at room temperature
- 1/4 cup (50g) granulated sugar
- 1 teaspoon salt
- 14 Tablespoons (196g) unsalted butter, cold
- 2 and 1/2 cups (313g) all-purpose flour (spooned & leveled), plus more for generously flouring hands, surface, and dough
Egg Wash
- 1 large egg
- 2 Tablespoons (30ml) whole milk
Instructions
- Preliminary note: To help guarantee success, I recommend reading through the recipe, watching the video tutorial, and reading the explanations below this recipe. (All answer many FAQs.) Do not use an electric mixer for this dough. It’s best if the dough is folded together with a wooden spoon or silicone spatula since it is so sticky. There is very minimal mixing required.
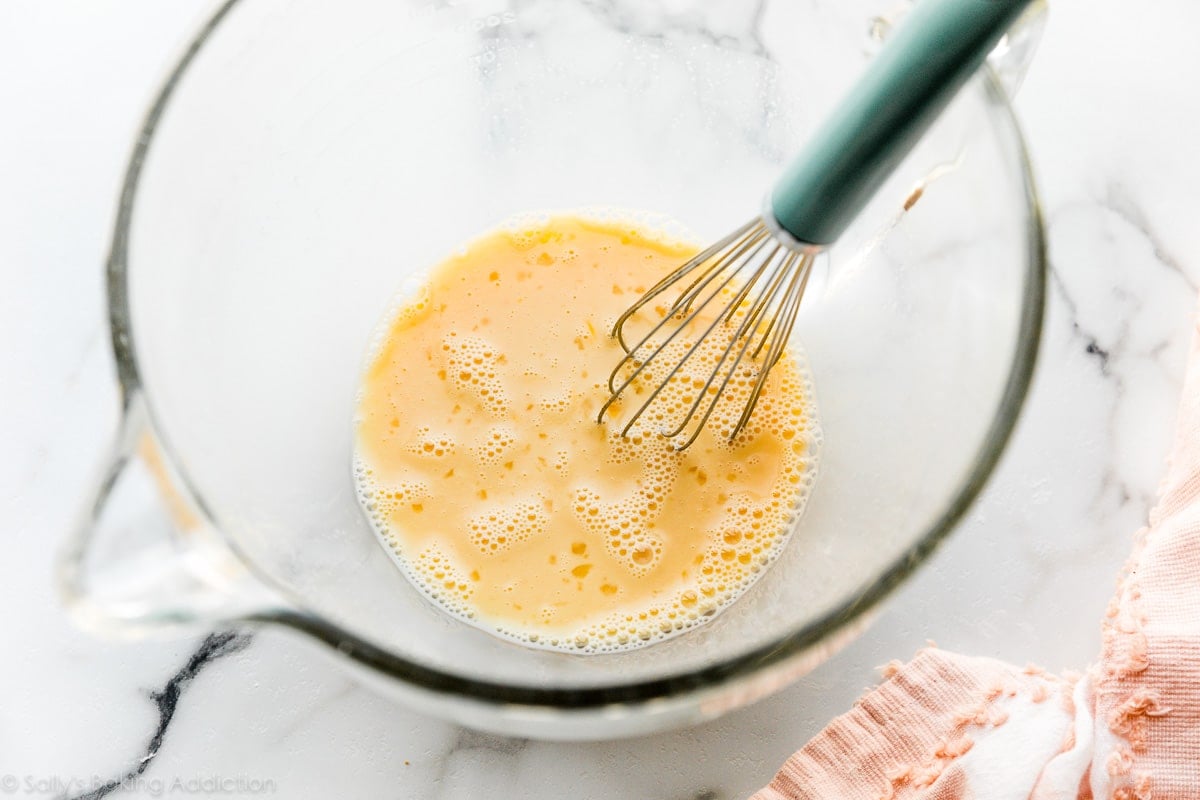
- Make the Pastry Dough: Whisk the warm water, yeast, and 1 Tablespoon (6g) of sugar together in a large bowl. Cover and allow to rest until foamy on top, about 5 minutes. If the surface doesn’t have bubbles on top or look foamy after 15 minutes (it should if the yeast isn’t expired), start over with a fresh packet of yeast. Whisk in remaining sugar, the milk, egg, and salt. Once these wet ingredients are mixed together, lightly cover and set the bowl aside as you work on the next step.
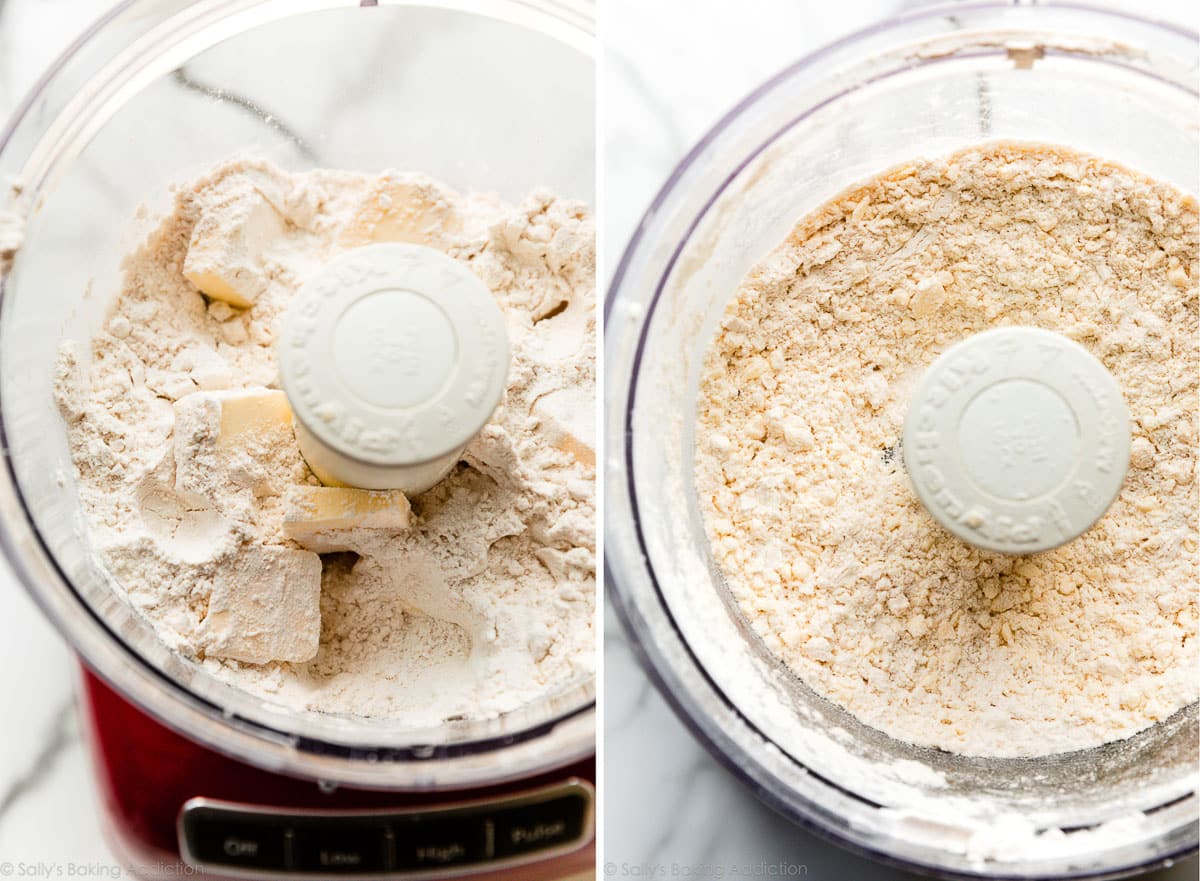
- Cut the cold butter into 1/4 inch slices and add to a food processor or blender. Top with 2 and 1/2 cups flour. Pulse the mixture 12-15 times, until butter is crumbled into pea-size bits. See photo below for a visual. Using a food processor or blender is best for this dough. Keeping that in mind, if you don’t have one, you can use a pastry cutter to work in the butter.
- Pour the flour mixture into the wet yeast mixture. Very gently fold everything together using a rubber spatula or wooden spoon. Fold *just until* the dry ingredients are moistened. The butter must remain in pieces and crumbles, which creates a flaky pastry. Turn the sticky dough out onto a large piece of plastic wrap, parchment paper, aluminum foil, or into any container you can tightly cover.
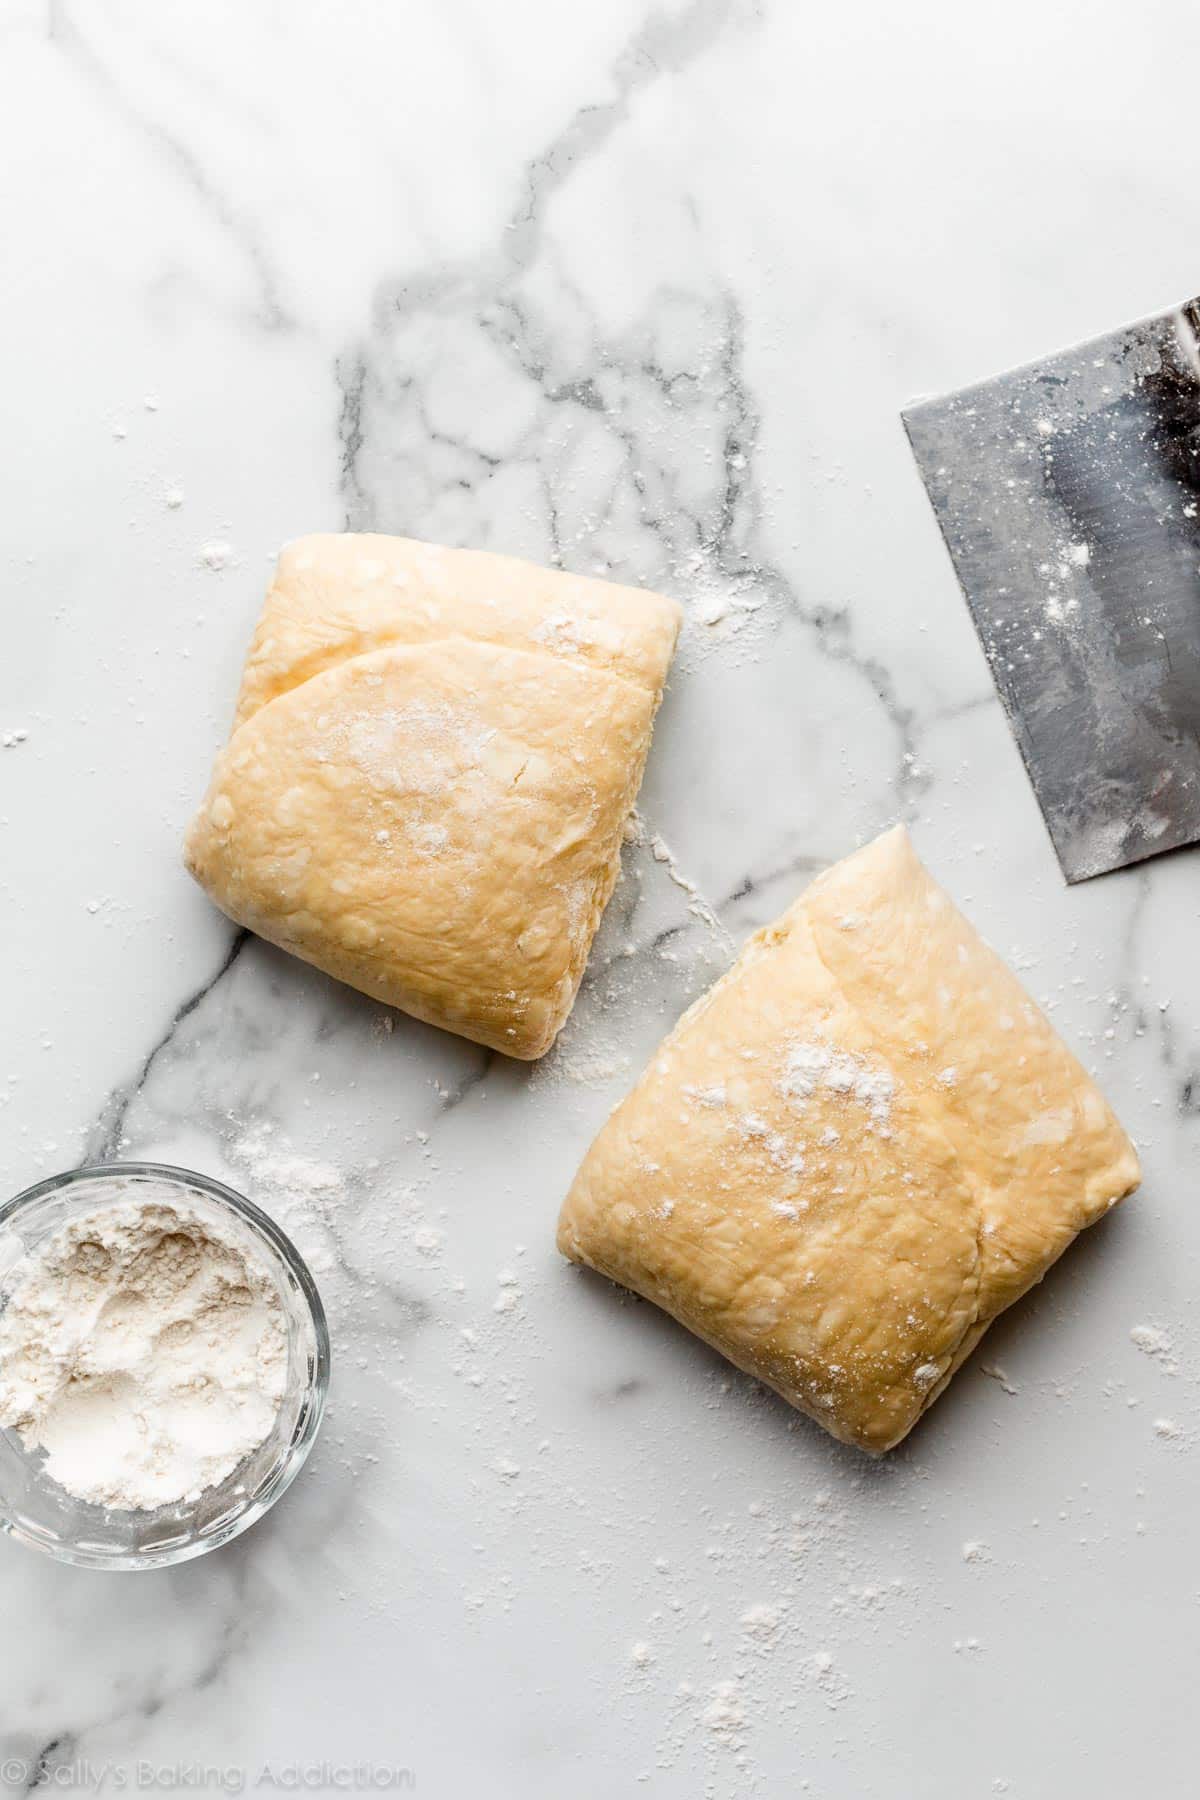
- 1st Refrigeration: Wrap the dough/cover up tightly and refrigerate for at least 4 hours and up to 48 hours.
- Roll & Fold: Take the dough out of the refrigerator to begin the “rolling and folding” process. If the dough sat for more than 4 hours, it may have slightly puffed up and that’s ok. (It will deflate as you shape it, which is also ok.) Very generously flour a work surface. The dough is very sticky, so make sure you have more flour nearby as you roll and fold. Using the palm of your hands, gently flatten the dough into a small square. Using a rolling pin, roll out into a 15×8-inch rectangle. When needed, flour the work surface and dough as you are rolling. Fold the dough into thirds as if it were a business letter. (See photos and video tutorial.) Turn it clockwise and roll it out into a 15 inch long rectangle again. Then, fold into thirds again. Turn it clockwise. You’ll repeat rolling and folding 1 more time for a total of 3 times.
- 2nd Refrigeration: Wrap up/seal tightly and refrigerate for at least 1 hour and up to 24 hours. You can also freeze the dough at this point. See freezing instructions.
- Line two large baking sheets with parchment paper or silicone baking mats. Rimmed baking sheets are best because butter may leak from the dough as it bakes. If you don’t have rimmed baking sheets, when it’s time to preheat the oven, place another baking sheet on the oven rack below to catch any butter that may drip.
- Take the dough out of the refrigerator and cut it in half. Wrap 1 half up and keep refrigerated as you work with the first half. (You can freeze half of the dough at this point, use the freezing instructions below.)
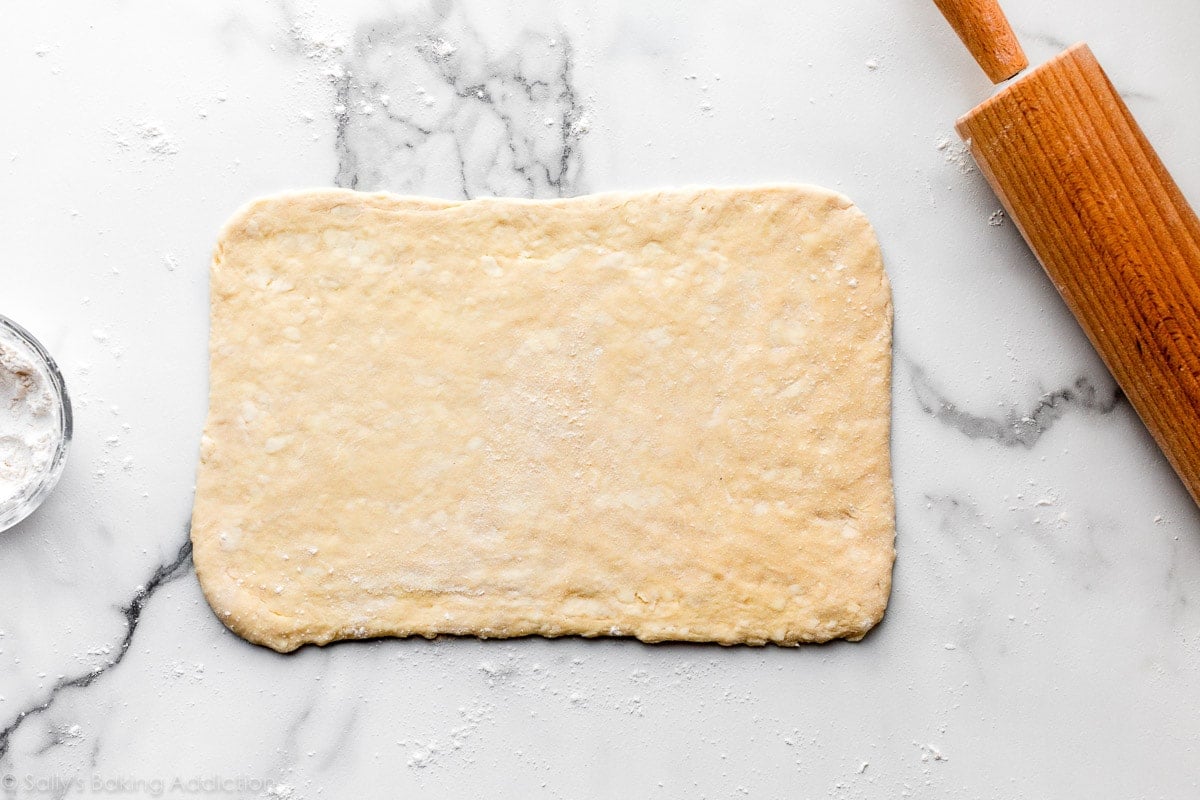
- On a floured work surface, roll dough out into a 12×8-inch rectangle. You can roll out the dough on a lightly floured piece of parchment paper or lightly floured silicone baking mat instead because you will transfer the shaped dough to a lined baking sheet next.
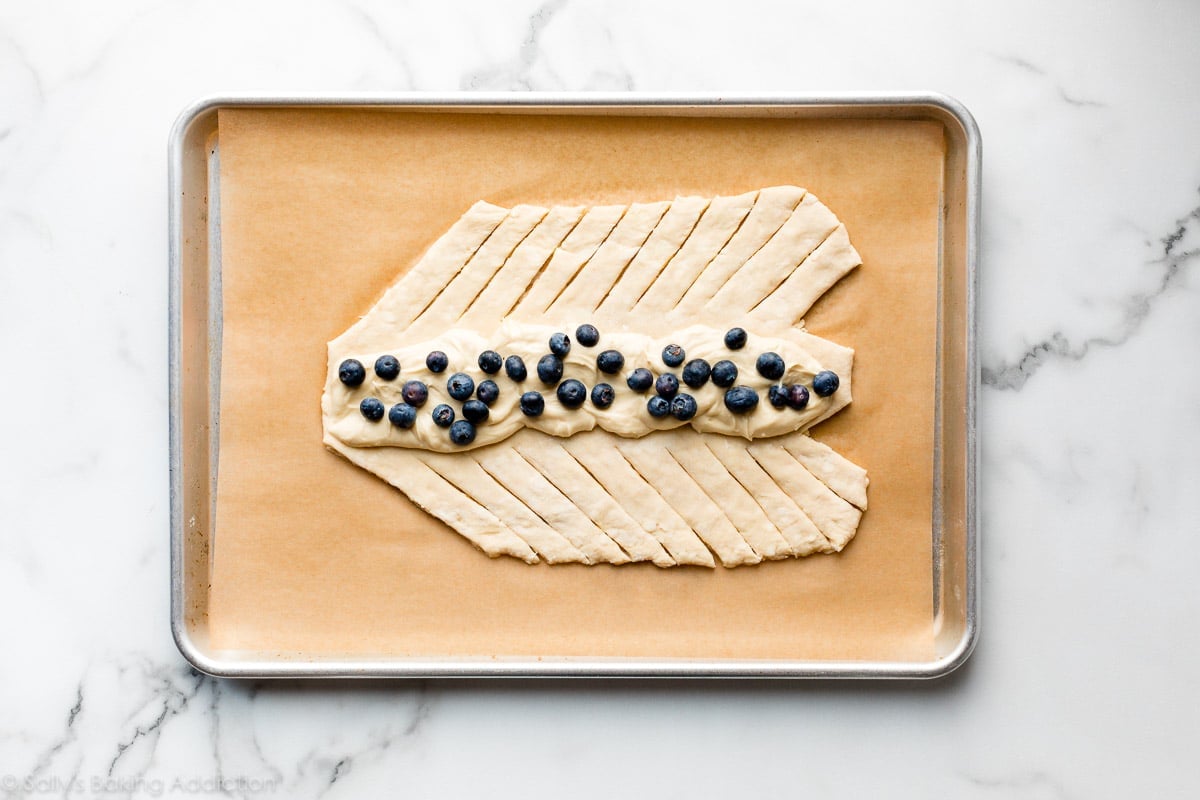
- Using a sharp knife, cut off two corners of the dough (on one 8-inch side) and then two small triangles 3 inches apart from each other on the other end (the other 8-inch side). See visual below.
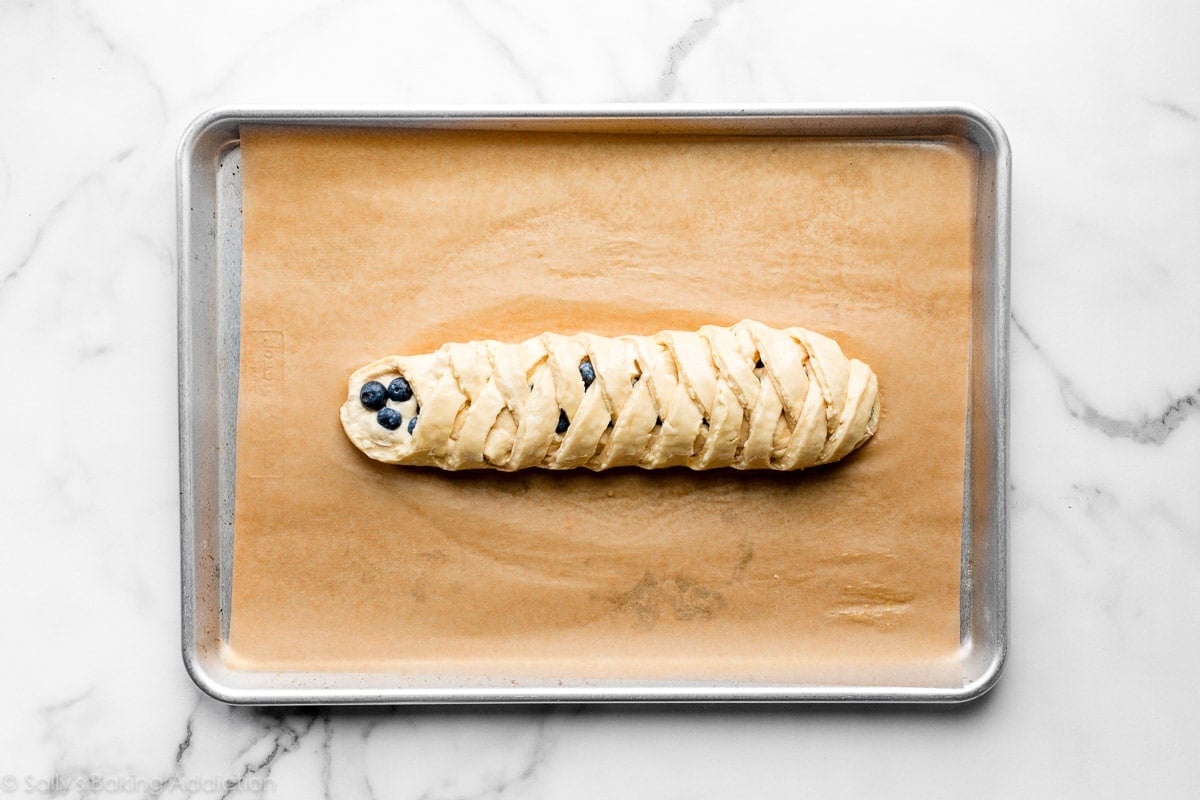
- Spread 1/2 of the filling (from raspberry pastry braid or blueberry cream cheese pastry braid) down the length of the center of the strip, which should be about 3 inches wide. Using a sharp knife, pastry wheel, or pizza cutter, cut 10 slanting strips (3/4 – 1 inch wide each) along both sides. Fold strips over filling, alternating each side to resemble a twist or a braid. Fold the bottom end up to seal the filling inside. Repeat with the second half of the dough and the rest of the filling. The braids may seem very narrow, but they puff up and out as they bake.
- Egg Wash: Whisk the egg wash ingredients together. Brush all over the dough.
- I strongly recommend refrigerating the shaped braids before baking for at least 15 minutes and up to 1 hour before baking. The braids tend to leak more butter and/or lose more shape if they haven’t chilled.
- Preheat oven to 400°F (204°C).
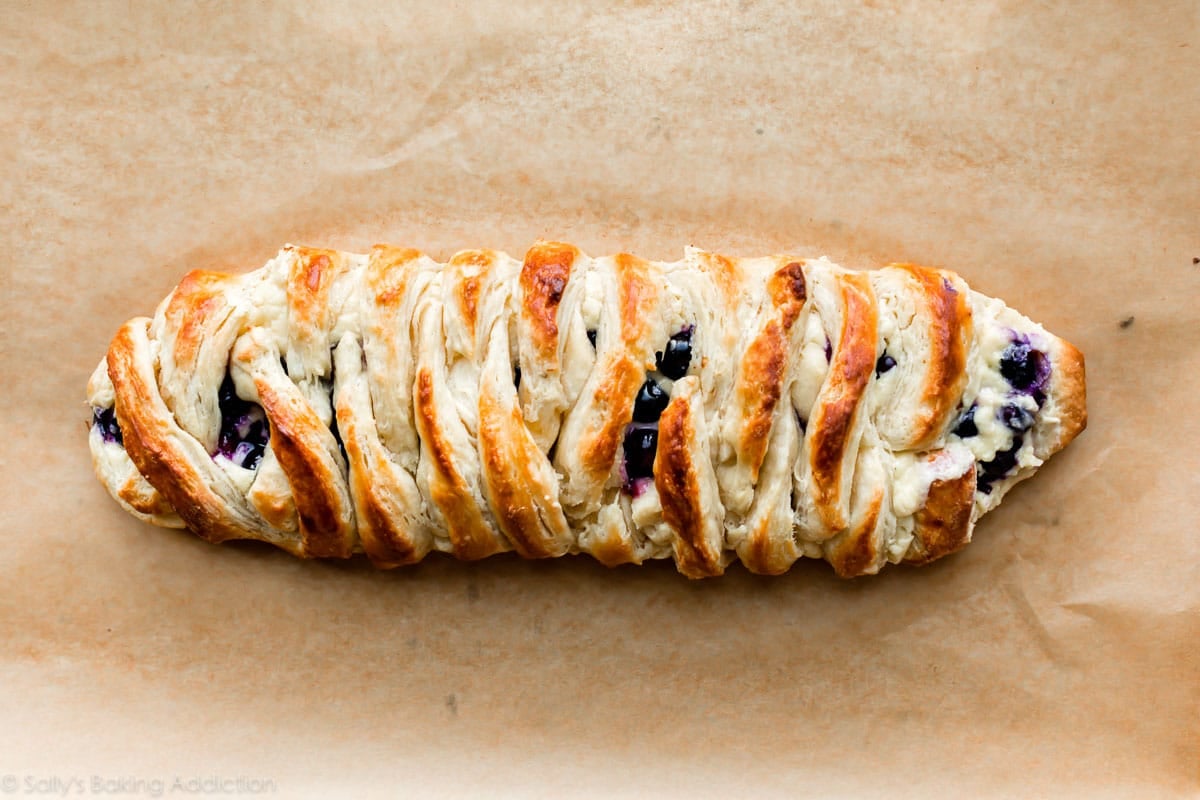
- Bake each braid for 18-22 minutes or until golden brown. Some butter may leak from the dough, that’s completely normal and expected. Feel free to remove the baking sheets from the oven halfway through baking and brush the dough with any of the leaking butter, then place back in the oven to finish baking. (That’s what I do!)
- Remove baked danish braids from the oven and cool for at least 5 minutes before cutting and serving.
Notes
- Make Ahead & Freezing Instructions: Prepare the dough as instructed in steps 2-4. At this point the dough can be refrigerated up to 48 hours. You can also prepare the dough through step 6. At this point the dough can be refrigerated up to 24 hours. During or after this second chilling time, you could also freeze the dough for up to 2 months. (I don’t recommend freezing the dough before the rolling and folding step.) Thaw overnight in the refrigerator, then continue with step 8. You can also freeze the shaped and filled braids after shaping them in step 12. Thaw in the refrigerator, then continue with step 13.
- Special Tools (affiliate links): Glass Mixing Bowl | Whisk | Silicone Spatula or Wooden Spoon | Food Processor or Pastry Cutter | Rolling Pin | Baking Sheets (preferably rimmed) | Silicone Baking Mats or Parchment Paper | Pastry Wheel or Pizza Cutter | Pastry Brush
- Temperature & Substitutions: The temperature of your ingredients is imperative to this pastry’s success. Make sure you take the time to warm the water and bring the milk to room temperature. Keep the butter in the refrigerator until you need it in step 3. I do not recommend any substitutions in this carefully formulated dough, though a lower fat or nondairy milk works in a pinch. For the egg wash, low fat or nondairy milks work, as do heavy cream or half-and-half.
- Yeast: You can use either active dry yeast or instant (quick rise) yeast. The instructions and amount are exactly the same no matter which you use. Reference my Baking with Yeast Guide for answers to common yeast FAQs.
- Halve the Recipe? I don’t recommend halving this dough recipe. Make the dough as written, then freeze half after step 9.
- Dough recipe adapted from Cooking Illustrated, Joy of Cooking, and Beatrice Ojakangas
Step-By-Step Photos
Whisk the warm water, yeast, and 1 Tablespoon of sugar together. Cover and allow to rest until foamy/bubbly on top:
Whisk in the rest of the sugar, the milk, egg, and salt. We’ll call these the wet ingredients:
You need a food processor blender for this recipe. If you have neither, use a pastry cutter to cut the cold butter into the flour. An electric mixer will not work for this step. You are looking for pea-size crumbles of flour coated butter. This step is only possible if the butter is cold.
Pour the butter/flour crumbles into the wet ingredients and fold it together using a wooden spoon or silicone spatula. It is very sticky. Since this dough is so sticky, I do not recommend using an electric mixer. It will create a huge mess! There is minimal mixing required anyway—we don’t want to overwork this dough.
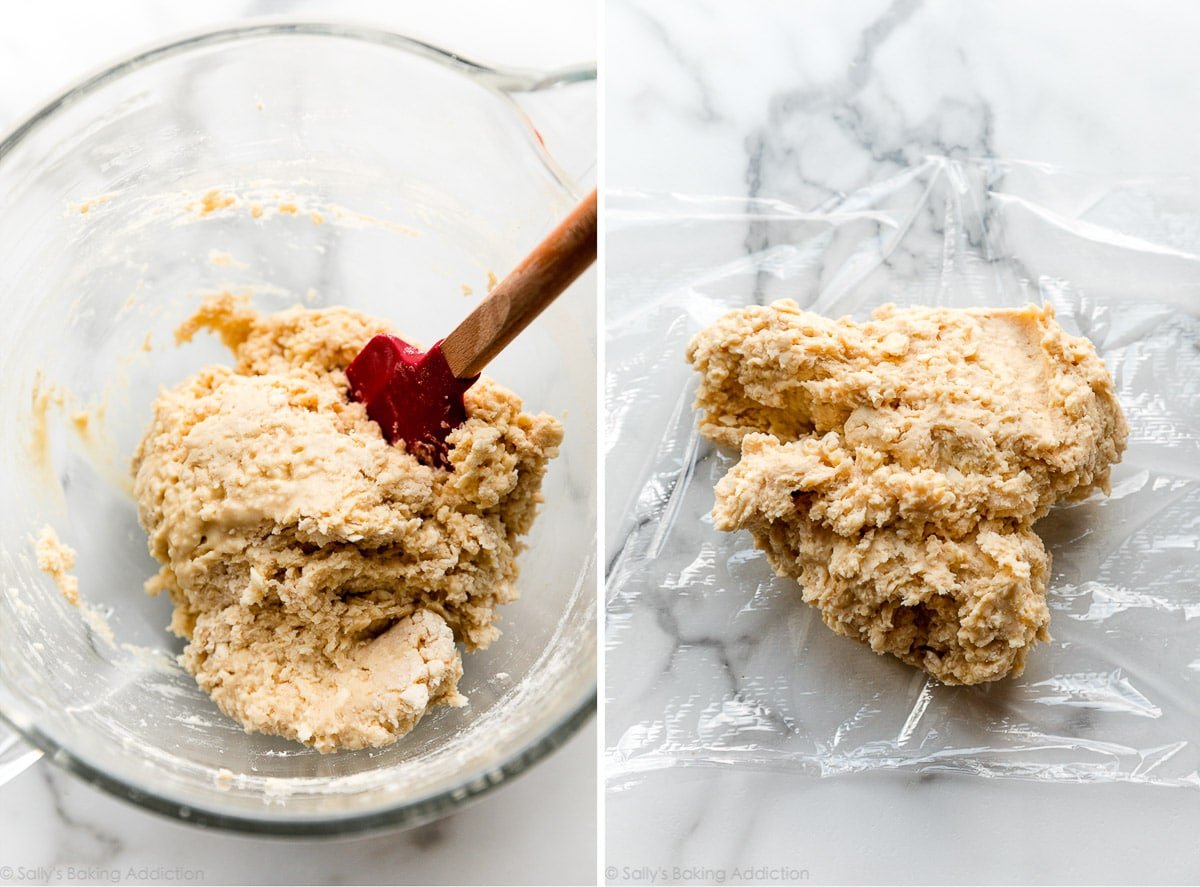
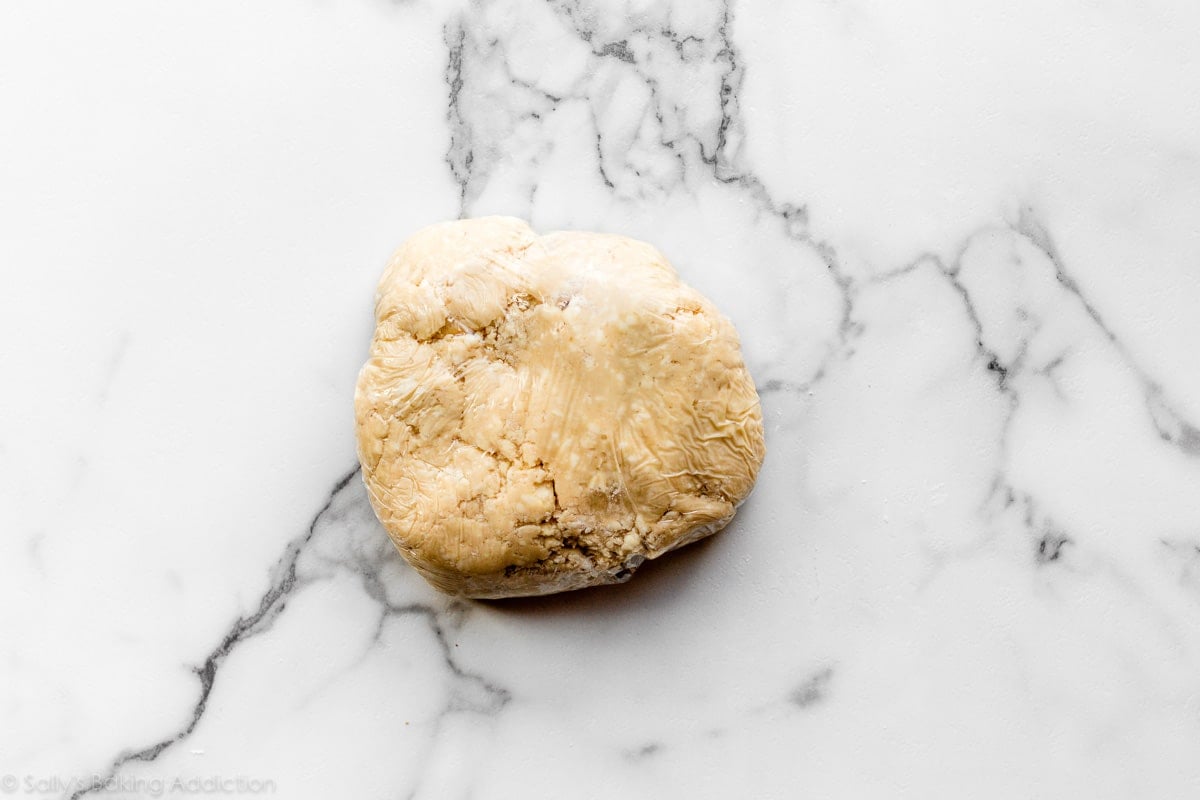
You’ll notice many bits of butter still visible in the dough—that’s a GOOD thing! Wrap the dough up tightly and refrigerate for at least 4 hours and up to 48 hours.
This is the 1st refrigeration.
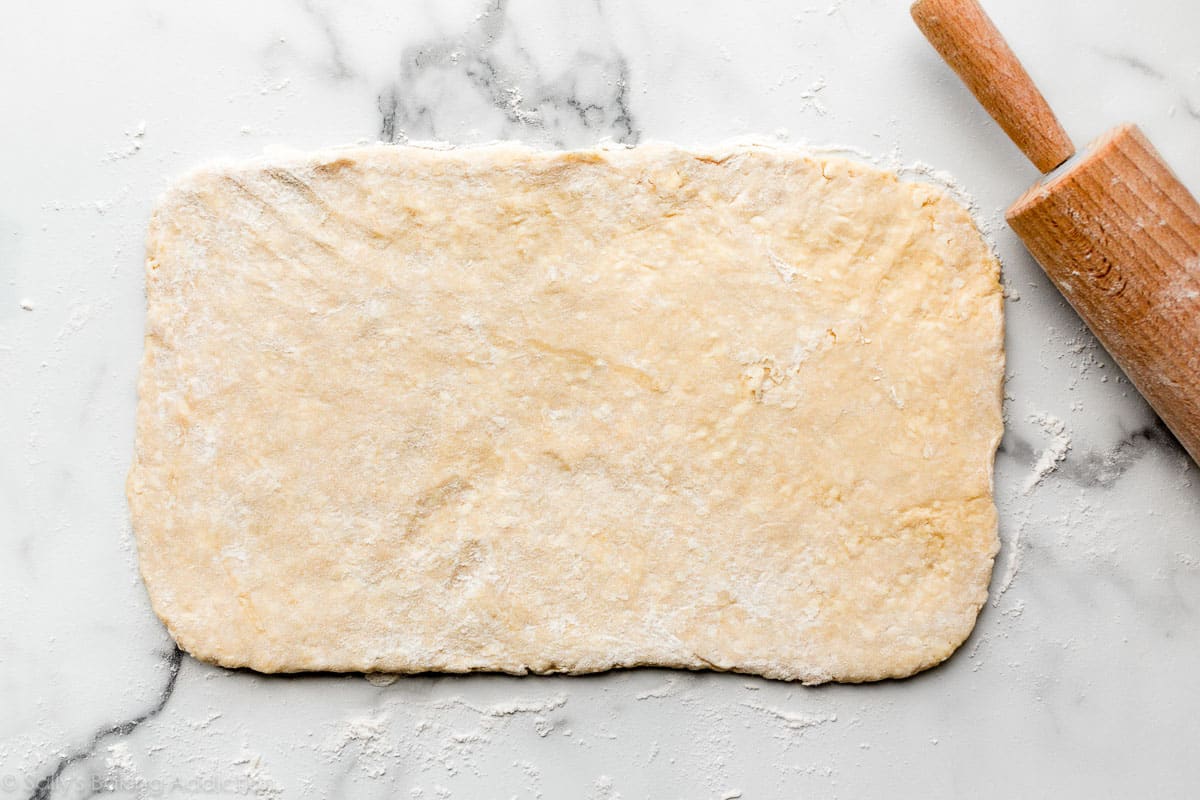
Shortcut Lamination
Now let’s do a variation of laminating aka rolling and folding dough and butter together. Remember when we made croissants and laminated the dough with a sheet of butter? The butter is IN this homemade pastry dough. So, instead, we’re just rolling and folding the dough itself. Roll it out into a 15×8-inch rectangle:
Fold it in thirds like a letter:
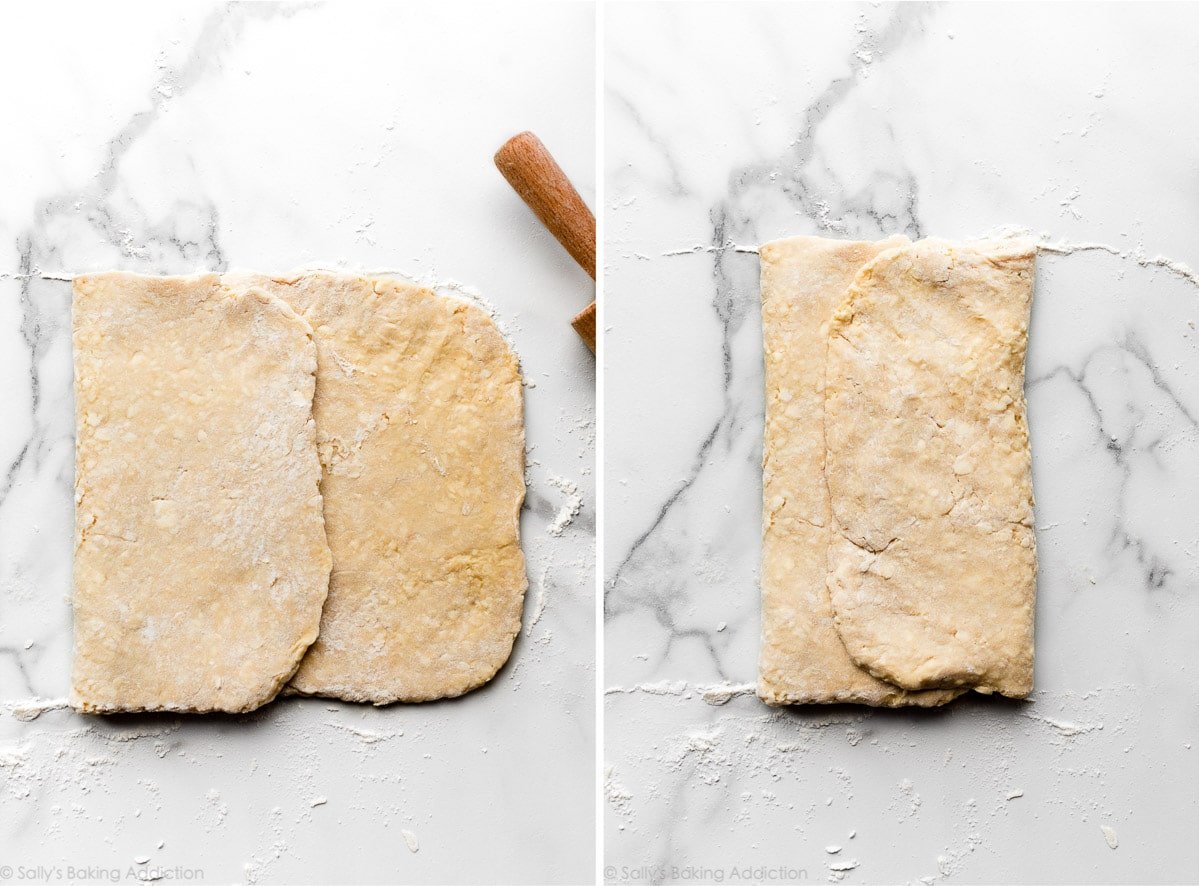
Turn it clockwise:
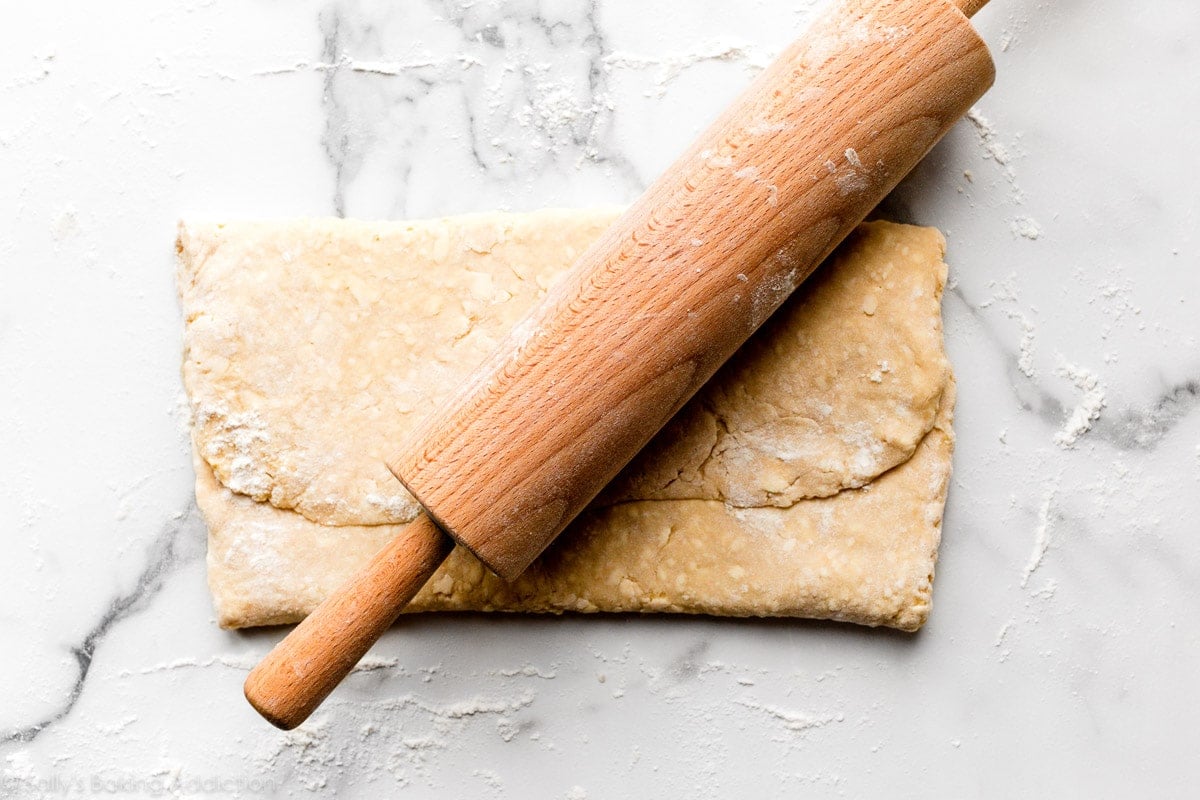
Then roll it out into a 15-inch rectangle again. Repeat the folding. Turn it clockwise again. Repeat rolling and folding 1 more time for a total of 3 times. Wrap the laminated dough up tightly and refrigerate for at least 1 hour and up to 24 hours.
This is the 2nd refrigeration. After this 2nd refrigeration, you can move on to shaping your dough based on what you’re making like individual danishes or pastry braids. The full written recipe above includes the steps you need to make a pastry braid. Here’s how to make individual breakfast pastries.
Shaping the Pastry Braid
Cut the dough in half.
This recipe yields 2 lbs of dough, which equals 2 braids. 1 braid serves 5-6 people. If you don’t need that many tempting pastries around, freeze the second half of the dough for a later time. All make-ahead and freezing instructions in the recipe above.
Work with only half the dough at once. Wrap half up and refrigerate until ready to use. Roll the half of dough into a 12×8-inch rectangle.
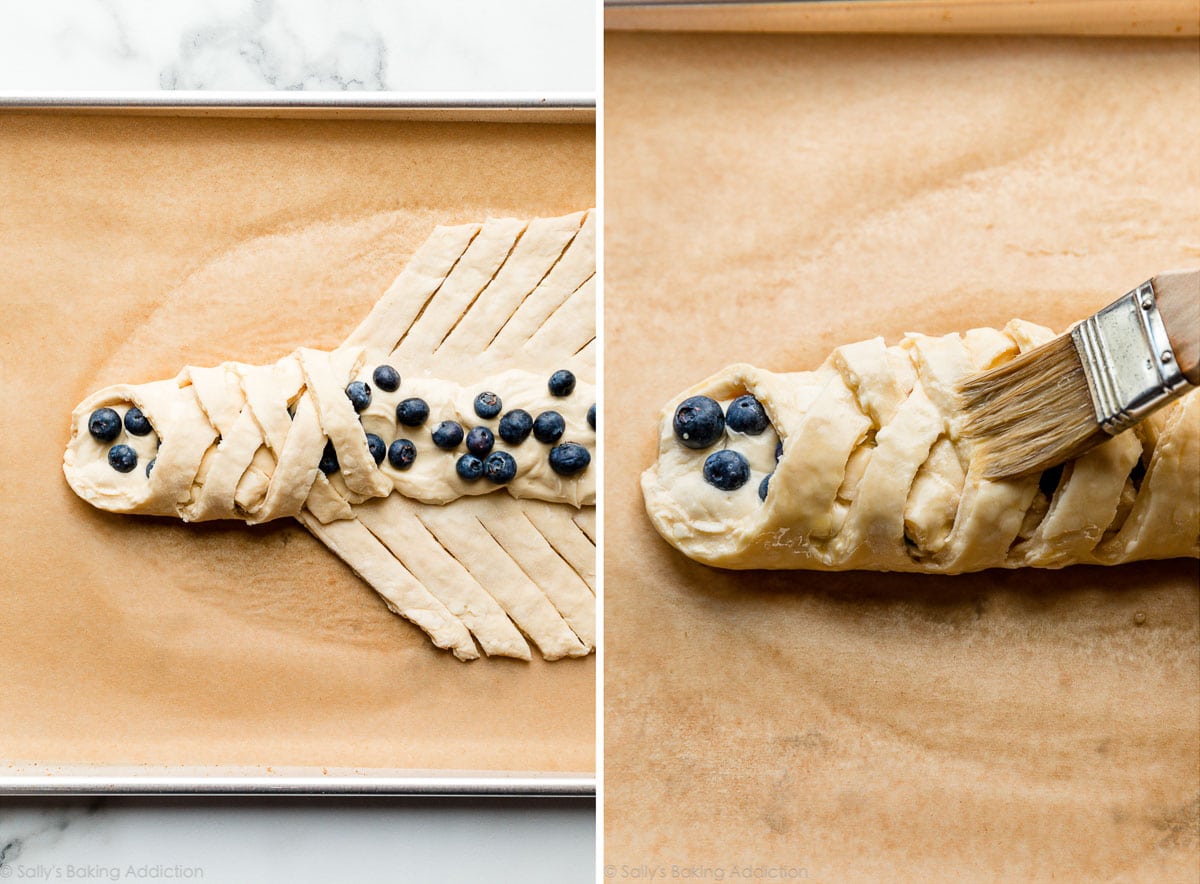
Transfer to a lined baking pan. Using a sharp knife, cut off two corners of the dough (on one 8-inch side) and then two small triangles 3 inches apart from each other on the other end (the other 8-inch side):

Spread 1/2 of the filling (from raspberry pastry braid or blueberry cream cheese pastry braid) down the length of the center of the strip. Using a sharp knife, pastry wheel, or pizza cutter, cut 10 slanting strips along both sides.
Fold strips over dough, alternating each side to resemble a twist or a braid. Fold the bottom end up to seal the filling inside. The braids may seem very narrow, but they puff up and out as they bake.
Brush the shaped dough with egg wash, which is a combination of 1 egg and milk. What is the purpose of an egg wash? It guarantees a shiny and crisp golden crust.
To help guarantee the braids hold their shape, chill them in the refrigerator as the oven preheats and even up to 1 hour.
Bake until golden brown.


Reader Comments and Reviews
Love this.
Can this be used for a savory filling such as boudin? I’m looking for a slightly sweet flaky pastry for Mardi Gras boudin king cakes
Yes, absolutely!
Thank you for the quick response! I really appreciate it.
Ashley
Hello. I am planning to make pop hearts which are pastry dough in the shape of hearts filled with jam. The recipe called for pastry dough. Would this work for that? Thank you.
Hi Karen, this should work well! Let us know if you try it.
This braid is the first recipe I will be making out of your new cookbook that I just purchased today. Your instructions and video are so informative! So many good recipes, my book already has page markers all over it!
Do you think this could work to refrigerate the made braid over night and bake in the morning?
Should be fine, Karisa!
I tried to make this and the egg started to cook and scramble in the mix so I had to toss it out. I followed the temperature as the recipe says. How can I avoid my egg from cooking in the wet ingredients?
Hi Kari, it sounds like your water may have been too warm. Did you keep it between 100-110°F, 38-43°C?
I think it was just an anomaly. I attempted again keeping my temperatures in the range you gave and everything worked out this time. Braid is in the oven right now 🙂
These were delicious! I appreciated how thorough the instructions were along with the video. Being able to refrigerate the dough for long periods of time allowed me to work around my toddler’s schedule, which was really nice. And though it takes time to refrigerate, the recipe itself was not too difficult to make! Thanks for a great recipe!
This looks absolutely delicious! Any thoughts or suggestions for using gluten free flour before I jump in and try? Thanks for any advice!
Hi Christiana, we have not tested this recipe with gluten free flour. It may be best to search for a gluten free pastry dough recipe, but let us know if you try adapting this recipe!
I’ve been making a cream cheese danish braid every weekend for almost a year now & I’ve tried many recipes for the dough. There aren’t a lot of options for danish dough so I sometimes use crescent roll dough too. This recipe is the best of all i have tried! It’s exactly perfect, even better than laminated dough (that leaked, this one didn’t). I made the round ones the first day. They were amazing. I froze the rolled-out other half (like i usually do) to make a braid next weekend but then this morning i decided today was braid day. It was the best one so far. Thank you for sharing this recipe!
Positively divine! And my first try at Danish! Many thanks go to Sally for giving
excellently detailed but not overly detailed instructions. It’s an art in and of itself.
First of all, thank you for this lovely website , clear instructions, beautiful photos, and fun narration. I have a question: what to replace the egg with when cooking for people with egg allergy?
Hi Vivek, We haven’t tested most of our recipes with egg substitutes. However, we do have a section of egg free recipes if you are interested.
The dough looks amazing. I’m thinking of making a New Year pretzel, using canned poppyseed for the filling. Would the flavors mesh and do you think the dough would be flexible to form the pretzel shape? Any suggestions on how to do so welcome.
My family and I love this recipe! I made two batches (which will be made into 4 braids in total) and would like to freeze them all to be used at a later date. Can I freeze them longer than one month? Just made them and would like to freeze to use over Thanksgiving weekend.
Thanks!
Hi Randi, you could freeze the dough for 1 to 2 months. Let me update that. Freezing now until Thanksgiving would be fine!
hey I have a question. can I use this pastry recipe to fry in oil? if not, how can I keep the dough round while baking if I want to make raspberry filled balls?
You might try using our homemade doughnut recipe instead—that one should keep shape and then you can fill them with piped raspberry filling after they bake. Let us know how it goes!
Can’t wait to make this! Just wondering if you’ve ever added sourdough starter ~ just recently began my sourdough journey and wondered if it could be added or if you have any suggestions for that. Thank you!
Hi Laura, I’m afraid we don’t have much experience with that, so can’t offer you a recommendation for how to incorporate it in this recipe. If you try it, let us know how it goes!
I have a question, well two, no three… I know that yeast needs to feed on sugar to grow, but can I use a minimum of sugar for the yeast and replace the rest of the sugar with sugar substitute? How much would the minimum amount to feed the yeast be? Also, could I use shredded frozen butter in the dough or would that be too cold?
Hi Ann, You could use frozen butter however, it will take several more pulses in the food processor to break down the frozen butter. Make sure you have a sturdy food processor, too. Sugar substitutes generally do not feed yeast the same way regular sugar does, and different sugar substitutes interact with yeast differently. Without testing them we can’t say for sure the exact ration to use. If you try anything, let us know!
Loved making this, should have probably read the part where it would take 6 hours, was still making danishes at like 4 in the afternoon, but it was so worth it. I ended using 3 different recipes, this one for the pastry dough, another for a diamond shaped type pastry not a braid and the last for an apple danish filling. But it was lovely nonetheless. Gonna make again soon with more awareness of time
Hi, I was wondering if I could let the dough chill in the fridge just for 1 hour, instead of 4 to 48, for the first chill. Thanks!
Hi Inaaya, we do not recommend shortening the chill time. At least 4 hours is imperative.
Hi, quick question, about to make this pastry dough, but I wonder, instead of freezing the dough before rolling ect. Can the braid be entirely made, filled/shaped, then frozen, and baked from frozen the next morning? Thank you!
Hi Amanda, when making a pastry braid, you can refrigerate the filled and shaped pastry overnight. No need to freeze it, unless you want to store it for longer.
Loved this braid, have made with apricot and added layer of almond paste filling with it. How long can a filled braid be in fridge prior to baking…could it handle a full day?
Hi Allison, you can cover the shaped and filled braid and refrigerate overnight. We wouldn’t recommend extending it much longer than that. So glad you enjoy it!
When I look at the pictures of the dough it looks as if you turned the dough counterclockwise instead of clockwise, did you!
Hi Prisca, the dough is turned clockwise. It was turned counterclockwise from Sally’s perspective in the video, so that it appeared clockwise to viewers! Hope this helps.
Love this dough and using it to make cheese danish weekly. Besides the braids are there other suggestions? So you think it would work for pinwheels?
Hi Sandra, we’re so glad this is a favorite for you! You can also use the dough to make individual breakfast pastries. We haven’t tried shaping them as pinwheels, but let us know if you give it a try!
I sure wish there were a downloadable pdf version of this recipe since I don’t have access to a printer or internet anytime I need. Writing all the instructions down takes a while and trying to do it quickly is certainly a task to get writers cramps lol
You can save it as a PDF when you print. On a PC or Mac, the print window usually has a print to PDF option somewhere. On an iPad, in the window that pops up after choosing print, there’s a share button (looks like a rounded square with an arrow pointing up). Tap the share button and you can save it to your device as a PDF. Android devices should have something similar but I’ve never used one so I can’t give you any steps for those. Hope this helps!