

These easy cinnamon rolls from scratch are perfect for yeast beginners because they only require 1 rise. Each cinnamon roll is extra soft with the most delicious cinnamon swirl! The rolls freeze beautifully, so this is a great make-ahead recipe, especially for planning ahead for holidays or the next time you need a special breakfast. Choose from a few easy icing flavors to top the warm & gooey rolls.
This recipe is brought to you in partnership with Red Star Yeast.
I originally published this recipe in 2013 and have since added new photos, a video tutorial, and a few more success tips. I also added one additional step to the recipe that yields even softer, fluffier rolls. This is reflected in the printable recipe below.
This easy cinnamon roll recipe is one of the most popular recipes on my website, for good reason.
These are classic, homestyle cinnamon rolls. It took me lots of recipe testing trial-and-error to develop quick cinnamon rolls that maintain all the flavor and texture of traditional overnight cinnamon rolls. But THIS. IS. IT. And I promise, making these easy cinnamon rolls is 100x more satisfying than that feeling you get from popping open a store-bought can of ready-to-bake rolls.
Here’s Why You’ll Love These Easy Cinnamon Rolls
- All the deliciousness of traditional homemade cinnamon rolls, but in half the time
- Soft and fluffy
- Gooey cinnamon sugar swirl
- Only 1 rise time
- Easy enough for yeast beginners
- Great make-ahead, freezer-friendly recipe—making it an excellent addition to your menu of Easter brunch recipes!
Lately, I’ve had even more success with the dough when I let the yeast dissolve in the warm milk/butter mixture, instead of whisking it into the dry ingredients. The rolls turn out even fluffier and softer, and I know you’ll appreciate that, too! The recipe below includes this small change.
Here’s what some readers are saying about this recipe:
One reader, Kristine, commented: “This recipe is perfect in every way. It is simple to execute and requires a very reasonable amount of time. … The best part for me, however, is that they tasted just like my grandmother’s cinnamon rolls. I have her recipe but it requires hours and hours and I rarely have that kind of time. Tasting these warm from the oven brought back a flood of happy memories and made me feel like I was right back in her kitchen. ★★★★★“
Another reader, Lana, says: “I admit, I was very skeptical about my cinnamon rolls rising in 90 minutes. And I was nervous about making cinnamon rolls because I didn’t think that I could make anything close to what my grandma used to make. But I’ve made other recipes from your site and have been successful so I gave it a try. Let me say, the cinnamon rolls are amazing! And easy! ★★★★★“
Just like grandma used to make! Is there a better compliment than that? I doubt it.
Yeast Beginners Rejoice: Only 1 Rise!
Do you love homemade cinnamon rolls, but are nervous to bake with yeast? You’re not alone! But if you’re curious about learning how to bake with yeast, this recipe is a perfect one to start with. No yeast cinnamon rolls are quick and tasty, but the Fluffiness Factor (I should trademark that) is simply unparalleled when it comes to yeast rolls vs. no-yeast rolls.
Unlike these homemade overnight cinnamon rolls that require hours of rise time, plus a 2nd rise after the rolls are shaped, this easy cinnamon rolls recipe requires only 1 rise, for just 60–90 minutes. And, honestly, they’re every bit as delicious. Bakery-style perfection for beginners!
Are You a Yeast Beginner?
This Baking with Yeast Guide is a wonderful starting point for yeast beginners. I answer many common yeast FAQs in easy-to-understand explanations, so you can learn about the basics before beginning.
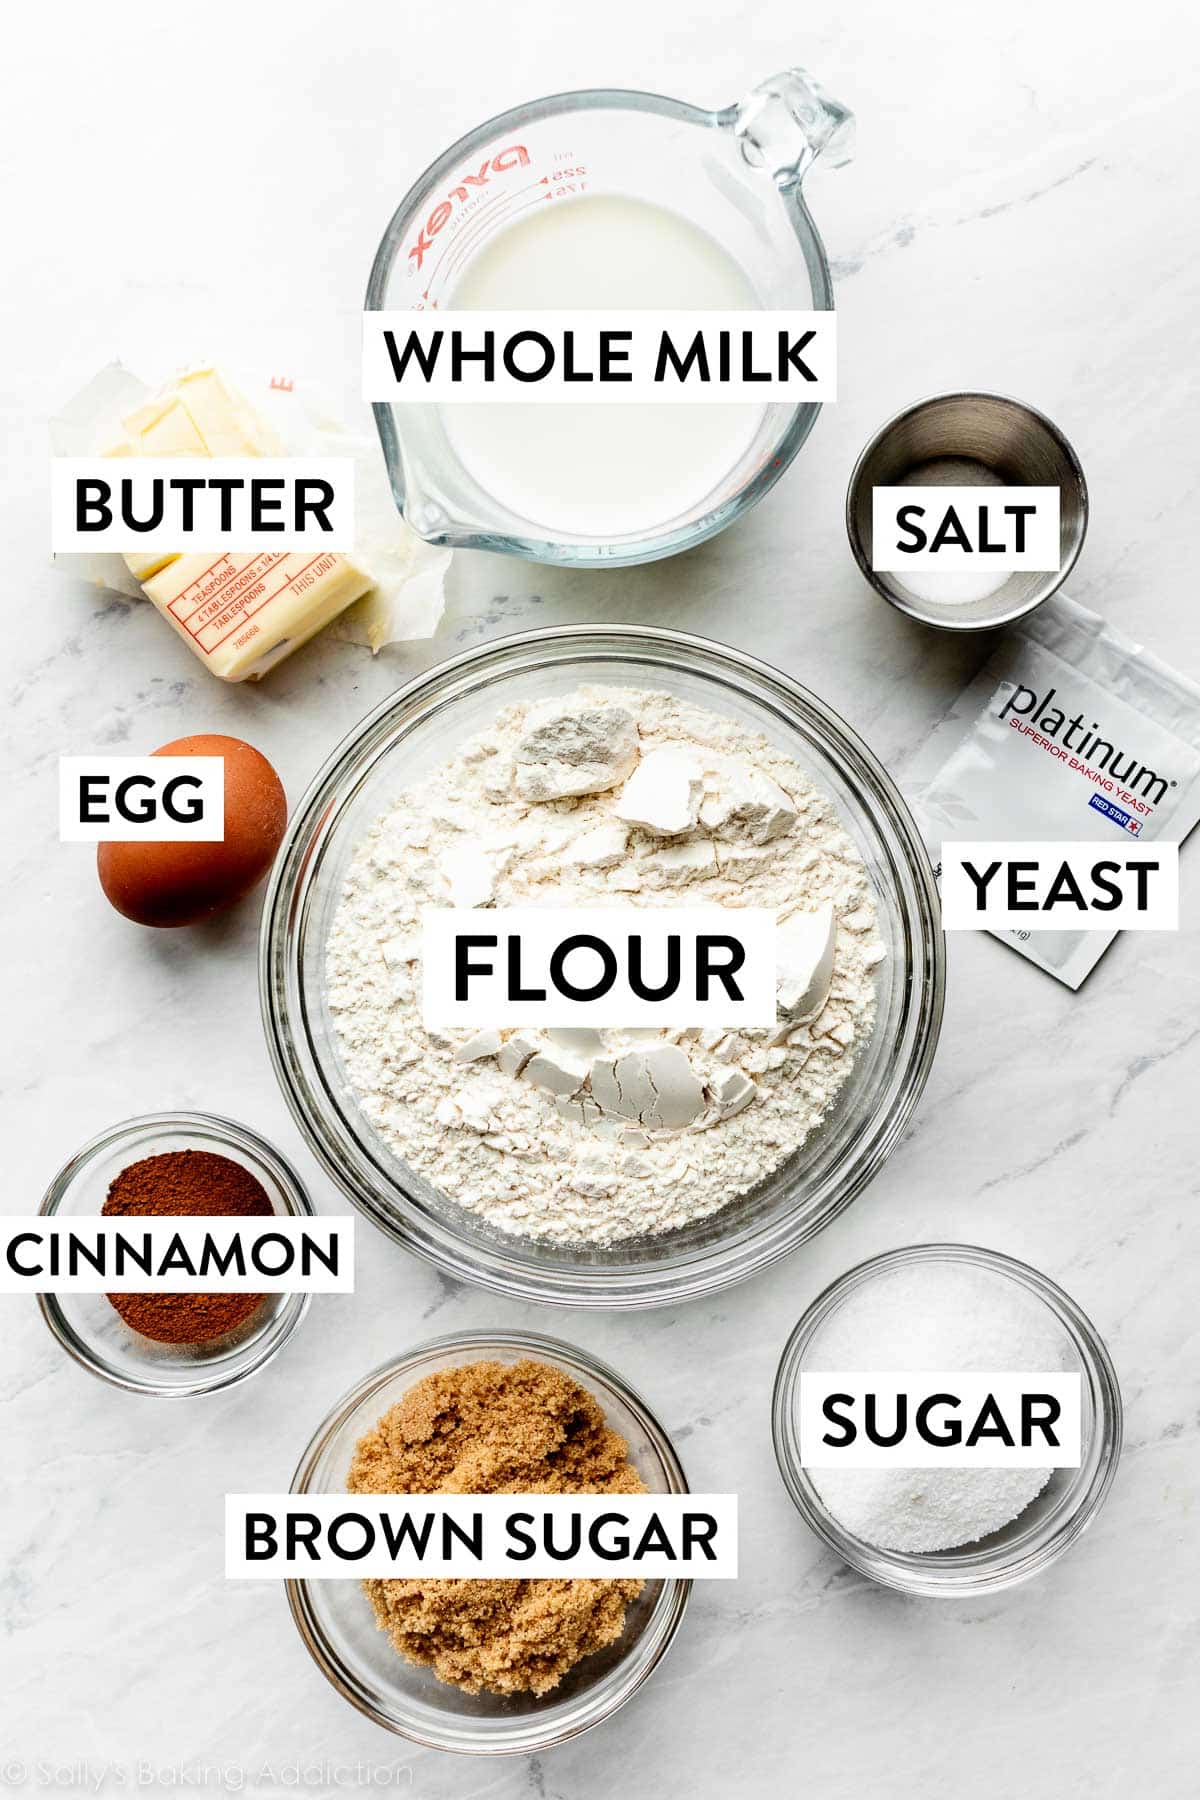
Key Ingredients to Use for the Dough
Here’s my #1 tip: I recommend using a strong and dependable yeast. Platinum Yeast from Red Star is a premium instant yeast, which cuts down on rise time. Its careful formula contains natural dough strengtheners and makes working with yeast simple. And simple is always good, right? See recipe Note if using active dry yeast instead.
Here’s the rest of the lineup of ingredients for this rich dough:
- Flour: Flour provides the dough structure. All-purpose flour is best for these cinnamon rolls. You could also use bread flour—the rolls will be chewier.
- Sugar: You need white granulated sugar in the dough, both for flavor and to feed the yeast.
- Salt: Flavor.
- Whole milk: Whole milk is ideal for the richest-tasting cinnamon rolls. Buttermilk works just as well without any changes to the recipe. Many readers have successfully substituted nondairy milks. In a pinch, you can use low-fat milk, but avoid using nonfat milk.
- Butter: This is a rich dough, meaning it has fat to help guarantee softness.
- Egg: Like butter, egg promises a softer, richer dough.
These Step-by-Step Photos Will Help
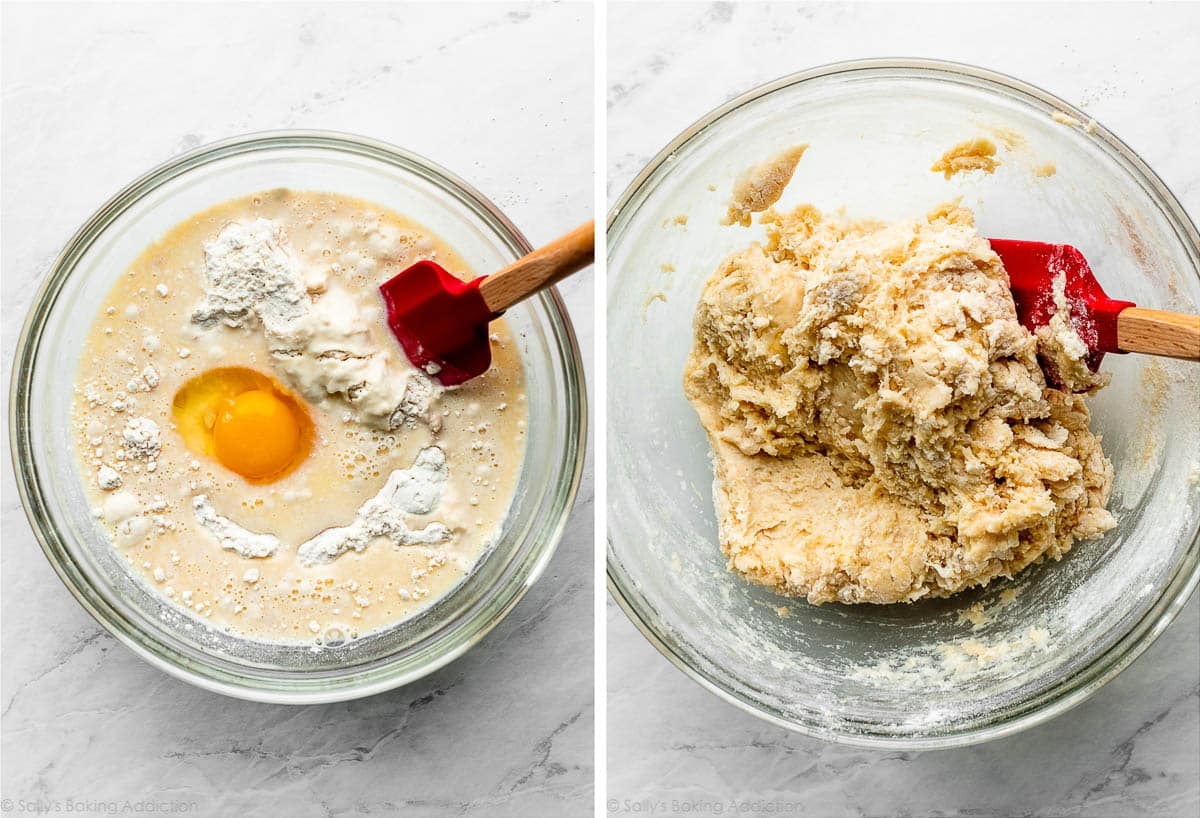
The first step is to mix your dry ingredients together in a big bowl and this includes the flour, sugar, and salt. After that, warm the milk and butter together, and then whisk in the yeast until it has dissolved. Then you know it can start working its magic in your dough!
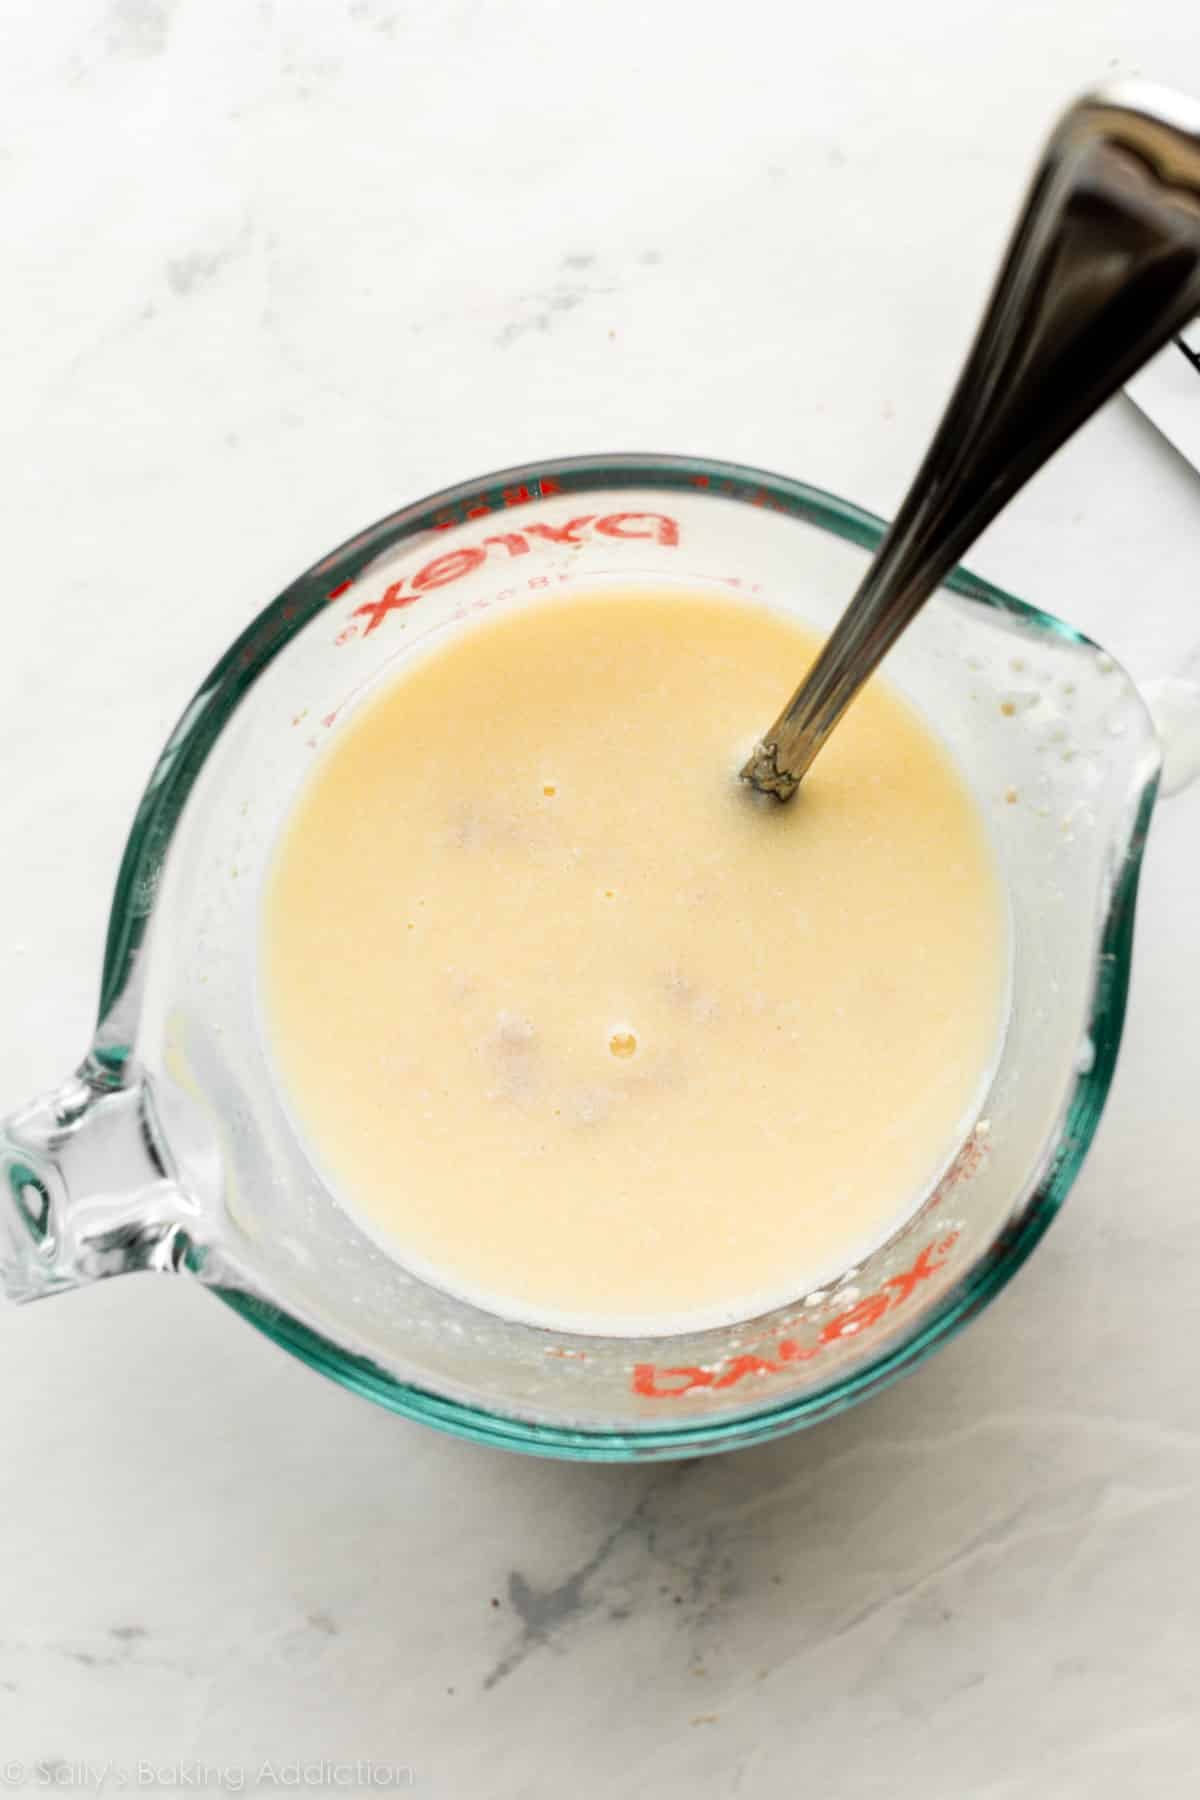
Pour this mixture over the dry ingredients, add the egg and then mix everything together. You do not need a stand mixer for this recipe, though you could certainly use one if desired.
Transfer dough to your work surface (below, left), and then knead by hand for 3 minutes until a soft dough forms (below, right). If you’re new to yeasted doughs, my how to knead dough post and video can help with this step.
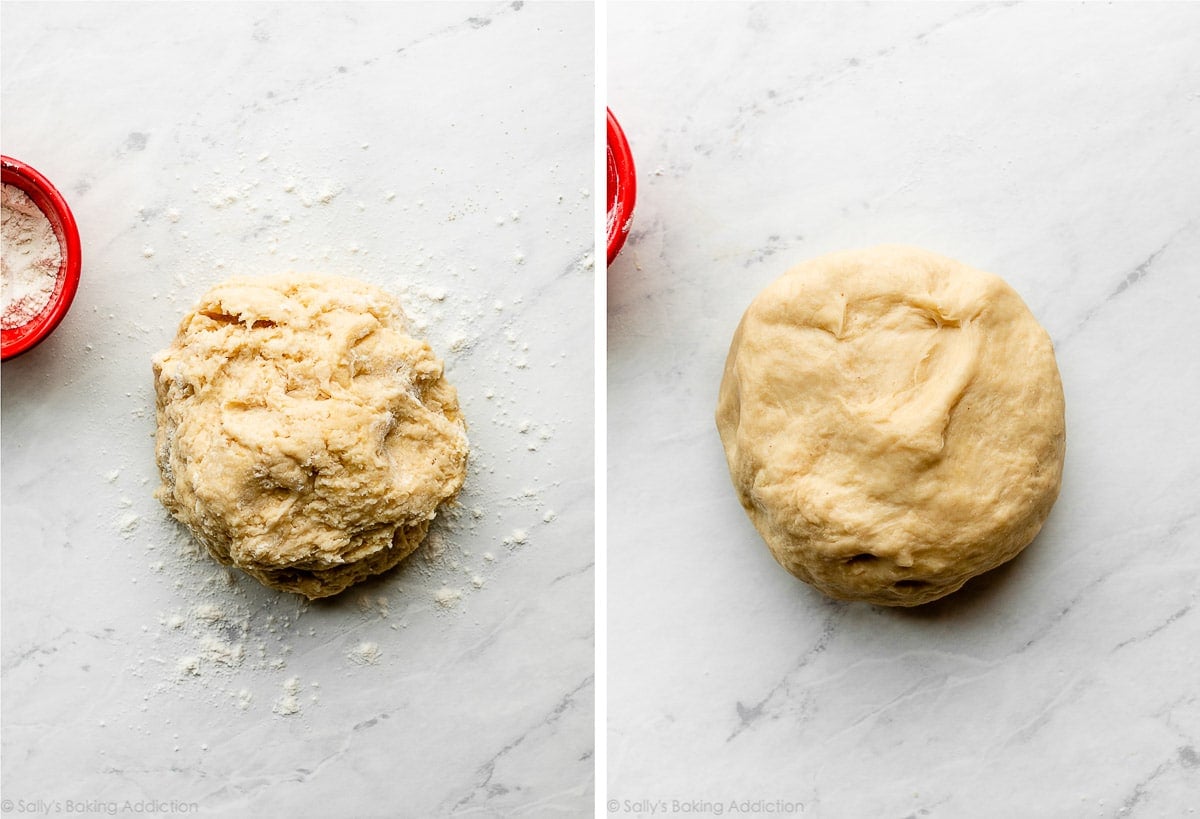
Let the dough rest for 10 minutes as you prepare the filling—this gives the dough’s gluten a chance to settle and relax, which will make rolling out much easier.
3 Ingredient Filling
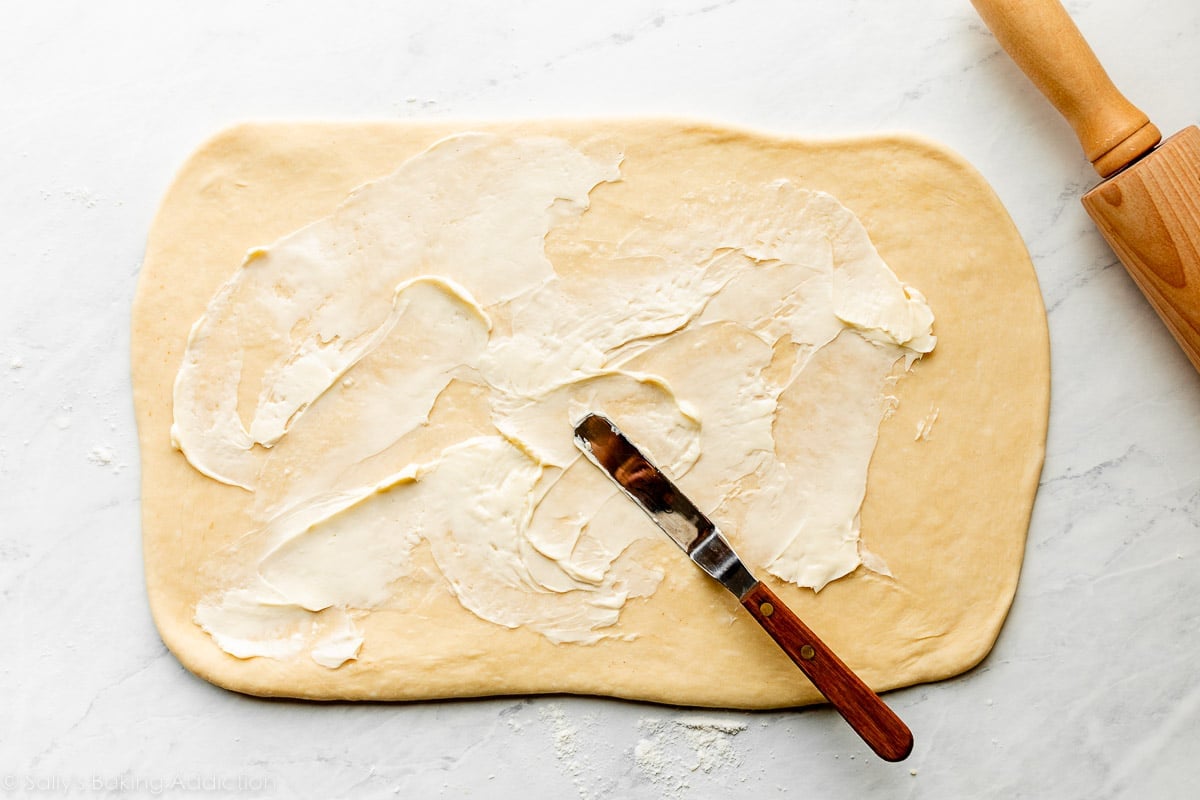
- Butter: Use super-soft butter for the filling—not too hard, not too melty. If the butter is too hard, it won’t be easy to spread it evenly over the soft dough. If it’s too melty, it will seep into the dough, and we don’t want that either. Butter that’s had time to soften to room temperature should be just right. If you forgot to get it out of the fridge earlier, here’s my trick for how to soften butter quickly.
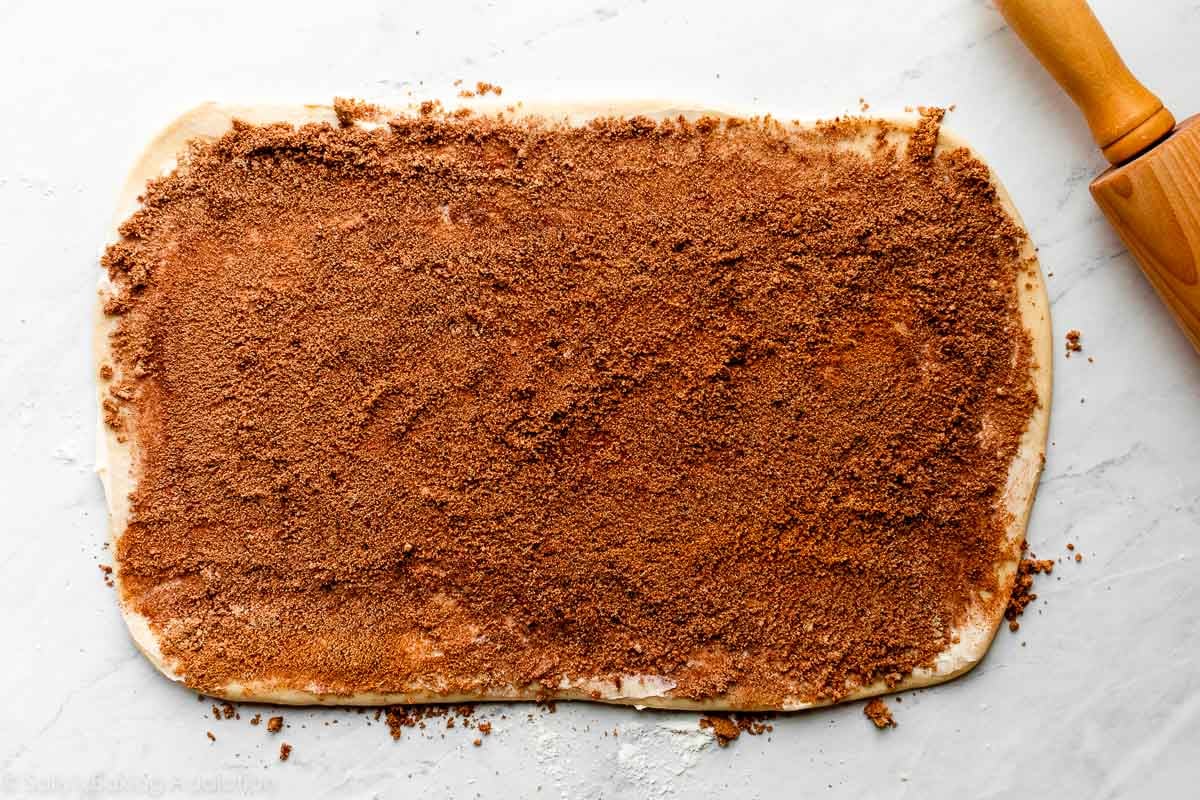
- Brown Sugar: Using brown sugar in the filling gives these cinnamon rolls an extra-delicious depth of flavor.
- Cinnamon: You can’t have cinnamon rolls without it!
Roll out the dough and then top with softened butter and the brown sugar & cinnamon mixture.
Many readers have asked about using different fillings. Try using this raspberry cake filling instead—it’s delicious! Or if you love lemons, these lemon sweet rolls use this same dough.
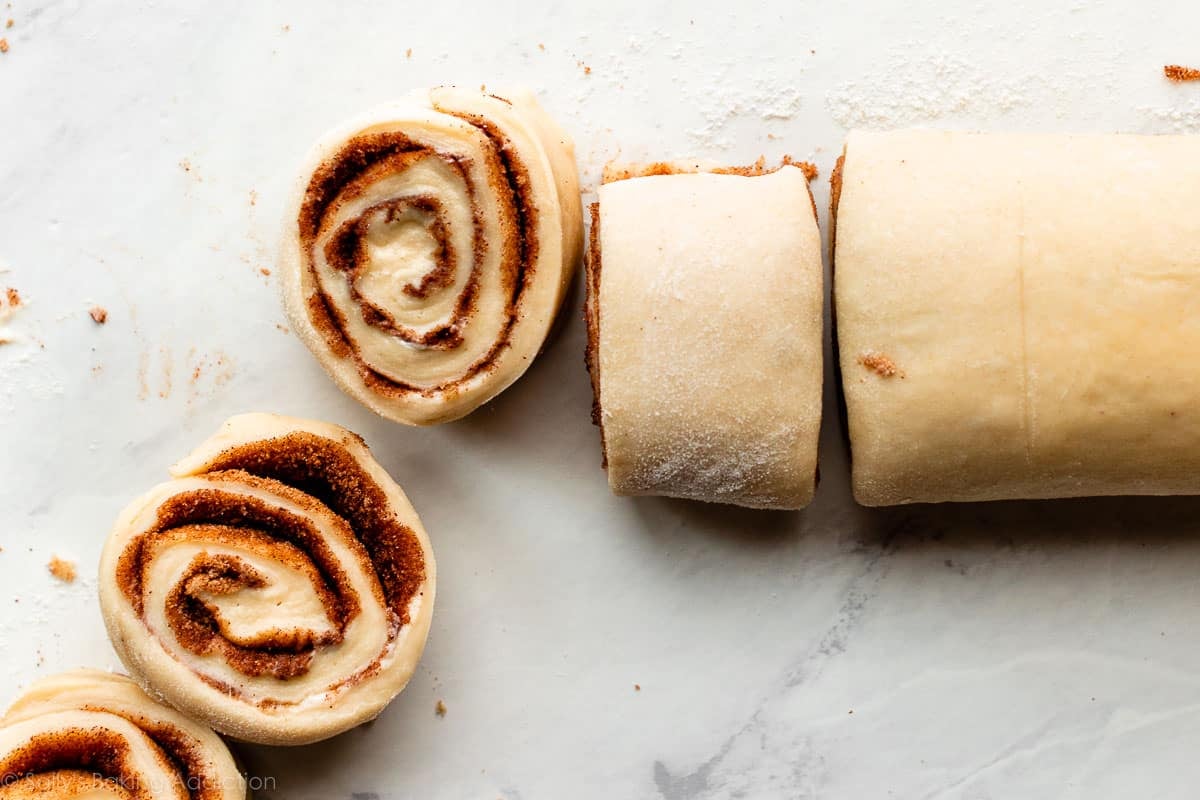
Roll up the dough and then use your sharpest knife to cut into 10-12 rolls.
Why Are My Cinnamon Rolls Not Fluffy?
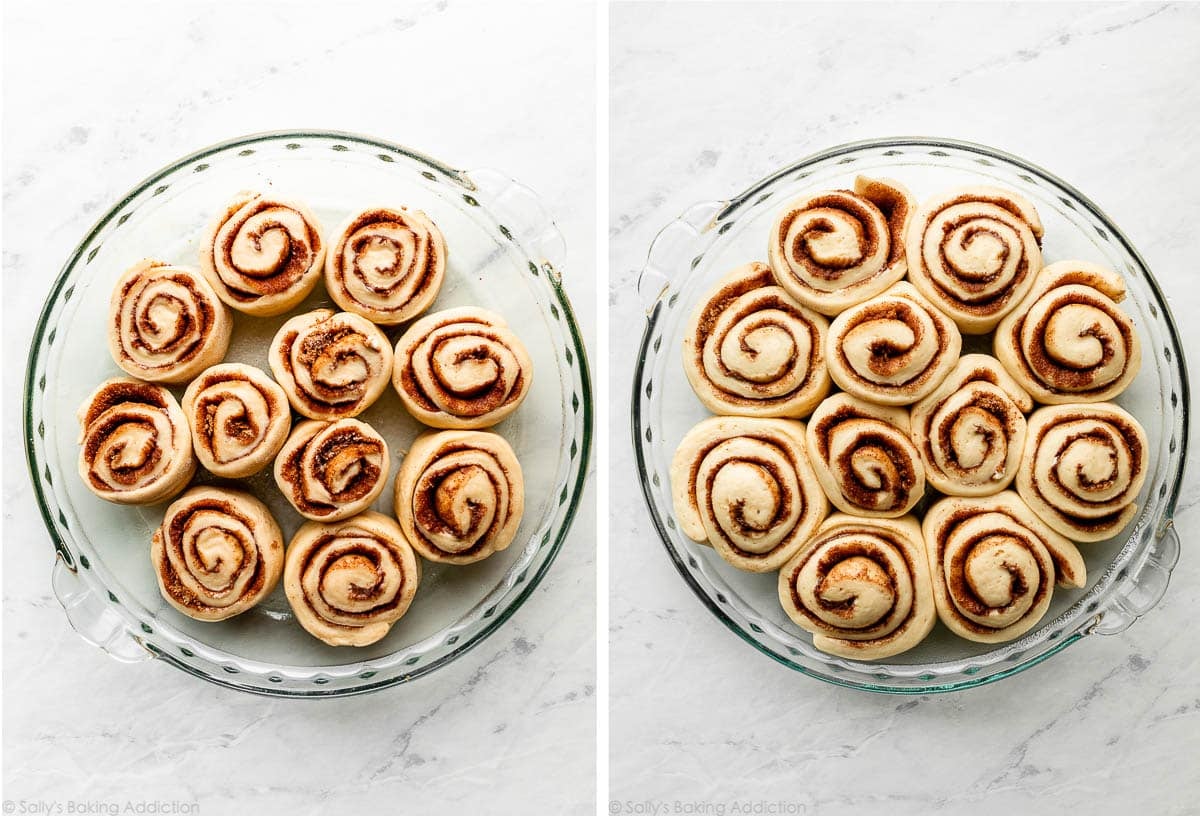
There are a lot of variables that go into the consistency of dough, even down to the weather and humidity. But the most common reason cinnamon rolls don’t turn out fluffy is because the dough didn’t have enough time to rise. In this particular recipe, with only 1 rise, it’s imperative the shaped rolls double in size in step 5 below. See the next photo? You want a pan of puffy-looking rolls even before baking.
Additionally, be sure to add only as much flour as you need to make a workable dough. This is a soft and tacky dough and it’s not supposed to be tough and hard. Too much flour will give you stiff, dense, dry cinnamon rolls.
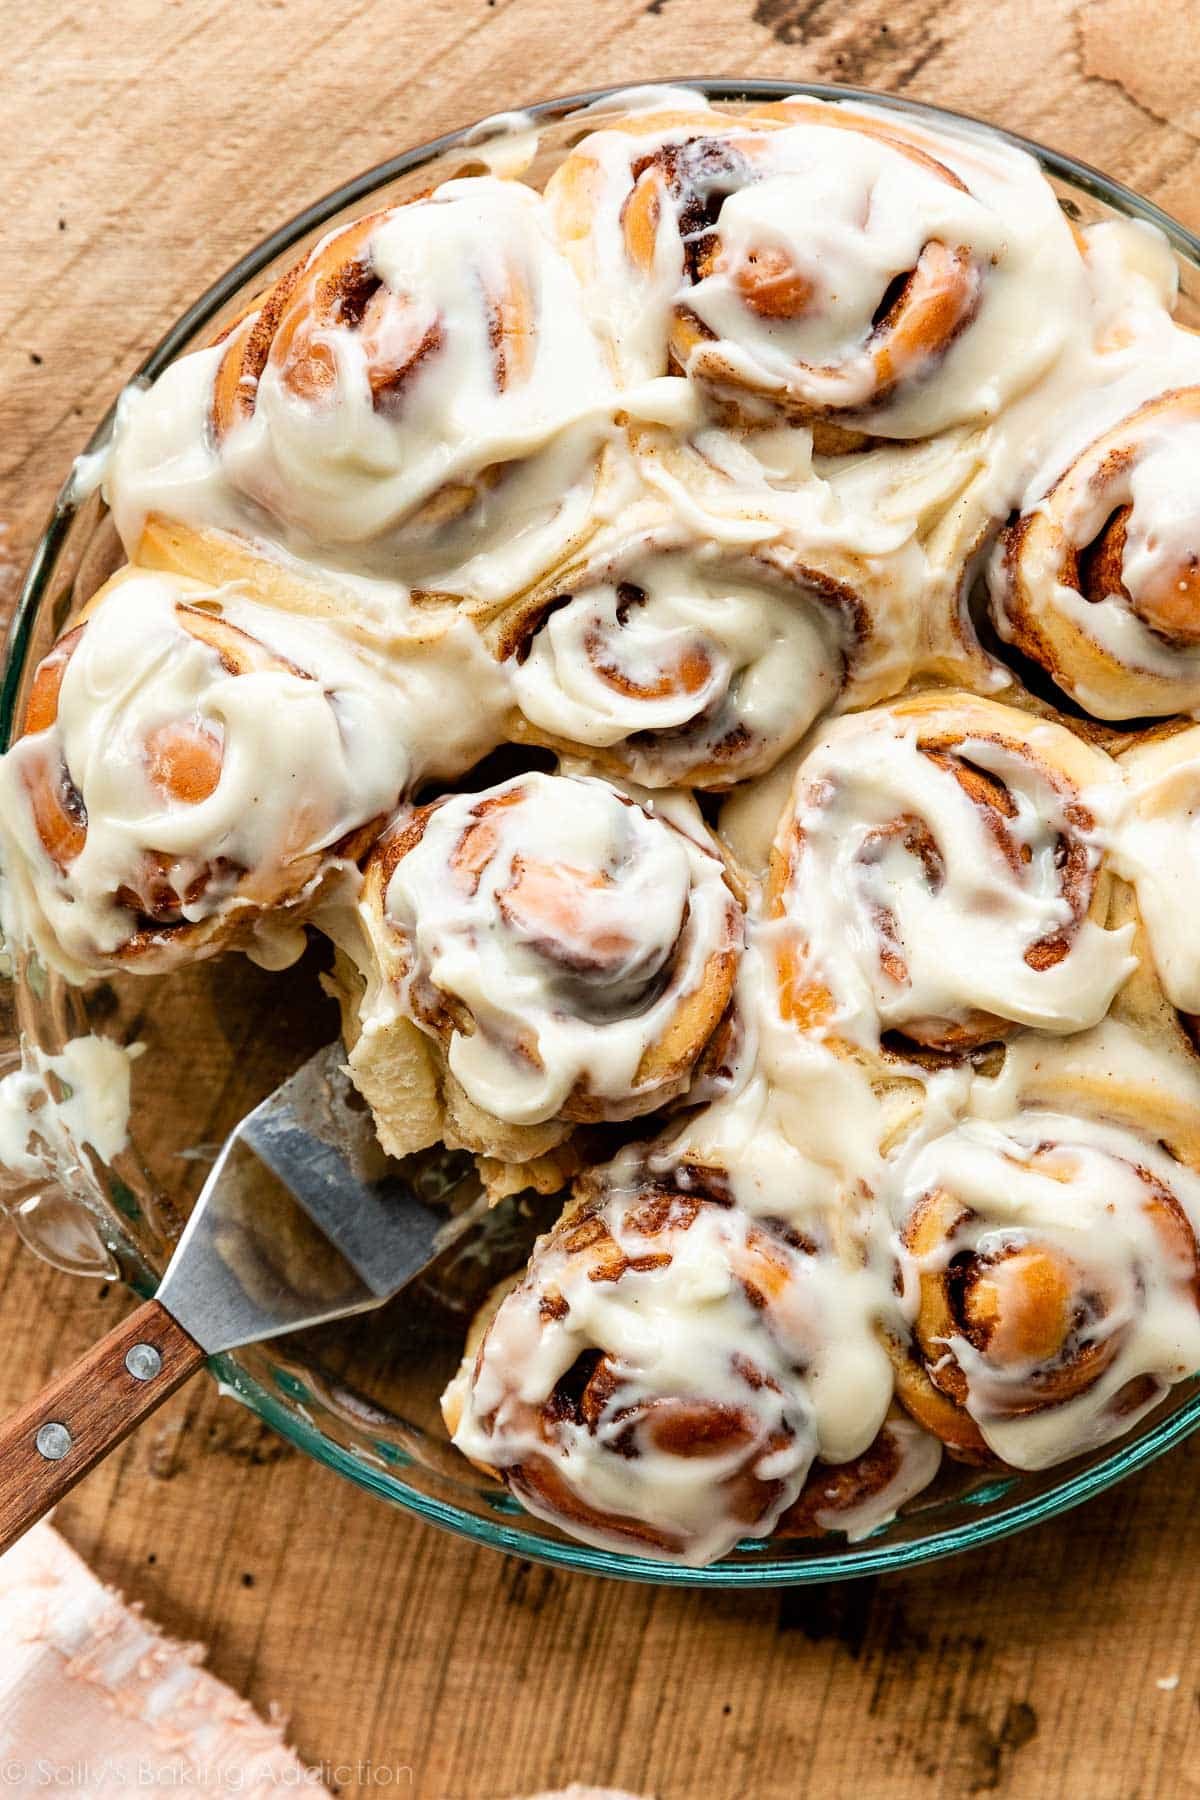
Arrange your rolls in a lightly greased 9-inch or 10-inch pan. I appreciate that this recipe makes a slightly smaller batch than most other cinnamon roll recipes.
Here are the rolls before and after rising. This is the only rise! They’re ready to bake after they have nearly doubled in size.

Why Do My Cinnamon Rolls Rise Unevenly When Baking?
Sometimes the centers of the cinnamon rolls can pop up whack-a-mole-style while baking. This is caused by either rolling them too tight, or if the pan is too small/crowded. It’s happened to me many times before. But this is really easy to fix! Pull the pan out of the oven and use the back of a spoon to gently press the overly risen parts back down.
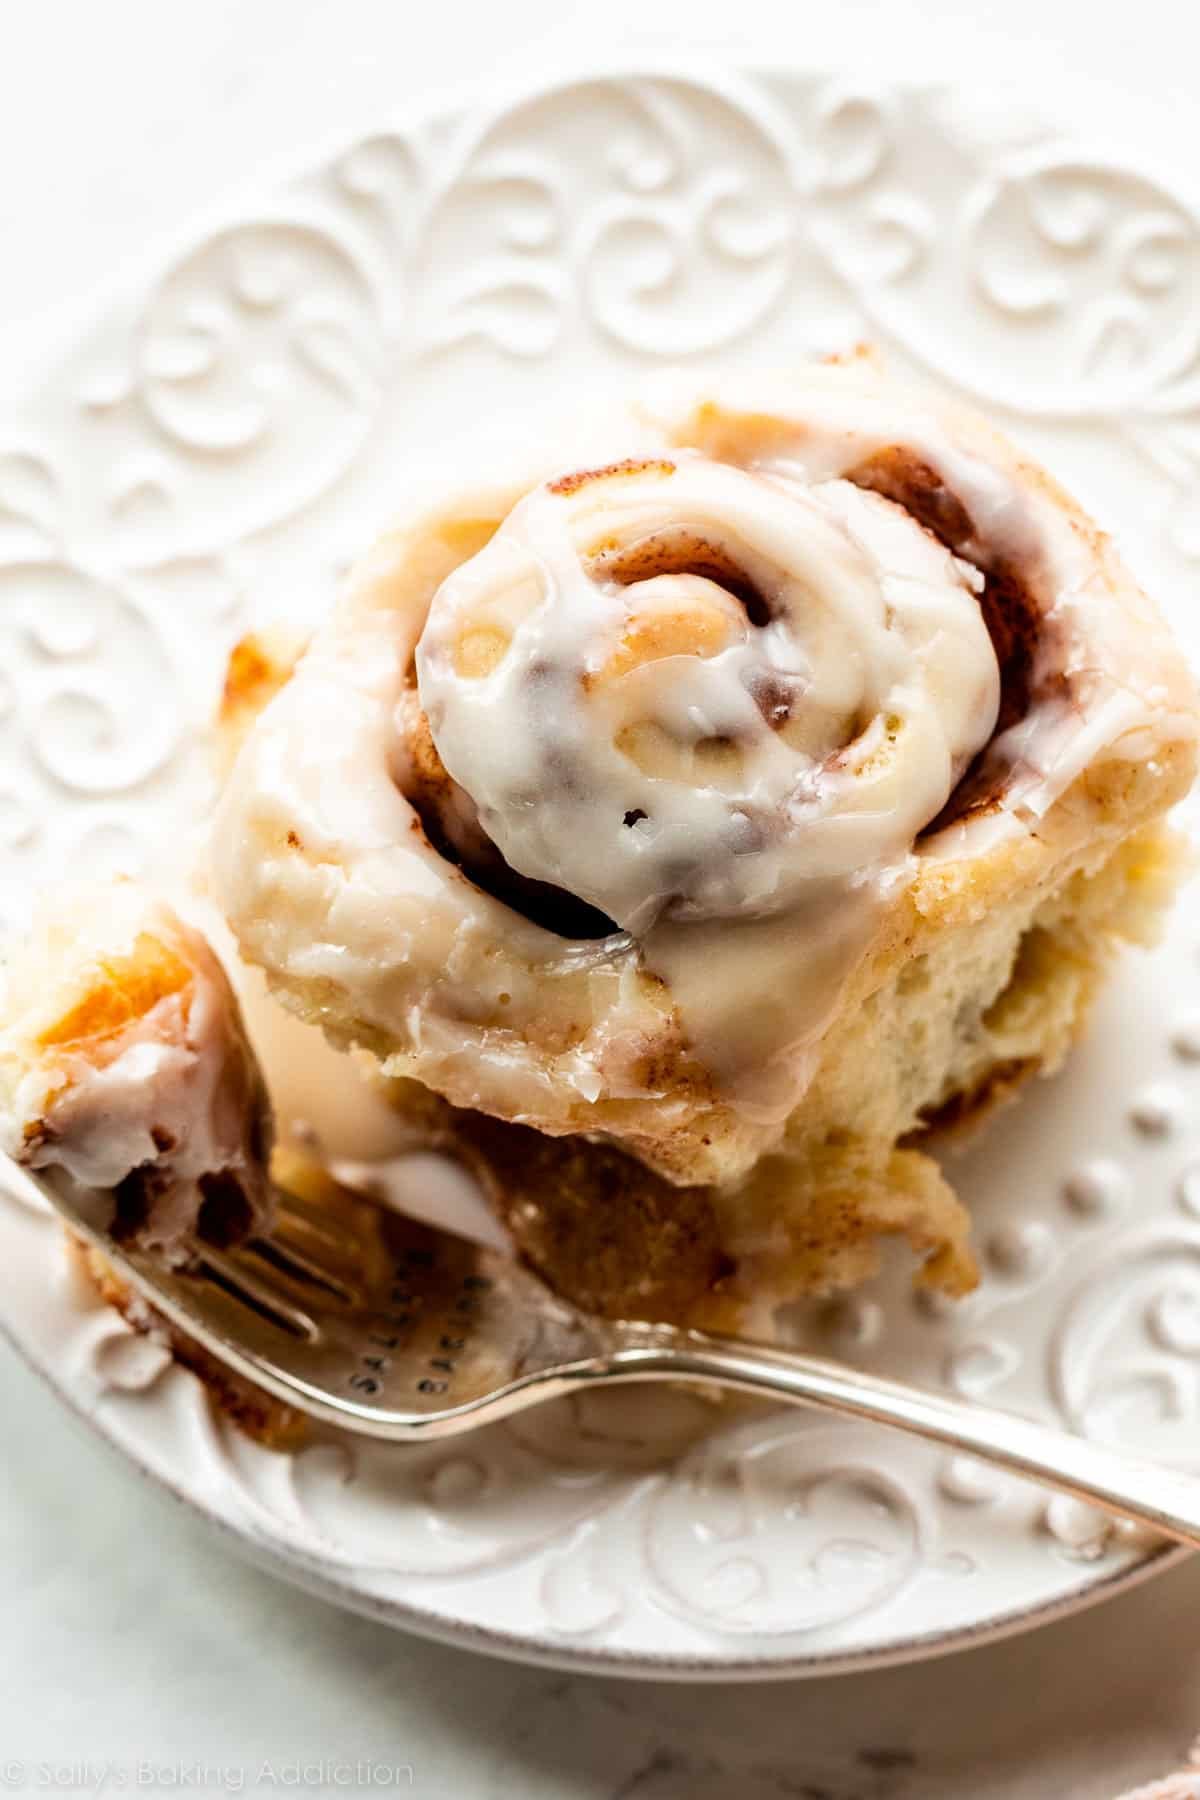
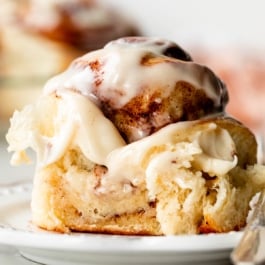
You Have Options for the Icing
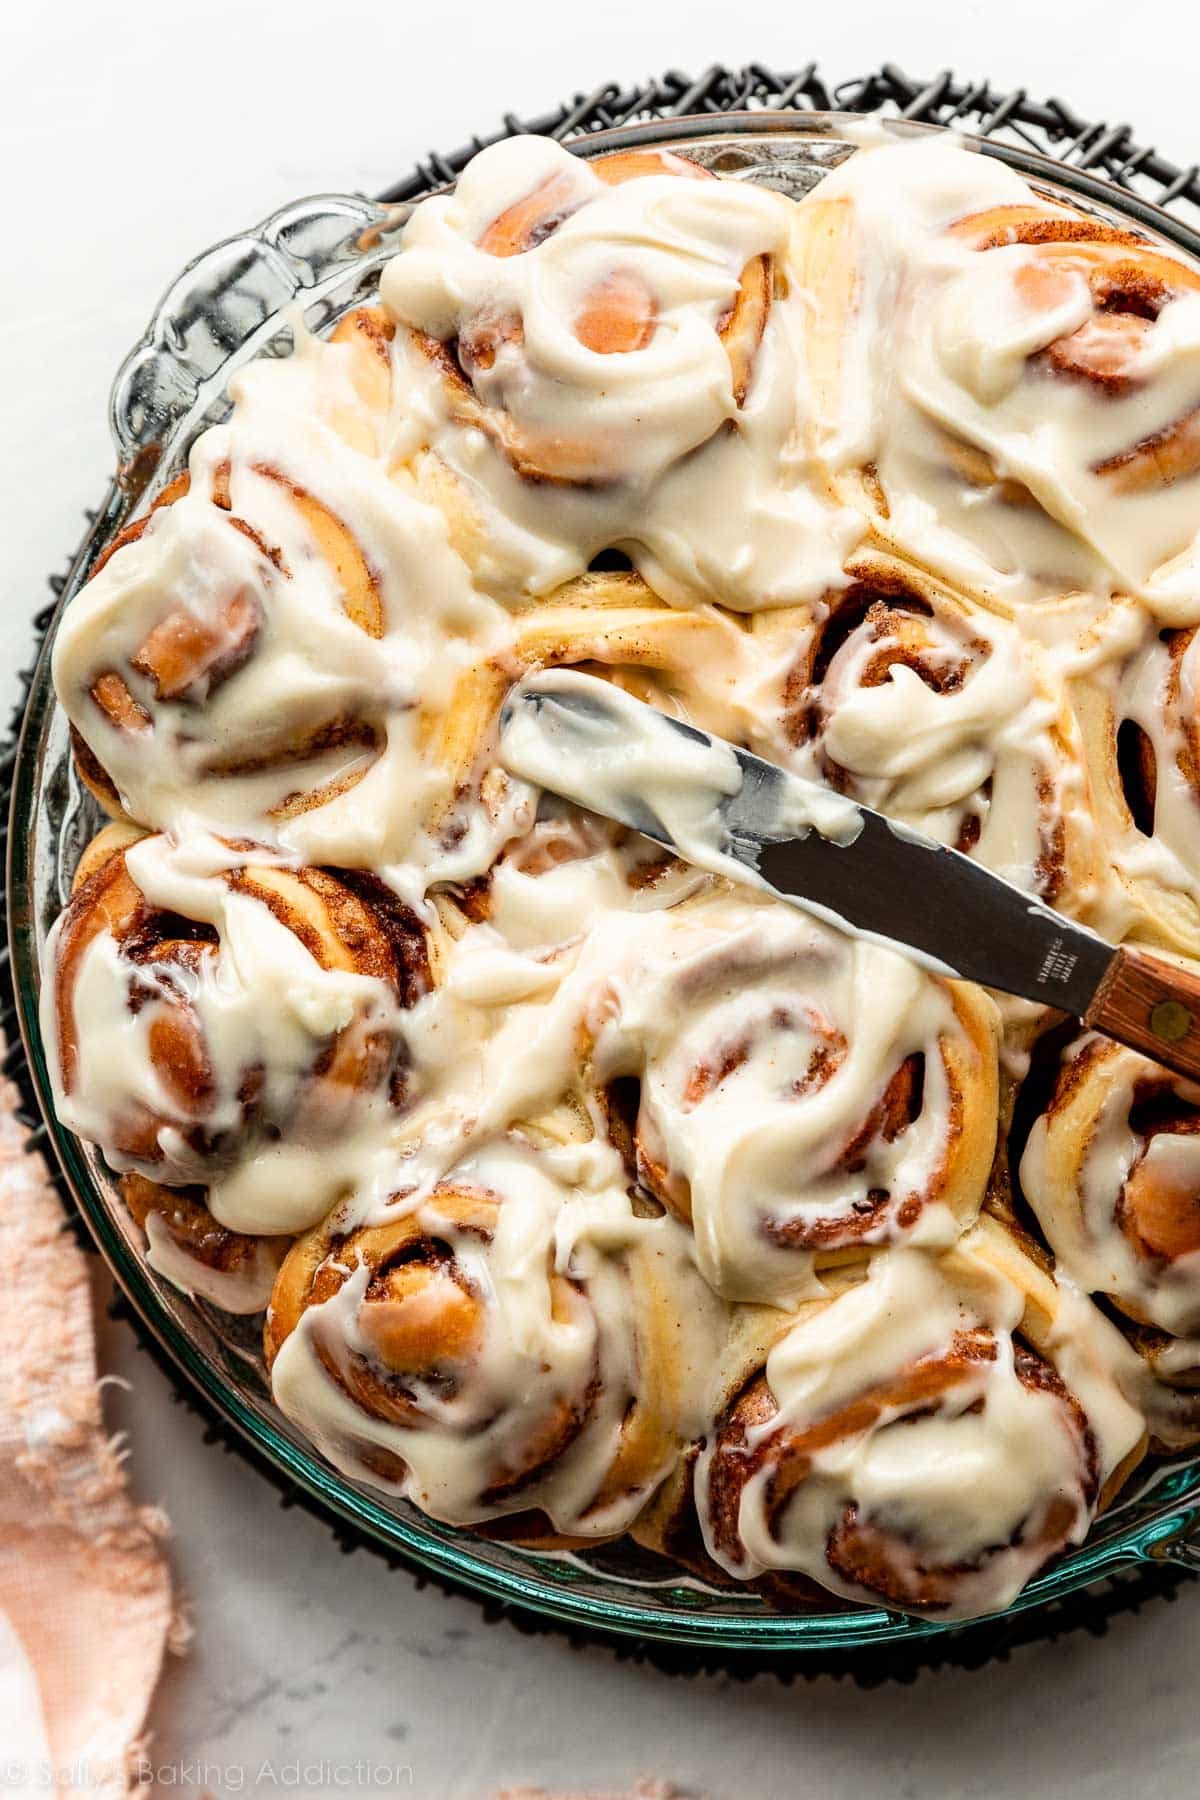
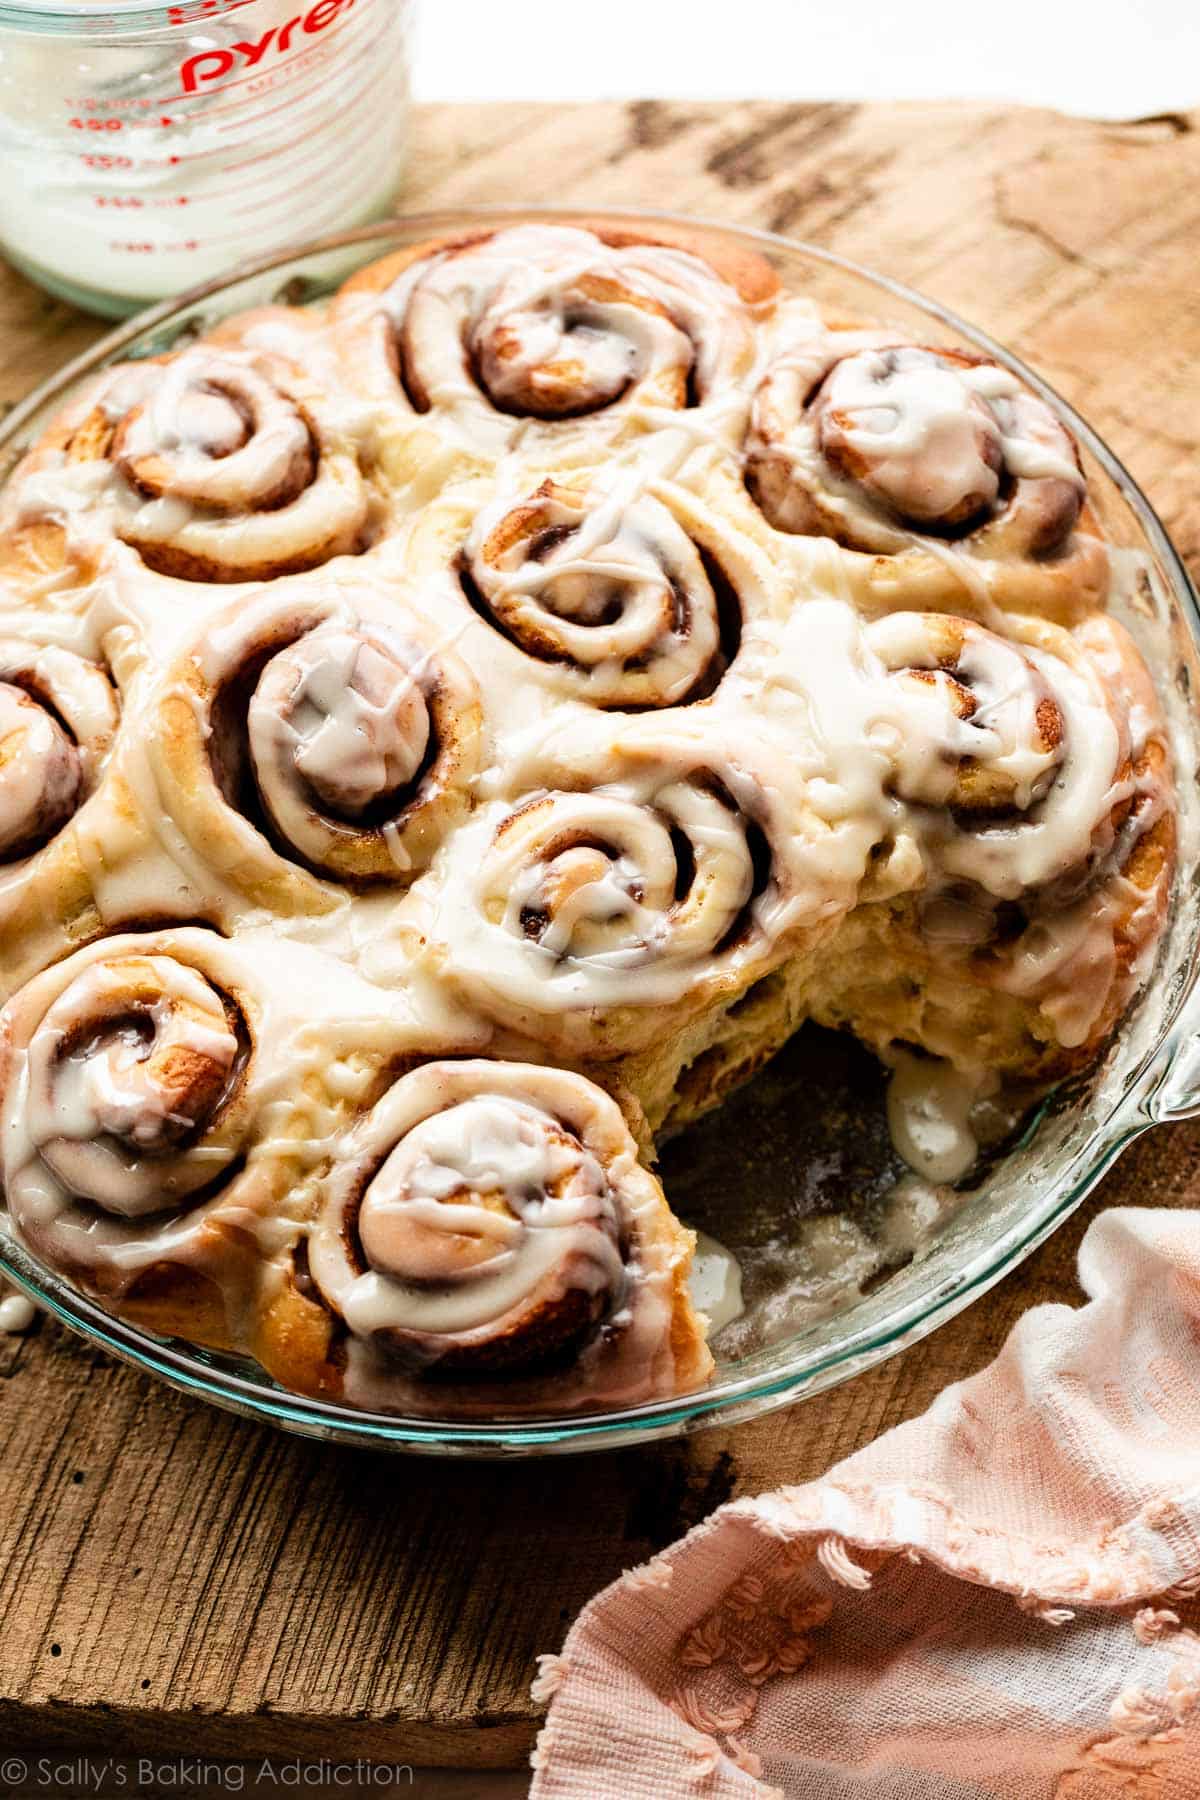
I use the same luscious cream cheese icing here that I use for raspberry sweet rolls. It takes just a couple quick minutes to make, and you only need cream cheese, a little butter, confectioners’ sugar, and vanilla extract. For something even easier, try a vanilla (or even coffee) icing like we use on coffee cake. Simply whisk confectioners’ sugar, vanilla extract, and a little milk or strong coffee together until smooth. The video tutorial in the recipe below shows both icing options.
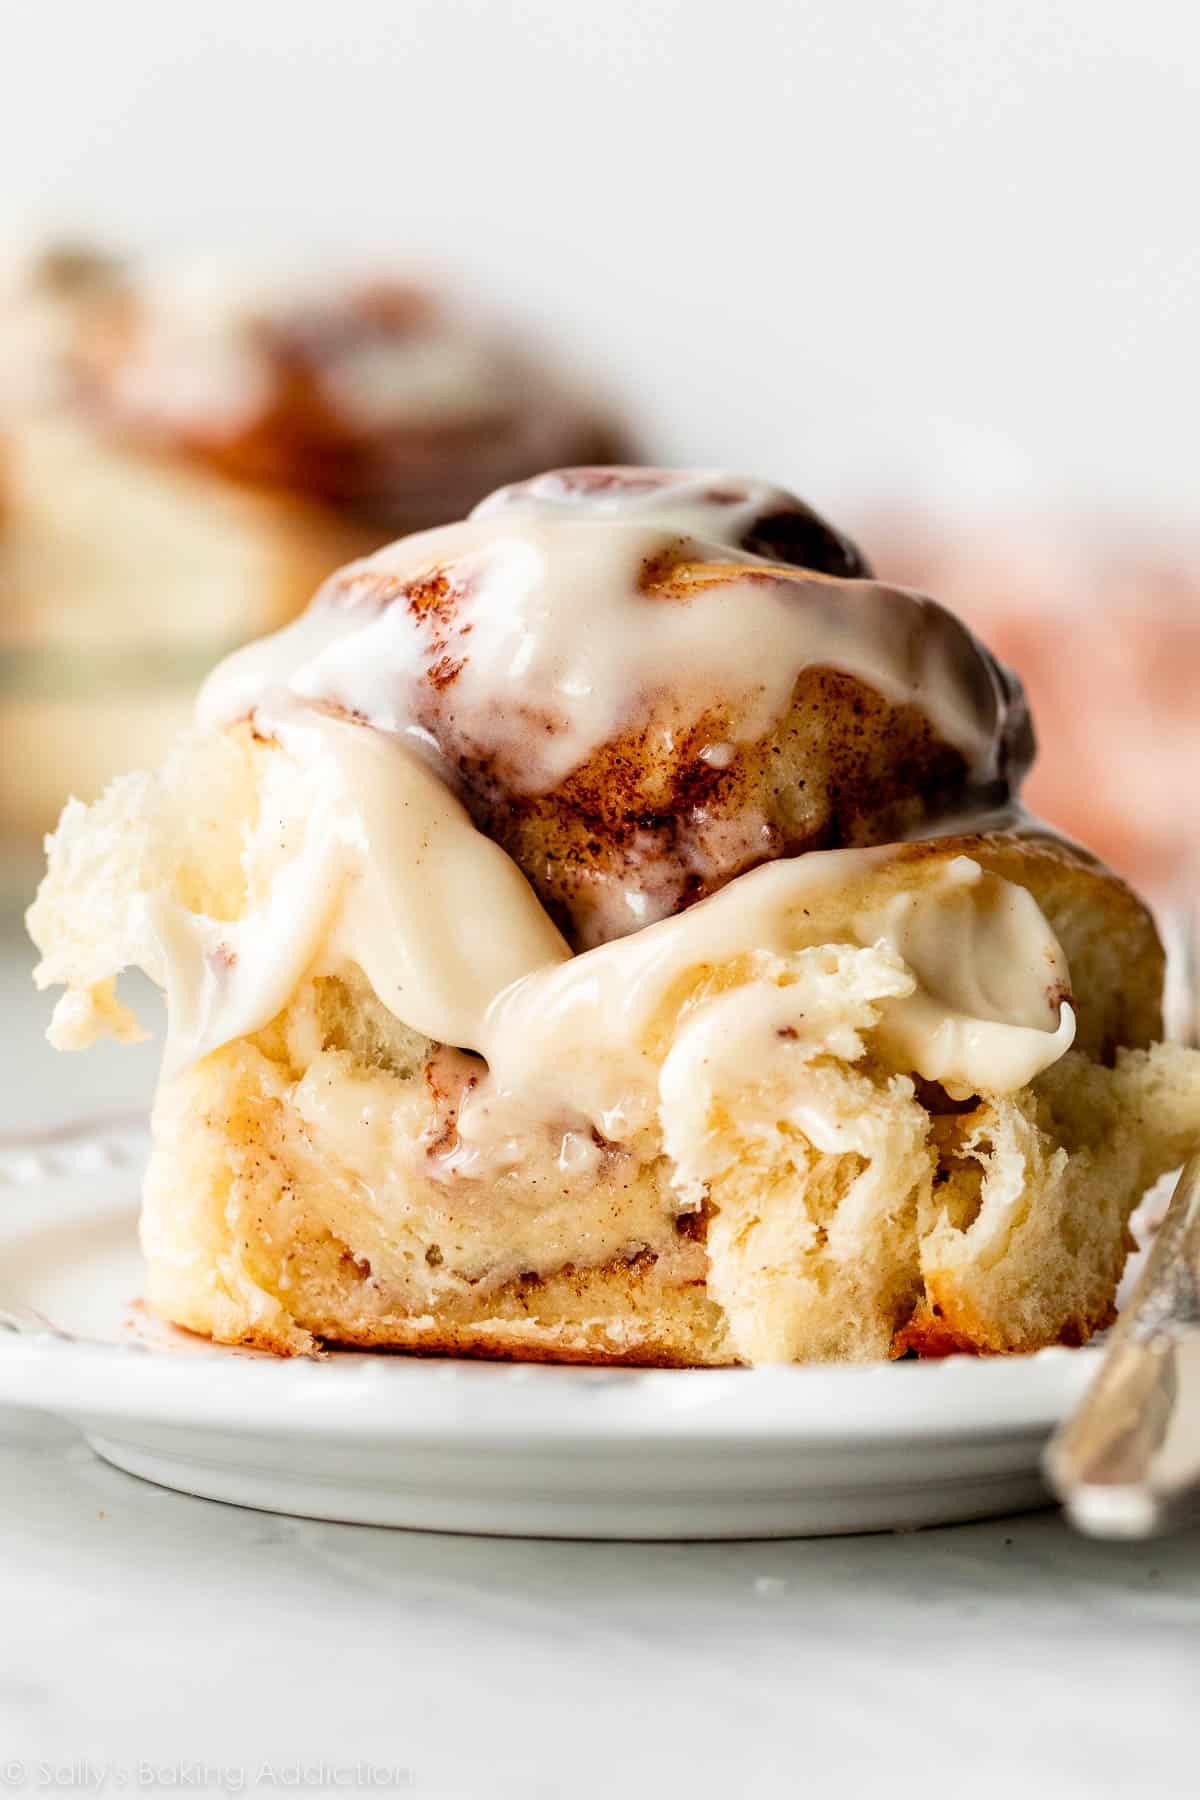
Spread or drizzle your icing on the warm rolls before serving—both icings seep right into every gooey swirl! The finished rolls pictured above have cream cheese icing, and here is the vanilla icing batch:
These easy cinnamon rolls from scratch are completely irresistible and they take half the time. If you’re looking for that perfect cinnamon roll recipe that doesn’t require 4+ hours, this is the winner.
Success Tips for Making the Best Cinnamon Rolls
- Don’t add more flour than you need. You can add a little more flour to bring the dough into a knead-able consistency, but adding too much will give you dense, dry rolls.
- Don’t kill the yeast. If your butter/milk mixture is too hot, it will kill the yeast and you won’t really notice until you’re far into the recipe… when the rolls won’t rise! Keep the temperature warm to the touch, around 100–110°F (38–43°C). An instant read thermometer is a handy tool for this baking recipe and many others.
- Use your sharpest knife to cut the rolls, so they don’t squish down.
- Use the correct size pan. This recipe makes 10–12 rolls, which fit in a 9- or 10-inch pan. If the pan is too small, they’ll be overcrowded. You can use a 9- or 10-inch pie dish, round cake pan, or square baking pan. If you want larger rolls, check out this recipe for jumbo cinnamon rolls!
- Let the rolls rise in a warm, draft-free environment. Here’s my favorite trick: Preheat your oven to 150°F (66°C), then turn it off. Cover the shaped rolls with aluminum foil and place the pan inside the warm oven. Leave the oven door cracked open for about 30 minutes, then close it and let them finish rising (another 30–60 minutes) in the oven with the door closed. Just don’t forget to take them out of the oven before you preheat it to bake them!
Easy Cinnamon Rolls (from scratch)
- Prep Time: 1 hour, 40 minutes
- Cook Time: 25 minutes
- Total Time: 2 hours, 5 minutes
- Yield: 10-12 rolls
- Category: Breakfast
- Method: Baking
- Cuisine: American
Description
These easy cinnamon rolls are perfect for yeast beginners because they only require 1 rise. You have a few options for toppings. The recipe below includes a simple cream cheese icing, but we also love these with the coffee icing or vanilla icing that’s included in the recipe Notes below.
Ingredients
Dough
- 2 and 3/4 cups (344g) all-purpose flour (spooned & leveled), plus more as needed
- 1/4 cup (50g) granulated sugar
- 1/2 teaspoon salt
- 3/4 cup (180ml) whole milk
- 3 Tablespoons (43g) unsalted butter
- 2 and 1/4 teaspoons Platinum Yeast from Red Star or any instant yeast (1 standard packet)
- 1 large egg, at room temperature
Filling
- 3 Tablespoons (43g) unsalted butter, extra softened
- 1/3 cup (67g) packed light or dark brown sugar
- 1 Tablespoon ground cinnamon
Cream Cheese Icing
- 4 ounces (113g) full-fat block cream cheese, softened to room temperature
- 2 Tablespoons (28g) unsalted butter, softened to room temperature
- 2/3 cup (80g) confectioners’ sugar
- 1 teaspoon pure vanilla extract
Instructions
- Make the dough: Whisk the flour, sugar, and salt together in a large bowl. Set aside.
- Combine the milk and butter together in a heatproof bowl. Microwave or use the stove and heat until the butter has melted and the mixture is warm to the touch (about 110°F/43°C, no higher). Whisk in the yeast until it has dissolved. Pour mixture into the dry ingredients, add the egg, and stir with a sturdy rubber spatula or wooden spoon OR use a stand mixer with a paddle attachment on medium speed. Mix until a soft dough forms.
- Transfer dough to a lightly floured surface. Using floured hands, knead the dough for 3-5 minutes. You should have a smooth ball of dough. If the dough is super soft or sticky, you can add a little more flour. Place in a lightly greased bowl (I use non-stick spray), cover loosely, and let the dough rest for about 10 minutes as you get the filling ingredients ready.
- Fill the rolls: After 10 minutes, roll the dough out in a 14×8-inch (36×20-cm) rectangle. Spread the softened butter on top. Mix together the cinnamon and brown sugar. Sprinkle it all over the dough. Roll up the dough to make a 14-inch log. Cut into 10–12 even rolls and arrange in a lightly greased 9- or 10-inch round cake pan, pie dish, or square baking pan.
- Rise: Cover the pan with aluminum foil, plastic wrap, or a clean kitchen towel. Allow the rolls to rise in a relatively warm environment for 60–90 minutes or until double in size. (For a tiny reduction in rise time, see my answer to Where Should Dough Rise? in my Baking with Yeast Guide.)
- Bake the rolls: After the rolls have doubled in size, preheat the oven to 375°F (190°C). Bake for 24–27 minutes, or until lightly browned. If you notice the tops are getting too brown too quickly, loosely tent the pan with aluminum foil and continue baking. If you want to be precise about their doneness, their internal temperature taken with an instant read thermometer should be around 195–200°F (91–93°C) when done. Remove pan from the oven and place pan on a wire rack as you make the icing. (You can also make the icing as the rolls bake.)
- Make the icing: In a medium bowl using a handheld or stand mixer fitted with a paddle or whisk attachment, beat the cream cheese on high speed until smooth and creamy. Add the butter and beat until smooth and combined, then beat in the confectioners’ sugar and vanilla until combined. Using a knife or icing spatula, spread the icing over the warm rolls and serve immediately.
- Cover leftover frosted or unfrosted rolls tightly and store at room temperature for a day or in the refrigerator for up to 5 days.
Notes
- Make Ahead Instructions: This dough can be made the night before through step 4. Cover with plastic wrap and let rest in the refrigerator overnight. The next morning, remove from the refrigerator and allow to rise in a warm environment, about 1 hour. Continue with step 6.
- Make Ahead Instructions – Freezing: You can freeze the rolls for up to 3 months, and I recommend a few different methods. The first method is to freeze them after shaping, before they rise (before step 5). Thaw in the refrigerator overnight, then let rise for 1.5–2 hours at room temperature before baking. The second method is to par-bake the risen rolls for 10 minutes, let cool completely, then cover and freeze. Thaw in the refrigerator overnight, then let sit at room temperature for 30 minutes before baking. Finish baking at 375°F (190°C) for around 15 minutes. You can also freeze fully baked rolls. See How to Freeze Cinnamon Rolls for more details about all of these methods.
- Special Tools (affiliate links): Electric Stand Mixer or Glass Mixing Bowl with Silicone Spatula/Wooden Spoon | Rolling Pin | 9- inch Round Cake Pan, 9-inch Pie Dish, or 9-inch Square Baking Pan | Instant Read Thermometer | Cooling Rack | Electric Mixer (Handheld or Stand) for icing | Icing Spatula
- Yeast: I highly recommend instant yeast. If you only have active dry yeast, you can use that instead. Active dry and instant yeast can be used interchangeably in recipes (1:1). Active dry yeast has a moderate rate of rising and instant dry yeast has a faster rate of rising; active dry yeast will take longer to raise the dough.
- Milk: This recipe used to call for 1/2 cup (120ml) milk and 1/4 cup (60ml) water. The rolls taste much richer using all milk, and that is what I recommend. Whole milk or even buttermilk are ideal for this dough. If needed, you can substitute 3/4 cup (180ml) lower-fat or nondairy milk.
- Coffee Icing (or Vanilla Icing): Whisk 1 cup (120g) confectioners’ sugar, 1/2 teaspoon pure vanilla extract, and 2–3 Tablespoons (30–45ml) strong brewed coffee together until smooth. Or swap milk for coffee for regular vanilla icing. Drizzle over warm rolls.
- Reference my Baking with Yeast Guide for answers to common yeast FAQs.


Reader Comments and Reviews
Can I bake these in my cast iron Dutch oven?
Hi Lou, I can’t see why not!
Your article before the recipe says don’t use non-fat milk. I only buy skim milk, so could I add a little heavy whipping cream to the skim milk to equal whole milk? If so, how much? Thanks. I want to try this recipe but don’t want to buy whole milk.
Hi Barb, adding 1 Tbs cream to your skim milk should be just about right. Happy baking!
I felt so proud of myself. Thank you for this easy and well explained recipe.
Hi! My elevation is 6000ft, what adjustments would I need to make?
Hi Jess, we wish we could help, but we have no experience baking at high altitude. Some readers have found this chart helpful: https://www.kingarthurflour.com/learn/high-altitude-baking.html
I bake at 5000+ feet and this recipe works so well as is… Maybe a minute less baking time but other than that it’s perfect!
Amazing recipe! Brother says, it’s the best cinnamon rolls he’s ever had. Thank you so much!
I loved the easy instructions for my first attempt at cinnamon rolls. I found that my texture came out a little more like a cross between a muffin and bread though not like a typical cinnamon roll. Only variation is I had dry active yeast on hand. Is there a tip to fix this? Or is it the difference in the traditional versus quick recipe?
Hi Melissa, the cinnamon rolls should still be fluffy and flaky, not at all like a muffin. When you let the dough rest for 10 minute before rolling out out/filling it, try extending that to 30 minutes to give the dough more time to rest. That can help. Also, be sure not to over-bake the rolls. That will also create a denser-tasting roll.
Loved this recipe, would be doing it again this week!
I just have a question, if I have to bake it ahead of the time of serving, what would you recommend for the re-heating procedure?
Thank you.
Hi Haya, if you scroll down to the bottom of the recipe card, you’ll see make-ahead instructions in the Notes section. Enjoy the rolls!
It’s only gonna be a few hour-gap. So I would just need to re-heat.
Just need to know the temperature and time in the oven. Thank you!
Hi Haya, you can re-warm the rolls at 300F, we’re unsure of the exact time needed.
Is there typically a difference in texture over the traditional recipe and this one? I just made a batch. First time ever making these not from a pillsubury tube. But my texture was more like a roll than anything and the dough lacked a little depth of flavor. Is that the difference in the recipes? Or is there a tip to correct this? The directions were easy to follow so it was a nice introductory to making cinnamon rolls. Also these are great made with the cream cheese frosting recipe provided but add a little orange zest and orange extract as I have always loved that style.
Hi Melissa, the rolls should still come out nice and flaky. The best way to improve the texture would be to extend the initial rest time to 30-45 minutes, before rolling out and shaping. Use whole milk, or even buttermilk in the dough. Great flavor that way!
Can you use a stand mixer with a dough hook instead of kneading by hand?
Hi Allison, yes you can.
Can I add raisins?
Yes, you sure can!
I’m excited to try this recipe! Any suggestions for Vegan alternatives for the butter, eggs and milk used for the cinnamon rolls and icing? Thanks!
i would guess vegan butter, plant milk, and some kind of egg replacer but im not certain which
Is it really important that I use unsalted butter opposed to salted?
Unsalted butter is recommended, as salted butter can contain various amount of salt depending on the brand used. If using salted butter, feel free to reduce the added salt to 1/4 teaspoon. (And here is more on the difference between unsalted and salted butter, if you’re interested!)
Hi! I placed the buns on a sheet pan so they won’t bake into each other. Wow fluffy beauties with tiny centers peaking out – thank you!
DELICIOUS! This is a BEAUTIFUL recipe So very easy too! The baked cinnamon buns were so light & fluffy and the cream cheese frosting is PERFECTION! So delicious. I used convection bake and found they were maybe a tad over-baked at 22 minutes and had used aluminum foil around 17 minutes into baking — I might take them out sooner next time. It’s such a WONDERFUL recipe – thank you very very very much
These are the best cinnamon rolls we’ve ever tried. And I can’t believe how quick and easy the dough is. This is replacing my usual recipe which takes a lot longer to make. They have great flavor! I used the cream cheese frosting.
Thank you so much for this recipe and all the others. Your recipes are fool-proof and work perfectly each time. This was my first attempt at making cinnamon rolls and they turned out so good they are no more, all gone. I didn’t even make a topping, they were eaten naked 🙂
Hello, I’m planning to make this recipe as a birthday breakfast surprise as it looks great! If I freeze the rolls once baked, and defrost overnight, how long do you think they will need to warm up the next day and what temperature would you use for warming? Thanks
Hi Laura, you can heat them up anywhere between 300-350 until warmed to your liking. Enjoy!
Love your recipes. Do you have a recipe for Caramel Rolls/Sticky buns on this site or in one of your books? Could this recipe be used somehow as a base? Suggestions?
Hi Kathy, here is our recipe for maple pecan sticky buns!
Loved this recipe
I make this recipe a couple of times a month for my grandkids. They love them.!
Hi there. I’m gonna try to make these. Any changes with high altitude? Love your baking site. I’ve master scones now ready to try something else.
Hi Mary! We wish we could help, but we have no experience baking at high altitude. Some readers have found this chart helpful: https://www.kingarthurflour.com/learn/high-altitude-baking.html
Very easy to make and WOWWW they are soooo fluffy
I love this recipe!! My family goes crazy for these every time I make them, thanks Sally!!
First time making cinnamon rolls.. super easy, I added some extra filling.. and cooked at 350 for about 15 mins then 400 for 10 mins ..turned out perfect.. thanks for recipe..
The recipe was really straightforward and good but my cinnamon rolls were browning much too quickly in my gas oven, i would say 350 for 22 minutes max is a much more accurate cook temp and time
Ive made this recipe twice, both times Ive made them with raisins in them, the first time my oven burnt the bottoms and tops a little, so Ive adjusted the oven and baking time to my ovens standards and theyre a massive hit! Super easy to make, store and overall an amazing recipe and really simple and easy to follow along with.
The one rise dough recipe was good. I almost always use full fat plain yogurt for milk and I used bread flour instead of APF which I also do on occasion. The recipe warned if the rolls browned too fast to place a foil tent over it but after 12 minutes (out of 24 min) the rolls were smoky brown. The internal roll temperature was 212. Over 10 degrees where the preferred temperature. I did not frost them. I thought they were dry and had a bread crumb texture (maybe from the flour?) but my husband did not think they were dry. The filling seemed scant to me. I think I’d use a two rise recipe and double the cinnamon dark brown sugar filling. I’m ordering an oven thermometer too I made 11 rolls and by the end of the day there were only 4 left, me being the one with less control ,I wasn’t sure of how eliminating the 2nd rise helped a novice. I don’t know if using bread flour or having a hot oven caused the browning and bread like texture versus pillowy feel. I baked them in a dark 10″ springform pan. I’ve used this before with no early browning. I think the bake time for my batch was 8 minutes.
Best cinnamon rolls ever, can’t stop eating them!
Can i use buttermilk in this recipe instead of whole milk?
Yes, not a problem.
Can you make just the dough the night before, let it rest in the fridge and then put the rest together the next day?
Hi Amy, after you shape the dough into a ball, you can cover it and let the dough rest and rise slowly in the refrigerator overnight. Punch down, then proceed with the recipe. (The recipe, as written, doesn’t let the ball of dough rise but it doesn’t hurt.) This works just as well as the overnight instructions, where you let the shaped/cut rolls rest overnight.