

Here’s how to make authentic-tasting Chicago deep dish pizza. Complete with the buttery crust, slightly sweet tomato sauce, and a thick layer of cheese.
This recipe is brought to you in partnership with Red Star Yeast.

Warning: this post has about 1,000,000 step-by-step photos and lots of little explanations to go along with them. Might want to grab some coffee.
I recently looked at my website’s stats and came to find out that Chicago is my most popular city in the US. I have more Chicago readers than any other place in this country. That’s crazy awesome because I love Chicago. As a little tribute to my #1 city, I’m finishing one blow-out year with a Chicago inspired recipe.
I’ve only had the pleasure of having real, authentic Chicago-style pizza a few times. And those few times have been enough to convince me that Chicago-style pizza is incomparably good. Better than good.
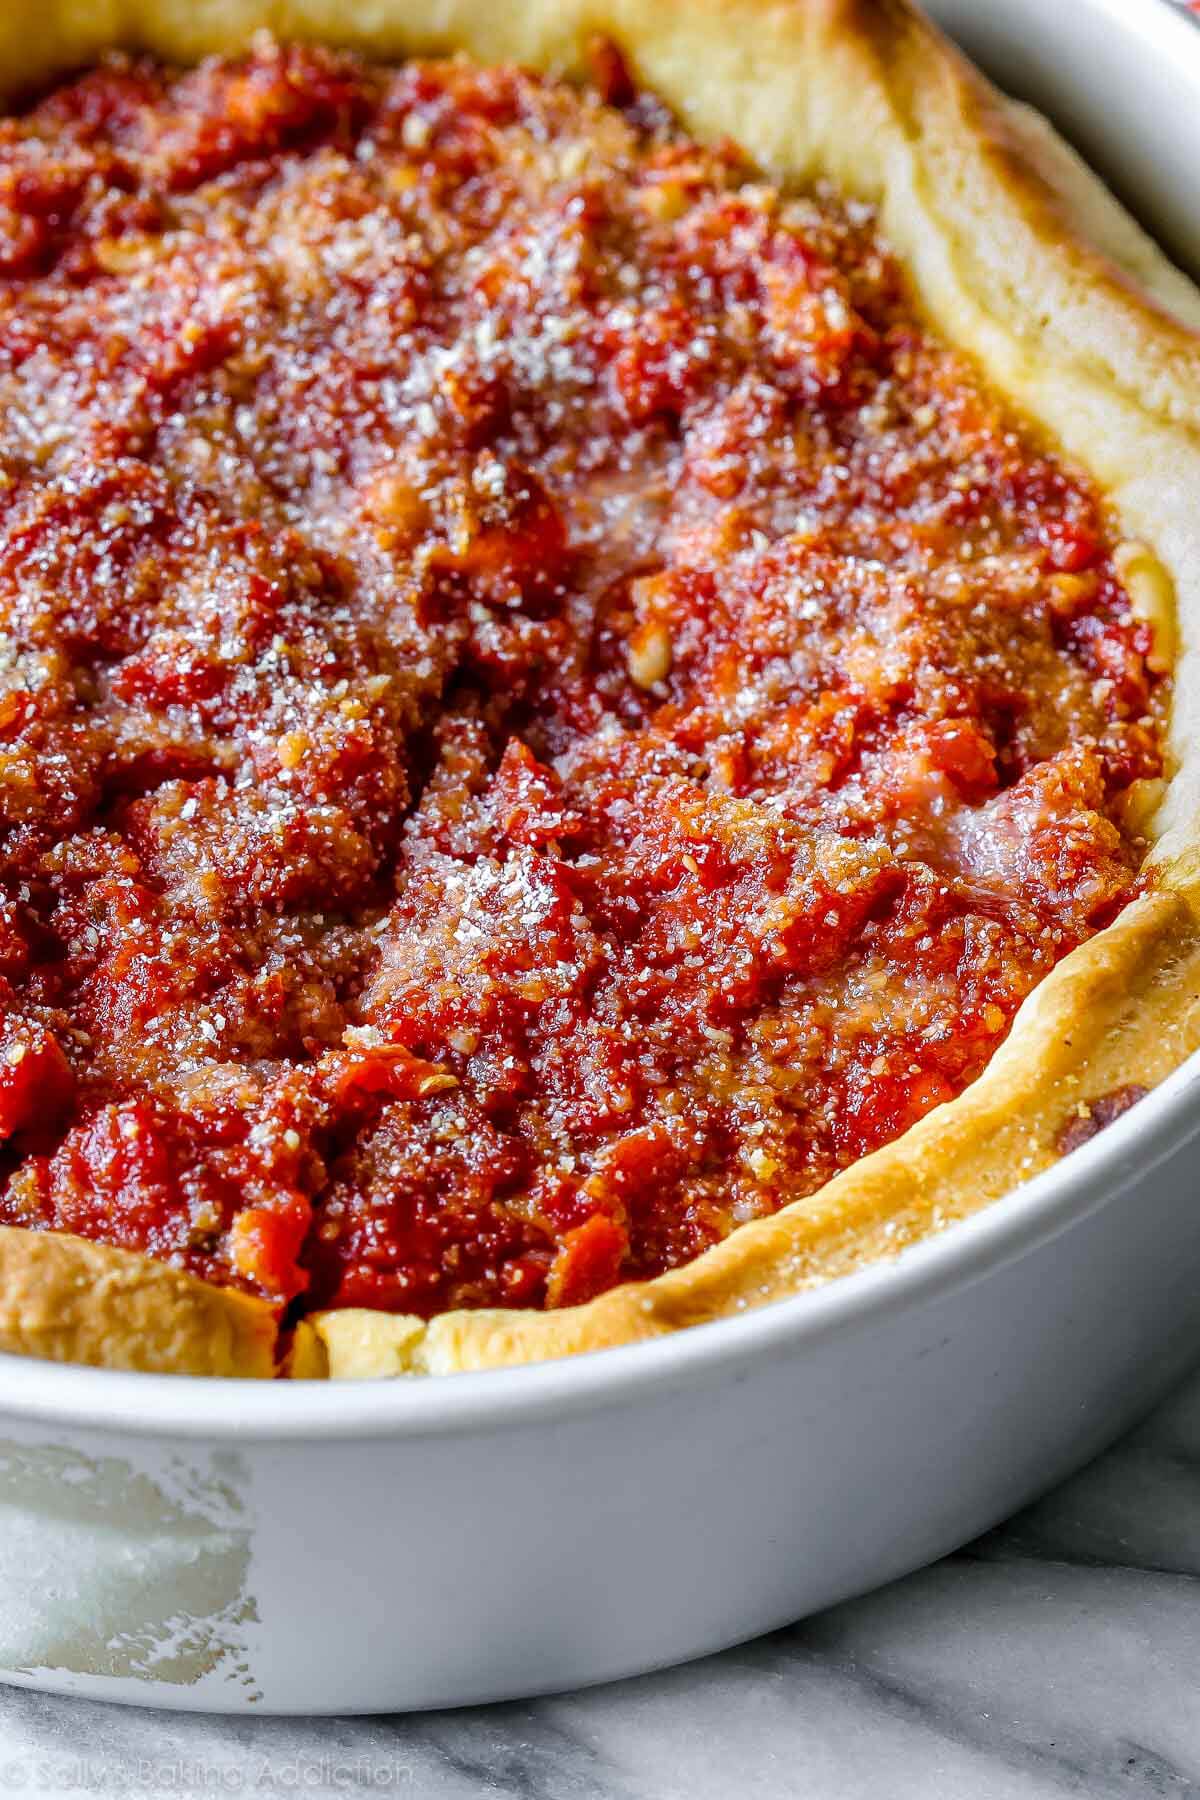
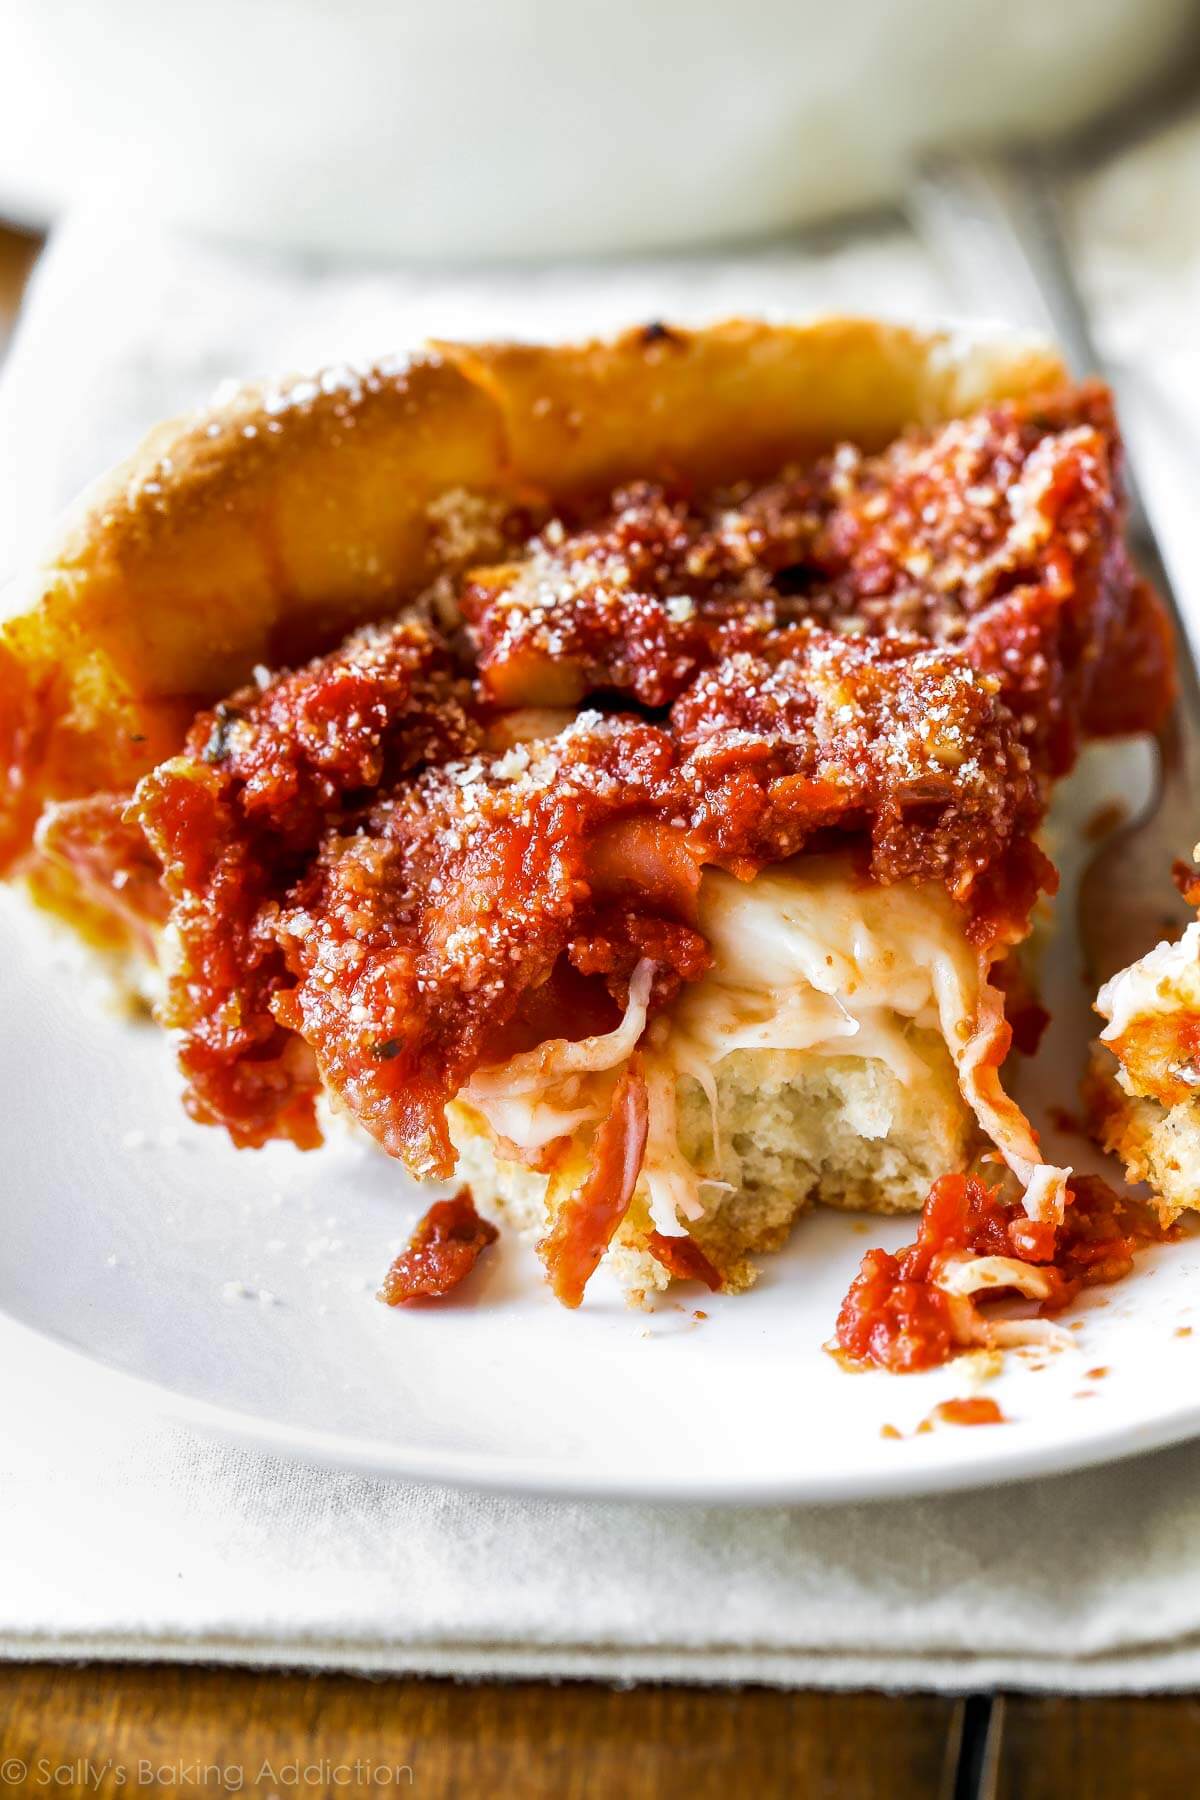
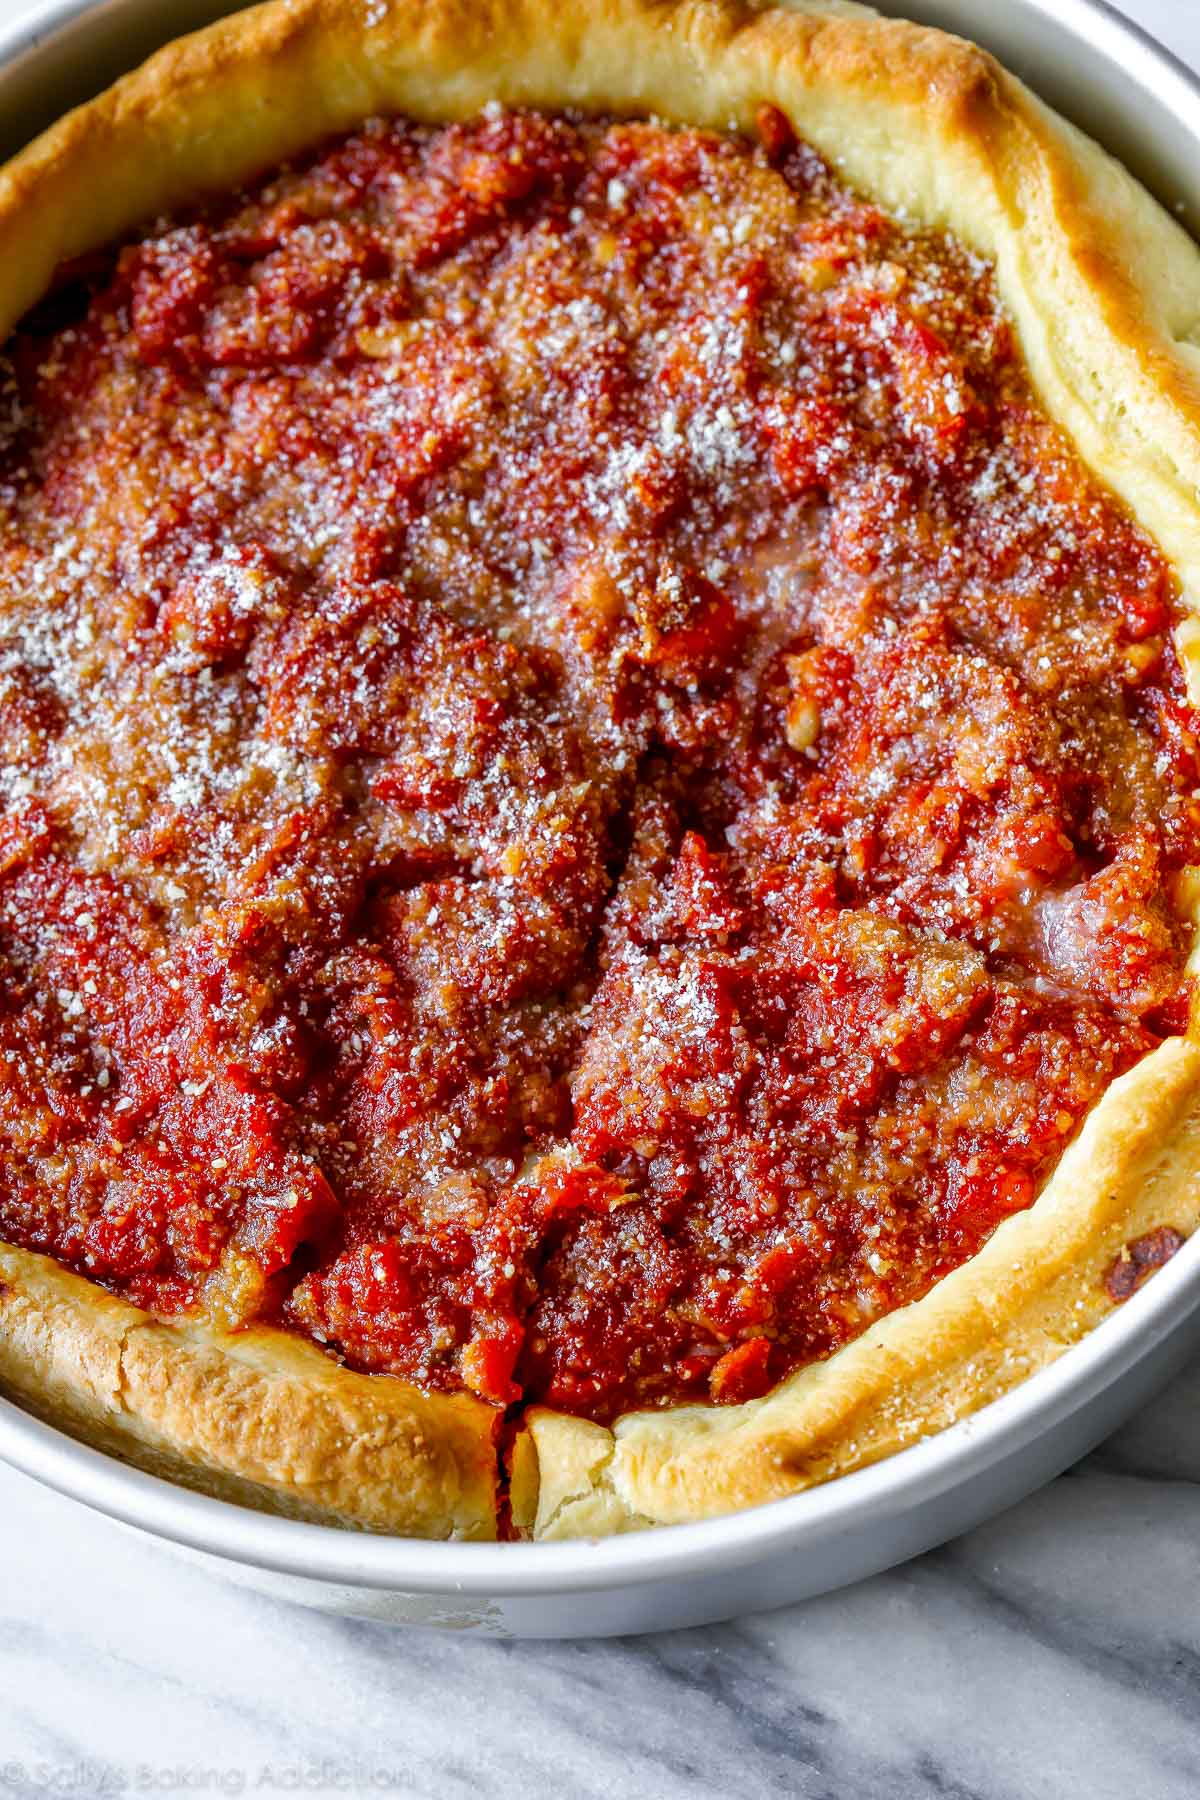
So, what makes Chicago-style pizza so damn amazing? The answer is everything. Every little detail about this pizza is special. First, this pizza clearly doesn’t look like a pizza you are used to. It’s baked in a deep dish cake pan. The cheese goes directly on top of the crust and the sauce is piled on top. An upside-down pizza pie of sorts. Now, I may be completely wrong, but I’ve learned that the proper way to eat Chicago-style pizza is with a fork. Is this right, Chicago readers? I hope so because it’s the only way I can eat it without making an atrocious and very embarrassing mess.
Let’s talk about all the wonderful layers in this pizza.
The deep dish pizza crust. A crunchy-edged, flaky crust is key in Chicago-style pizza. It’s absolutely not a regular pizza crust. No, this crust is unique. And that’s why I steered completely away from my regular pizza crust recipe and dove headfirst into something completely nuts. Adding a little cornmeal. Cornmeal is what makes the crust so crunchy and flavorful. Not to mention, tasting like you’re eating the real deal.
What else is special about this pizza crust? It’s so buttery. The butteriest pizza crust on the planet, or at least the butteriest pizza crust I’ve ever had the pleasure of tasting. To get that ultra buttery flavor, as well as the iconic flaky texture of Chicago-style pizza crust, we’re going to laminate the pizza dough. Umm, what?? Yes. It sounds weird, I know. But laminating dough is exactly what gives croissants its flaky layers. Laminating, or layering, butter into dough is the answer an authentic tasting Chicago pizza crust.
This all sounds hard, doesn’t it? Good news, it’s not! Laminating is literally just spreading butter on your pizza dough and folding it up. Then, rolling the pizza dough out again locking that butter inside. Easy.
I’m not sure how and I’m not sure why… but despite being a little crunchy and very flaky, this pizza crust will absolutely melt in your mouth. It’s crunchy, buttery, and tender all at the same time? A miracle crust.
Baking with Yeast Guide
Reference my Baking with Yeast Guide whenever you work with baker’s yeast. I include practical answers to all of your common yeast questions.
Let’s talk about the pizza sauce. Slightly sweet, incredibly thick, and wonderfully flavorful. The sauce is always my favorite part about Chicago-style pizza. In fact, I usually order extra sauce on the side. All about the condiments in my world.
This garlic infused pizza sauce is made on the stovetop and, while waiting for the pizza dough to rise, simmers quietly allowing the flavors to develop and the texture to thicken. I like to add some red pepper flakes for a little heat; it really gives this sauce something extra. If you don’t like heat, you can leave it out. This sauce is unlike ANY other tomato sauce I’ve ever had. To me, it tastes like the kinds I’ve had in Chicago. You’re going to love it. Unless of course you don’t like tomato sauce.
Along with the miracle crust and this luscious pizza sauce, a whole lotta cheese goes into this deep dish pie. You may use sliced mozzarella or shredded. Whatever it is, slice or shred it yourself from a block of real mozzarella cheese. Pre-shredded mozzarella is just fine, but the taste of sliced or shredded fresh mozzarella is just unbeatable.
My husband loves a good pepperoni pizza with bacon, so I add both to the Chicago-style pizza. These go on top of the cheese and before the sauce. A little grated parmesan to finish things up and we’ve got ourselves one damn tasty copycat Chicago deep dish pizza. How many times can I type Chicago in one post?
I love you Chicago and your pizza too!
This recipe makes 2 deep dish pizzas. They are small 9 inch pizzas. Two hungry people can easily finish one. Make them both if you have a family of 4-5 or are having friends over. If your family is smaller, freeze half of the dough per the make-ahead/freezing instructions in the recipe notes. Please use my step-by-step photos below this written out recipe as a guide to making the pizza. For best results and ease of mind (!!!), please read through the recipe completely before beginning.
Print
How To Make Chicago-Style Deep Dish Pizza
- Prep Time: 4 hours
- Cook Time: 30 minutes
- Total Time: 4 hours, 30 minutes
- Yield: 2 deep dish 9-inch pizzas
- Category: Dinner
- Method: Baking
- Cuisine: American
Description
Here’s how to make authentic-tasting Chicago deep dish pizza. Complete with the buttery crust, slightly sweet tomato sauce, and a thick layer of cheese. This recipe makes two deep dish 9-inch pizzas. Make them both if you have a family of 4-5 or are having friends over. If your family is smaller, freeze half of the dough per the make-ahead/freezing instructions in the recipe notes.
Ingredients
Pizza Crust (makes 2)
- 3 and 1/4 cups (406g) all-purpose flour (spooned & leveled)
- 1/2 cup (60g) yellow cornmeal
- 1 and 1/4 teaspoons salt
- 1 Tablespoon (12g) granulated sugar
- 2 and 1/4 teaspoons (7g) Platinum Yeast from Red Star instant yeast (1 standard packet)*
- 1 and 1/4 cups (300ml) slightly warm water
- 1/2 cup (8 Tbsp; 113g) unsalted butter, divided (1/4 cup melted, 1/4 cup softened to room temperature)
- olive oil for coating
Tomato Sauce for Both Pizzas
- 2 Tablespoons (28g) unsalted butter
- 1 small onion, grated (about 1/3 cup)*
- 3/4 teaspoon salt
- 1 teaspoon dried oregano
- 1/2 teaspoon crushed red pepper flakes (optional, but recommended)
- 3 garlic cloves, minced
- one 28-ounce can (794g) crushed tomatoes*
- 1/4 teaspoon granulated sugar
Toppings for Both Pizzas
- 4 cups (about 16 oz) shredded mozzarella cheese*
- 1/2 cup (45g) grated parmesan cheese
- optional: 1/2 cup sliced pepperoni
- optional: 4 slices bacon, cooked and crumbled
Instructions
- Please use my step-by-step photos below this written out recipe as a guide to making the pizza. For best results and ease of mind, read through the recipe completely before beginning. You will need two deep dish 9×2-inch round cake pans if you are making both pizzas at the same time. You can also use 9-inch springform pans.
- For the crust: Combine the flour, cornmeal, salt, sugar, and yeast in the bowl of your stand mixer fitted with a dough hook attachment. If you do not have a stand mixer, use your hand mixer and a very very large bowl. If you do not have any mixer, you will do this all by hand. Again, use a very large bowl. Give those ingredients a quick toss with your mixer on low or with a large wooden spoon. Add the warm water and 1/4 cup of melted butter. The warm water should be around 90°F (32°C). Make sure it is not very, very hot or it will kill the yeast. Likewise, make sure the butter isn’t boiling hot. If you melt it in the microwave, let it sit for 5 minutes before adding. On low speed, beat (or stir) the dough ingredients until everything begins to be moistened. Continuing on low speed (or remove from the bowl and knead by hand if you do not own a mixer), beat the dough until it is soft and supple and gently pulls away from the sides of the bowl and falls off of the dough hook- about 4-5 minutes. If the dough is too hard (it will be textured from the cornmeal), but if it feels too tough, beat in 1 teaspoon of warm water. Alternatively, if it feels too soft, beat in 1 Tablespoon of flour.
- Remove the dough from the bowl and form into a ball. Lightly grease a large mixing bowl with olive oil and place the dough inside, turning it around so that all sides of the dough are coated in the oil. Cover the bowl tightly with aluminum foil and allow to rise in a warm environment for 1-2 hours or until double in size.
- Once the dough is ready, lightly flour a large work surface. Remove dough from the bowl, set the bowl and aluminum foil aside (to use later). Gently punch down the dough to remove any air bubbles and roll the dough into a large 15×12-inch rectangle. Spread 1/4 cup of softened butter on top of the dough. Roll it up lengthwise per the photos below. Cut the dough log in half. Form the two pieces of dough into balls and place back into your greased bowl. Cover with aluminum foil and allow to rise in the refrigerator (not in a warm place) for 1 hour until they are puffy as you make the sauce.
- For the sauce: Place butter in a medium saucepan over medium heat and allow it to melt. Once melted, add the grated onion, salt, oregano, and red pepper flakes. Once the onion has slightly browned after about 5 minutes, add the garlic, tomatoes, and sugar. Turn the heat down to low-medium and allow it to simmer until it’s hearty, fragrant, and thick- about 30 minutes. You’ll have about 2 and 1/2 cups of sauce at this point. If you have more than that, keep simmering until the amount has reduced. Remove from heat and set aside until ready to be used. You may store the sauce in a tightly covered container in the refrigerator for up to 2 days if planning to make the pizza another day. You may freeze this sauce for up to 2 months as well.
- Preheat oven to 425°F (218°C).
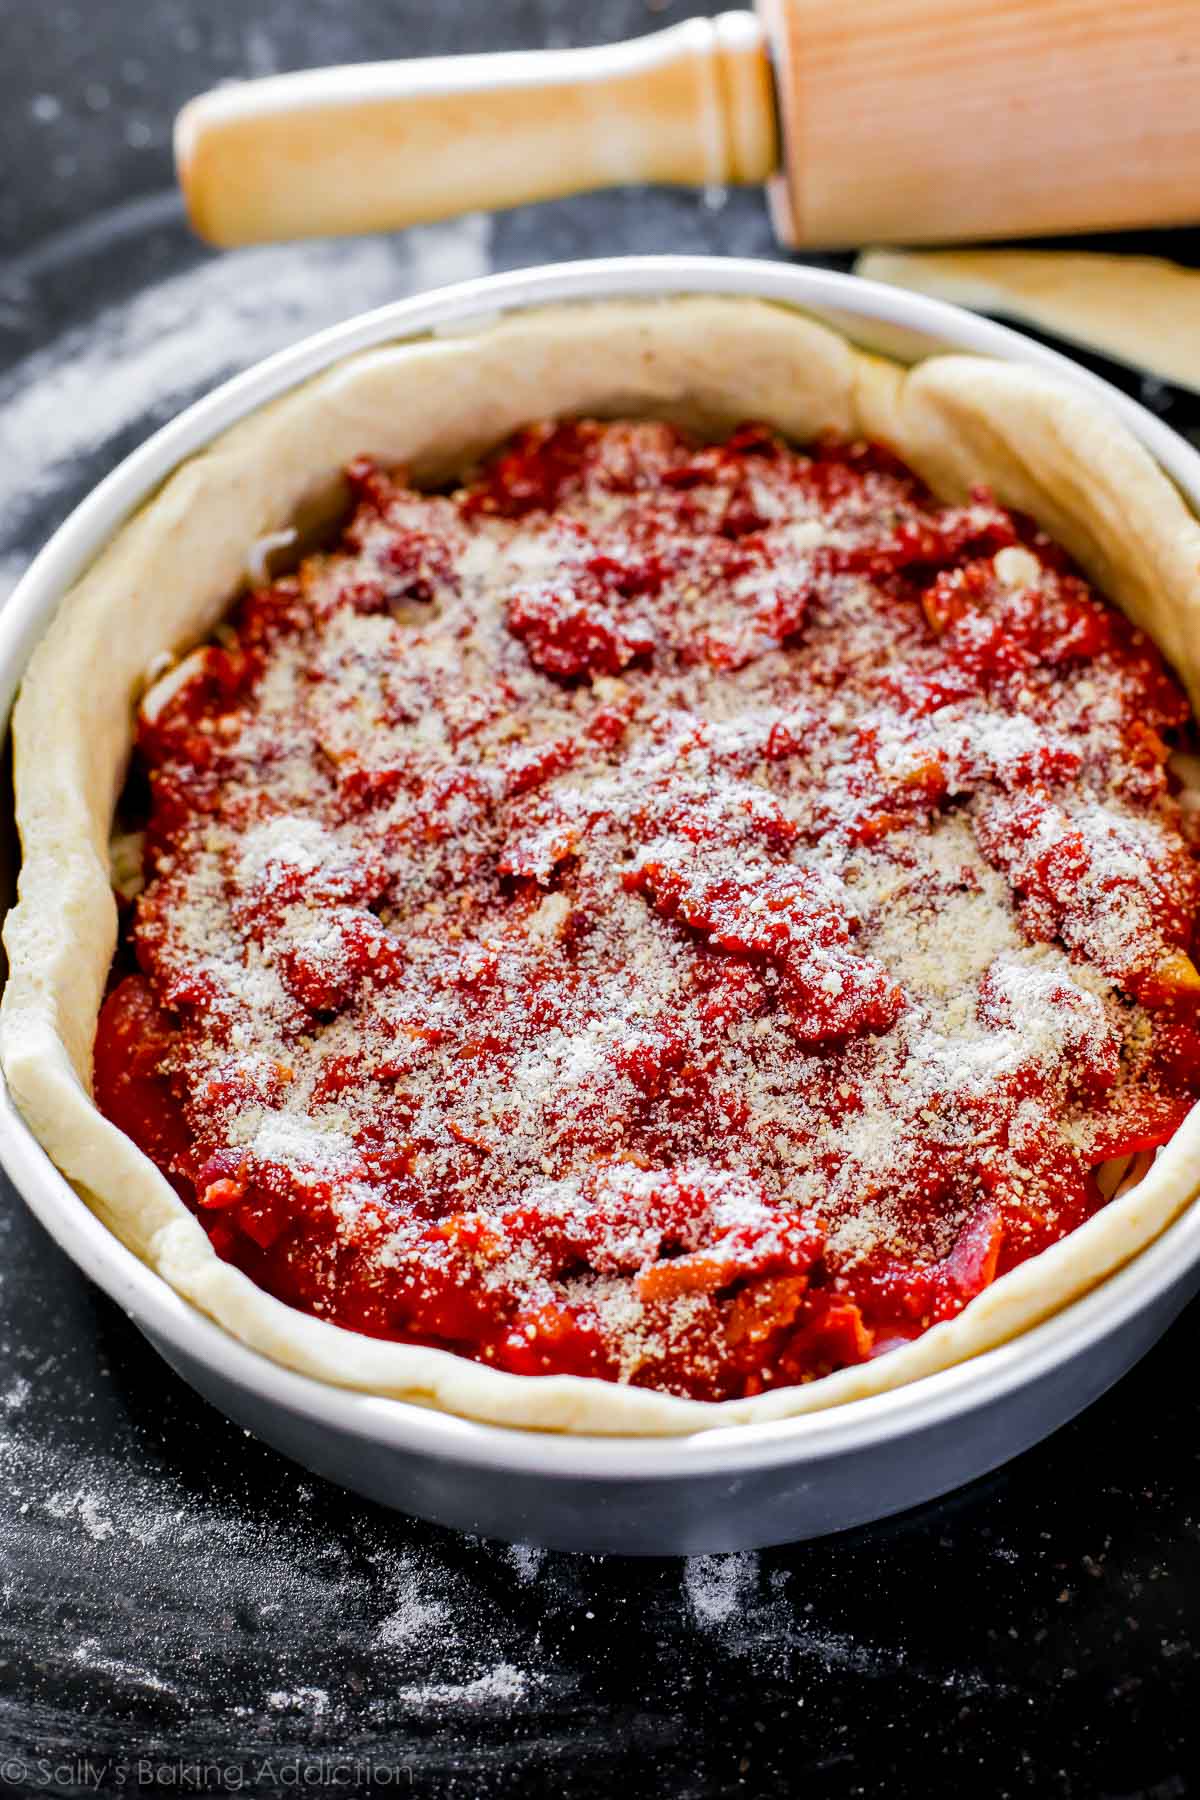
- Assemble the pizzas: After the dough balls have risen in the refrigerator, they should be puffy. Keep one ball of dough in the refrigerator as you work with the first one. Roll it out on a lightly floured work surface, working it into a 12-inch circle. Using your rolling pin as a guide (see photos below), place over a 9×2-inch deep dish cake pan. Using your fingers, press the dough into the cake pan. Make sure it is nice and tight fitting inside the pan. Trim any excess dough off the edges with a small knife. Repeat with 2nd dough. Brush the top edges of the dough with a little olive oil, which gives the crust a beautiful sheen. Fill each pizza with 1/2 of the cheese (about 2 cups/8 oz per pizza), then the pepperoni and bacon or your desired toppings. Pour about 1 and 1/4 cups (300ml) of sauce evenly on top of each. If you do not like that much sauce, you can reduce to 3/4 cup (180ml) per pizza and have leftover sauce. Sprinkle each with 1/4 cup (22g) of grated parmesan cheese.
- Place the cake pans on top of a large baking sheet, which will catch anything potentially spilling over the sides of the pans. (Nothing usually does.) Bake for 20-28 minutes or until the crust is golden brown. Feel free to loosely cover the pizzas with aluminum foil after the 15 minute mark to prevent any heavy browning and uneven baking. Remove the pizzas from the oven and allow to cool in the pans placed on a wire rack for 10 minutes. After 10 minutes, slice, serve, and enjoy. Place any leftover pizza in an airtight container and refrigerate for up to 5 days. Reheat leftovers in a 300°F (149°C) oven for 15-20 minutes or until hot.
Notes
- Make Ahead & Freezing Instructions: Dough may be prepared through step 4. In the last part of this step, the dough needs to rise in the refrigerator for 1 hour. You may leave it in the refrigerator for up to 1 full day, making sure to punch it down to remove any air bubbles before rolling out as directed in step 7. You may freeze the pizza doughs after preparing them through step 4, and instead of allowing to rise in the refrigerator, simply freeze for up to 2 months. Then, allow the doughs to thaw overnight in the refrigerator and allow to rise at room temperature for 1 hour before continuing with step 7. Make-ahead and freezing instructions for the sauce are written in step 5.
- Special Tools (affiliate links): 9×2-inch Round Cake Pans or 9-inch Springform Pans | Electric Mixer (Handheld or Stand) | Glass Mixing Bowl | Wooden Spoon | Rolling Pin | Saucepan | Box Grater
- Yeast: Platinum Yeast from Red Star is an instant yeast. You can use any quick rise or instant yeast in this recipe. You can also use active dry yeast in this recipe with zero changes. The rise time may be slightly longer if using active dry yeast.
- Onion & Tomatoes: Please see notes below the recipe in the step-by-step photos for details about the grated onion and the can of crushed tomatoes.
- Cheese: You can use sliced mozzarella or shredded mozzarella cheese.
- Toppings: Feel free to swap the pepperoni and bacon with cooked and crumbled sausage, thinly sliced green peppers and/or onions, sliced mushrooms, etc. Add enough toppings to suit your tastes.
- Reference my Baking with Yeast Guide for answers to common yeast FAQs.
- Adapted from: a mix of Food.com and Cooks Illustrated
Begin by combining the flour, cornmeal, salt, sugar, and yeast in the bowl of your stand mixer fitted with a dough hook attachment. If you do not have a stand mixer, use your hand mixer and a very very large bowl. If you do not have any mixer, you will do this all by hand. Use a very large bowl.
I always use Red Star Yeast. I use it for all of my yeast doughs including cinnamon rolls, breads, pizzas, etc. Their platinum line is my variety of choice.
Give those ingredients a quick toss with your mixer on low or with a large wooden spoon.
Per the recipe instructions above, add 1 and 1/4 cups of warm water and 1/4 cup of melted butter. The warm water should be around 90 degrees. Make sure it is not very, very hot or it will kill the yeast. Likewise, make sure the butter isn’t boiling hot. If you melt it in the microwave, let it sit for 5 minutes before adding.
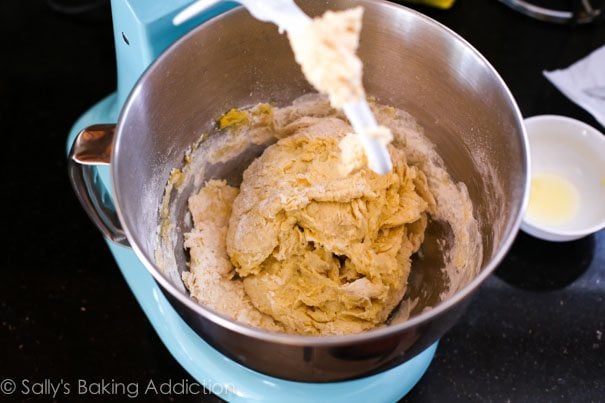
On low speed, beat (or stir) the dough ingredients until everything begins to be moistened.
Continuing on low speed (or kneading by hand—see my How to Knead Dough video tutorial for extra help here), beat the dough until it is soft and supple and gently pulls away from the sides of the bowl and falls off of the dough hook. If the dough is too hard (it will be textured from the cornmeal), but if it feels too tough, beat in a teaspoon of warm water. Alternatively, if it feels too soft, beat in a Tablespoon of flour.
Remove the dough from the bowl and form into a ball. Lightly grease a large mixing bowl and place the dough inside, turning it around so that all sides of the dough are coated in the oil. Cover the bowl tightly with aluminum foil and allow to rise in a warm environment. For this warm environment, here is what I do (see the right photo below):
Preheat oven to 250F degrees. Once 250F degrees, turn oven off. Place bowl inside. Close the oven. The lingering heat will help your dough rise. This is especially ideal on cold winter days!

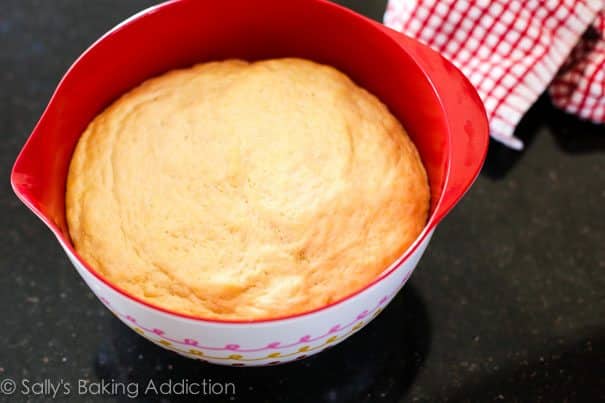
After 1-2 hours, the dough will have doubled in size. Gently punch it down.
Lightly flour a large work surface.

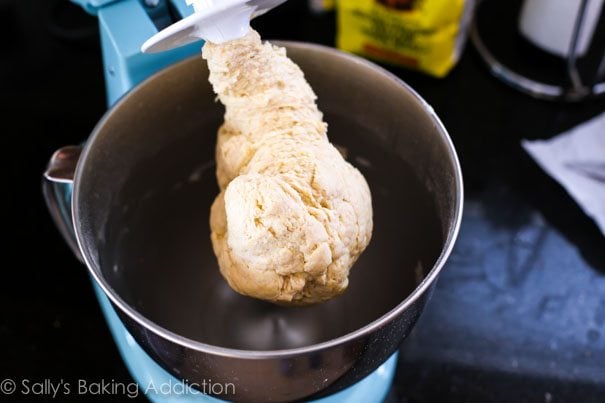
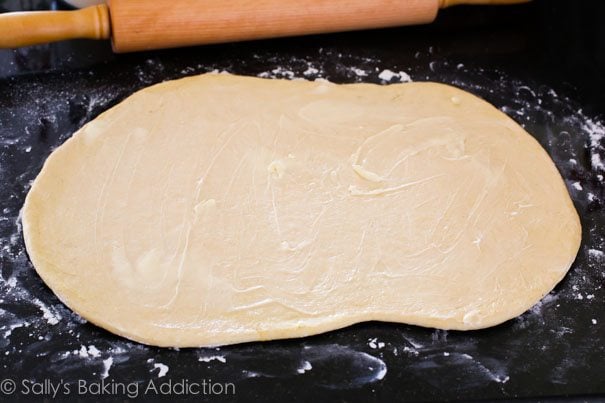
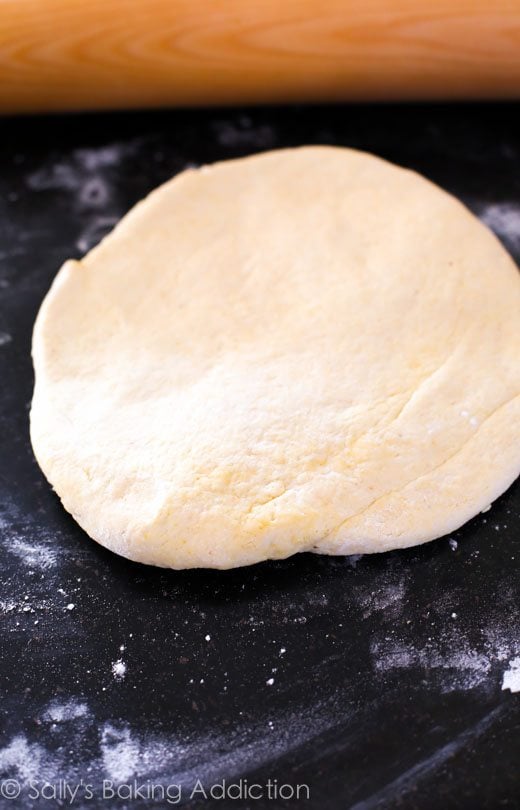
Remove dough from the bowl, set the bowl aside (to use later) and roll the dough into a large 15×12 rectangle. It does not have to be a perfect rectangle as you can see from my obscure looking shaped dough. As long as the measurements are right.
Per the written recipe above, spread 1/4 cup of softened butter on top.
Roll it up the opposite way you roll cinnamon rolls. With cinnamon rolls, you always roll the longest side. Here we are rolling the shortest side:
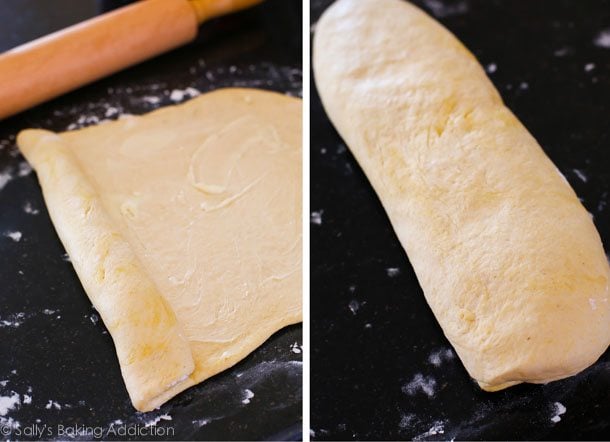
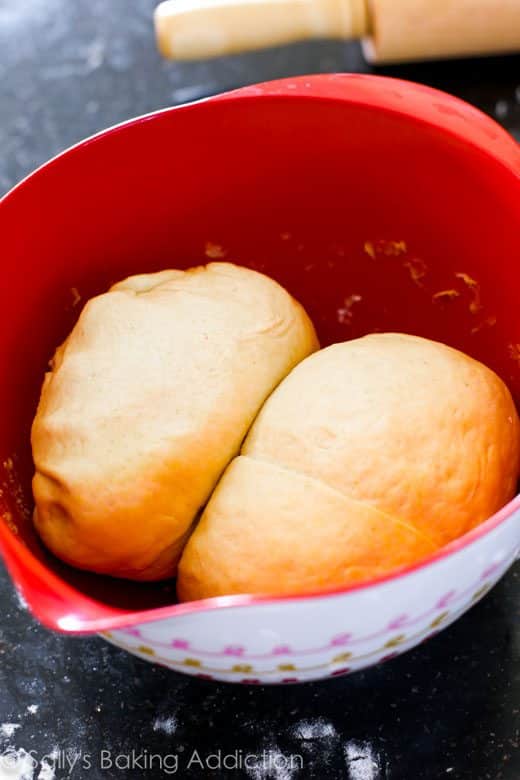
Cut the dough log in half. See all those layers? That is what will make our pizza crust so incredibly flaky!
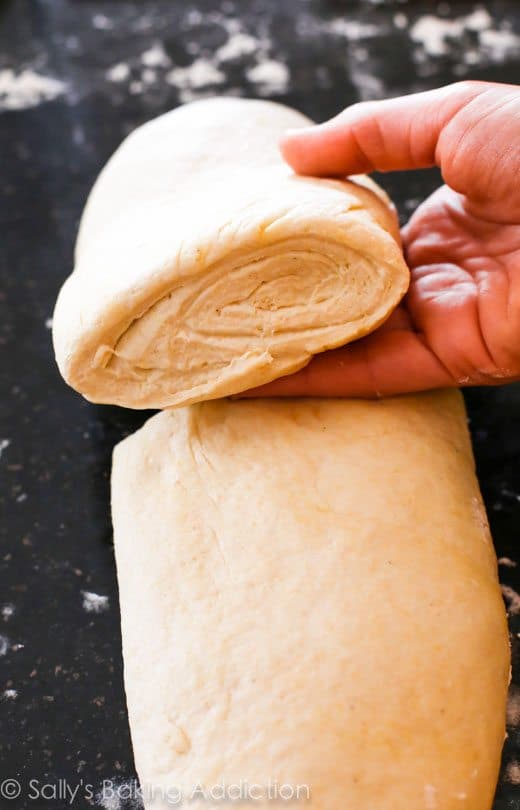
Form these two pieces of dough into balls.
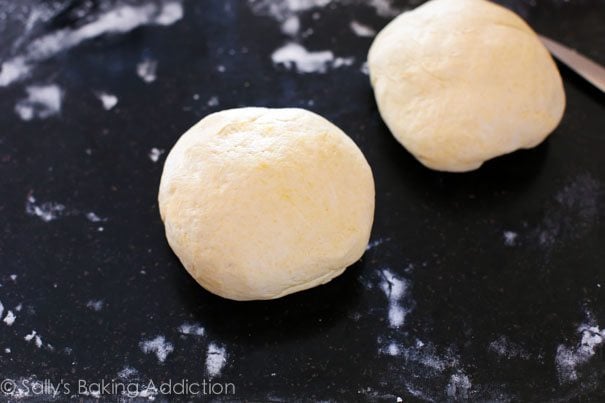
Place back into your greased bowl. Cover with aluminum foil and allow to rise in the refrigerator (not in a warm place) for 1 hour as you make the sauce.
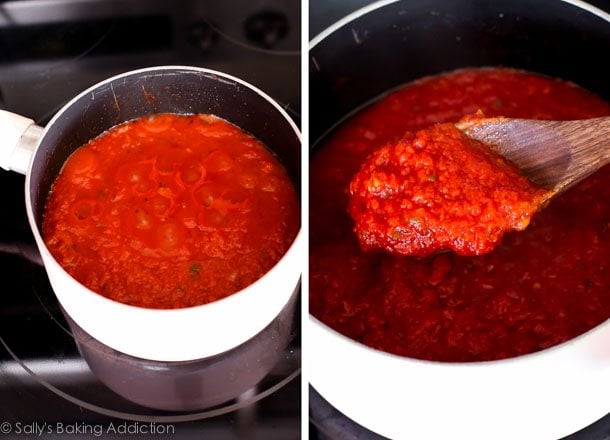
Let’s begin the tomato sauce.
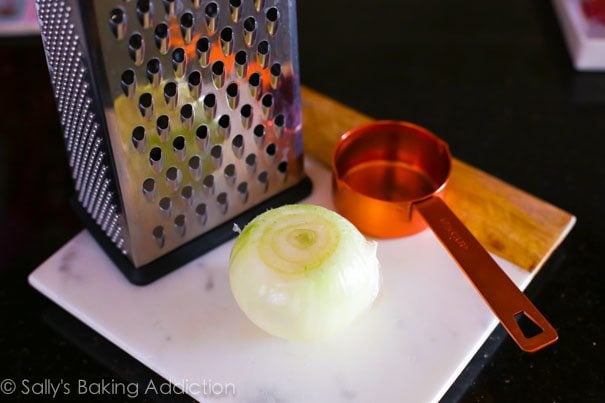
1 very small onion, grated. Why grated? Grated onion lets off SO much moisture. Much more than simply dicing or chopping the onion. You want that moisture in your sauce, trust me. Grate the onion and use about 1/3 cup of it. If your onion yield more than this amount, save the rest for a different recipe. Or just grate the onion until you have 1/3 cup.
Easy.
Over medium heat, melt 2 Tablespoons of butter and then add the grated onion, the oregano, salt, and red pepper flakes. Once the onion has slightly browned, add the garlic, tomatoes, and sugar.
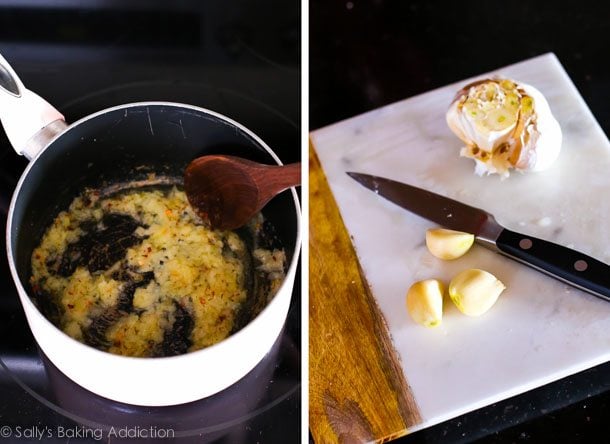
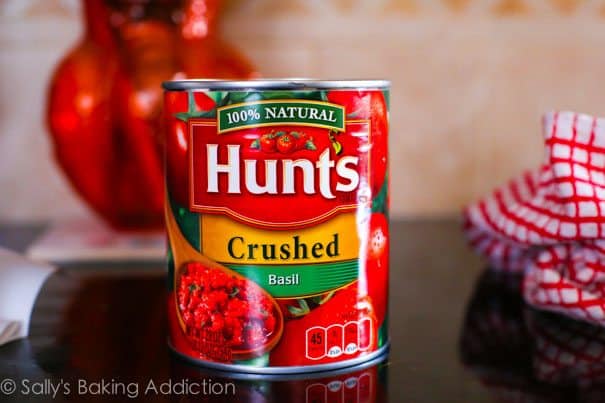
Here is a 28-ounce can of crushed tomatoes. I use a kind that has basil flavor added. You can certainly use a can of plain crushed tomatoes. If using that, make sure to add 1 – 2 Tablespoons of chopped fresh basil (or about 1/2 teaspoon of ground dried basil) when you add the tomatoes.
Let it simmer until it is hearty, fragrant, and thick. About 30 minutes. You’ll have about 2 and 1/2 cups of sauce at this point. If you have more than that, keep simmering until the amount has reduced.
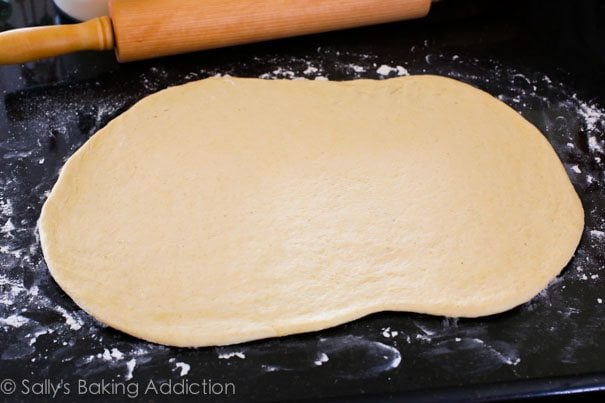
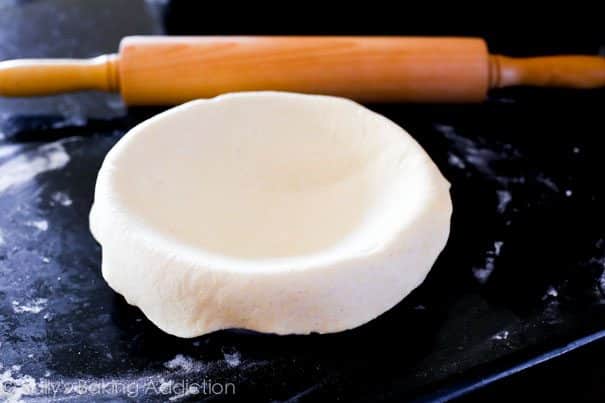
Dough balls have risen in the refrigerator, let’s roll them out one at a time. Keep the 2nd one in the refrigerator as you roll the first. The dough should be puffy, buttery, and smooth.
Roll the dough ball out into a 12-inch circle. Using your rolling pin as a guide, place over a 9×2-inch cake pan. Like this:

And then this:
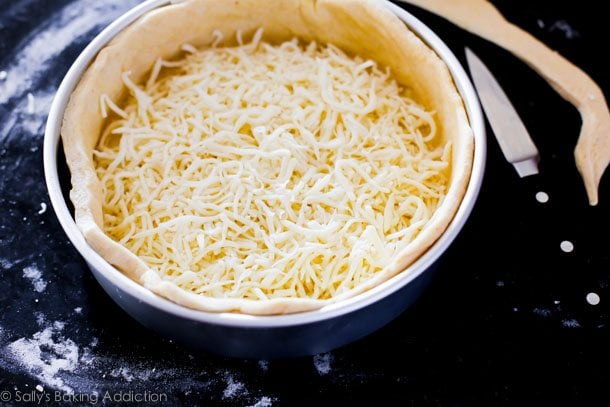
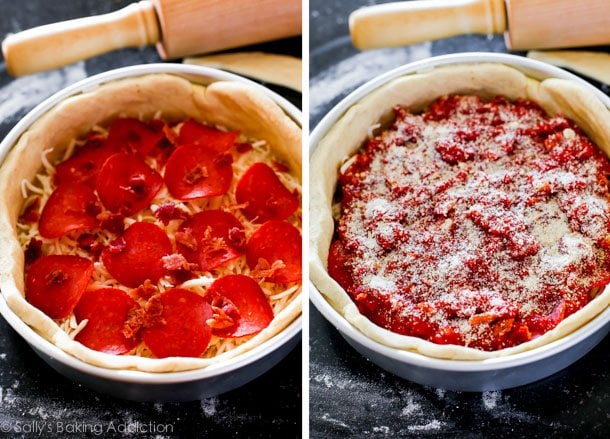
Using your fingers, press the dough into the cake pan. Trim any excess dough off the edges. I like to brush the top edges with a little olive oil, which gives the exposed crust a little sheen when baked. After that, fill with 1/2 of the cheese (about 2 cups).
Then, top with your toppings of choice. As mentioned in the written recipe above, we use pepperoni and bacon. Diet food, really.
Top with 1/2 of the tomato sauce (about 1 and 1/4 cups—see written out recipe if you want to use less) and then 1/2 of the parmesan cheese (about 1/4 cup per pizza). Repeat these last couple of steps with the second pizza.
Bake pizzas in a preheated 425F degree oven. Make sure that the oven is fully preheated and incredibly hot. Also, make sure you place the pans on top a baking sheet. Just in case anything spills over.
Crust is golden, pizzas look great.
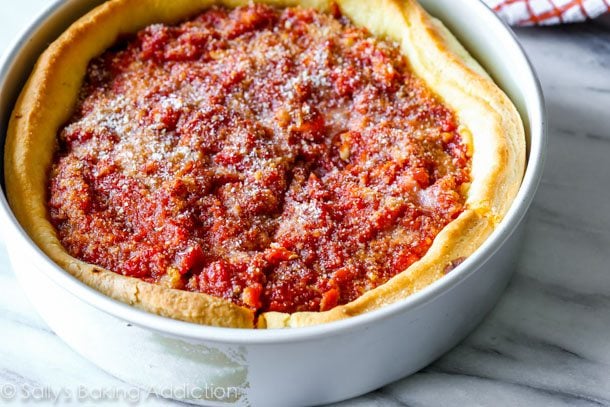
Slice and serve and ENJOY.


Reader Comments and Reviews
I absolutely love this recipe! I’ve made it several times as a deep dish pizza, and I was wondering how this crust would fare as a thin crust or regular-style pizza.