

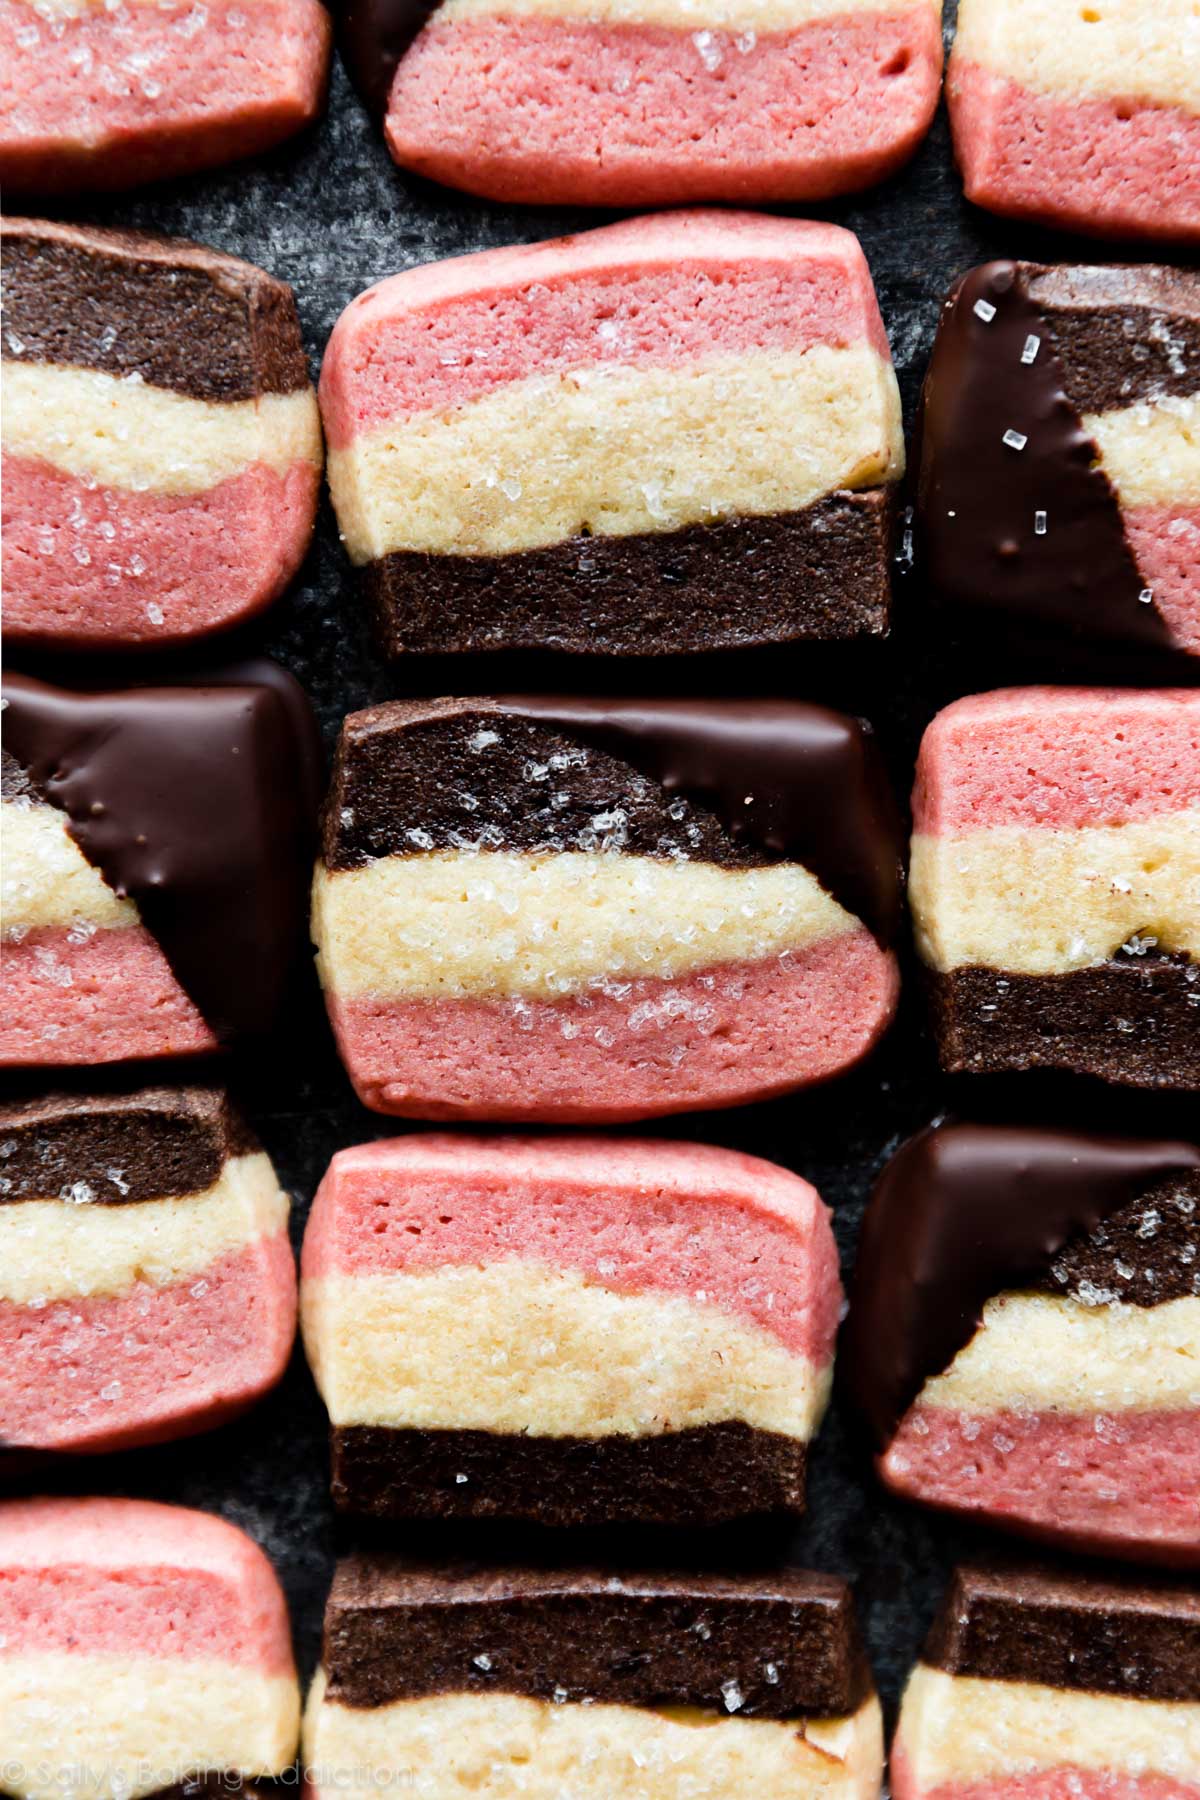
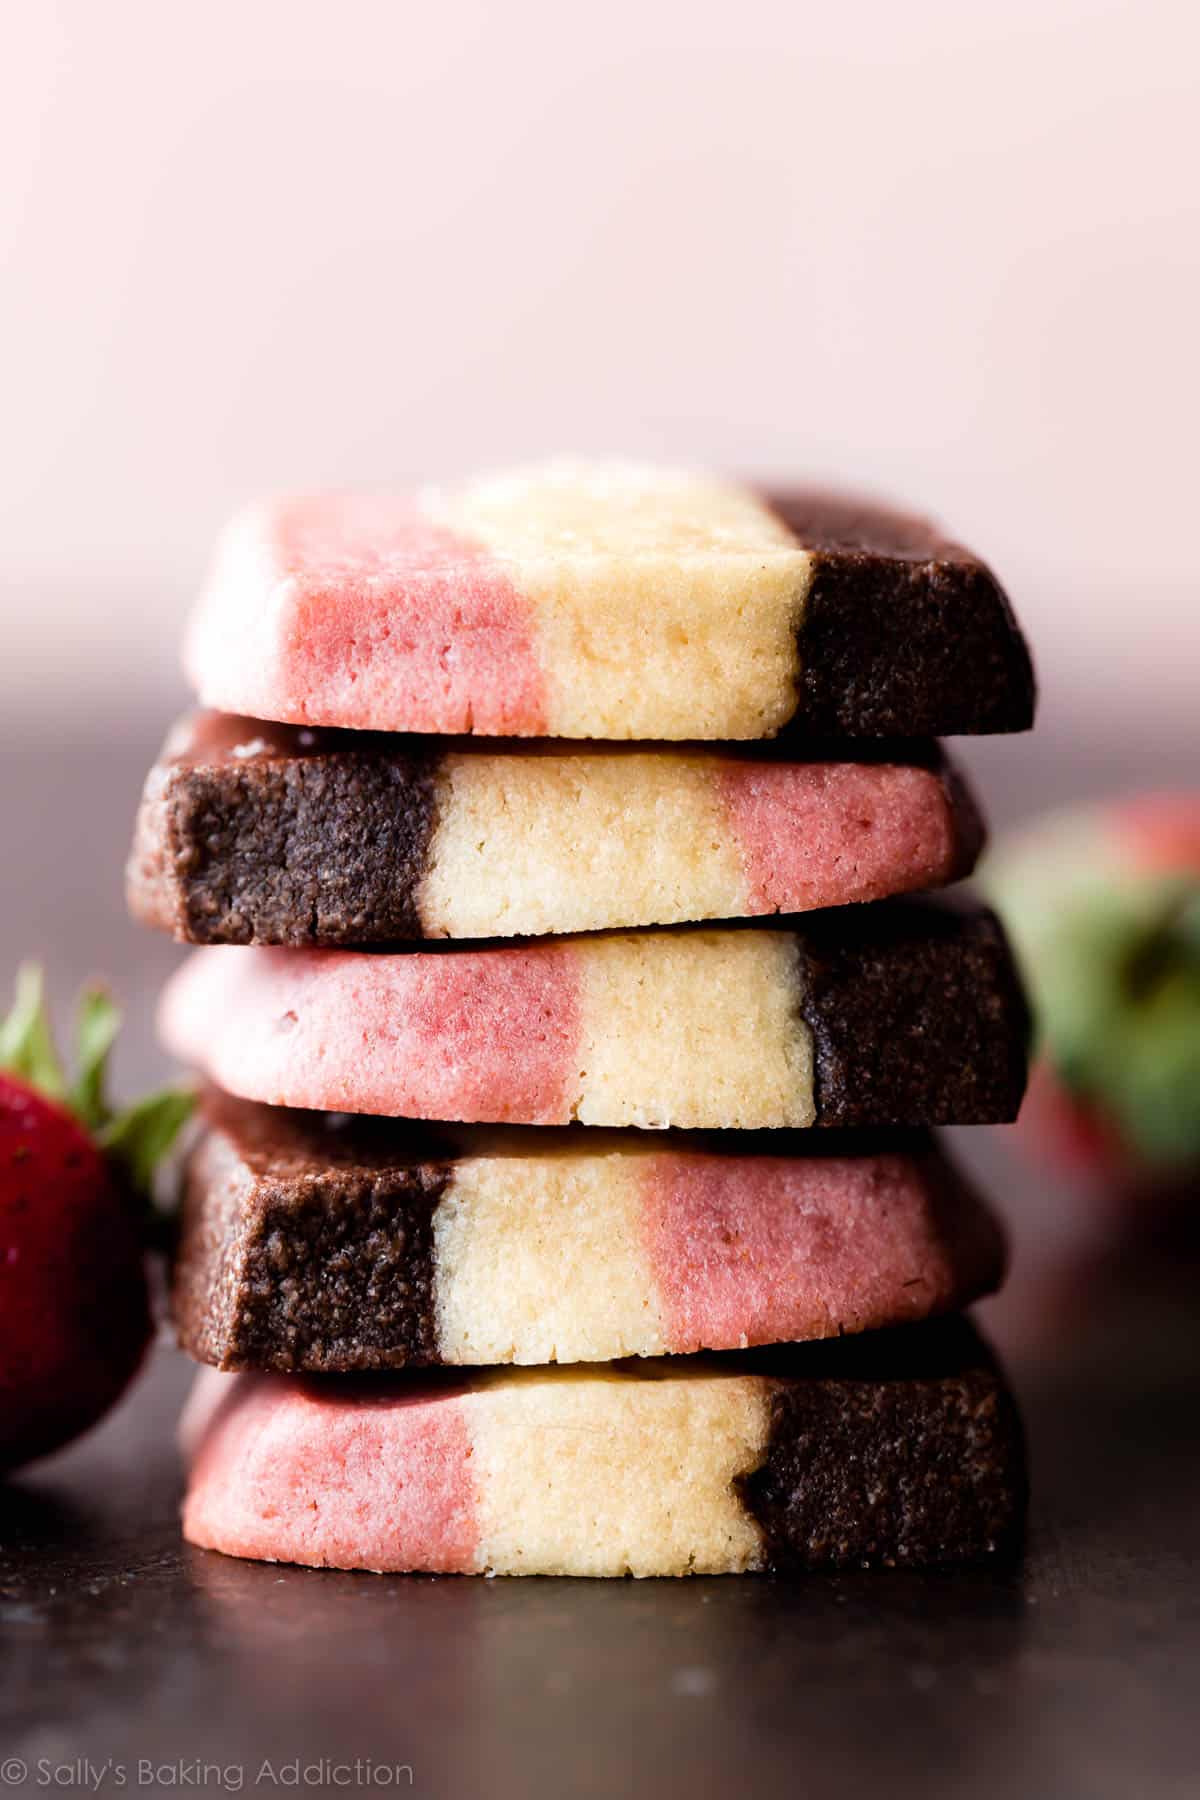
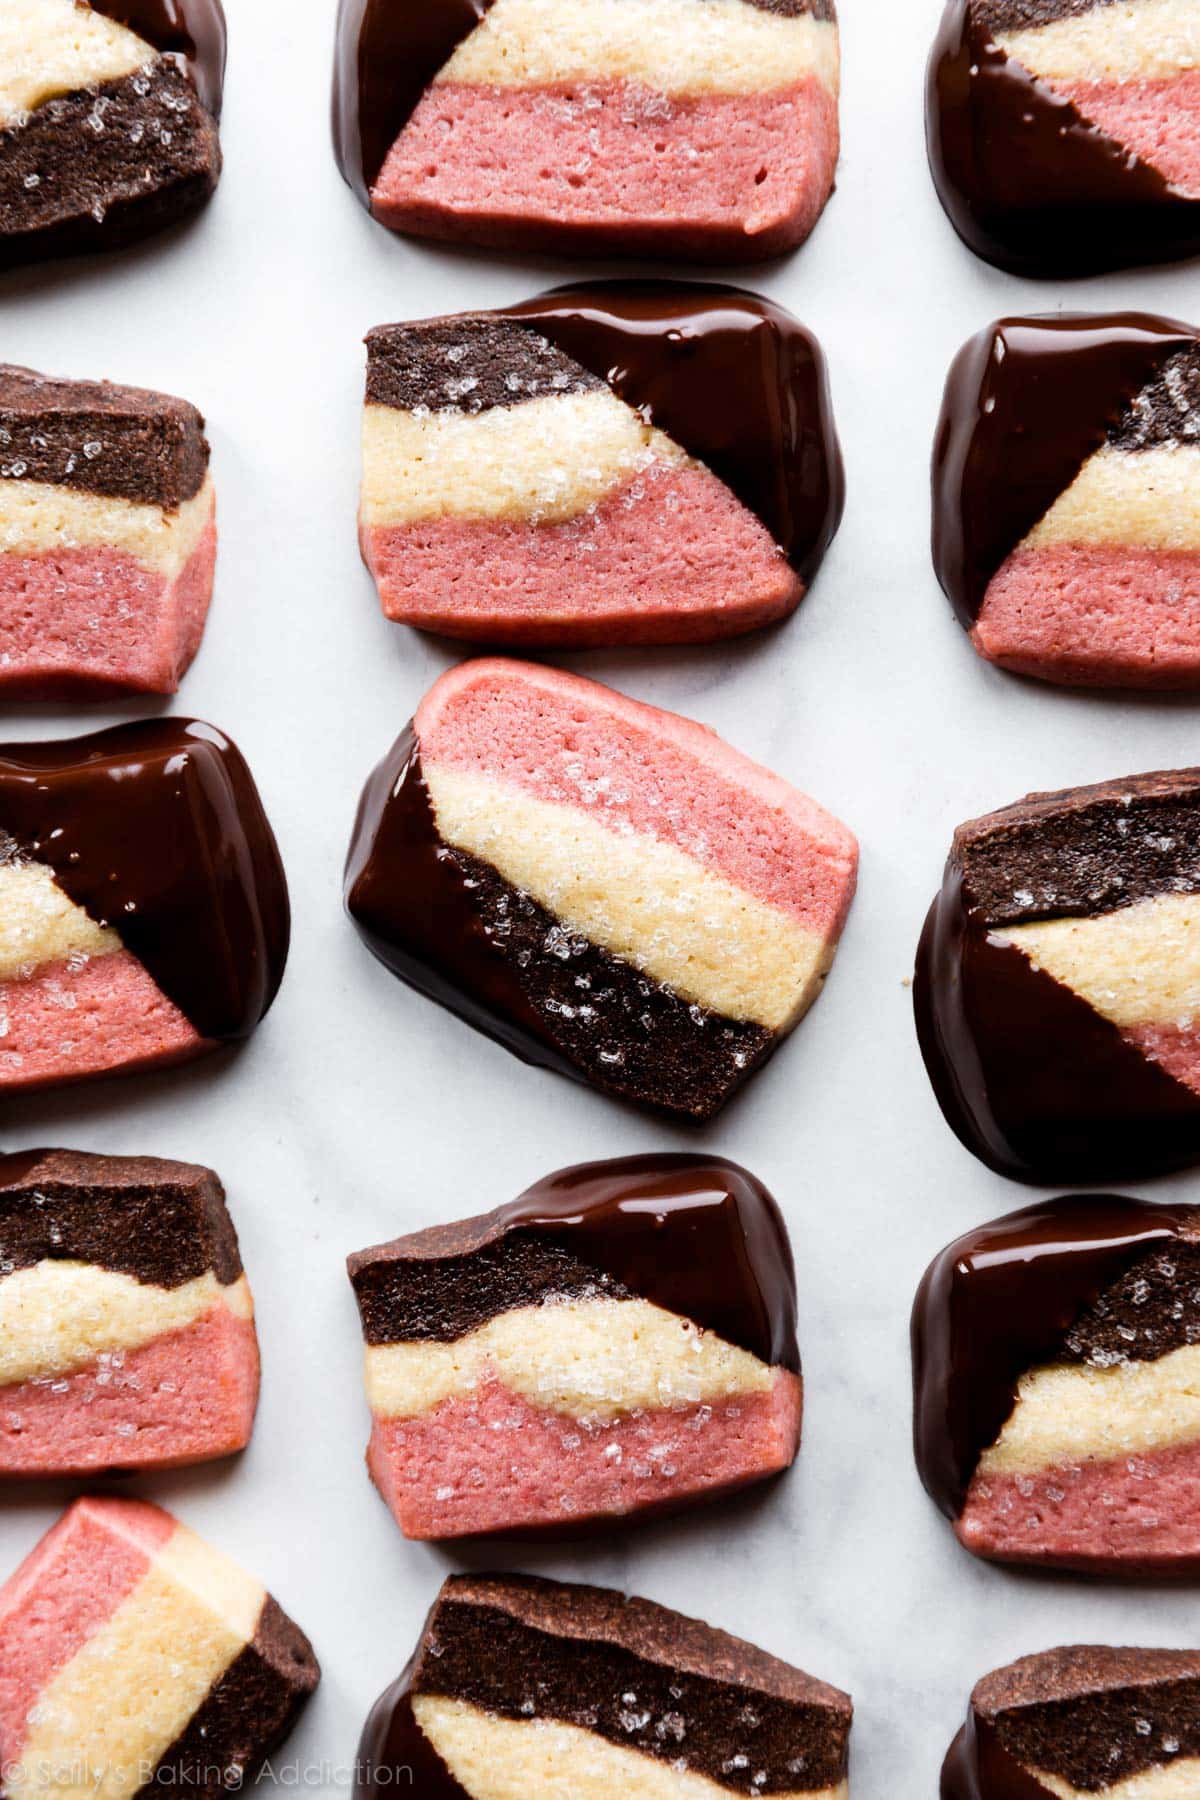
Neapolitan cookies are soft butter cookies flavored with chocolate, vanilla, and strawberry. They’re shaped in a loaf pan and made from just 1 cookie dough. So pretty!
We are almost finished the 6th annual Sally’s Cookie Palooza! Today is day 9 of my annual Christmas cookie countdown. Let’s look back at all the recipes published so far this year:
- Peppermint Bark Cookies
- Spritz Cookies
- Christmas Cookies in a Jar (with free printable!)
- Santa’s Whiskers Cookies
- Iced Oatmeal Cookies
- Gingerbread House (December Baking Challenge)
- Lace Cookies
- Drop Style Christmas Sugar Cookies
Day 9 is one of my favorites—Neapolitan Cookies with chocolate, vanilla, and strawberry. These cookies are shaped in a loaf pan and made from just 1 cookie dough.
Neapolitan Cookies from 1 Base Cookie Dough
When I was writing Sally’s Cookie Addiction, my latest cookbook, I tested a basic vanilla butter cookie recipe. I turned this vanilla butter cookie recipe into my pinwheel cookies found on page 62. The base dough is very similar to my butter cookies, chocolate butter cookies, and spritz cookies. I LOVE this basic cookie dough and you can flavor it, shape it, and layer it in so many ways including my mint chocolate checkerboard cookies, pinwheel cookies, and today’s neapolitan cookies. Here’s what I love about today’s recipe:
- EASY. Made from just 1 cookie dough.
- SIMPLE TO SHAPE. No ruler or rolling pin needed. Use a loaf pan. (For another easy cookie recipe that bakes up in a pan, try my shortbread wedges!)
- BUTTERY AND SWEET. I love their flavor.
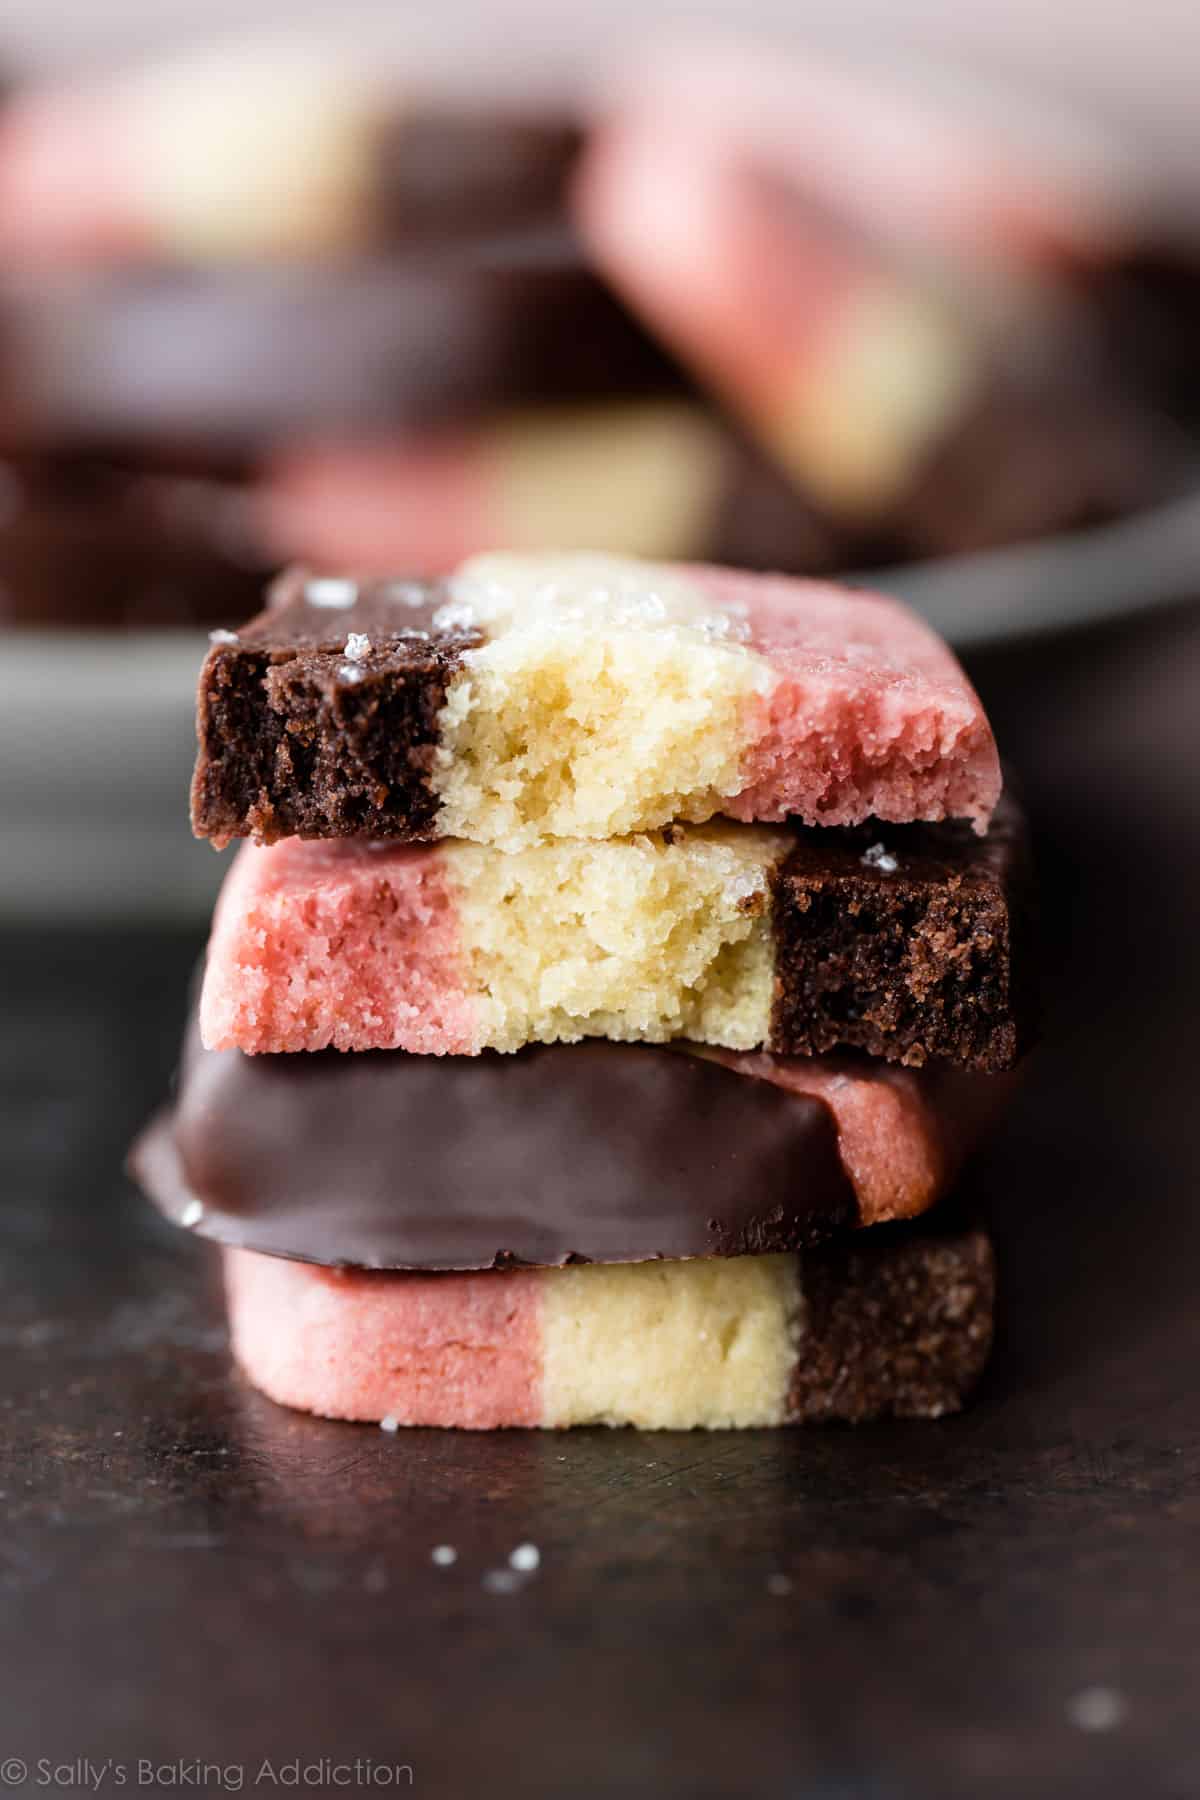
- SOFT. Crunchy crumbly edges and thick, soft centers.
- FUN WITH FLAVORS. Spruce up the vanilla layer with crushed walnuts or a little coconut extract. Switch out raspberry jam/extract for the strawberry. Add a pinch of espresso powder to the chocolate dough for a mocha flavor. Yum! These flavorful little cookies are such a fun addition to any plate of Christmas cookies.
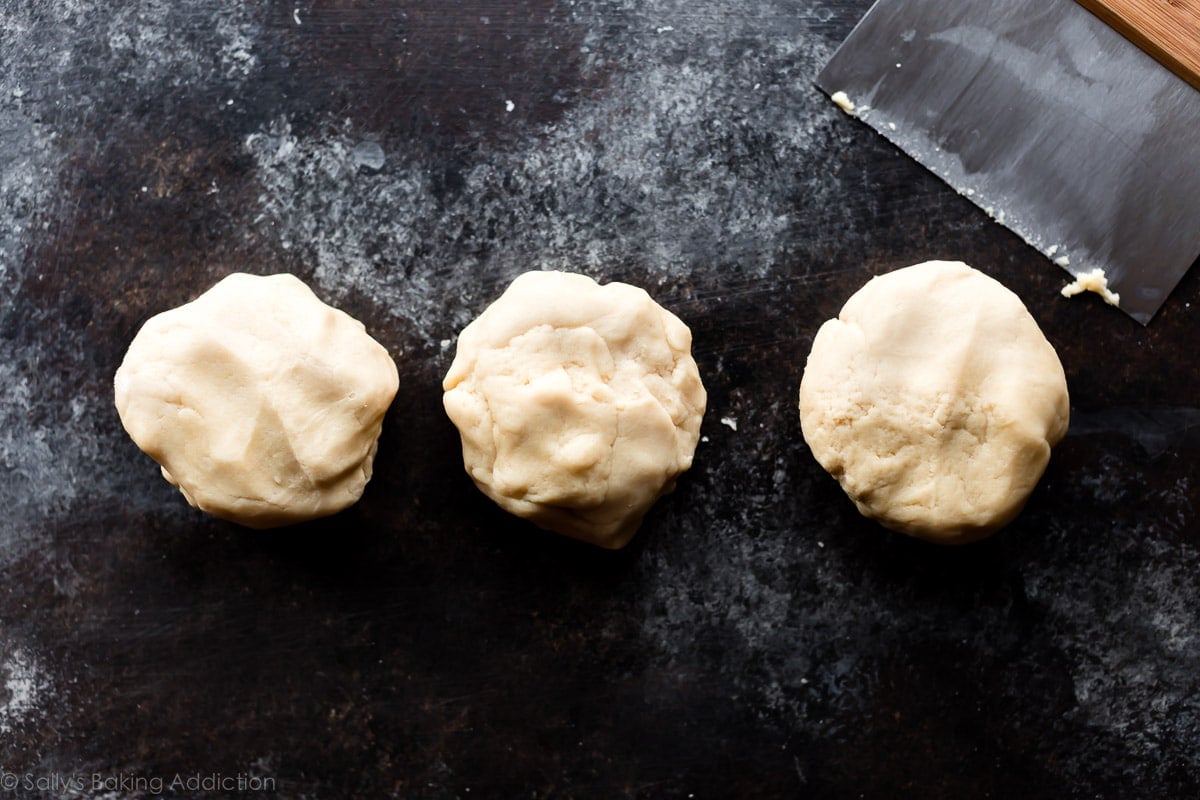
Prepare the base cookie dough, then divide it into 3 portions. One portion will be your vanilla dough, so set that aside. The other two portions will be your strawberry cookie dough and chocolate cookie dough.
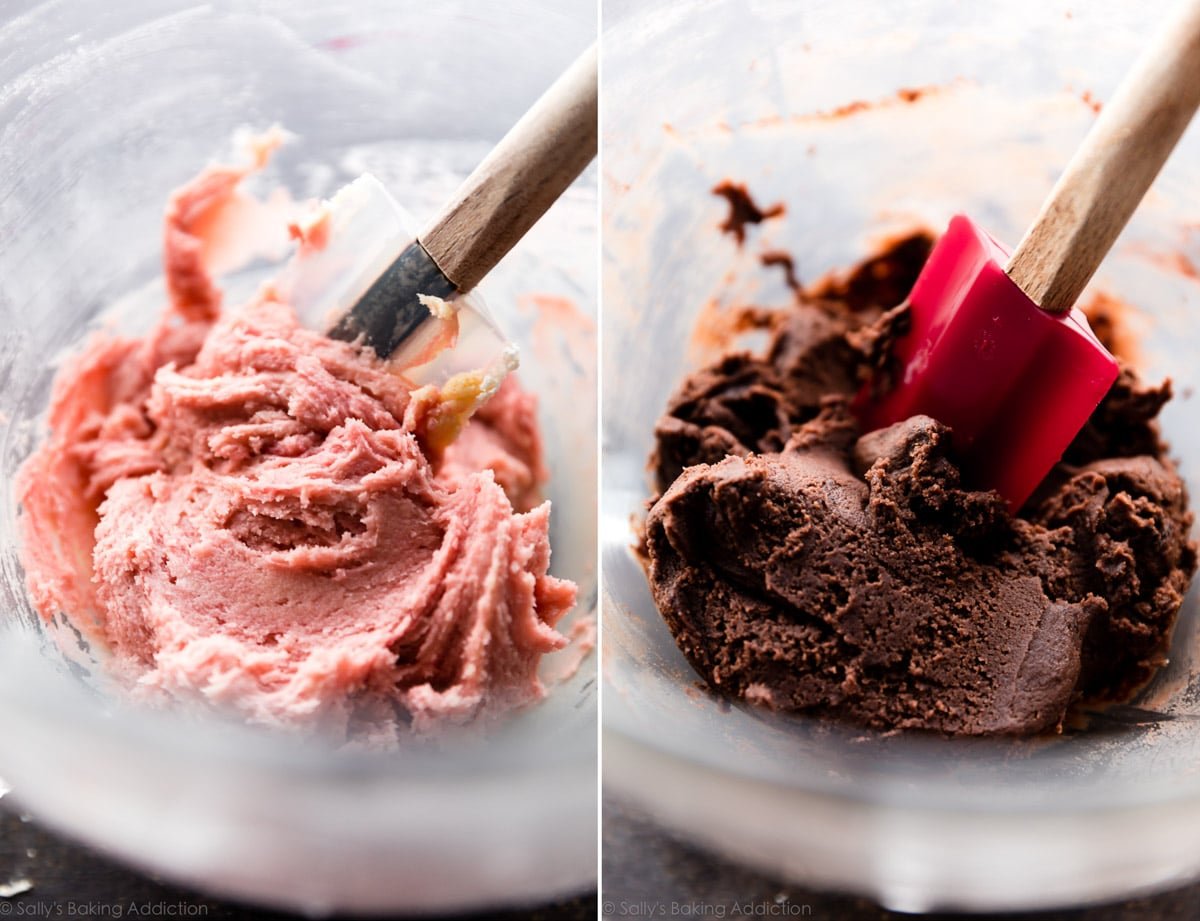
Flavor the Cookie Doughs
To make each flavor, place the portion of dough back in the mixer along with the flavoring ingredients listed in the recipe below. We’re using melted chocolate and cocoa powder in the chocolate cookie dough and strawberry jam, almond extract, and a drop of red/pink food coloring to brighten up the pink color.
Optional but recommended: a little strawberry extract. Makes a BIG difference.
The strawberry cookie dough also needs extra flour to offset the wet strawberry jam.
The EASY Way to Shape Neapolitan Cookies
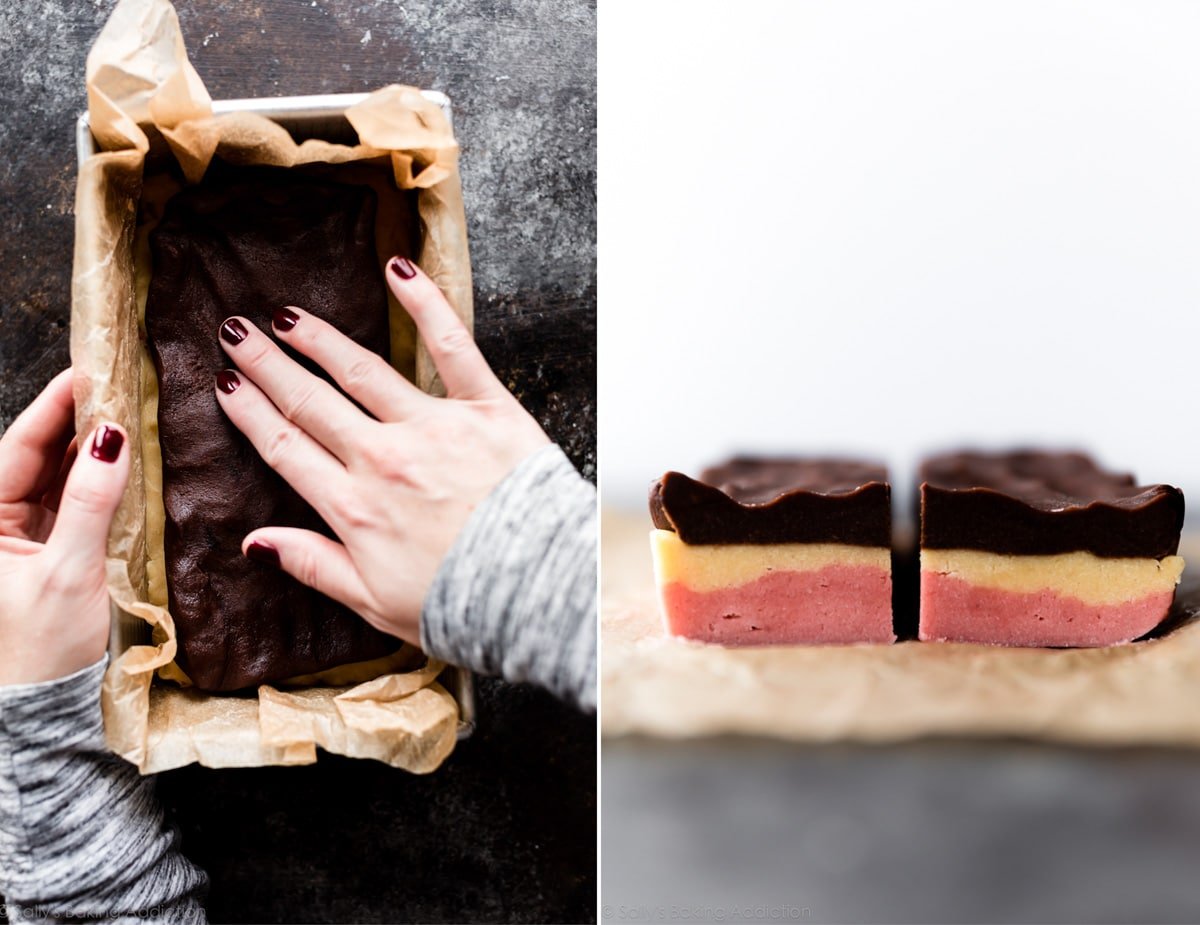
Put away your ruler and rolling pin because all you need are your hands and a 9×5-inch loaf pan. Line the loaf pan with parchment paper, then press/layer the cookie doughs in. Any order is fine, but I recommend the following:
- Strawberry cookie dough on the bottom
- Vanilla cookie dough in the center
- Chocolate cookie dough on top
There’s a little more strawberry cookie dough because we added extra flour, so it’s best that it’s the base of the neapolitan cookies. And I find the vanilla cookie dough stands out the most when it’s in the center. Just my opinion!
This cookie dough needs to chill.
Chill the cookie dough inside the loaf pan in the refrigerator or freezer. Once chilled, remove from the loaf pan using the parchment paper overhang on the sides. Slice the “loaf” in half lengthwise, then slice each into 1/2 inch thick cookies. Thicker cookies = softer cookies. 🙂
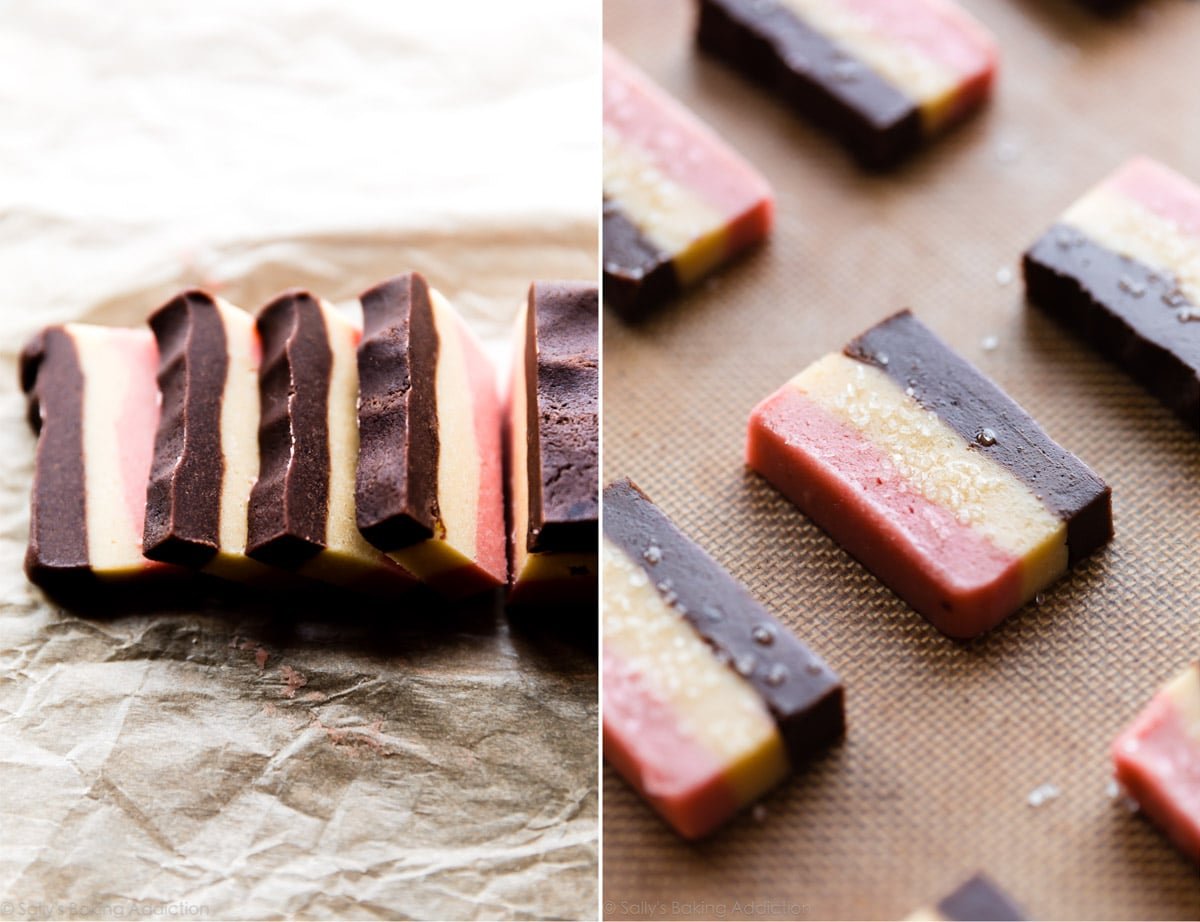
This is optional—try brushing the shaped cookies with egg white + water and sprinkling with coarse sugar. Adds a lovely sparkle and crunch! See my recipe note below—the cookie dough uses 1 egg + 1 egg yolk, so this is the perfect place to use up that leftover egg white.
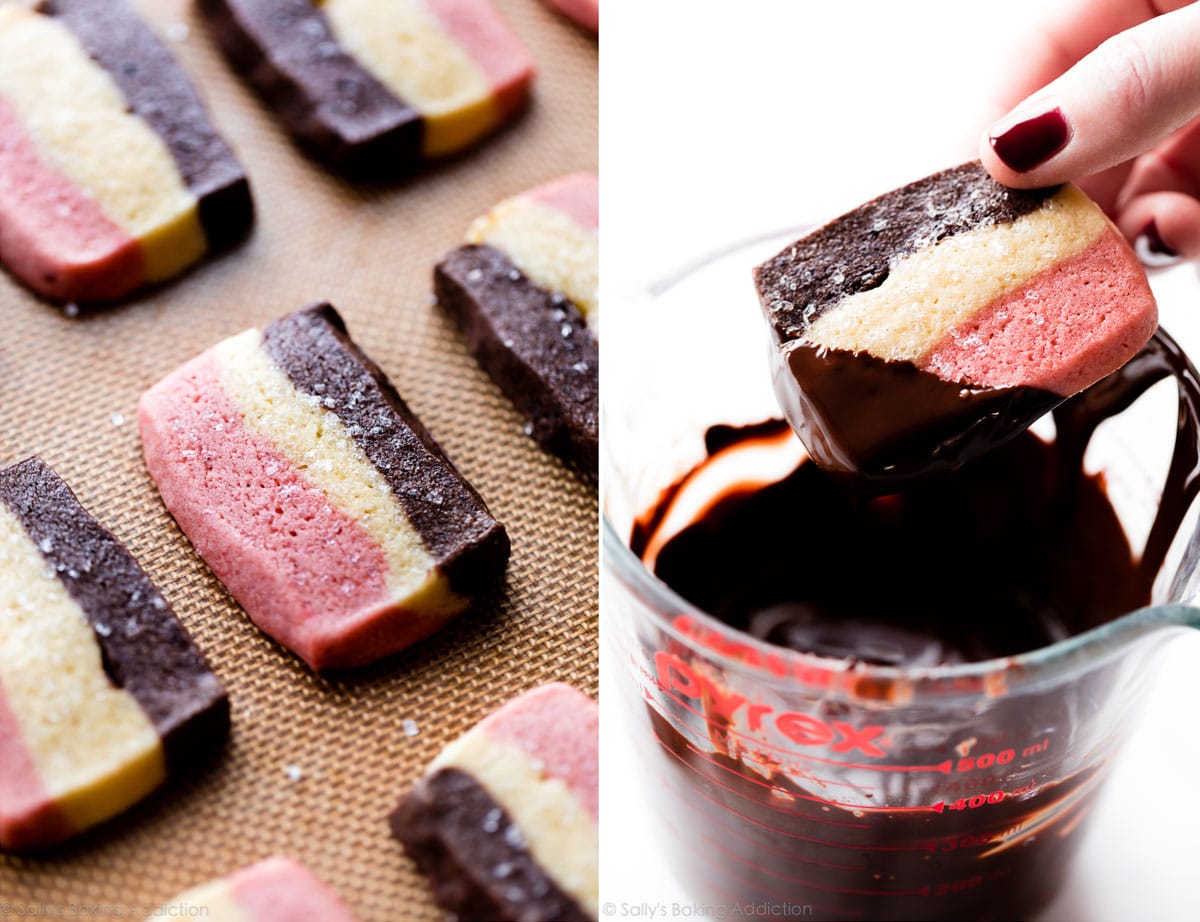
As these chocolate ginger cookies will tell you… a chocolate dip is the best finishing touch. You need melted chocolate for the chocolate cookie dough layer, so save a little extra for dipping the baked cookies. See my recipe note for instructions.
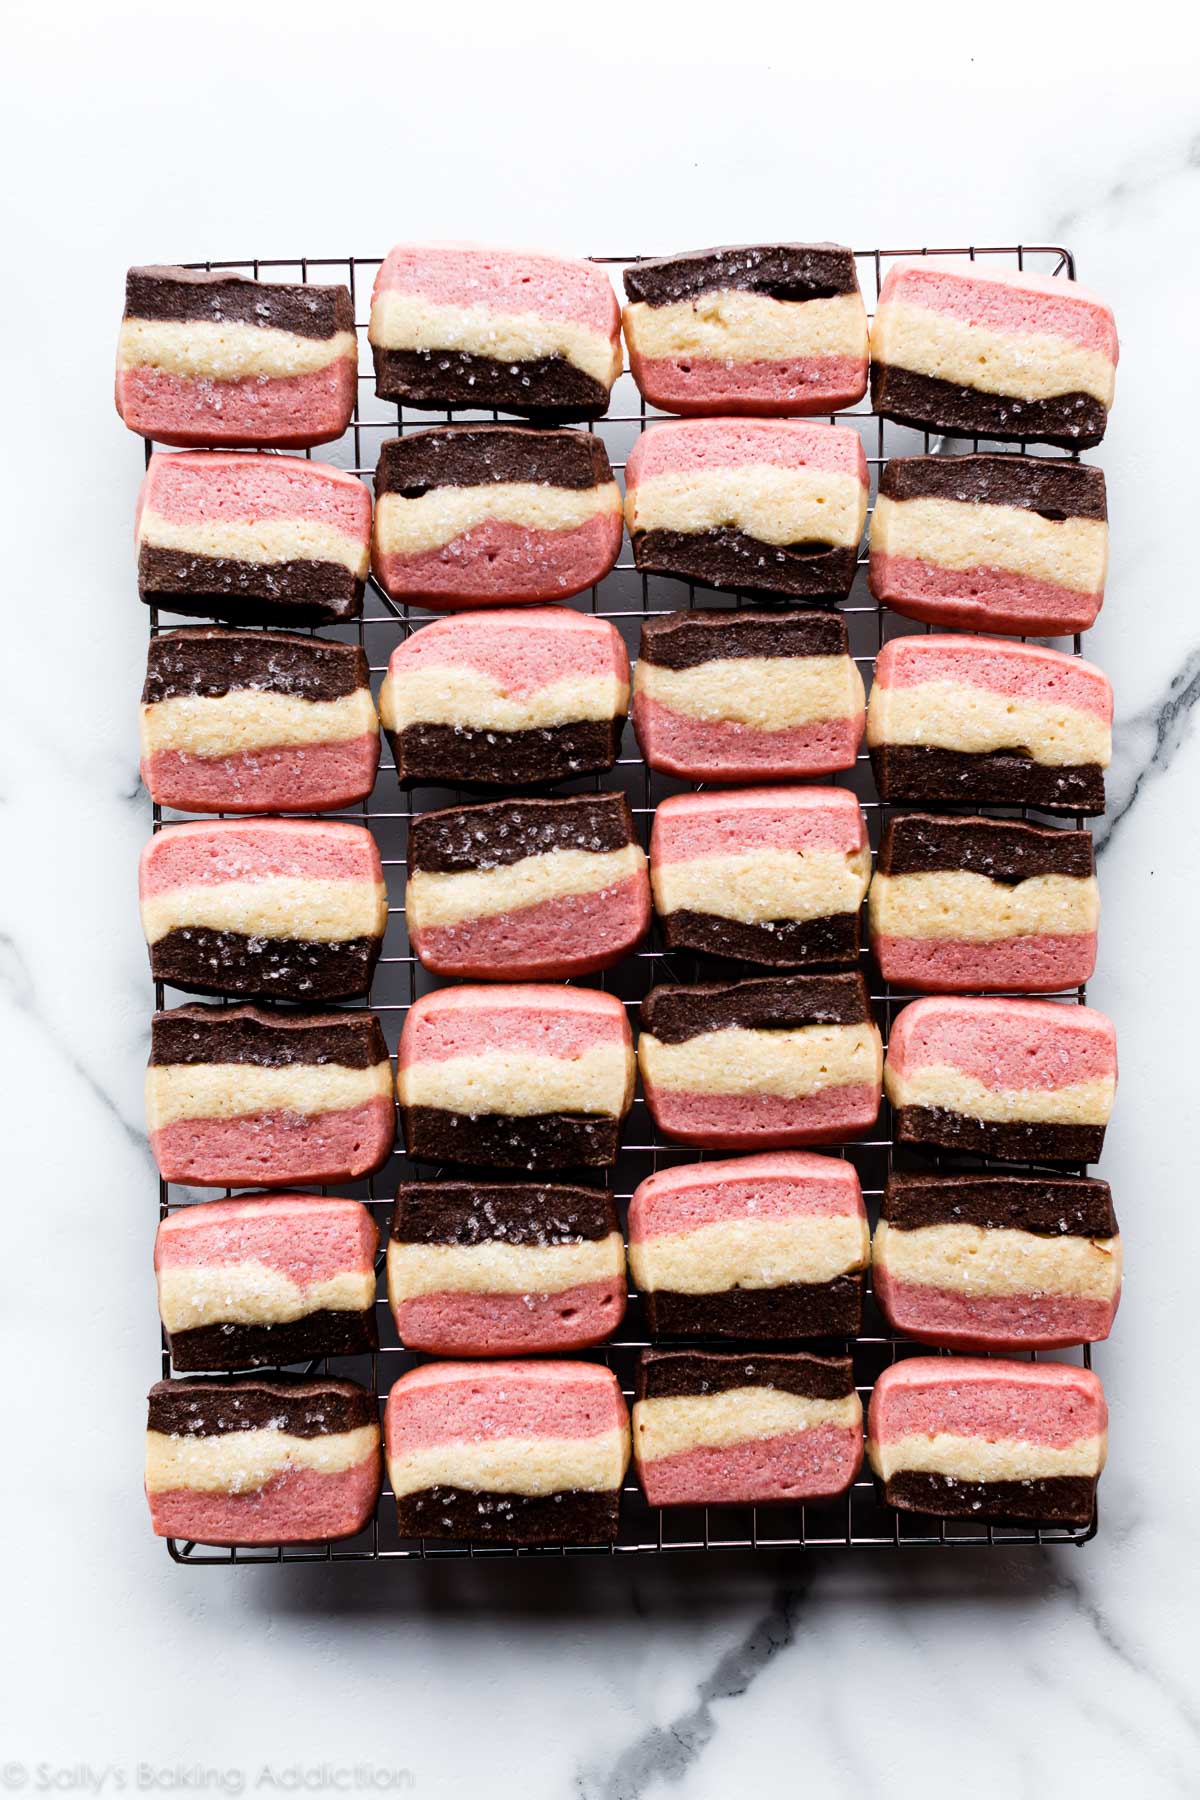
Aren’t these 3 layered butter cookies gorgeous?! And couldn’t be easier to shape.
We absolutely loved these and I definitely recommend that strawberry extract for the strawberry dough. (You can find it in the spice aisle of most major grocery stores.) Let me know if you make these 1 dough neapolitan cookies!
What is Sally’s Cookie Palooza?
Sally’s Cookie Palooza is a tradition since 2013. Every December we countdown to Christmas with 10 new cookie recipes in a row. Over the next two weeks, I’m publishing 10 brand new cookie recipes as well as giveaways, the December Baking Challenge, Christmas cookie video tutorials, and so much more. This is the biggest, most delicious event of the year! Sign up for instant updates and you’ll receive a free email alert whenever I publish a new recipe. 🙂
Click to see Sally’s Cookie Palooza over the years!


1 Dough Neapolitan Cookies
- Prep Time: 3 hours, 20 minutes
- Cook Time: 12 minutes
- Total Time: 3 hours, 45 minutes
- Yield: 32 cookies
- Category: Cookies
- Method: Baking
- Cuisine: American
Description
Neapolitan cookies are butter cookies with chocolate, vanilla, and strawberry. These easy cookies are shaped in a loaf pan and made from 1 cookie dough. Read my recipe notes before beginning.
Ingredients
Base Cookie Dough
- 2 and 1/2 cups (313g) all-purpose flour (spooned & leveled)
- 1/2 teaspoon baking powder
- 1/2 teaspoon salt
- 1 cup (16 Tbsp; 226g) unsalted butter, softened to room temperature
- 1 cup (200g) granulated sugar
- 1 large egg + 1 egg yolk, at room temperature* (see note)
- 1 and 1/2 teaspoons pure vanilla extract
- optional: 1 Tablespoon water and coarse sugar for sprinkling on top*
For the Strawberry Dough
- 1 and 1/2 Tablespoons (12g) all-purpose flour
- 1 Tablespoon (20g) strawberry jam
- 1/2 teaspoon almond extract*
- pink or red food coloring*
- optional: 1/4 teaspoon strawberry extract for extra flavor*
For the Chocolate Dough
- 1 and 1/2 Tablespoons (8g) unsweetened natural cocoa powder (or dutch process)
- 1 ounce (28g) semi-sweet chocolate, melted and slightly cooled
Instructions
- Make the dough: Whisk the flour, baking powder, and salt together in a medium bowl. Set aside.
- In a large bowl using a hand mixer or a stand mixer fitted with a paddle attachment, beat the butter and granulated sugar together on medium-high speed until creamed, about 2 minutes. Add the egg, egg yolk, and vanilla extract and beat on high speed until combined, about 1 minute. Scrape down the sides and up the bottom of the bowl and beat again as needed to combine.
- Add the dry ingredients to the wet ingredients and mix on low until combined. Dough will be thick and sticky. Remove from the mixing bowl. No need to rinse out the mixing bowl.
- Divide the dough into 3: There’s about 30 ounces of dough (1 lb, 14 ounces). Divide into three equal portions, about 10 ounces each. One portion is your vanilla dough. Nothing will be added to it. Set vanilla dough aside. The other two portions will be your strawberry dough and chocolate dough.
- Make the strawberry dough: Place one portion of dough back into the mixing bowl. Add all of the strawberry dough ingredients. I recommend starting with 1 drop of red or pink food coloring. Beat on low speed until dough is combined. Add another drop or 2 of food coloring until you reach the pink color desired. For the pictured cookies, I only used 1 drop of dusty rose gel food coloring. Remove from the mixing bowl. No need to rinse out the mixing bowl.
- Make the chocolate dough: Place last portion of dough back into the mixing bowl. Add all of the chocolate dough ingredients. Beat on low speed until dough is combined.
- Shape and chill cookie dough: See step-by-step photos above showing this following step so you have a better understanding. Line a 9×5-inch loaf pan with aluminum foil or parchment paper, leaving an overhang on the sides to lift the chilled cookie dough out. I recommend layering the cookie dough into the pan in the following order: strawberry dough on the bottom, vanilla dough in the middle, chocolate dough on top. Using your hands, press each dough layer firmly and evenly into prepared loaf pan.
- Cover loaf pan tightly and chill dough in the refrigerator for at least 3 hours (and up to 4 days) or 1 hour in the freezer. (See make ahead tip if you wish to freeze longer.)
- Preheat oven to 350°F (177°C). Line 2 baking sheets with parchment paper or silicone baking mats. Set aside.
- Slice: Lift dough out of the pan using the overhang of parchment paper on the sides. You’ll have a 9×5-inch block of dough. Slice in half lengthwise so you have two 2.5 x 9-inch rectangles. Use a sharp knife to trim off the ends so the rectangles are 8 inches long. Slice each into 16 cookies. Each cookie is 1/2 inch thick. Trim the cookie edges to make neat rectangles, if desired.*
- Bake: Arrange cookies 2-3 inches apart on the baking sheets. If desired, brush each lightly with egg wash (see recipe note) and sprinkle with coarse sugar. Bake for 11-13 minutes or until lightly browned around the edges.
- Remove from the oven and allow cookies to cool on the baking sheet for 5 minutes before transferring to a wire rack to cool completely.
- Once cool, enjoy cookies or dip in melted chocolate. See recipe note.
- Cookies without chocolate coating will stay fresh covered at room temperature for 1 week. Cookies with chocolate coating will stay fresh covered at room temperature for 3 days or in the refrigerator for 1 week.
Notes
- Make Ahead Instructions: Baked cookies, with or without chocolate coating, freeze well up to 3 months. Thaw overnight in the refrigerator and bring to room temperature, if desired, before serving. You can make/assemble the cookie dough in the loaf pan and chill in the refrigerator for up to 4 days (see step 8). If desired, you can freeze the cookie dough in the loaf pan for up to 3 months. Thaw overnight in the refrigerator then continue with step 9.
- Special Tools (affiliate links): Glass Mixing Bowl | Whisk | Electric Mixer (Handheld or Stand) | Dusty Rose Gel Food Coloring | 9×5-inch Loaf Pan | Baking Sheets | Silicone Baking Mats or Parchment Paper | Pastry Brush | Coarse Sugar | Cooling Rack
- Eggs: You need 1 egg plus an additional egg yolk for the cookie dough. Save the extra egg white and mix it with 1 Tablespoon of water to make a simple egg wash. Brush this over each cookie as directed in step 11, then sprinkle with coarse sugar before baking. This gives the cookies a little extra crunch and sparkle!
- Food Coloring: I recommend using gel food coloring in the strawberry dough instead of liquid food coloring. Liquid food coloring may alter the texture of the finished cookie. Start with 1 drop as directed in step 5, then add another drop or 2 if desired. For the pictured cookies, I only used 1 drop of dusty rose gel food coloring.
- Almond Extract: Almond extract adds a lovely flavor to the strawberry cookie dough. If desired, you can leave it out.
- Strawberry Extract: Strawberry extract is highly recommended for added strawberry flavor. You can find it in the spice aisle of most major grocery stores.
- Freeze-Dried Strawberries Instead? Many readers have asked about adding freeze-dried strawberry powder to the strawberry cookie dough. I don’t suggest this. When I tried it, the strawberry cookie dough spread all over while the other layers stayed put. The cookies were very lopsided. It’s the texture of the ground freeze-dried strawberries. So, unfortunately, it doesn’t work as nicely as the jam/flour/strawberry extract.
- Neat Rectangles: In step 10, I recommend trimming the sliced cookie edges to make neat rectangles. This is completely optional. You’ll have some leftover cookie dough scraps. Discard or roll it out using a rolling pin and cut into shapes. Bake as directed in this recipe.
- Dipped Neapolitan Cookies: You need 1 ounce of semi-sweet chocolate for the chocolate cookie dough and most baking chocolate is sold in 4 ounce bars. I recommend Bakers or Ghirardelli brands, both sold in the baking aisle. Melt the remaining 3 ounces of chocolate from that bar, plus an extra 4 ounce bar for a total of 7 ounces of melted semi-sweet chocolate. Make sure you chop the bars before melting. Melt in a double boiler or in the microwave in 15-second increments, stopping and stirring after each until completely smooth. Dip the corner of each cooled cookie into melted chocolate. Allow chocolate to set completely in the refrigerator for 20 minutes or at room temperature for 30 minutes.
- Fun with Flavors: Spruce up the vanilla layer with 1/2 cup crushed walnuts or 1/2 teaspoon coconut extract. Switch out raspberry jam and extract for the strawberry. Add a pinch of espresso powder to the chocolate dough for a mocha flavor.


Reader Comments and Reviews
I made these today they turned out great. I did use freeze dried strawberries for flavor. They worked great. I added 1/2 cup more sugar also. With that it seemed to not spread the strawberry at all! They turned out perfect. So if anyone wants to flavor them using the freeze dried strawberries it’s totally doable with 1/2 cup more sugar. Also freeze before you cut them and freeze again after like Sally offers above. It’s key! Thanks lively recipe!
Great idea about the freeze dried strawberries. Thank you.
Lovely cookie. I veganized the recipe with margarine/shortening and a Bob’s egg. The cookies are large- heed the 2″ apart direction for placement. I split them into 2 pieces with my bench scraper while they were cooling on the pan for a smaller shape. Worked great. Love the flavors. Thanks for a fine recipe.
I read all the comments before I made these. I would add the following comments to help others. I put the dough in a loaf pan overnight, took it out, cut in half and then put the second half back in the pan and into the refrigerator. I used a ruler to “nick” the loaf every half inch and then cut the slices and put 8 on each jelly roll pan. I also let the pans cool before I took the second batch out for cutting. My cookies didn’t spread at all. I cooked them 15 minutes because they didn’t look brown at 13 minutes. They turned out to be cookies with great texture and wonderful flavor. For the strawberry portion, I used the liquid from my homemade strawberry jam so they have great strawberry flavor. I’m a big believer in finding excellent base recipes and then switching out components but keeping the ratios and the cooking the same – I plan to try this for other holidays with different flavor layers since they are so easy to make and so pretty.
Could you cut tiny shapes out of this dough or does it probably spread too much? Making for the first time!
Hi Natalie! The cookies do spread a bit as they bake, so this dough wouldn’t be best for small shapes. Our sugar cookies or chocolate sugar cookies would be great, though!
Very flavorful ! I used the lorann strawberry emulsion they are the best for flavoring any baking
file:///var/mobile/Library/SMS/Attachments/21/01/751FC8C2-5C38-4E30-B574-99E7782BA7D8/69243415292__0DB3BB3B-14A0-4D34-8F5D-390049900EEC.JPG
Is the melted chocolate under the chocolate dough for the dipping or is that put into the chocolate dough? Thanks in advance for the clarification
Hi Evelyn! The 1 oz of melted chocolate goes into the chocolate cookie dough. Enjoy!
I was having trouble getting it spread even in the pan as it didn’t reach the edge the pan then I realized after baking them that I inadvertently grabbed a 10×5 pan. I’ve been baking a long, long, LONG time and just goes to show you always pay attention to every step. They still turned out amazing.
Great recipe. Used 20g of freeze dried strawberries (made into powder using food processor) and added a tbsp of milk to the strawberry layer instead of strawberry jam/extra flour. Worked perfectly, great flavor and texture. Highly recommend using the grams for measuring for this recipe.
Tried these for the first time. I followed the recipe and they are delicious. I couldn’t find strawberry extract so I used Lorann strawberry emulsion from Hobby Lobby. In my oven they baked for 15 minutes.
My mother use to make these with maraschino cherries with bits in and coconut in the vanilla layer and 2 tbs of cocoa so glad to see this recipe make a come from the 70’s
I made these cookies for the first time, and absolutely loved them!! One of my favorites this year. Followed the recipe exactly, with the exception of the egg wash and decreasing cocoa powder to 1 Tablespoon for personal preference. Will definately put these on repeat list!
These are one of my favorites that I make regularly! One tip for readers though, today I made them by putting them in the fridge overnight whereas I usually freeze the loaf pan and they spread far too much. Recommend freezing!
I’m confused. You recommend freezing? But that makes them spread out to far.???
Sally and team, I was wondering if anyone has reported success using Strawberry Nesquik powder in the strawberry portion? (P.S. when I was googling this idea, your beautiful photo came up and is being used in an Etsy shop selling cookies.)
Hi Stephanie, thank you for letting us know about the misuse of my copyrighted photo. Regarding the strawberry powder– I haven’t tested it and I haven’t seen any comments/messages about it either! If you try it, please let us know how it turns out.
Do these freeze well? I want to make for my nephews wedding cookie table.
Hi Laura, Baked cookies, with or without chocolate coating, freeze well up to 3 months. Thaw overnight in the refrigerator and bring to room temperature, if desired, before serving. Enjoy!
Excellent recipe. My daughter made these for a family gathering and they were wonderful. If you follow the recipe they come out great. She did double the strawberry jelly and then heated it on the stove top to concentrate it a bit. Very flavorful. Nicely done.
Does leaving the dough in the refrigerator overnight work just as well as freezing the dough for 1 hour?
Also, how long do you leave the sliced cookies in the freezer before baking?
Hi Marg, chilling in the fridge or the freezer as directed will both work perfectly! After the cookies are sliced, you don’t need to chill them again – just slice and bake (steps 10-11). If you want to freeze the dough to bake later, see recipe notes for make-ahead instructions!
This is absolutely fun to make! Was surprised at how flavourful the chocolate and strawberry were.
Definitely recommend freezing this well before cutting then freezing again before baking to minimise spreading – something I would do next time as I only put them in fridge and couldn’t wait for them to firm up as much as if they were in the freezer. And I did use liquid colouring for strawberry which made the dough a bit softer than the other two while cutting which is why it’s best to use gel and freeze dough.
Hi. Is there an easy way to double or triple this without making multiple batches? Could you stack two batches with parchment in between or use a 9×9 pan? Thank you!
Hi Sandra! We recommend 2 separate batches.
Thank you. Happy Holidays.
Just wanted to share that we had a jar of Divina Sour Cherry Spread and used it instead of Strawberry. With the almond flavoring it was delicious. We thought the color was beautiful and we did add a few drops of red food coloring to it. I would highly recommend these beautiful cookies with cherry instead of strawberry for a change.
Instead of a vanilla layer, I want to try a green pistachio layer for Xmas colours. Can I use ground pistachios and green food colouring in a layer. If so, is there anything I need to look out for?
Thanks. LOVE your recipes.
Hi Jo-Anne, what a fun idea! Pistachio would be delicious. You can add finely chopped pistachios and a bit of pistachio extract (or almond! – it’s very similar) if you would like.
What adjustments would need to be made to the strawberry dough if I used powdered freeze-dried strawberries instead of jam? Would I need to add extra liquid and what type would be appropriate? Also alternatively, would it be a problem to use preserves instead of jam (preserves tend to sometimes have chunks of strawberry in it)? Would that ruin it?
Hi Erika! See recipe notes for details on freeze-dried strawberries — we don’t recommend it.
I made these cookies and used strawberry jello is great for flavouring and colouring.
Hey there, love all your recipes and ideas, your always my go to! I was wondering how mix ins would work for this recipe. I got a pack of hot fudge Sunday morsels and thought it would be a fun different idea to make the neapoltian cookies. Or would it be better to dip the cookies and add the chips on top.
Thank you so much for everything
Hi Elyse! It would be difficult to shape and slice the cookies with morsels mixed in. I think your second idea of adding the chips on top would be great! Let us know if you give it a try.
This recipe also makes a nice and colorful pinwheel cookie.
I roll the dough to 1/8″ between parchment before chilling.
When thoroughly cool, peel the parchment, stack the layers, trim to 6″ by whatever length works (won’t affect the size of the cookie, only how many in the roll)
Roll carefully (make sure no gap in the center!) and chill the rolls again before slicing and baking. I used the same baking time; just watch carefully not to over-bake!
Just for fun, I rolled half with the red on the outside, and half with the chocolate.
I’m going to make these cookies, is it fine if my strawberry jam is chunky? Will that ruin the cookies? Thanks in advance!
Hi Owen! Some chunks are fine, but you want the strawberry flavor to mix through the dough instead of staying in a clump.
Love the taste of the chocolate and vanilla cookie part but the strawberry just wasn’t up to snuff. So, after much experimenting, for the strawberry dough, I left out the almond extract and increased the strawberry extract to ONE TABLESPOON, yes, that’s right, one tablespoon (along with the strawberry jam, flour, and red food color as prescribed in the recipe). That gave the cookie the nice hint of strawberry I was looking for. I didn’t use the egg wash because it just turned brown taking away from the fun look of the tri-color cookie. I just sprinkled course sugar on top before baking and it stayed on nicely. I also sliced the dough thinner giving a crispier cookie which tasted buttery and delicious. I’m making several batches for a friend’s wedding and I look forward to this Neapolitan cookie adding a bit of color and variety to the cookie table!
I know this is a super late comment- but I used freeze dried strawberry powder to taste. Turns out perfect and super pink-
I just made these cookies and they turned out perfect! I took care to follow Sally’s directions very carefully which is the reason for my success, I’m sure. I did use liquid pink food coloring on the strawberry dough but I only needed 1 drop to get it that nice bubblegum pink color so it really had no effect on the consistency at all. I also used strawberry bakery emulsion from Hobby Lobby (I couldn’t find extract) and it gave a nice flavor although I think I could even bump up the amount from 1/4 teaspoon to 1/2 teaspoon.
After reading all 4 pages of comments and learning that quite a few people had trouble with the cookies spreading I took care to freeze the mixture in the loaf pan for 2 hours, and then again after cutting the “loaf” into squares. Per Sally’s instructions I added 2 minutes to the baking time bringing it to a total of 15 minutes which was perfect. I also did the egg wash and coarse sugar and it was great. The edges did spread slightly but I was able to easily re-form them with the edge of a spatula as soon as they came out of the oven, so it was not an issue at all. Tomorrow I’m going to dip the edges in chocolate and add a tiny sprinkle of fleur de sel to the dipped areas, which I’m excited to try. I did add the pinch of espresso powder to the chocolate dough and I couldn’t really tell it was there; I just got an ever so slight tease of a taste here and there. It was a large pinch too, so that was slightly disappointing. Next time I make these I’m going to try 3 large pinches of espresso powder to really give it a bang of mocha flavor. I love one commenter’s suggestion for making these chocolate, orange, and vanilla for Halloween! I’m definitely going to that variation when fall comes.
In short, if you follow the directions exactly, take care to freeze the dough once while its in the loaf pan and then again after it’s cut into squares, place directly into the oven and bake for 15 minutes, you’ll have a hit on your hands! Thanks so much Sally for a wonderful recipe !!
Thank you for this explanation! I followed the recipe to a “T”, refrigerating the dough for 24 hours and they were gorgeous as I sliced them, but spread so badly during the bake – I’m so disappointed. I’ll try again but will freeze them next time.
Hi, thank you for replying, I actually used Clover Light spread (in the UK so you probably won’t know that one), but it was soft. I will use proper butter next time. That was all that was different though. I will definitely keep trying cos I love the look of these and all the other comments are great, so I will get these right eventually.
I’m just making these cookies and the mixture has been in the freezer for 1hr so far, but it is way too wet to slice……I can’t see it being any different if I leave it in the freezer for longer, it has turned out more like cake mixture, not sure what I did wrong but definitely wasn’t like a dough. I think I’ll just bake it like a cake in the tin and try again another day.
Hi Jacqui, did you happen to make any ingredient substitutions? Or perhaps your butter was much too soft? The dough should be rather thick, like the photos in the post, rather than like cake batter. We’re happy to try and troubleshoot further — appreciate you giving this recipe a try!
I made these for a Mother’s Day treat for all the Mom’s on my street. They turned out great and everyone loved them! Will definitely make these again! Thank you!